Instant POT DUO PLUS Fiche technique

INSTANT POT®DUO™PLUS
112-0169-01_112-0169-01-0301_IB_DuoPlusV4_6QT_US_GSG_FINAL_05-24-22.indd 1112-0169-01_112-0169-01-0301_IB_DuoPlusV4_6QT_US_GSG_FINAL_05-24-22.indd 1 5/24/22 2:47 PM5/24/22 2:47 PM

to your new Instant Pot®Duo™Plus!
This Instant Pot Duo Plus multifunction cooker can help you cook
healthy, delicious meals more easily and in less time. We hope you
fall in love with Instant Pot cooking, and enjoy it in your kitchen for
years to come!
Get started with your Instant Pot!
OM.
Welcome
112-0169-01_112-0169-01-0301_IB_DuoPlusV4_6QT_US_GSG_FINAL_05-24-22.indd 2112-0169-01_112-0169-01-0301_IB_DuoPlusV4_6QT_US_GSG_FINAL_05-24-22.indd 2 5/24/22 2:47 PM5/24/22 2:47 PM

CONTENTS
What’s in the box 2
Using your Duo Plus 4
Initial setup 7
Using the lid 11
Slow Cook 17
Rice 19
Steam 21
Sauté 22
Yogurt 24
Sous Vide 26
Cake 28
Keep Warm 30
Cleaning 31
Learn more 32
112-0169-01_112-0169-01-0301_IB_DuoPlusV4_6QT_US_GSG_FINAL_05-24-22.indd 1112-0169-01_112-0169-01-0301_IB_DuoPlusV4_6QT_US_GSG_FINAL_05-24-22.indd 1 5/24/22 2:47 PM5/24/22 2:47 PM
2
Get started
3
Get started
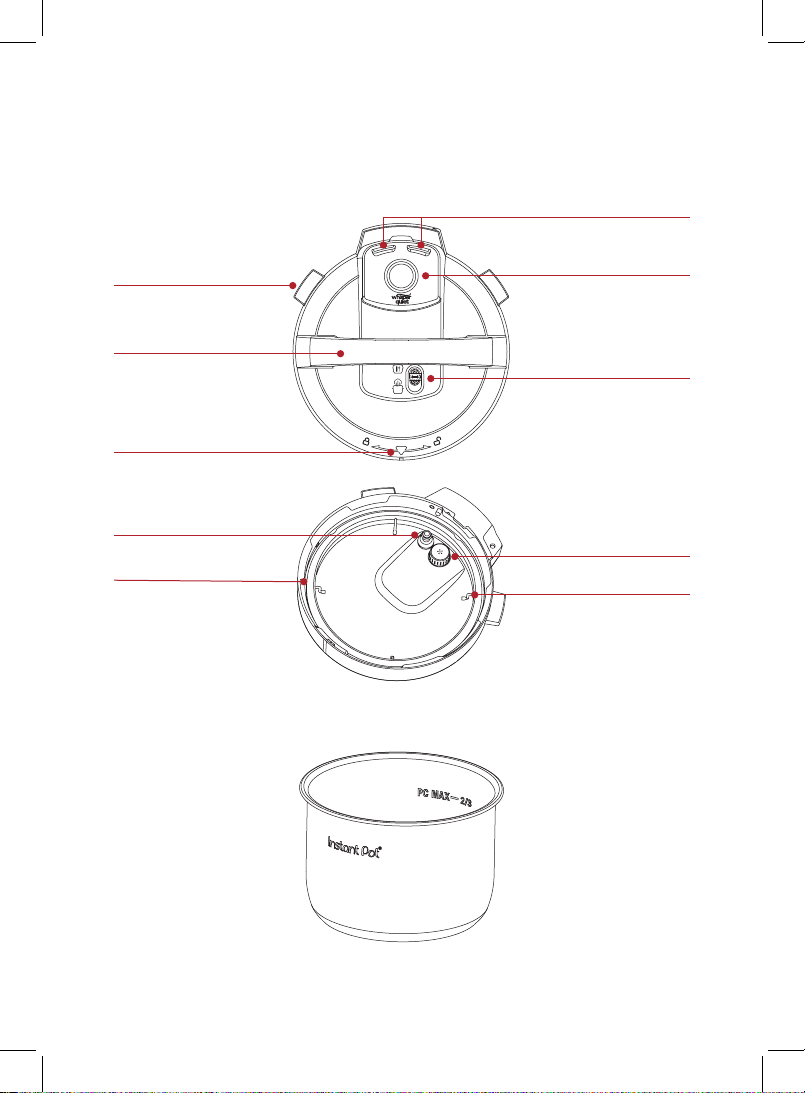
WHAT’S IN THE BOX
Lid
Stainless Steel Inner Cooking Pot
Whisper quiet lid cover
Sealing ring rack
Steam release valve and
Anti-Block shield
Float valve
Sealing ring
Steam release switch
Handle
Lid fins
Steam release vents
Lid position marker
112-0169-01_112-0169-01-0301_IB_DuoPlusV4_6QT_US_GSG_FINAL_05-24-22.indd 2112-0169-01_112-0169-01-0301_IB_DuoPlusV4_6QT_US_GSG_FINAL_05-24-22.indd 2 5/24/22 2:47 PM5/24/22 2:47 PM
3
Get started
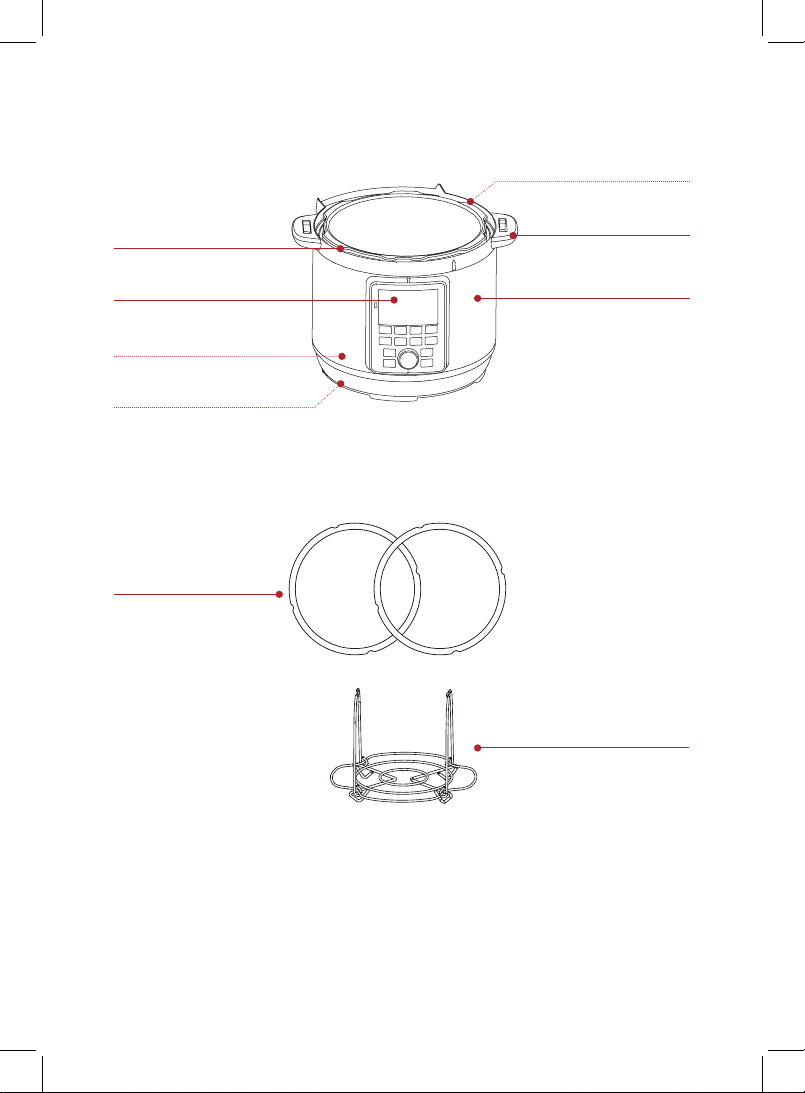
Cooker Base
Parts + Accessories
Illustrations are for reference only and may differ from the actual product.
Remember to recycle!
We designed this packaging with sustainability in mind. Please recycle
everything that can be recycled where you live.
Heating element (inside)
Cooker handles
Stainless steel exterior
Condensation collector (rear)
Power cord (rear, 8-quart
model has attached cord)
Condensation rim
Control panel
Sealing ring (extra)
1 sealing ring
comes installed
Stainless steel steam rack
with handles
112-0169-01_112-0169-01-0301_IB_DuoPlusV4_6QT_US_GSG_FINAL_05-24-22.indd 3112-0169-01_112-0169-01-0301_IB_DuoPlusV4_6QT_US_GSG_FINAL_05-24-22.indd 3 5/24/22 2:47 PM5/24/22 2:47 PM

4
Get started
5
Get started
USING YOUR DUO PLUS
Control panel
We’ve designed the control panel to be simple to use and easy to read.
1. Smart Program Settings
• Cooking presets
2. Time
• Cooking time
• Delay Start time
• Keep Warm time
3. Delay Start Indicator
• Shows Delay Start is active
4. Pressure Indicator
• When lit, shows the pressure
level selected
5. Temperature Indicator
• When lit, shows the
temperature selected
6. Progress Bar
• Shows cooking progress
7. Message Display
• Shows cooking instructions
8. Cooking Programs
• Active program will be lit
9. Delay Start
• Light shows ON
10. Keep Warm
• Light shows ON
11. Cancel
12. Start
13. Steam Icon
• When lit, there is pressure in
the multi-cooker
1
9
11 12
10
6
5
7
2
4
8
8
3
13
112-0169-01_112-0169-01-0301_IB_DuoPlusV4_6QT_US_GSG_FINAL_05-24-22.indd 4112-0169-01_112-0169-01-0301_IB_DuoPlusV4_6QT_US_GSG_FINAL_05-24-22.indd 4 5/24/22 2:47 PM5/24/22 2:47 PM

5
Get started
Turning the sound On or Off
Turn sound on
When in Ready mode, press and hold Delay Start and Keep Warm for
5 seconds. The message display shows Sound Off.
Turn sound off
When in Ready mode, press and hold Delay Start and Keep Warm for
5 seconds. The message display shows Sound On
Audible safety alerts (beeps) cannot be turned off.
Changing the temperature scale
Set to Fahrenheit
When in Ready mode (and scale is set to Celsius), press and hold the
Control Dial for 5 seconds. The message display shows Temp Unit F.
Set to Celsius
When in Ready mode (and scale is set to Fahrenheit), press and hold the
Control Dial for 5 seconds. The message display shows Temp Unit C.
Delay the start of cooking
You can set a Delay Start timer for a minimum of 10 minutes or a
maximum of 24 hours.
1. Select a Smart Program, adjust the settings as you want, then press
Delay Start.
2. When the minutes field flashes, turn the Control Dial to set the
minutes (in 10 minute increments) and press the Start to select.
3. Delay Start begins automatically and the timer counts down.
4. When Delay Start ends, the Smart Program begins.
112-0169-01_112-0169-01-0301_IB_DuoPlusV4_6QT_US_GSG_FINAL_05-24-22.indd 5112-0169-01_112-0169-01-0301_IB_DuoPlusV4_6QT_US_GSG_FINAL_05-24-22.indd 5 5/24/22 2:47 PM5/24/22 2:47 PM

6
Get started
7
Get started
Set a timer (without cooking)
You can set a timer for a minimum of 1 minute or a maximum of
60 minutes.
1. When the unit is on and the message display shows Ready, press
Delay Start.
2. When the minutes field flashes, turn the Control Dial to set the
minutes (in 1 minute increments).
3. Press Start to begin the timer.
Cancel cooking
When in Preheating, Cooking or Keep Warm modes, press Cancel.
The message display shows Ready.
Reset unit to original settings
Reset individual programs
• With the cooker in Ready mode, press and hold one program button
for over 3 seconds. The message display shows Ready.
The Program’s pressure level, cooking time and temperature are restored
to the factory default setting.
Reset individual programs during cooking
• With the cooker in Cooking mode, press and hold that program’s
button for over 3 seconds. The display returns to the Cooking
program in progress, but with the factory default settings.
The Program’s pressure level, cooking time and temperature are restored
to the factory default setting.
Reset all program settings
• With the cooker in Ready mode, press and hold Cancel for over
3 seconds. The message display shows Ready.
The unit’s settings are restored to the factory default.
112-0169-01_112-0169-01-0301_IB_DuoPlusV4_6QT_US_GSG_FINAL_05-24-22.indd 6112-0169-01_112-0169-01-0301_IB_DuoPlusV4_6QT_US_GSG_FINAL_05-24-22.indd 6 5/24/22 2:47 PM5/24/22 2:47 PM

7
Get started
INITIAL SETUP
Clean before use
1. Wash the inner cooking pot with hot water and soap. Rinse and use
a soft cloth to dry the outside. Or you can wash the inner cooking
pot in the dishwasher.
2. Wipe the heating element inside the cooker base with a soft cloth
to ensure there are no stray packaging particles.
Setting up the condensation collector
The condensation collector sits at the back of the cooker base and
accumulates overflow moisture from the condensation rim. It should be
installed before cooking, then emptied and rinsed out after each use.
Remove the condensation collector
• Pull the condensation collector away from the cooker base; do
not pull down.
Note the tabs on the cooker base and the grooves on the condensation collector.
112-0169-01_112-0169-01-0301_IB_DuoPlusV4_6QT_US_GSG_FINAL_05-24-22.indd 7112-0169-01_112-0169-01-0301_IB_DuoPlusV4_6QT_US_GSG_FINAL_05-24-22.indd 7 5/24/22 2:47 PM5/24/22 2:47 PM

8
Get started
9
Get started
Install the condensation collector
• Align the grooves on the condensation collector with the tabs on the
back of the cooker base and slide the condensation collector into place.
Using the Sealing Ring
When the lid is closed, the sealing ring installed on the underside of the
lid creates an air-tight seal between the lid and the cooker base.
• The sealing ring must be installed before using the cooker and
should be cleaned after each use.
• Install 1 sealing ring at a time; use one for sweet dishes and one
for savory.
• Sealing rings stretch over time with normal use. To keep your
product safe, replace the sealing ring every 12 to 18 months.
Replace sooner if you notice stretching, deformation, or damage.
112-0169-01_112-0169-01-0301_IB_DuoPlusV4_6QT_US_GSG_FINAL_05-24-22.indd 8112-0169-01_112-0169-01-0301_IB_DuoPlusV4_6QT_US_GSG_FINAL_05-24-22.indd 8 5/24/22 2:47 PM5/24/22 2:47 PM
Autres manuels pour POT DUO PLUS
1
Table des matières
Autres manuels Instant Autocuiseur électrique


Manuels Autocuiseur électrique populaires d'autres marques


Magefesa
Magefesa mageplus Manuel utilisateur

Espressions
Espressions EP6005 Manuel utilisateur

Bra
Bra NEW STAR Manuel utilisateur

GoWISE USA
GoWISE USA GW22700 Manuel utilisateur

Paula Deen kitchen electrics
Paula Deen kitchen electrics PDPC8 Caractéristiques techniques

Aurora
Aurora AU 251 Manuel utilisateur

Tramontina
Tramontina VANCOUVER Manuel utilisateur

Prestige
Prestige 2025 Manuel utilisateur

TEFAL
TEFAL Secure 5 Neo Manuel utilisateur

Rommelsbacher
Rommelsbacher KA 1800 Manuel utilisateur

PoongNyum
PoongNyum Stainless steel pressure cooker Manuel utilisateur

Vitesse Home
Vitesse Home VS-512 Manuel utilisateur