ICHIBOT LF ULTIMATE 4S Manuel utilisateur

USER GUIDE
ICHIBOT ULTIMATE 4S
2019 Rev 2.1

www.ichibot.id USER GUIDE Page 2
THANK YOU FOR PURCHASING ICHIBOT ULTIMATE 4S
Do you know ?
That to get one ream of A4 type paper, a 5-year-old tree is needed.
To get good paper quality, trees with type hard and soft wood are needed.
To save about 1 ton of paper, it is equivalent to not cutting down 13 large trees, and 400
liters of oil, 4,100 Kwh of electricity, and 31,780 liters of water.
3 pieces of paper is equivalent to 1 liter of water, and to produce 1 kilogram of paper
requires about 324 liters of water.
If in the past the paper was used only for writing, now almost all of the packaging industry
uses 41% of all paper use in the world.
Therefore we do not include guidebook in the form of paper to support environmental
conservation programs. Instead we include a guidebook in the form of a softfile in a
flashdisk that is already included in the product packaging.
You can find information about how to assemble and programming your robot in this guide.
The material in this guide is for information purposes only. The products described are
subject to change without prior notice, because we will always carry out continuous
development with all ICHIBOT products.
ICHIBOT makes no representations or guarantees in connection with this guide or in
connection with the products described herein. ICHIBOT is not responsible for any damage,
loss, cost or expense, direct, indirect or incidental, consequential or special, arising from or
related to the use of this material or the product described herein.

www.ichibot.id USER GUIDE Page 3
TABLE OF CONTENTS
SAFETY INFORMATION .................................................. ERROR! BOOKMARK NOT DEFINED.
WARNING ........................................................................................................................ 4
GENERAL INTRODUCTION ................................................................................................. 5
A PARTS OF ICHIBOT ULTIMATE 4S.................................................................................... 6
POWER SUPPLY ................................................................................................................ 7
TERMS THAT ARE IN ICHIBOT ............................................................................................ 7
HOME SCREEN .................................................................................................................. 9
BATTERY SETTINGS ........................................................................................................... 9
AUTOMATIC CALIBRATION OF SENSORS ......................................................................... 10
PLAN SETTINGS .............................................................................................................. 12
LOG IN TO THE SUB MENU .............................................................................................. 14
HIDDEN INDEX MENU ..................................................................................................... 14
INDEX DETERMINATION ................................................................................................. 15
CONCEPT OF MANAGING ICHIBOT MOVEMENTS ............................................................ 20

www.ichibot.id USER GUIDE Page 4
SAFETY INFORMATION
Read and understand this manual carefully before playing the ichibot. This product can be
played by everyone with a note that they understand the dangers in the electronic field and
understand how to use so didn't happen things that are not desirable.
WARNING
1. Make sure the installation is not reversed, even though it is equipped with battery
protection but it is recommended to install the battery according to the polarity.
Position (+) of the battery on the outside of the robot and polarity (-) on the inside.
Look at Picture 1.
Picture 1. Battery Installation
2. Avoid ichibot from liquid materials and equipment containing metals so it does not
experience short circuit.
3. Pay attention to the battery voltage when playing ichibot, making sure to play at
voltage 11.8 - 12.6 volt to get maximum results and the ichibot setting to be more
accurate. Battery voltage observations can use a lippo checker
4. It is recommended to charge the battery using an original and trusted charger. Use
the balance mode on the charger so that the battery lasts longer, the cell does not die
and does not easily bloated.
5. Use the cover on the bottom of the MCU to make it more comfortable for holding the
ichibot.

www.ichibot.id USER GUIDE Page 5
GENERAL INTRODUCTION
Ichibot Ultimate 4s is a line follower robot that is equipped with an operating system so users
can adjust the robot's path to the robot directly.
Specifications of Ichibot Ultimate 4s
Chips ATmega 1284p SMD Packages
CPU Speed 20Mhz
Flash Memory 128KB
EEPROM Memory 4KB
SRAM Memory 16KB
Motor 16mm DC motor Gearbox 1500 Rpm
Motor Encoder Support Yes
Communications USB to Serial CH340
Display Oled 0.96 Single Color
Sensor 14 Sensor White Photo Dioda
Button 6 Control Button and 1 Reset Button
Led Indicator 1 Led Indicator
External EEPROM 128Kb
Bootloader Arduino Bootloader
Chios Ichibot OS Yes, Chios 5+
Plan Instruction 8 Plan 99 Index
Arduino IDE Compatible Yes
Servo Gripper Yes (2 Pin Servo)
Fan Output Yes (5v or 12v support)
Voltage Regulator LM2596
Battery Recomendation Lithium Polymer 3s 450mah
Battery Protection Yes
Battery Sensor Yes
Buzzer No
Bluetooth No
Wifi No
www.ichibot.id USER GUIDE Page 6
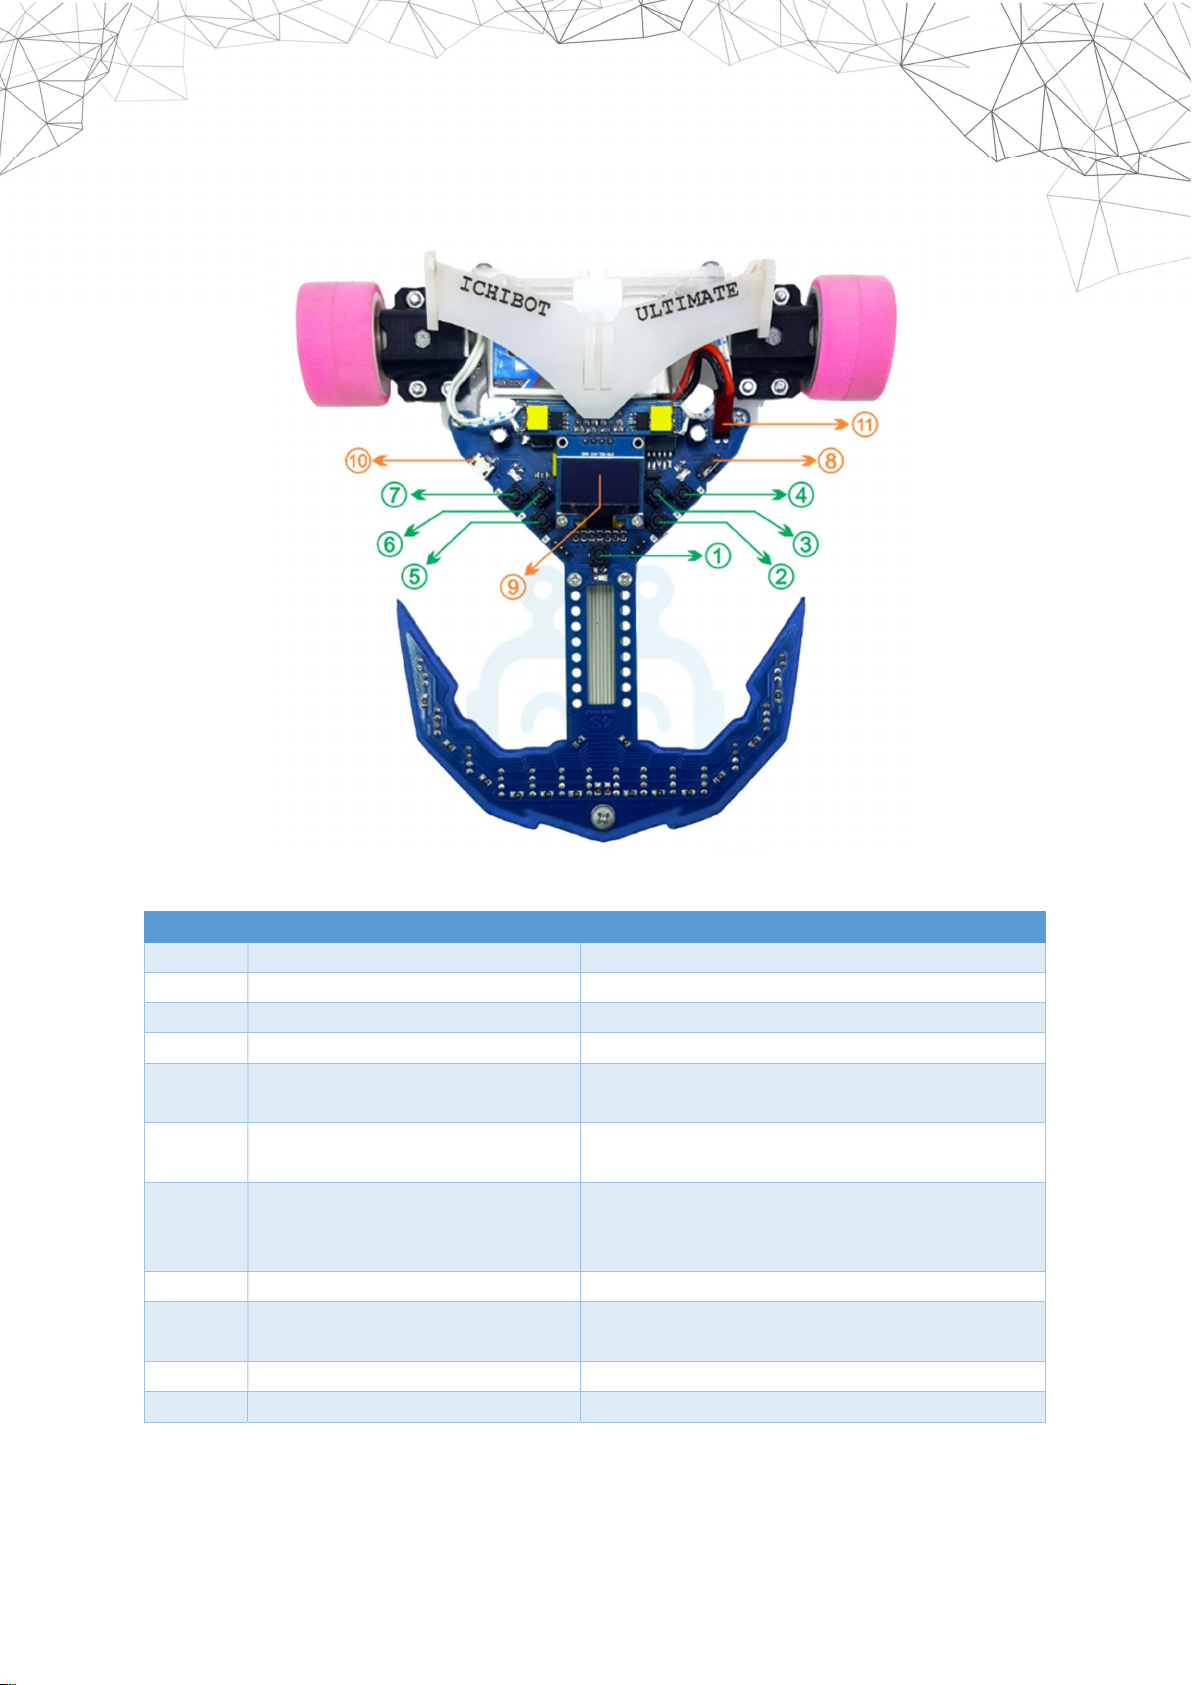
A PARTS OF ICHIBOT ULTIMATE 4S
Here are the parts of ichibot ultimate 4s and their functions:
Number
Name Function
1 Restart Button Restarting the robot.
2 UP Left Button Moving the Menu Cursor.
3 DOWN Left Button Moving the Menu Cursor.
4 OK Left/Enter/OK Button Enter the submenu and the OK button.
5 UP Right Button Increasing number parameters or other
parameters.
6 DOWN Right Button Decreasing number parameters or other
parameters.
7 OK Right/Back/Start Button Return or Cancel. At the position of the
Homescreen this button is used to run the
robot (start).
8 ON/OFF Switch Turn off or turn on the robot.
9 LCD Display The viewer of the chios operating system
interface
10 Micro USB Socket Connectors to computers / laptops.
11 Battery Socket Lithium-polymer battery socket.

www.ichibot.id USER GUIDE Page 7
POWER SUPPLY
Ichibot ultimate 4s uses a lithium Polymer (Lipo) 3 cell type battery. The safe limit of the
battery voltage used is 11.1 - 12.6 volts.
TERMS THAT ARE IN ICHIBOT
In playing ichibot there are several terms that need to be considered by users, namely:
TERM Explanation
PLAN (P) The plan is likened to a strategy folder that
stores all the logic of the action of the robot to
be executed in the order of the index number.
In 1 plan there are 99 indexes. The plan is
symbolized by the letter "P".
INDEX (i) Index is a sequence number of robotic actions
that are determined by the user according to
the path used. Index is symbolized by the
letter "i".
V Robot speed under normal conditions (when
the robot does not run SA or SB) the value is
between 0 - 255.
T (Trigger) Selection of sensor conditions so that robots
can turn or carry out actions. If the sensor
conditions are met, the robot will carry out
the action that has been set.
A (Action) Action is the choice of robot movement that
the user wants when it meets the
requirements, for example turning left,
turning right or turning on the fan, etc.
JUMP PLAN Move to a specific Plan and index.
L Left Motor Speed.
R Right Motor Speed.
B Break before taking action.
D (Delay) Duration The robot takes L / R action.
FAN Additional fire extinguishers that can be set to
on or off when performing an action.
PICK Command to position the Gripper to take
objects.
DROP Command To position the Gripper to place
objects.
SA (Speed A) is the speed after the robot takes
action. Usually used to increase speed after
taking action.

www.ichibot.id USER GUIDE Page 8
TA (Timer A). The length of the robot runs SA.
When TA is active, the index reading system is
inactive (in lock).
SB (Speed B) is the speed of the robot after the
robot does SA during TA.
TB (Timer B). The duration of the robot runs SB.
CAL Calibration. The menu is used to calibrate the
sensor in order to distinguish between black
and white color.
STOP INDEX An index number where if the robot has
reached the specified index number, the
robot will stop.
CHECKPOINT Features for running robots starting from the
specified index number.
FLL (FL.LEFT) Follow Line Left. Feature to make the robot
always turn left when getting an intersection.
FLR (FL.RIGHT) Follow Line Right. Feature to make the robot
always turn right when getting an
intersection.
FLC (FL.CENTER) Follow Line Center. Feature to run the robot in
normal mode.
PID The algorithm control system used so that the
robot can follow the line.
BLACK/WHITE Selection of the track line color.
COPY Copying the index.
PASTE Pasting the index that was copied.
INSERT Add an index to a specific index number.
REMOVE Deleting certain indexes.
INVERS Reversing a certain logic index.
INVERSE PLAN Reversing the logic of each index referred to
in a particular Plan.

www.ichibot.id USER GUIDE Page 9
HOME SCREEN
1. PLAN number that is currently active
2. Robot name
3. Battery indicator
4. Sensor indicator
5. The main speed value used
6. The selected checkpoint value and the value of the first index that will be run
7. Track line color
8. Line sensor calibration
BATTERY SETTINGS
Hover over the battery indicator and press the OK Button to display the battery menu
LIMIT : select 11.1 for the 3 Cell battery or 7.2 for 2 Cell
CALIB : add or subtract if the battery voltage reading is not in accordance with the
appointment of the measuring instrument.
1
2 3
4
5
6
8
7

www.ichibot.id USER GUIDE Page 10
AUTOMATIC CALIBRATION OF SENSORS
Before running the robot, the sensor must be calibrated so that the robot can distinguish
between black and white color. The simplest calibration method is automatic calibration by:
1. Select the CAL menu on the homescreen.
2. Place the robot behind a horizontal line. When scanning the sensor make sure the
robot is always on the floor (don't lift it). Then Press OK Left (enter).
3. Make the robot move forward and backward at least five times until all sensors pass
the black line. Then Press OK Left (enter).
Autres manuels pour LF ULTIMATE 4S
1
Table des matières
Manuels Robotique populaires d'autres marques

STEMCenter USA
STEMCenter USA Pi-Bot v2.00 Manuel utilisateur

SunFounder
SunFounder PiDog Manuel utilisateur

Universal Robots
Universal Robots UR5 Manuel utilisateur

Universal Robots
Universal Robots E Series Manuel utilisateur

YASKAWA
YASKAWA MOTOMAN-MPL80 II Manuel utilisateur

EFORT
EFORT ECR5 Manuel d'instructions


