iBasso DX50 Manuel utilisateur

http://www.iBasso.comThank you for purchasing the DX50
DX50
User Guide

2
1
3
4-7
3-4
7-9
Contents
Power on/off the screen
Power on/off
Reset
Charging

DX50 User Guide
2
Package Components:
Screen protectorPouch
Micro USB cable/Coaxial cableDX50
Micro USB cable: Connect the Micro USB cable to a computer for
charging and data transmission.
Coaxial cable: Connect the coaxial cable to an external DAC, to allow
the DX50 working as a digital transport.
Pouch: Use the pouch to protect the DX50 from scratches.
Screen protector: Use the screen protector to protect the DX50`s
screen from scratches.
10-11

DX50 User Guide
3
- Bit Perfect, Support up to 24Bit/192kHz.
- WM8740 24Bit DAC Chip.
- Built-in 9V Voltage Swing Headphone AMP.
- 2.4" IPS Screen(320*240) with Capacitive Touch Screen,
Bonded by OCA.
- Up to 24Bit/192kHz Mini Coaxial Output.
- 3.5mm Headphone Output, and Line Out.
- Three Physical Buttons (Previous, Play/pauses, Next)
on The Top Panel.
- 256-Steps Digital Volume Control.
- 8GB Onboard Flash.
- Support SDXC and SDHC MicroSD Card, up to 2TB.
- 3-Setting Gain Switch.
- Audio Formats Supported: APE, FLAC, WAV, WMA, AAC,
ALAC, AIFF, OGG, MP3, DSD.
- User Replaceable Battery(Compatible With S**sung S3),
14hours Play Time.
Main Features:
Specifications:
Line out:
Frequency response: 20Hz~20KHz +/-0.2dB.
S/N: -109dB +/-3dB.
THD+N: 0.003%.
Output level: 1.5V rms (1kHz 0dB).
Headphne out:
Frequency response: 20Hz~20KHz +/-1dB.
THD+N: 0.004% (32ohm load).
Output level: 1.2V(Low gain), 1.7V(Mid gain), 3.1V(High Gain).
S/N: -103dB +/-3dB(Low gain), -106dB +/-3dB(Mid gain).
108dB +/-3dB(High Gain) (32ohm Load).
Output Impedance: <0.5ohm.

Names of Parts & Functions:
Battery life: 14hours.
Battery charge time: 3hours with AC adapter, 5.5hours with PC USB port.
Case dimension: 2.52W x 3.98L x 0.67H (inch).
64W x 100L x 17H (mm).
Weight: 146g or 5.15oz.
Phone Port
Line Out Port
Coaxial Output Port
Micro USB Port
Micro SD Card Slot
Gain Switch
DX50 User Guide
4
Coaxial output has the highest output priority which would close the
phone out or line out when coaxial cable plugged in.
Use the furnished coaxial cable to play music stored in the DX50 on an external device
with a coaxial input port.
Coaxial Output Port:

DX50 User Guide
5
Plug in the earphone and output sound through the phone jack.
Phone Port:
Connect the DX50 to a computer or a USB charger to charge the DX50.
Connect the DX50 to a computer to transfer data into the DX50.
Connect the DX50 to an OTG storage device to play music files.
Micro USB Port:
Insert a Micro SD card into the DX50 to access its stored files.
The following screen pops up after Micro SD card inserted.
Micro SD Card Slot:
When using line out, one should always turn the volume up to the maximum
“255” to ensure that your amplifier has as much dynamic range as possible
to work with.
Use a 3.5 to 3.5 interconnect cable to play music stored in the DX50 on an external amplifier
with a line in port.
Move the switch to set the Low, Mid, and High gain.
Gain Switch:
Line Out Port:
The first media scanning will take more time as the DX50 is building the library for this
card. The DX50 will create a folder called “.audio_data” in the Micro SD card after
that. The speed of the media scanning the next time this card is inserted is much faster
as the library is already built and stored on this card.
Scan SD Card: Press this button to fully scan the Micro SD card.
Browse files: Press to skip media scanning, and browse the Micro SD card in folder
structure.

DX50 User Guide
6
Volume +
Volume -
Power
Hold
Next/Fast Forward:
Previous/Rewind
Play/Pause
Short Press - Power the LCD screen on and off,
Long Press - Power the DX50 on and off.
Power:
Move the hold switch to activate or deactivate the button operation.
Hold:
Volume +:
Short-press to increase one step of the volume,
Long-press to continuously increase until its maximum.
Volume -:
Short-press to decrease one step of the volume,
Long-press to continuously decrease until its minimum.

DX50 User GuideUser Guide
7
Basic Operation:
Next/Fast Forward:
Previous/Rewind:
Play/Pause:
Short Press - Play/Pause.
Short Press - Replay previous track,
Long Press - Rewind.
Short Press - Play the next track,
Long Press - Fast forward.
Power on/off the screen:
Single press the power button to power on/off the screen after the DX50 was powered on.
Power on/off:
1. Press and hold the power button to power on.
2. After the DX50 is powered on, a long press of the Power button will display the shutdown
menu. Press OK to power off.
Reset:
When the DX50 stop unexpectedly during operation and the keys are no longer responsive,
press and hold the power button for 7 seconds to reset the DX50.
Reset also can be achieved by removing the battery.
Charging:
The DX50 can be charged by computer through the USB port, or any USB charger with 5V
output voltage and 1 A or above output current.
A full charge takes about 3 hours with USB charger and 5.5 hours with computer`s
USB port.

DX50 User GuideUser Guide
8
Battery & removing the battery cover:
The DX50s battery is user replaceable. It is 2100mAh, 3.8V, and compatible with
S**sumg S3`s (i9300). It is a widely available battery.
To remove the aluminum back cover, press down on the center of the back cover,
and slide it in direction of the arrow.
Connecting to a computer for data transmission:
1. Power on the DX50 first.
2, Select Storage under Setting/USB Settings.
3. Connect the DX50 to a computer via the furnished USB Cable.
4. The “USB Connected” will be shown on the DX50 screen. The DX50 will appear on the
computer as a drive labeled“DX50”.
5. If a Micro SD card is in place, it will show up as a second drive on the computer.
6. Music files can be easily transferred to the internal memory via drag and drop or copy and
paste. Either complete albums or individual music files can be transferred. No special
software is required for transferring files.
No special software is required for transferring files.
Battery Cover
Battery
DX50 User GuideUser Guide
9
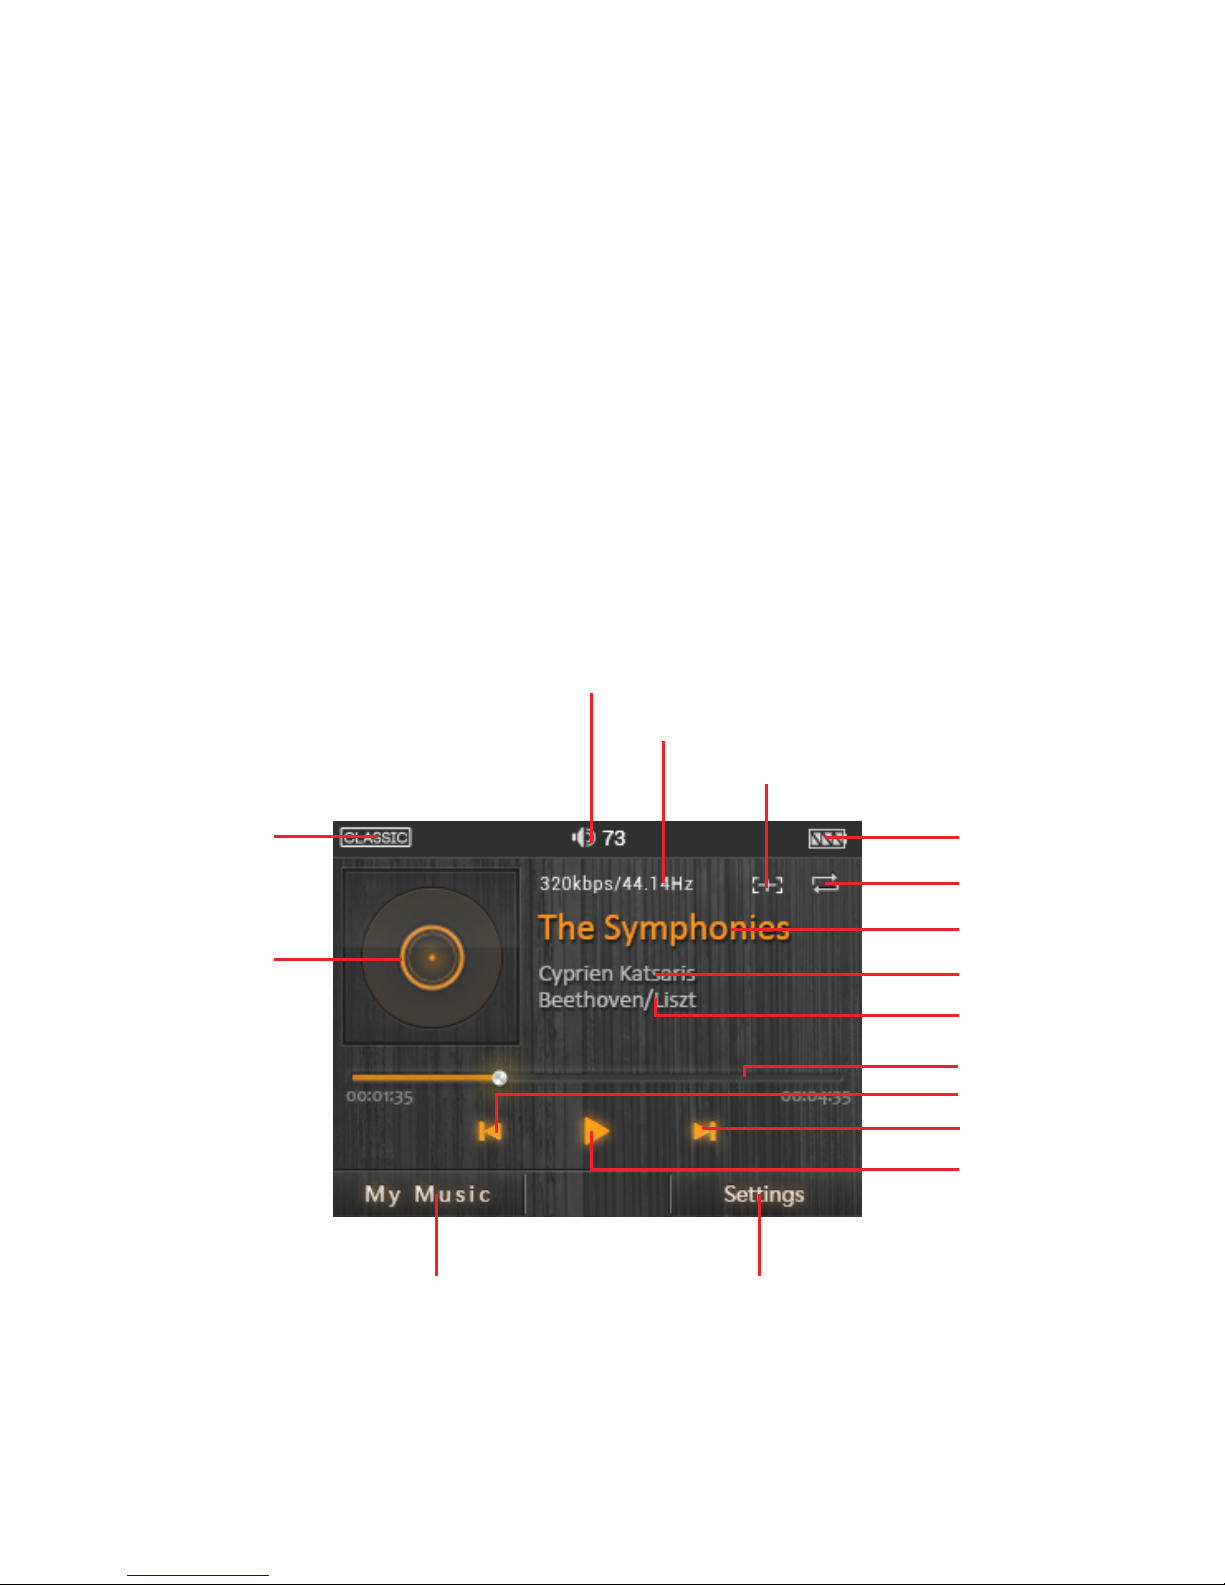
User Interface:
The DX50 User interface is composed of three parts:
Music playback screen (homepage), my music, and settings.
Music Playback Screen:
Disconnecting from a computer:
When transfer is completed, make sure to safely remove the drive(s) from the
computer before disconnecting the USB connection to the DX50. Click the icon
displayed in the task bar or desktop of the computer to safely disconnect the DX50.
Play/Pause
Next/Fast forward
Previous/Rewind
Progress bar
Track name
Battery indicator
Bit rate & Sample rate
Add to playlist
Settings
Artist name
Album name
My music
Album artwork
Play mode
EQ indicator
Volume indicator
Table des matières
Autres manuels iBasso Lecteur MP3


Manuels Lecteur MP3 populaires d'autres marques

Blaupunkt
Blaupunkt Compact Drive MP3 Manuel utilisateur

Memorex
Memorex MMP9008 - 8GB USB 2.0 Manuel utilisateur

Meizu Electronic Technology
Meizu Electronic Technology E5 Manuel utilisateur

Naxa
Naxa NMV-173NX Manuel utilisateur

Philips
Philips PSA250 Manuel utilisateur

Zipy
Zipy go! Waving Manuel utilisateur


