HYFIX MobileCM Base-Station Manuel utilisateur
MobileCM Base-Station
for GEODNET Manual
Release Number
Author
Date
Comments
0.2.0
Mike Horton
Feb 4,
2022
First release: GNSS Antennae Installation
and Basic Network Connection

HYFIX MobileCM Base-station Manual Page 2 of 12
Table of Contents
1. UNPACK & POWER ON .............................................................................................................. 3
1.1. FIND AND RECORD STATION SERIAL NUMBER ........................................................................ 3
1.2. POWER UP ................................................................................................................................ 3
1.3. ANTENNAE PORTS ................................................................................................................... 4
1.4. LED DEFINITION ..................................................................................................................... 4
1.5. ANDROID SET-UP APP ............................................................................................................. 4
2. WIFI CONNECTION AND INTERNET SETUP ....................................................................... 5
2.1. CONFIGURE MOBILECM NETWORK CONNECTION (AP MODE) ............................................... 5
2.2. OPEN MOBILECM WEBUI (STATION MODE) .......................................................................... 6
2.3. SET MINER KEY AND TRANSMIT DATA TO GEODNET .......................................................... 7
2.4. RESET WIFI FOR A NEW NETWORK / MOVING LOCATIONS ..................................................... 7
3. GNSS (SPACE WEATHER) ANTENNAE INSTALLATION .................................................. 8
3.1. CHOOSING A LOCATION ........................................................................................................... 8
3.2. INSTALLING ANTENNAE ........................................................................................................... 8
3.3. RF EXTENSION CABLES ........................................................................................................... 9
4. SET UP YOUR MINING ACCOUNT ON THE CONSOLE ..................................................... 9
5. LEARNING MORE ..................................................................................................................... 10
5.1. GNSS SYSTEM & SPACE WEATHER ...................................................................................... 10
5.2. GNSS CORRECTION NETWORKS FOR PRECISE LOCATION ..................................................... 10
6. DEBUG AND GETTING HELP ................................................................................................. 10
HYFIX MobileCM Base-station Manual Page 3 of 12
1. Unpack & Power On
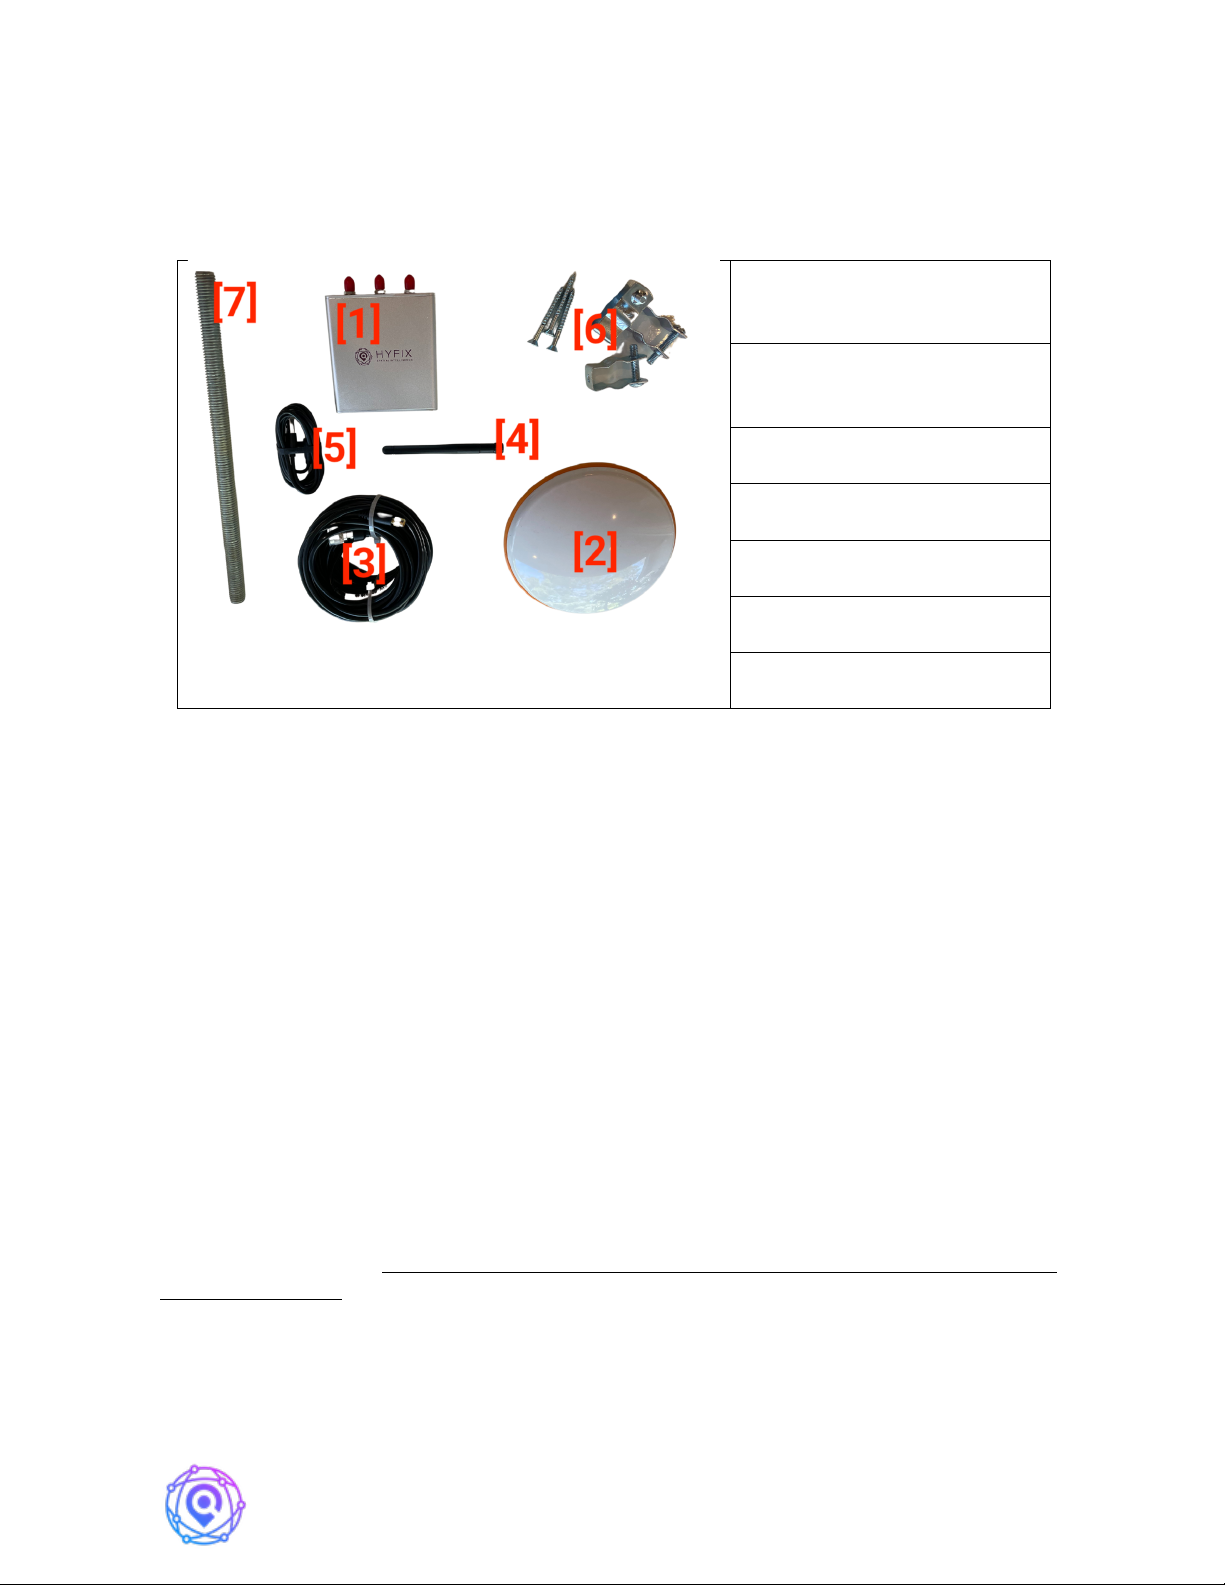
HYFIX's MobileCM Station Kit contains the following items:
MobileCM GNSS (Space
Weather) Receiver [1]
GNSS (Space Weather)
Antenna [2]
Primary Antennae Cable [3]
WiFi Antennae [4]
USB-C Power Cable [5]
Brackets Bag [6]
Antennae Mounting Rod [7]
To configure and connect the MobileCM (Section 2), you will need a Windows 10 PC
or MAC computer and be nearby the WiFi network you intend to use for data transmission.
Ubuntu should also work, but use of a Mobile Phone for setup is not recommended at this
time. An ability to login into the Internet connected WiFi router’s web-page is also desirable.
To install the GNSS antennae (Section 3), you will likely need an electric drill, Philips
screwdriver, and a ladder. More hardware maybe required depending on location.
1.1. Find and Record Station Serial Number
Turn the MobileCM receiver upside down. Find the Station Serial number as shown
below. Record the Station Serial number in your STATION INSTALLATION RECORD
found at the end of this manual.
The Station Serial number is important, and the label may get damaged.
1.2. Power Up
Plug in USB-C Cable [5] and Turn Switch to On Position. RED LED will turn on
SOLID. On first use, GREEN LED will FLASH slowly indicating Access Point Mode
(AP). This is normal. Note: The USB-C connection is just simply a power connection under
normal conditions. However, for Debug of Problems USB-C can be used as a serial
communication port.

HYFIX MobileCM Base-station Manual Page 4 of 12
1.3. Antennae Ports
There are three antennae ports on the rear of the MobileCM as pictured below.
Connect the small WiFi Antennae [4] to the WiFi port. You can connect the GNSS antennae
port later in Section 3. The LoRa port is for future function expansion and is not connected in
the base-station product.
Note: We recommend using the provided WiFi Antennae, as during testing we have
seen issues with some random WiFi antennae.
1.4. LED Definition
LED
FUNCTION
STATUS
RED
POWER
SOLID, when powered
ORANGE
PPS (Pulse Per Second)
BLINKING (1s), antennae sees satellites
GREEN
WiFi / INTERNET
BLINKING (SLOW): Access Point mode.
Used for configuring Internet connection.
(http://192.168.4.1)
BLINKING (FAST): Attempting to Connect
to Internet via Configured SSID and
Password
SOLID, Internet is connected.
1.5. Android Set-Up App
Bluetooth-based Set-up App Coming in Q3 2022 time-frame.
HYFIX MobileCM Base-station Manual Page 5 of 12
2. WiFi Connection and Internet Setup
WiFi is the default connection for both configuring the MobileCM and transmitting
data to GEODNET. When first configuring the MobileCM, you make a local WiFi network
between your PC or MAC to the MobileCM. This is called AP mode, and there is No Internet
connectivity in this phase. Once configuration of step 2.1is completed, the MobileCM will
restart and attempt to securely connect to your local WiFi network and begin transmitting.
This is called Station mode.
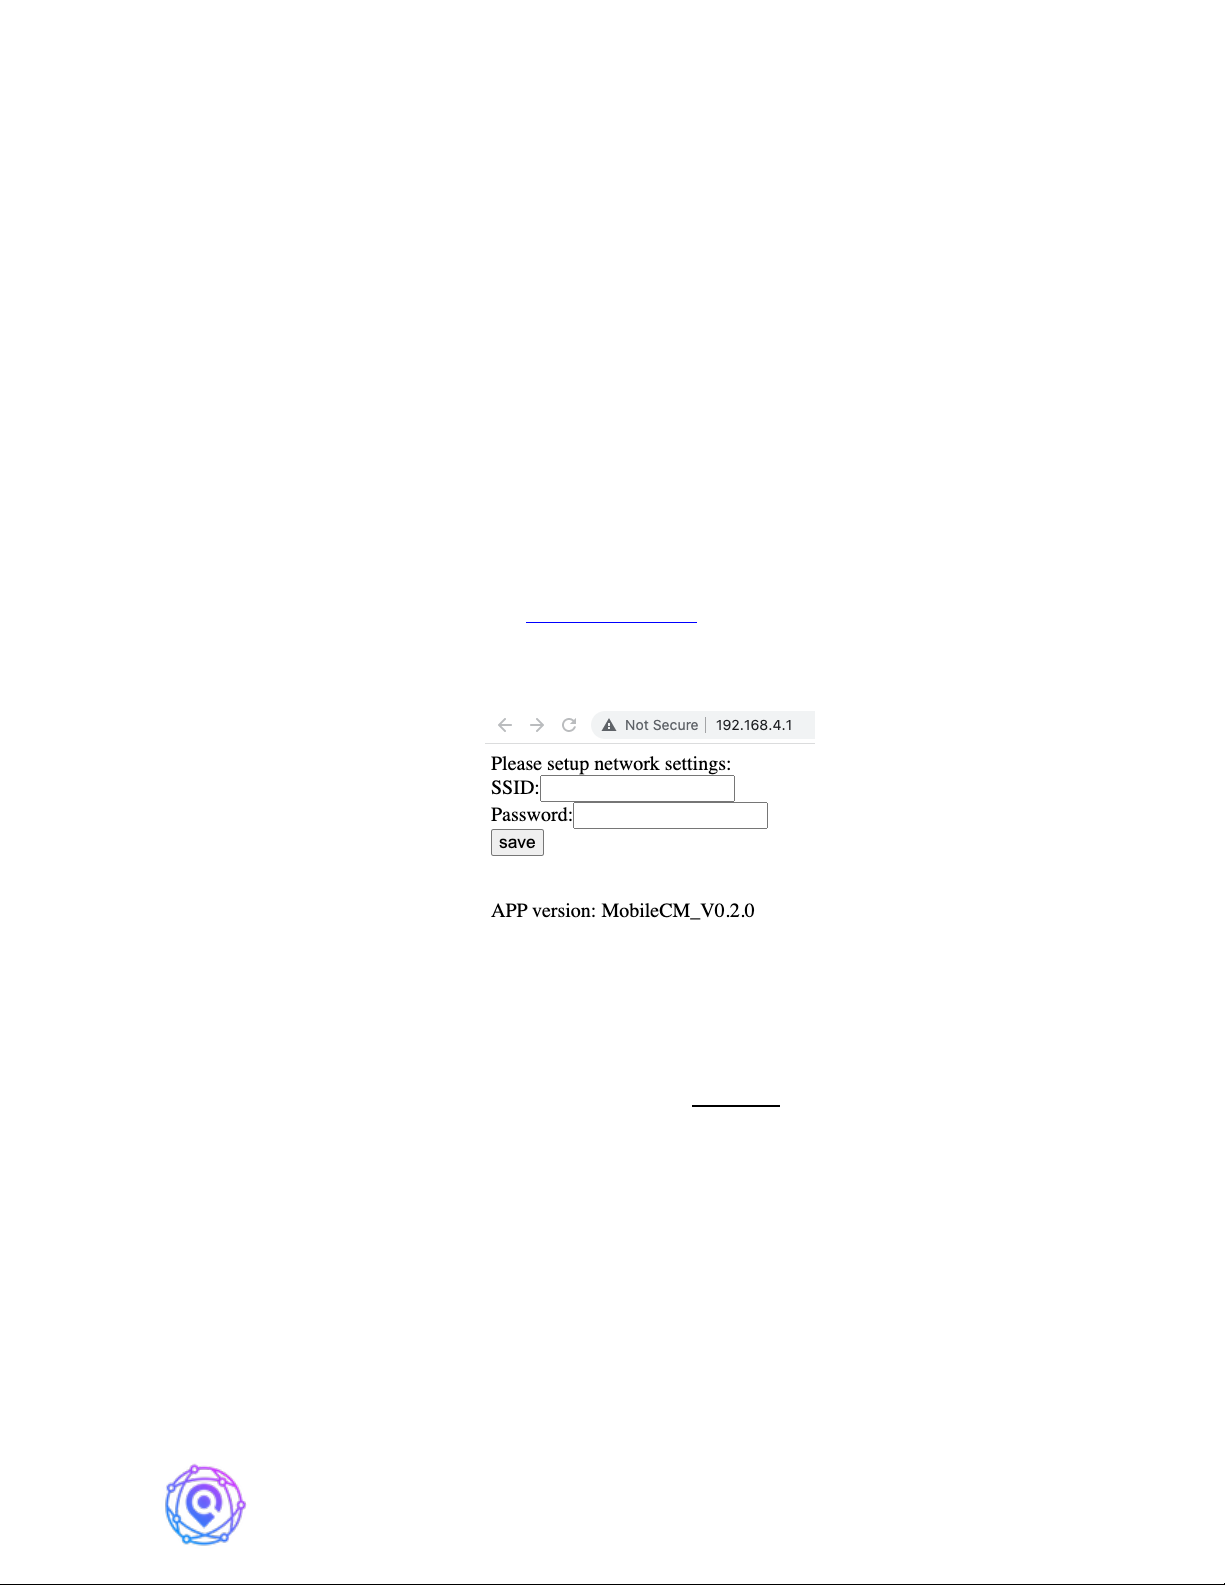
2.1. Configure MobileCM Network Connection (AP Mode)
Prior to connecting to the Internet, the MobileCM is in Access Point (AP) mode. The
network SSID will be MobileCM_xxxxxx where the xxxxx code is the last 6-digits of the 12-
digit Station Serial Number. The Password is the full Station Serial Number listed on the
bottom of the device.
A MobileCM webpage may automatically appear on a MAC. More likely you will
need to manually enter the IP address http://192.168.4.1 . In AP mode, the the MobileCM is
acting as the router in this simple two device network. Enter this local IP address into a web-
browser and the following screen should appear.
As shown above, enter the SSID and Password of the WiFi network you would like to
use for data transmission. This network should be stable.
IMPORTANT! Enter the SSID and Password carefully, as this will speed up process
and avoid hassle. You may want to test the SSID and Password on another device prior to
hitting Save, if you are unsure of the values. Also avoid SSID names that have special
characters in it e.g., for example punctuation marks.
If the connection was successful, the GREEN LED will turn solid after a few seconds
of blinking rapidly (max time should be 1 minutes). Move to Step 2.2 if the GREEN LED
remains solidly lit.
If the connection was not successful, the GREEN LED will eventually stop blink and
begin blinking slowly … reverting to AP Mode. While slowly blinking, repeat step 2.1
double checking your SSID and Password for the WiFi network.
HYFIX MobileCM Base-station Manual Page 6 of 12
2.2. Open MobileCM WebUI (Station Mode)
IMPORTANT! Ensure your PC or MAC is now connected to same WiFi SSID as
entered above.
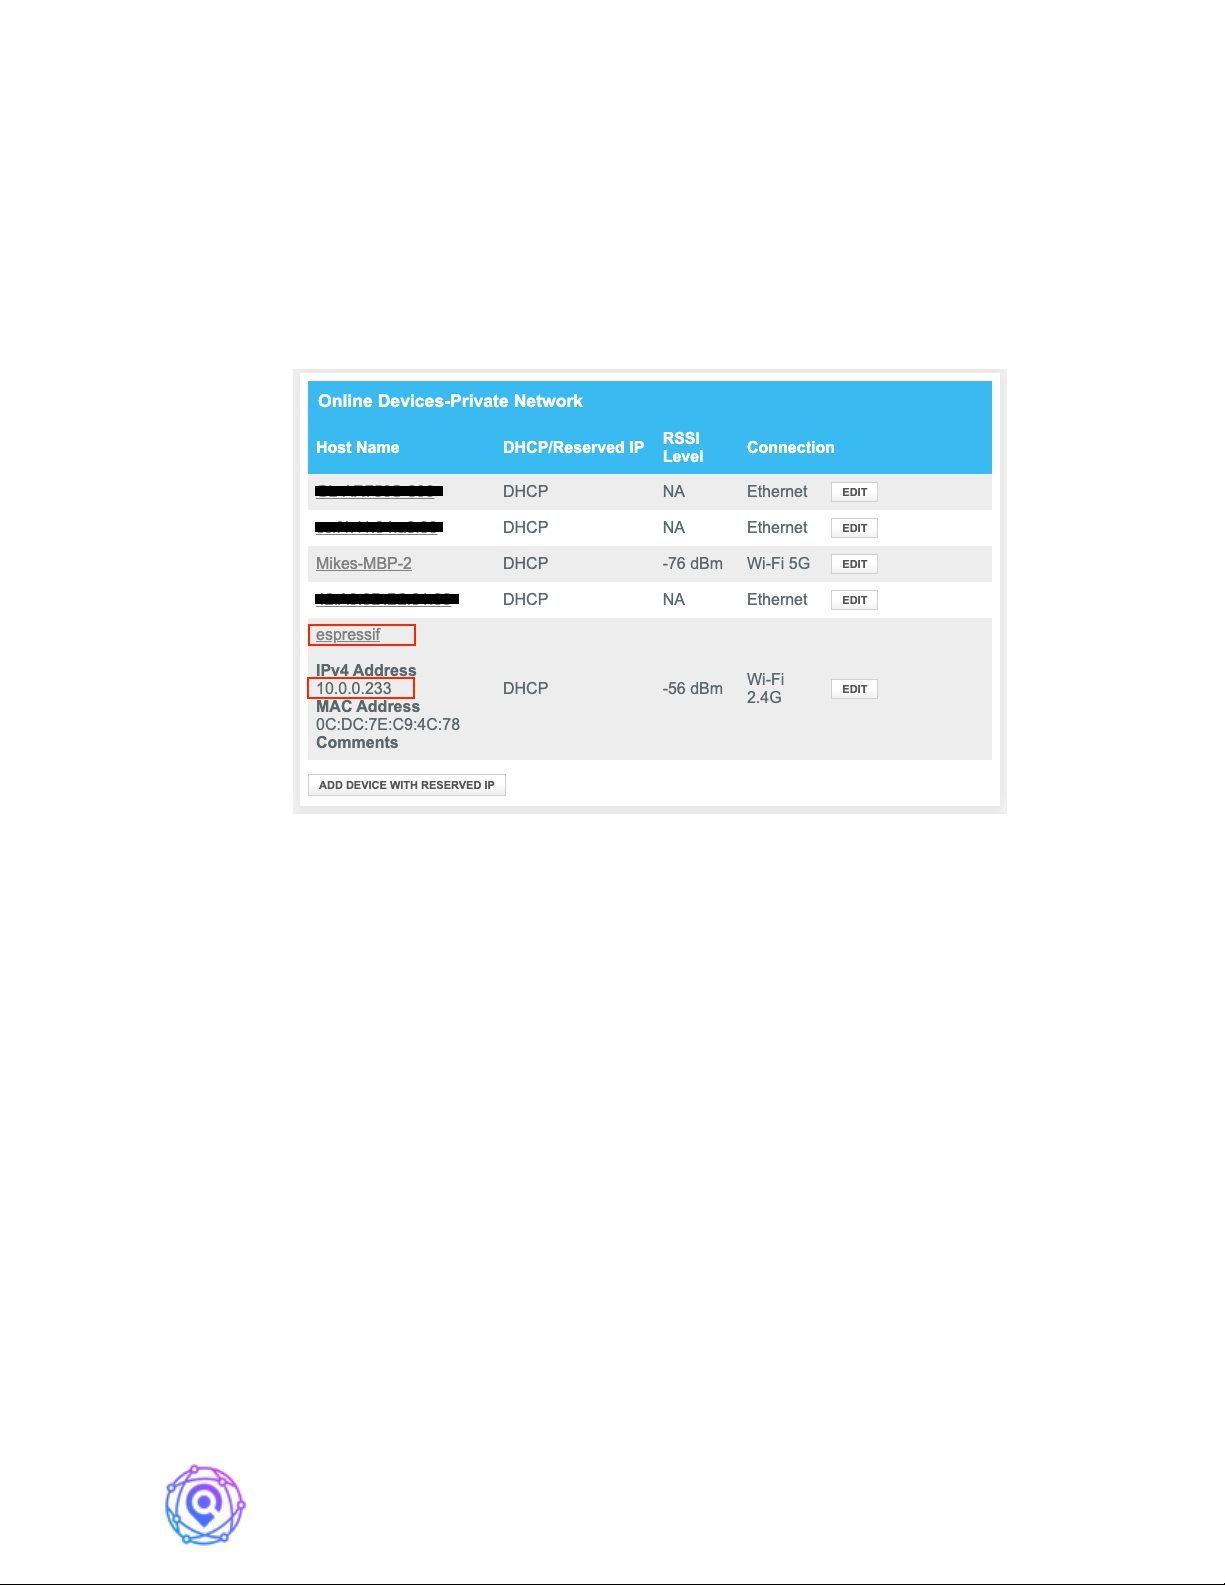
Finding the newly assigned local IP address of the MobileCM can be a little tricky.
The simplest route is to check the table of connected devices on your WiFi router’s web page.
See an example photo below – look for ‘espressif’.
An alternate method to find the device IP is to retrieve the assigned IP from
MobileCM’s debug serial port (See section 6 Debug).
Enter the assigned IP address to your web browser and the following configuration
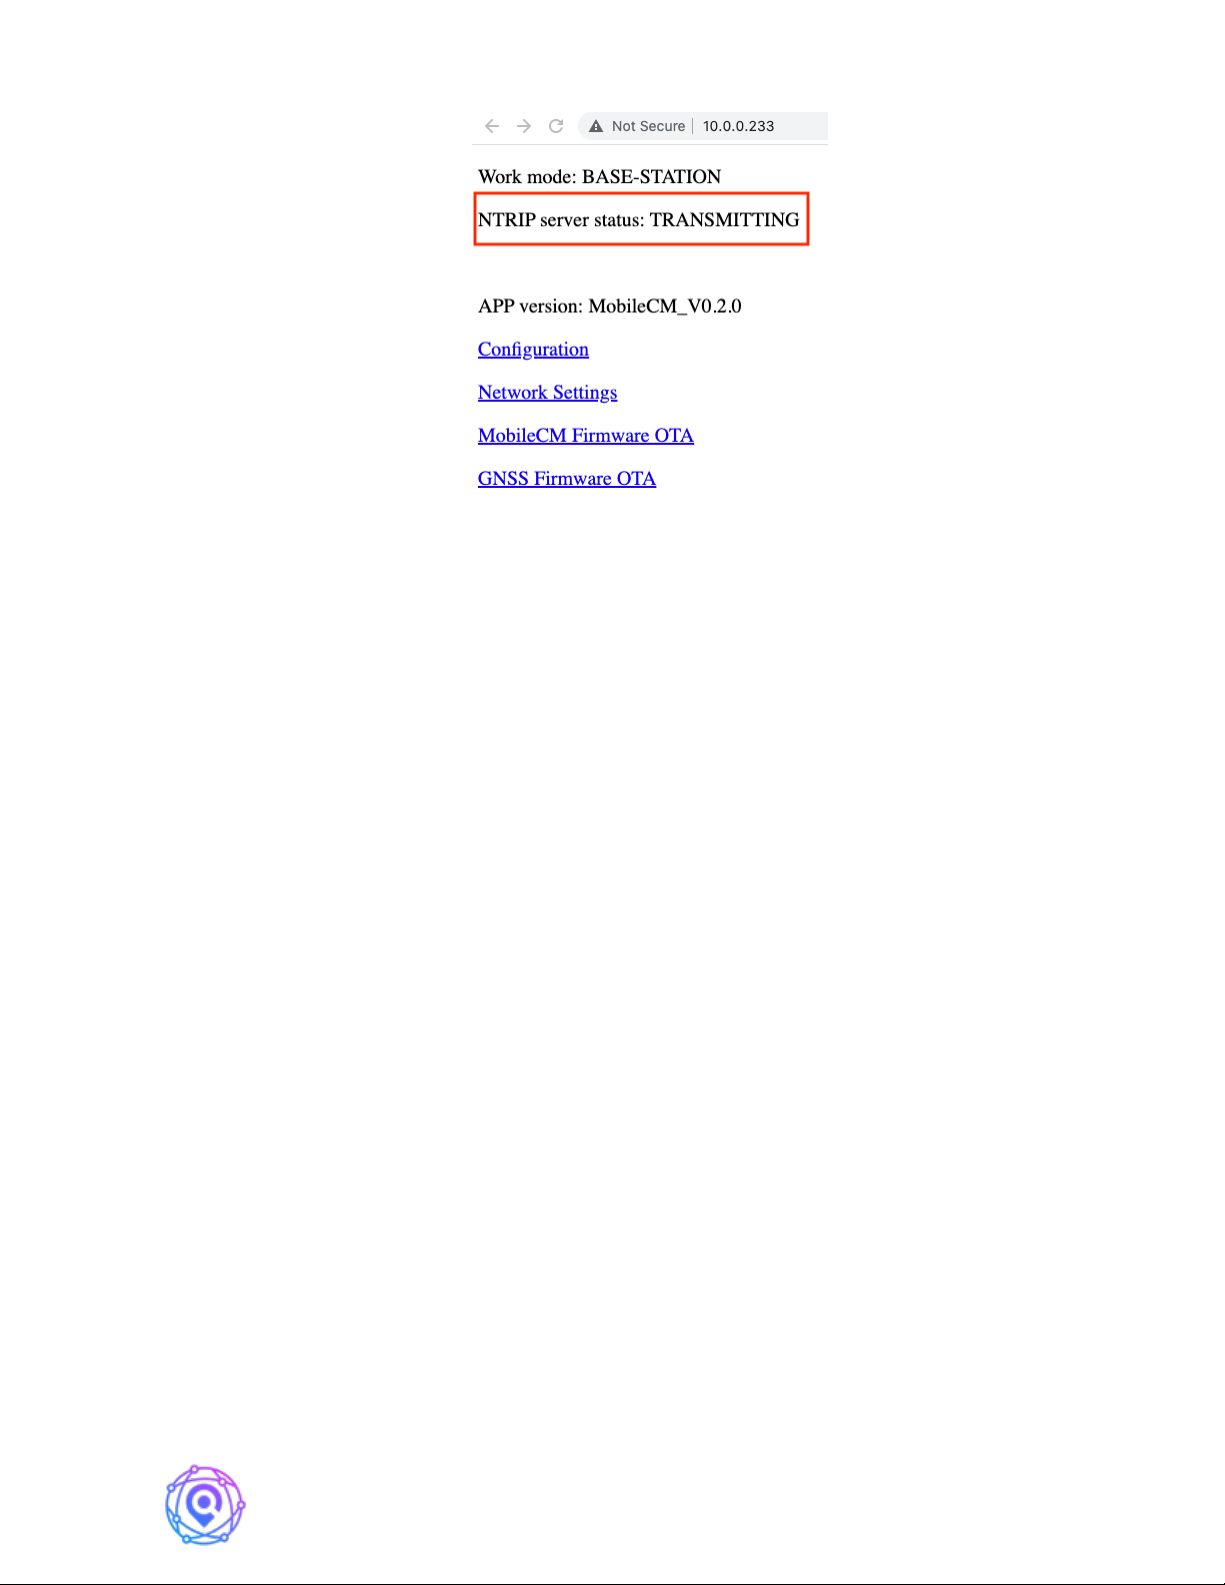
page will appear. In this example that is 10.0.0.233 and a screen appears below.
HYFIX MobileCM Base-station Manual Page 7 of 12
Check the NTRIP server status. If it says “TRANSMITTING”, record this IP (e.g.,
10.0.0.233) in the STATION INSTALLATION RECORD.
You are almost done!
2.3. Set Miner Key and Transmit Data to GEODNET
From the main mobile webpage, select ‘Configuration’
Enter a unique phrase in the Miner Key field (12-18 bytes) with standard ASCII. This
parameter must be changed from the default value, and the default value is an invalid
placeholder value. This Key will be used to associate your Geodnet Miner Account with this
station on the Geodnet Console Application. Record the Key on your STATION
INSTALLATION RECORD.
IMPORTANT! Do not share the Miner Key with others. The Miner Key is not a
Wallet Address nor a User Id/User Password. The Miner Key is just a code that you use with
Geodnet Console Application.
Congratulations! You are Connected.
2.4. Reset WiFi for a New Network / Moving Locations
If you decide to move the MobileCM to a different WiFi network, you can pre-
emptively change the settings from the MobileCM. Go to the Network Settings link from the
main page.
Again, be sure your PC or MAC is on same WiFi SSID as the newly configured SSID
and repeat step 2.2.

HYFIX MobileCM Base-station Manual Page 8 of 12
3. GNSS Space Weather Antennae Installation
Proper installation of the primary GNSS antennae is crucially important to both future
token rewards as well as the overall measurement quality of GEODNET network data.
GEODNET is different from HELIUM and other Radio Networks. The primary GNSS
antennae only receives signals; there is NO data transmission. As a result, placing the device
higher than necessary is not beneficial and may result in a less physically stable installation.
As described in detail in section 3.1 and 3.2, the real key for successful installation is physical
stability and 360-degree clear sky view.
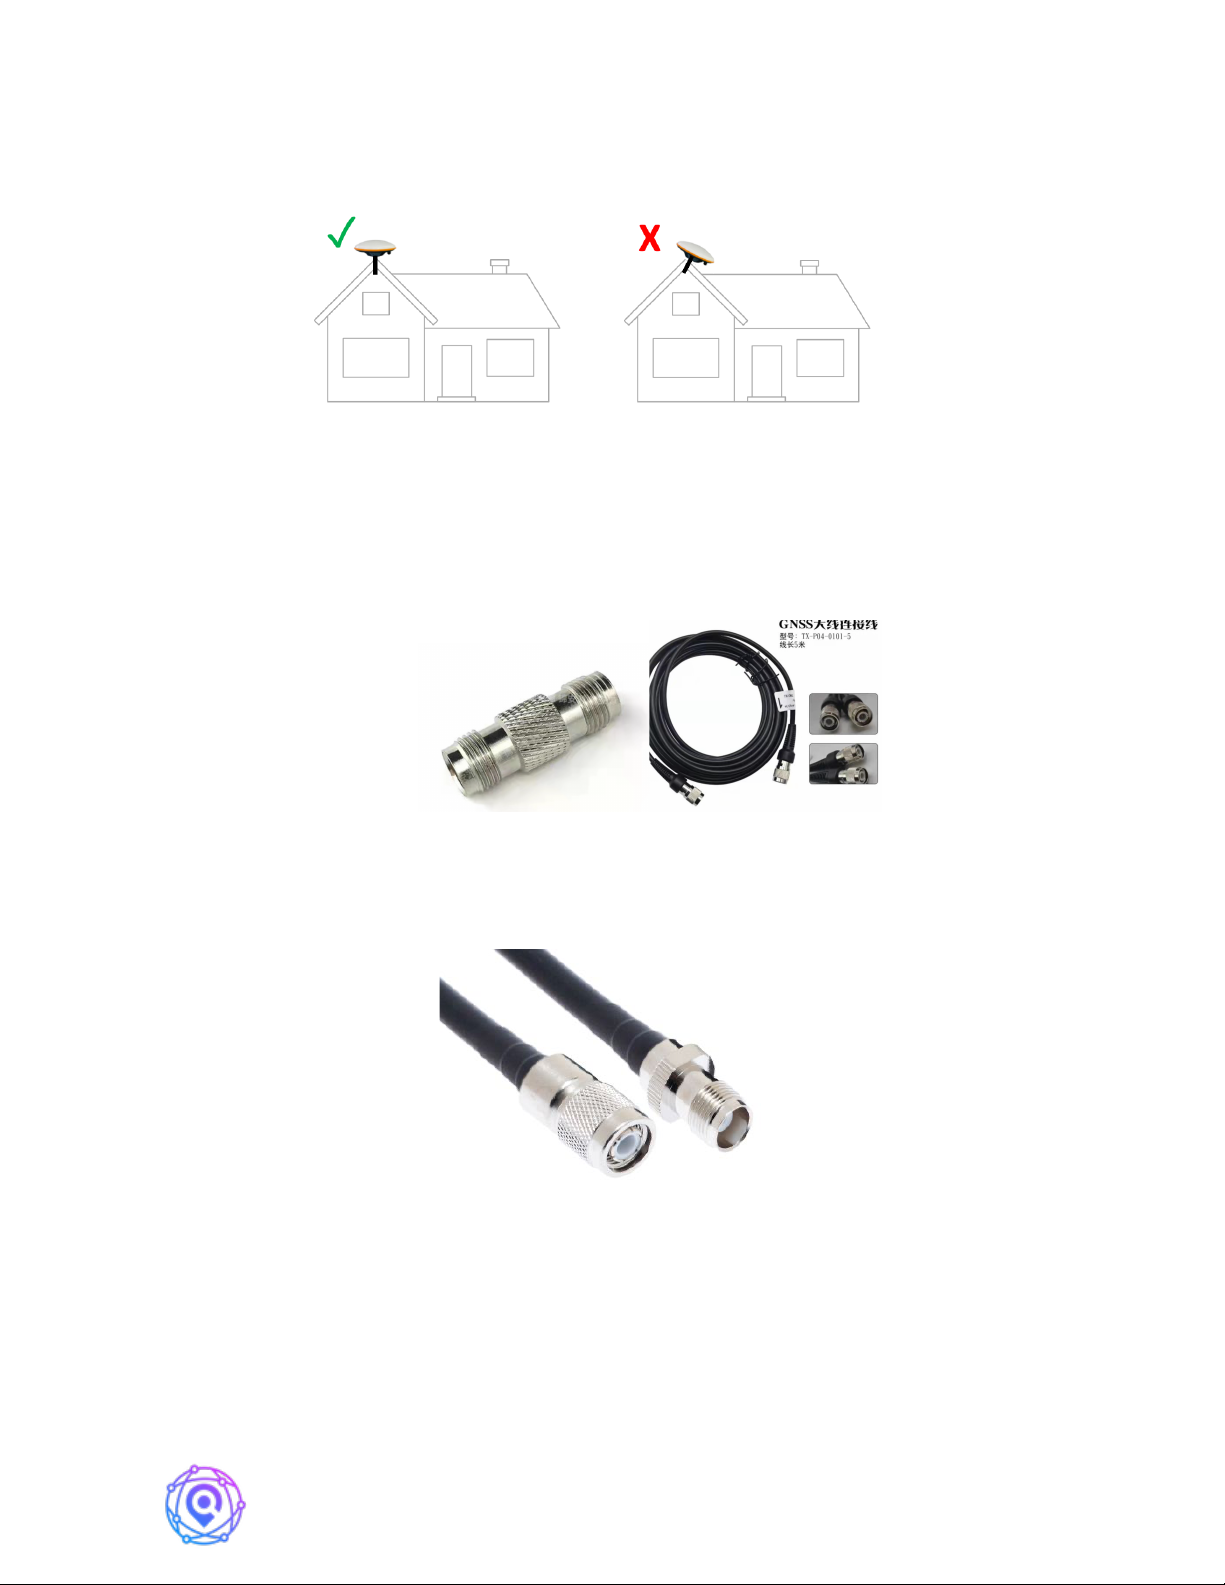
3.1. Choosing a Location
When initially selecting a location, look for an accessible roof-mounted placement
which has clear sky view with a 10 degree elevation angle. The figure below illustrates the
meaning of a 10 degree elevation angle. The left side illustrates a good condition, and the
right side illustrates a problematic condition. Obstructions including nearby trees, buildings,
and other roof mounted features are all possible sources of multi-path reflections as well as
blockage of the overhead satellites. When obstructions are below a 10 degree elevation angle,
they will not impact the measurements. The selected location should also be no more than
30m from the receiver location, and the receiver should be installed indoors. The standard
supplied cable is 10m, longer distances will require an extension RF cable (Section 3.3).
3.2. Installing Antennae
First turn off the power on the MobileCM when setting up the GNSS antennae for the
first time. Install the antennae vertically. Do not install it at a tilted angle; see examples
pictured below. The supplied brackets [6] and mounting rod [7] are an installation hardware
option that works well for a simple installation along the roof eave. In some cases, a larger
rod (5/8” thread) or other hardware (e.g., Unistrut) maybe preferrable to the supplied parts.
The brackets should be installed first with the supplied wood screws. Then the rod can be
placed inside the brackets, and the brackets tightened firmly. The rod should not be move by
even 1mm when subject to strong forces. Thread the primary antennae [2] on to the top of the
rod [7], and then connect the primary antennae cable [3]. Connect the other end of the
antenna cable [3] to the MobileCM GNSS port. Turn MobileCM back on and after a few
HYFIX MobileCM Base-station Manual Page 9 of 12
minutes of warm-up time, the ORANGE LED should flash one time per second indicating
reception of Satellite signals.
3.3. RF Extension Cables
In some cases, the supplied RF cable of 10m is not long enough. You can extend this
cable up to 30m using a female-to-female TNC adapter, and additional low-loss RF cable with
TNC male connectors.
Alternatively, you can extend the cable, using a low-loss TNC female to TNC male
cable.
4. Set Up Your Mining Account on the Console
Coming Soon….
HYFIX MobileCM Base-station Manual Page 10 of 12
5. Learning More
The use of terrestrial GNSS ground network data is diverse and spans both
commercial and scientific cases. The following sources provide additional background.
5.1. GNSS System & Space Weather
Navipedia - European Space Agency
Space Weather Prediction Center - NOAA
GNSS Market Report – European Space Agency
5.2. GNSS Correction Networks for Precise Location
GNSS Corrections Demystified – Septentrio
RTK Networks – What, Why, Where? – GPS World
Network RTK for Automated Driving – Swedish Government and Industry Study
6. Debug and Getting Help
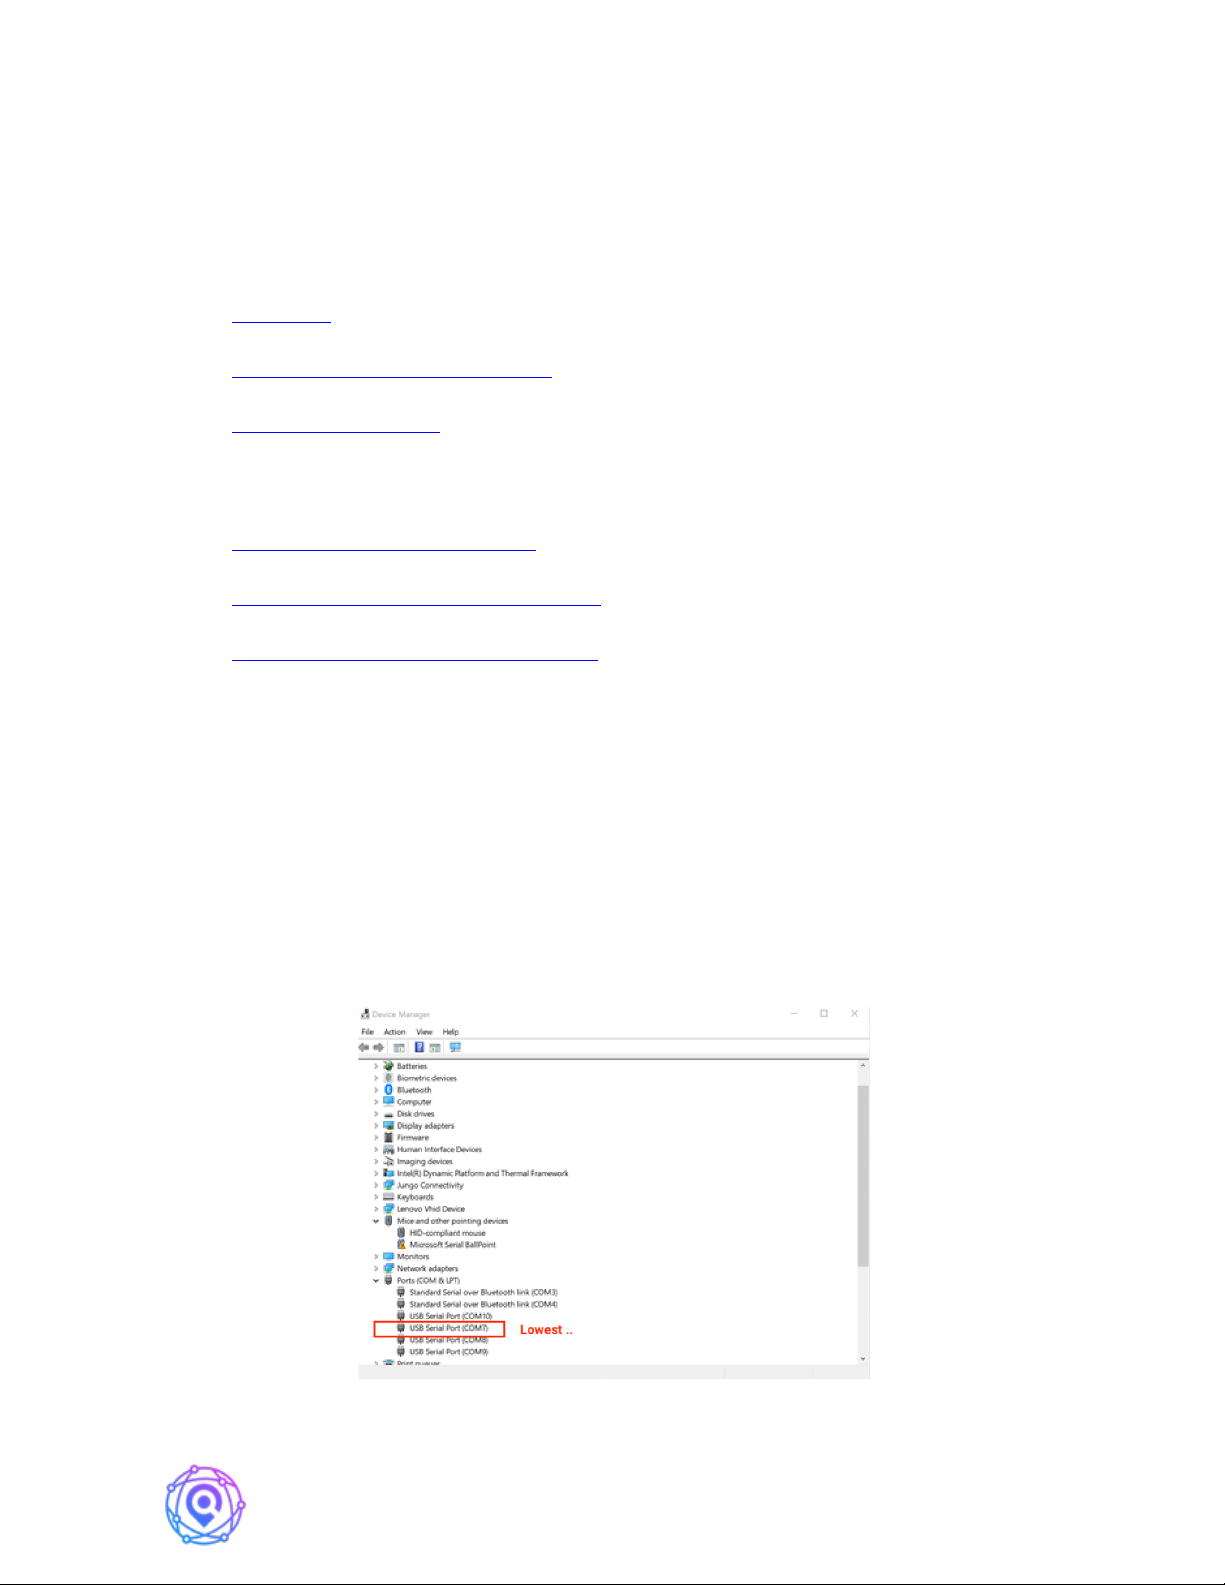
In the case, that you are having problems finding your MobileCM IP and/or
understanding connection status, you can poll this information thru the USB COM port.
Step 1: Plug the USB Cable into a PC or MAC
Step 2: Find the list of four virtual COM ports which will automatically appear. The
debug port is the lowest numbered port number in the group of four ports created by the
MobileCM.
Table des matières


