
HotBrick VPN Client Manuel utilisateur

HotBrick VPN Client
User Manual

HotBrick VPN Client User Manual Property of HotBrick — 2005 2
Table of Content
1INTRODUCTION 3
2INSTALL 3
2.1 Software installation 3
2.2 Evaluation Period 4
3SOFTWARE MANIPULATION 4
3.1 System Tray 4
3.2 Hidden User interface 5
3.3 Main window 5
4CONFIGURATION 7
4.1 USB Mode 7
4.2 Configuration Wizard 9
4.3 Tunnel configuration (main window) 11
4.4 Authentication or Phase 1 12
4.5 IPSec Configuration or Phase 2 14
4.6 Certificate management15
4.7 Global Parameters 16
4.8 Configuration management 17
4.9 Tunnel management (Connections) 17
4.10 Configuration tools 18
4.11 Console 19
5UNINSTALL 20
5.1 Software uninstall 20
6TROUBLESHOOTINGS ERRO! INDICADOR NÃO DEFINIDO.
7CONTACTS 20

HotBrick VPN Client User Manual Property of HotBrick — 2005 3
1 Introduction
HotBrick VPN client is a complete IPSec VPN solution for all Windows versions. It provides full IKE support
(preshared keying and X509 certificates) and Nat Traversal. It is compatible with most of the currently available
IPSec gateways and also operates as a peer-to-peer VPN in a “point – to – multiple" mode, without a gateway
or server.
HotBrick VPN Client provides 3DES, DES and AES encryption and MD5 and SHA authentication.
• Our IPSec client is the result of many years of experience in network security and Windows network driver
development, as well as extensive research in related areas.
• Our IKE implementation is based on the OpenBSD 3.1 implementation (ISAKMPD), thus providing best com-
patibility with existing IPSec routers and gateways.
Our offer is specially designed to target OEM clients and System Integrators. We provide a fully functional VPN
Client solution to complete existing offers. Our IPSec VPN Client can be re-branded and source code license is
available on demand.
The VPN IPSec Client completes our range of network security products and like all our products is easy to use
and to install.
HotBrick VPN IPSec Client is compatible with all current Windows versions: 9x, ME, NT4, 2000, XP.
2 Install
2.1 Software installation
HotBrick VPN client installation is a classical Windows installation that does not require specific information.
After completing the installation, you will be asked to reboot your computer.
Caution: On Windows NT, 2000 and XP, you must have administrator rights. If it is not the case, the installation
stops after the language choice with an error message.
After reboot and session login, a window appears for a license number request.

HotBrick VPN Client User Manual Property of HotBrick — 2005 4
The license number is a string with hexadecimal characters as "0123456789ABCDEF0123". An error message
warns user if this value is false.
If the License number is correct, HotBrick VPN Client is activated. You can then find a green/red icon in the
taskbar. Right and left click give access to the configuration user interface and “Quit” command.
Shortcuts: After software installation, HotBrick VPN window can belaunched:
• from user desktop, by double-clicking on HotBrick VPN shortcut
• from VPN Client icon available in the taskbar
• from menu Start > Programs > HotBrick > VPN > HotBrick VPN
2.2 Evaluation Period
It is possible to use HotBrick IPSec VPN Client during the evaluation period (i.e. limited to 30 days) by clicking
on "Trial" button. When the IPSec VPN Client is on "Evaluation" mode, the register window appears at each
boot of the client.
3 Software manipulation
HotBrick VPN Client is fully autonomous and can start and stop tunnels without user intervention, depending on
traffic to certain destinations. However it requires configuration.
The VPN Client configuration is defined in a configuration file. The software user interface allows creating, modi-
fying, saving, exporting or importing the configurations.

HotBrick VPN Client User Manual Property of HotBrick — 2005 5
3.1 System Tray
The configuration user interface can be launch via a double click on application icon (Desktop or Windows Start
menu) or by single click on application icon in system tray. Once launched, the VPN Client software shows an
icon in the system tray that indicates whether a tunnel is opened or not, using color code.
3.1.1 Color code is the following
Red icon: no VPN tunnel is established
Green icon: at least one VPN tunnel is established
Tool tips over VPN Client icon shows the connection status of the VPN tunnel:
• "Tunnel tunnelname" when one or more tunnels are established
• "Wait VPN ready..." when the IKE service is reinitializing
• "HotBrick VPN Client" when the client is up but with no established tunnel.
A left-button click on VPN icon opens configuration user interface. A right-button click shows the following menu:
• "Quit" will close established VPN tunnels, stops the configuration user interface.
• "Save & Apply" will close established VPN tunnels and reopen all the VPN tunnels.
• "Console" shows log window.
• "Connections" opens the list of already established VPN tunnels. You can configure tunnels to open up auto-
matically when the software starts.
3.2 Hidden User interface
The configuration user interface can be hidden to the end user. We provide configuration tools for IT managers
that prevent the end user from changing their configuration. Access to the configuration user interface can be
restricted with configuration tool VPNHIDE. See section 4.10.3 page 18.
In that case, the Main window can not be opened and showed by double-clicking on desktop icon, by selecting
Start menu. Right-click over the icon in taskbar is limited to "Console" access:

HotBrick VPN Client User Manual Property of HotBrick — 2005 6
3.3 Main window
The main window is made of several elements:
• A tree list window (left column) that contains all the IKE and IPSec configuration
• Three buttons '”Console”, “Parameters” et “Connections” (left column)
• A configuration window (right column) that shows the associated tree level.
3.3.1 Main menus
• “File” menu is used for saving and loading a configuration. With this menu, you can import or export
VPN configuration.
• 'Configuration' menu contains all actions from tree control right-click menu
• 'Configuration' menu gives also access to the configuration wizard.
• 'Tools' menu contains 'Console' and 'Connections' choice.

HotBrick VPN Client User Manual Property of HotBrick — 2005 7
• '?' menu gives access to online help and window 'About'.
3.3.2 Status bar
The status bar displays several information:
• The “USB Token box” (left side) indicates whether the “USB mode” is set “On” or “Off” (see also sec-
tion 4.1 page 7). In case it is set “On”, “USB” will appear.
• The “central box” gives some information about VPN Client Software status (e.g. “opening tunnel in
progress”, “saving configuration rules in progress”, “VPN client start up in progress”, …)
• The “light box” (right side) gives some information about tunnels (e.g. red light means at least one tun-
nels is open, green light means notunnel open, gray light means VPN Client restart pending)
3.3.3 Window 'About'
The 'About' window provides the VPN Client software version. There is also an URL to our web site.
4 Configuration
You’ll find a set of useful VPN Client configuration documents available for each of the VPN Client gateway we
support. Please go to our knowledge base on our website: http://www.hotbrick.com.br/vpnclient_list.htm
4.1 USB Mode
The VPN Client 2.5 brings the capability to secure tunnel security elements by the use of a USB Stick.
Once the "USB mode" is set “On”, you just need to insert the USB stick to automatically open tunnels. And you
just need to unplug the USB stick to automatically close all established tunnels. In that mode, no tunnel can be
opened.
When you select “USB mode”, the tunnel security elements contained into the configuration are stored onto the
USB stick the first time you plug it in.
HotBrick VPN Client User Manual Property of HotBrick — 2005 8
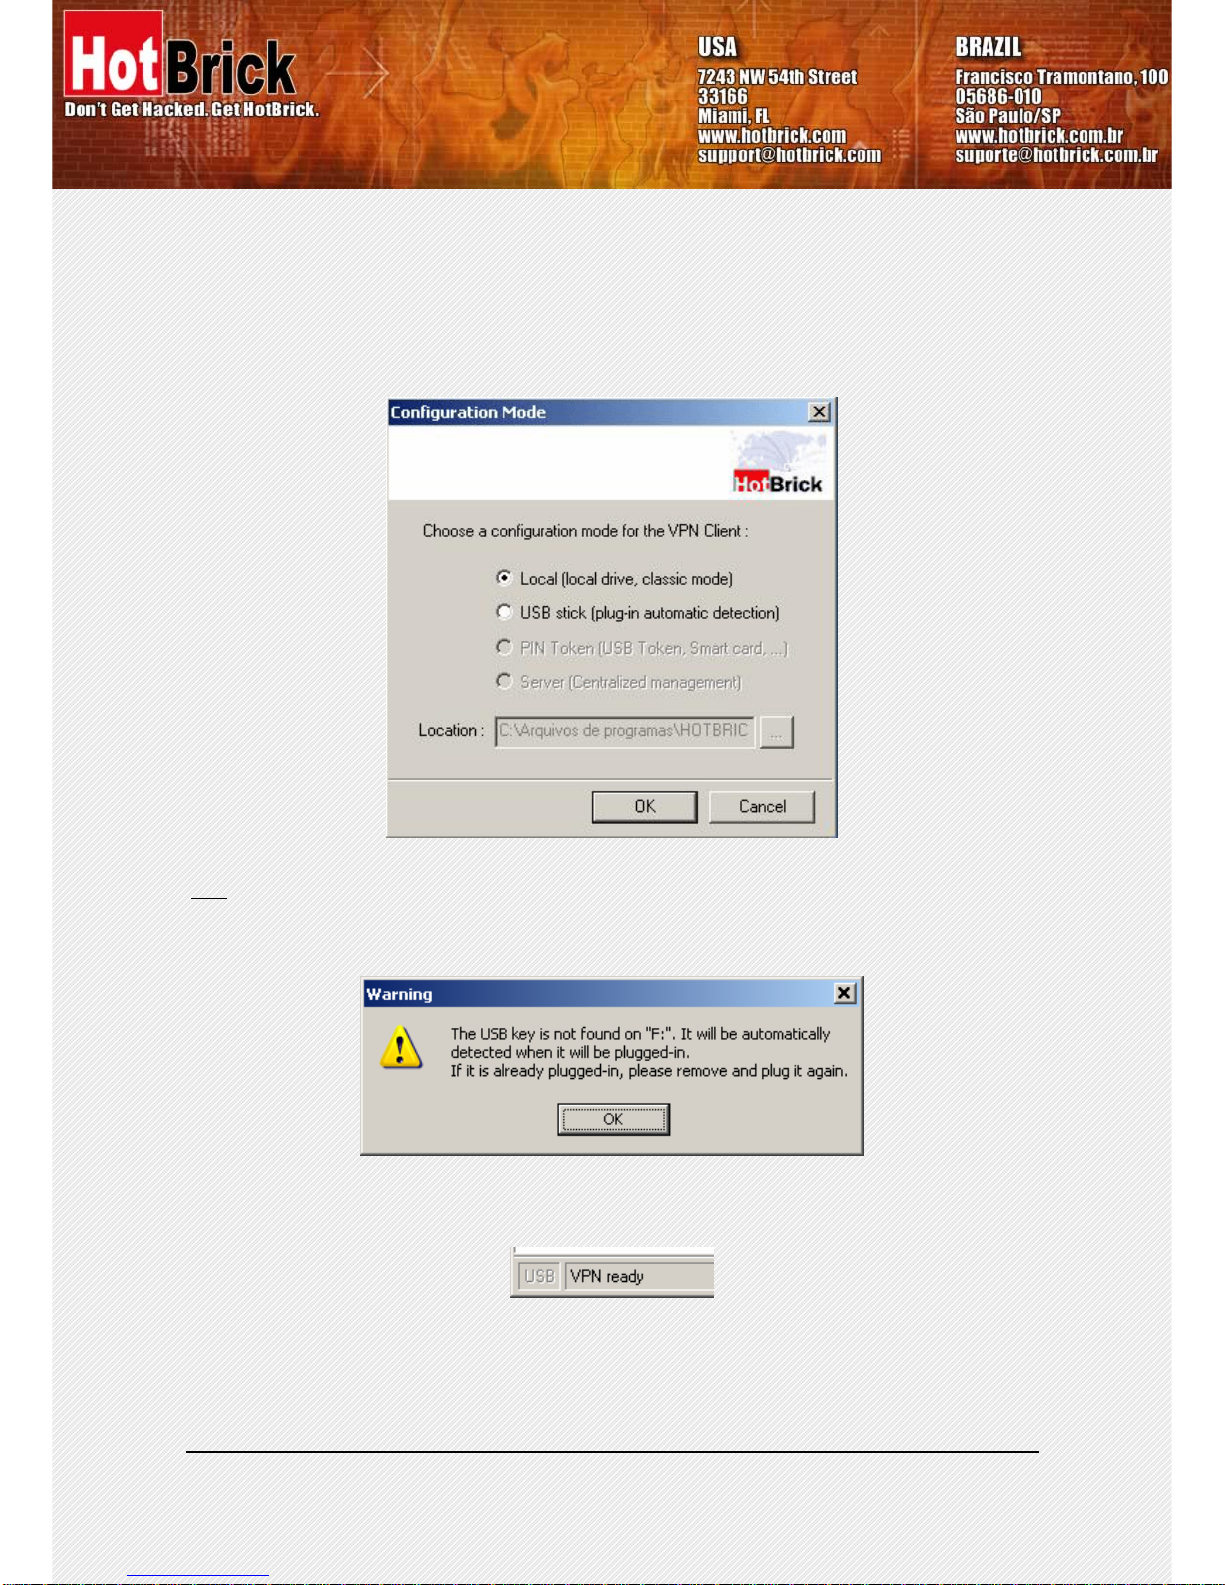
4.1.1 How to set “USB mode" on?
• Select menu File > Configuration Mode
• Select USB Stick
• Optional: indicates the drive of the USB stick if you’ve plugged it in
Note: At this stage, if an USB stick containing a VPN configuration with tunnel security elements is already
plugged in, the associated drive will be automatically recognized. Please note also that this is not necessary to
insert a USB Stick during this step. In case no USB Stick is plugged in, the following pop window will inform the
user:
Once USB mode is set on, the “USB token box” (status bar) shows “USB”. The text is gray (i.e. see below) if no
USB stick is plugged in. The text is plain when a USB Stick is plugged in.
4.1.2 How to enable the USB Stick?
When you insert a new USB stick, the IPSec VPN Client automatically propose to enable the USB stick through
the following options:

HotBrick VPN Client User Manual Property of HotBrick — 2005 9
• Copying the configuration onto the USB stick: the VPN client will copy the configuration onto the USB
Stick and leave a copy in the computer. This is used by IT managers to enable multiple USB Sticks for
multiple users.
• Moving the configuration onto the USB stick: the VPN client will copy the configuration onto the USB
Stick and remove all configuration information from the computer. This method is used to secure a
computer once VPN configuration completed setup.
4.1.3 How to open tunnels automatically when an USB stick is plugged in?
Each and every tunnel must be configured individually:
• Select one tunnel by clicking on IPSec Configuration (Phase 2) in the tree list window (see section 4.5)
• Set the mode "Auto open when USB stick plugged in" on
4.2 Configuration Wizard
HotBrick IPSec VPN client integrates a Configuration Wizard that allows the creation of VPN configuration in
three easy steps.
This wizard is designed for remote computers that need to get connected to a corporate LAN through a VPN
gateway. Let take the following example:
• The remote computer has a dynamically provided public IP address.
• It tries to connect the Corporate LAN behind a VPN gateway that has a DNS address
"gateway.mydomain.com".
• The Corporate LAN address is 192.168.1.xxx. E.g. the remote computer wants to reach a server with
the IP address: 192.168.1.100.

HotBrick VPN Client User Manual Property of HotBrick — 2005 10
For configuring this connection, open wizard's window by selecting menu "Configuration > Wizard"
4.2.1 Step 1 of 3
You specify the type of the equipment at the end of the tunnel: VPN gateway.
4.2.2 Step 2 of 3
You must specify the following information:
• the public (network side) address of the gateway
Table des matières


