Headwaver TAG Manuel utilisateur


Welcome
Headwaver!

1
B
B
A
A
E
D
C
B
A
87654321
A
B
C
D
E
F
12345
CAD-Zeichnung darf nicht manuell geaendert werden
Schutzvermerk nach DIN 34 -
ISO 16016 beachten
All rights reserved ISO 16016
Form
A2
CAD
Unit
mm
0.2
0.2
0.2
0.4
1.5
Dateiname des Zeichnungsobjektes/file name part:
11117-000-00
Dateityp/type
ASSEM
Dateiname der Zeichnung/ file name drawing:
11117-000-02
Allgemeintol.
general tolerances
DIN ISO
16742 TG3
Maßstab/scale 1:1 Gew./weight:0.2956kg
Werkstoff/material: -
Halbzeug/beginning part: -
Dat./date Name/name Benennung/title:
HEADWAVE
ASSEMBLY
Bear. 19-Jun-15 Rossow
B-B
A-A
61
123
40.6
1.6
0.5
0.2
0.4
0.6
Gepr.
Norm
Zeichnungsnummer/drawing number:
11117-000-03
Blatt/page
1
2 Bl./pages
Nr./no
Ändg./modification
Dat./date
Name (Urspr.) (Ers.f.:) (Ers.d.:)
TAPE
Button
Charging
LEDs Tape
Tape Cover
Headwave TĀG
2

3
English
Included in Packaging:
1 Headwave TĀG (mounting tape already attached)
1 Replacement mounting tape
1 Charging cable
1 Manual
Before Mounting
Connect charging cable to Headwave TĀG and proper charging
outlet (any computer USB port should be suitable).
Leave to charge until LED light displays continuous
GREEN (indicates battery is fully charged).

4
English
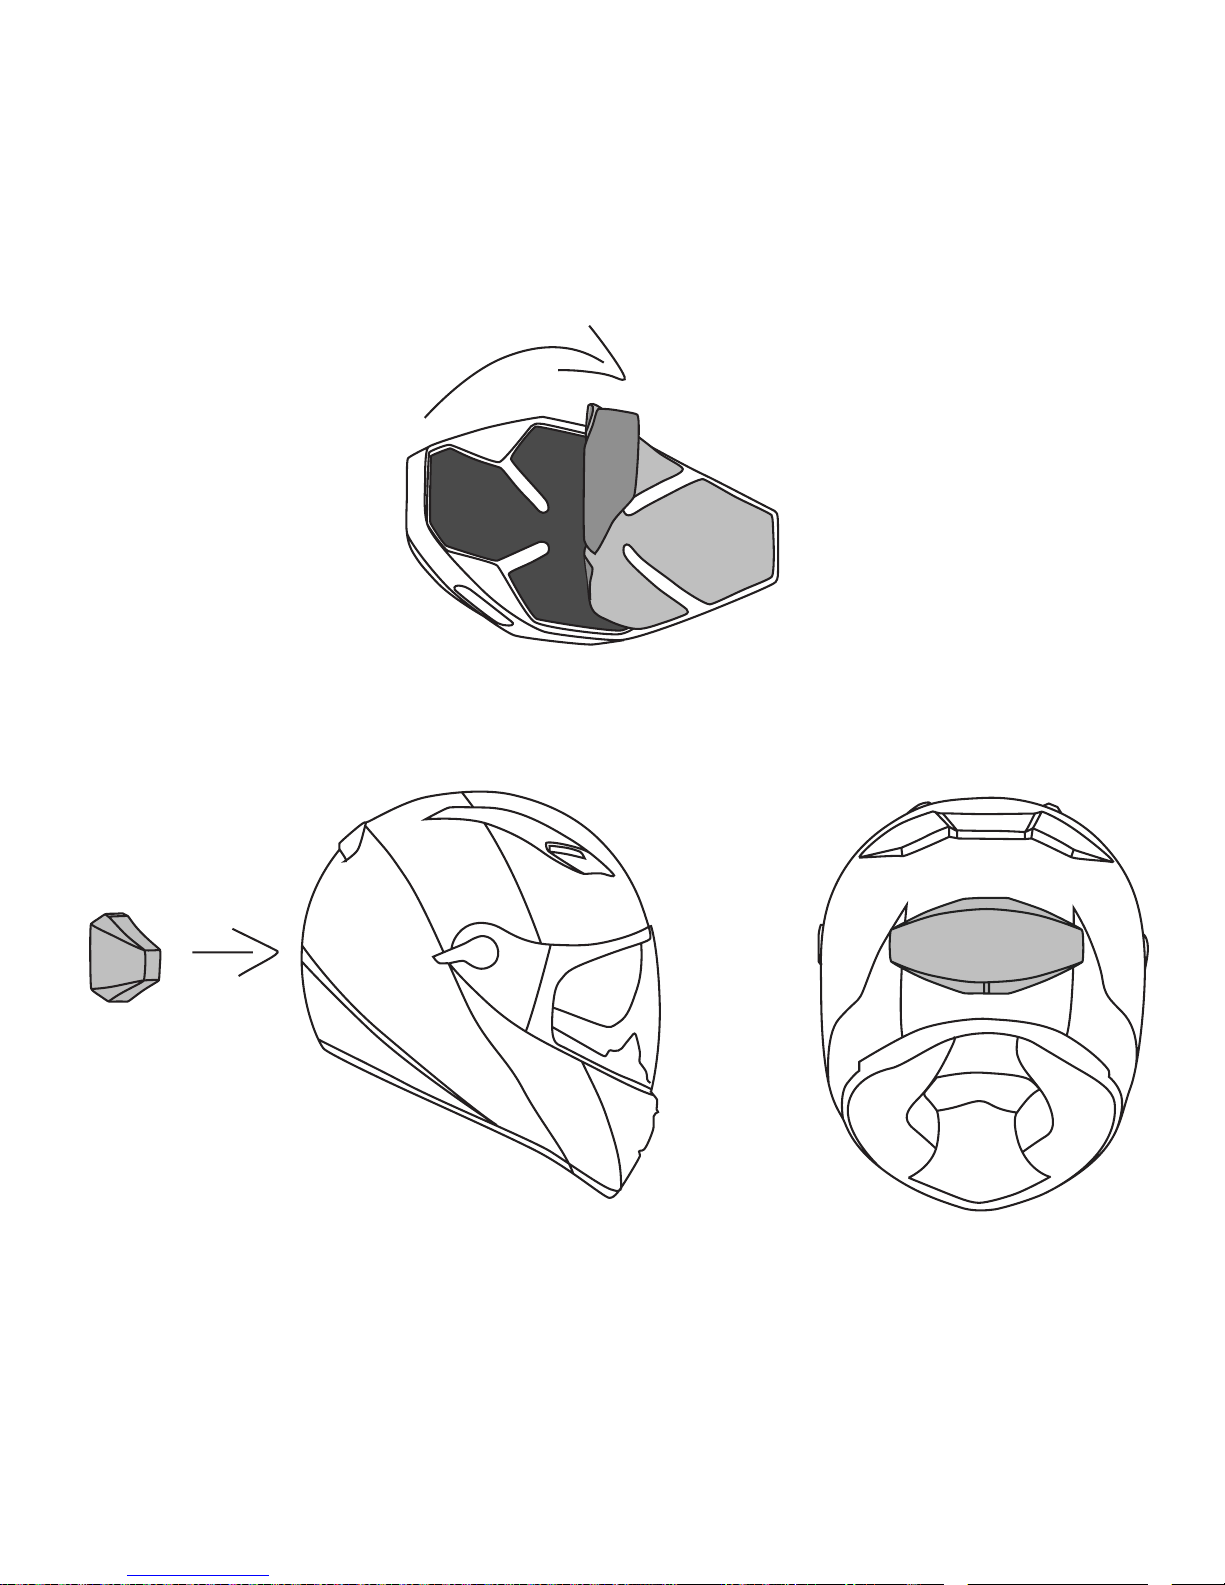
Mounting Headwave TĀG
Identify area on the back the helmet, close to the center,
both vertically and horizontally.
Clean this area - It must be free from oil, dust and humidity upon mounting.
Remove the backing of the mounting tape already preattached
to Headwave TĀG. Gently place Headwave TĀG in the horizontal
position against the identied area. Please make sure that
the entire product is rmly axed to your helmet.
Depending on your helmet’s curvature, the edges may not
be ush against the helmet’s surface. If so, gently push on
each side until the edges are rmly axed. TĀG is designed to
accommodate some exing, so don’t worry about damaging it.

5
English
Using Headwave TĀG
1. Press the button once to power the unit on. The
LEDs are green while turning one.
2. If you haven’t paired the device already the LEDs blink blue to indicate
it’s searching for a connection. If you have paired the device already
and the LEDs are GREEN then you can skip the next two steps.
3. Go to your mobile device and to Bluetooth® settings. The device should
be listed as “Headwave TAG”. If a key is required please enter 0000.
4. Once it’s paired, the LEDs switch to GREEN.
5. Headwave TĀG is capable of streaming music over Bluetooth® either
from a mobile phone or any other Bluetooth® device supporting
A2DP. Once you have paired TĀG with your device, use your
music player to play, pause, stop, skip and adjust the volume.
6. To power o, press and hold the button for
2 seconds. The LED will turn o.

6
English
7. To connect a new device, please turn your Bluetooth® o or disconnect
Headwave TĀG in the Bluetooth® settings of your Bluetooth® device. If
TĀG cannot nd a already paired device it will switch into pairing mode.
Event
Press Button once (short) Product on GREEN Ascending tones
Press Button long (2 sec.) Product o O Descending tones
Bluetooth® not connected Pairing Mode BLUE -
Press Button once short
while streaming
Pause GREEN -
Battery low Battery low RED + GREEN 1x Alerting sound
Battery very low Battery very low RED + GREEN 2x Alerting sound
No connection for 10 min. Product o O Decreasing tone
Plug charger on Charging RED One short tone
Temperature too high (>60°C) Product o O Descending tones

7
English
Removing Headwave TĀG
NOTE: We don’t recommend removing TĀG, unless you wish to switch helmets.
Also, using any tools to remove TĀG may result in damage to your helmet.
Gently pull on the top of TĀG. It should slowly come away.
After TĀG is completely removed, gently peel away mounting
tape. It should come o without any additional tools.
If you wish to re-mount TĀG on a helmet, please nd the replacement
mounting Tape, and attach to the backside of TĀG.

8
English
Warranty, Terms and Conditions:
We at Headwave value both your patronage
and your safety. If at any time, the use of this
product aects or impairs your judgment
or abilities, please refrain from usage.
If at any time you are dissatised with
your purchase, please contact us and we
will do our best to rectify the situation.
This product may be used while operating
a motorcycle or motorized vehicle. Please
exercise caution and good judgment,
and be aware of your surroundings
at all time. Always drive safely, avoid
distractions and obey all local trac laws!
Safety Guidelines:
Prior to use, please follow these
steps: Before putting on the product,
adjust the volume control to its lowest
level. Put the product on slowly, and
then adjust the volume control to
a comfortable and safe level.
During the use of the product: Keep the
volume at the lowest functional level;
if higher volume is necessary, adjust
slowly and carefully. If you experience
any discomfort or ringing in your ears,
discontinue usage immediately. Continued
use at high volumes may result in
permanent damage to your hearing without
any obvious or noticeable discomfort.
Safety Information:
This product contains some small parts that
may be hazardous to children. Always store
the product out of reach from children, as the
parts may cause a choking risk if ingested.
Never dismantle the product yourself or
attempt to insert/add-on additional parts.
Doing so will not only void the warranty, but
it may also cause short circuits, which could
result in electrical shocks, or start a re.
Observe all signs, instructions and
regulations that require an electrical
device or RF radio product to be switched
o, such as in aircrafts or hospitals.
This product contains LiPoly batteries.
Do not leave the battery discharged or
unused for extended periods of time. If
the product will be unused for extended
periods, leave the batteries fully charged
Table des matières
Langues :
Manuels Intervenants populaires d'autres marques


Bowers & Wilkins
Bowers & Wilkins 4 Manuel utilisateur

Sonance
Sonance SONOS OUTDOOR Series Manuel utilisateur

Electro-Voice
Electro-Voice EVID FM4.2 Manuel utilisateur

Pioneer
Pioneer XW-HTD630 Manuel utilisateur

Onn
Onn BWA16AA002 Manuel utilisateur

HP
HP GL313AA - USB Speakers PC Multimedia Manuel utilisateur