HCL Beanstalk Ultima Manuel utilisateur

LEAF TOUCH PC
USER MANUAL

Preface
TABLE OF CONTENTS
Overview.............................................................................................. 1-1
Packing Contents............................................................................................
System Overview............................................................................................
Mainboard Specifications................................................................................
System Specifications.....................................................................................
Component Replacement & Upgrade ............................................................
Getting Started .................................................................................... 2-1
Safety & Comfort tips ....................................................................................... 2-2
..........................................................................
Knowing the Keyboard (Optional)...................................................................
Positioning your system..................................................................................
Connecting Peripheral Devices.......................................................................
Connecting Power.........................................................................................
ystem Operations.............................................................................. 3-1
System Booting Setup for the first time...........................................................
Premium sound (Optional) .....................................................................
Screen Display (OSD)...............................................................................
........................................................................................
Power Management
1.
2.
3. S
SRS
On-
1-2
1-3
1-9
1-10
1-11
2-3
2-4
2-6
2-7
2-12
3-2
3-3
3-5
3-9
Having Good Working Habits
......................................................................................
Multi-Touch Gesture 3-8

Chapter 1
Overview
Beanstalk Ultima is integrated in design, selecting a stylish app-
earance with a glassy frame, which displays the simplicity of
modern individualism and the comfort of home. Furthermore, it
is accompanied with the best computer features, such as instant
message, low acoustics, energy saving and 802.11 b/g/n wire-
less internet capability so you may roam freely in the realm of
cyberspace.

1-2
Overview
PACKING
* The picture is for your reference only and your packing contents may slightly vary
depending on the model you purchased.
Beanstalk Series AC/ DC Adapter AC Power Cord
User Manual &
Quick Guide
Driver/Utility Disk
LCD Display Wiper
Mouse (Optional)
Keyboard (Optional) Stylus (Optional)
CONTENTS

1-3
SYSTEM OVERVIEW
Front View
1 Microphone
- The built-in microphone can be used for video chatting online.
2 Webcam
- The built-in webcam with the microphone can be used for picture tak-
ing, video recoding, online conferencing and any other interactive ap-
plications.
3 IR Receiver (Optional)
- This infrared receiver is provided for remote control.
4 LCD Display
- The 21.5-inch TFT LCD display is with an optimal resolution of 1920 X
1080 and standard proportion of 16:9 widescreen.
Stereo Speakers
- The built-in stereo speakers deliver high quality sound blaster with ste-
reo system and Hi-Fi function supported.
1
4
2
3
5
5
Overview

1-4
Overview
Important
We suggest that you connect the AC/ DC adapter to your AIO PC first and then
connect the AC power cord to the socket-outlet for safety concerns.
Rear View
1
1
2
3
4
5
1
6 7 8 9 10
12
8
11

1-5
1 Ventilator
- The ventilator on the enclosure is used for air convection and to pre-
vent the equipment from overheating. Do not cover the ventilator.
2 Optical Disk Drive
- A DVD Super-Multi drive is integrated for your home entertainment
(Blue-ray is optional).
3 Card Reader Drive
- The built-in card reader may support various types of memory card,
such as XD (eXtreme Digital), SD (Secure Digital), SDHC (SD High
Capacity), MS (Memory Stick), MS Pro (Memory Stick Pro) or MMC
(Multi-Media Card) cards that usually used in devices like digital cam-
eras, MP3 players, mobile phones and PDAs. Contact the local dealer
for further information and please be noted that the supported memory
cards may vary without notice.
4 Stand
- Use this stand to position your system on a fat and stable surface.
5 Cable Routing Hole
- Route the cables through the cable routing hole to avoid cable spa-
ghetti when connecting devices.
6 Power Jack
- The power adapter converts AC power to DC power for this jack. Pow-
er supplied through this jack supplies power to the PC. To prevent
damage to the PC, always use the supplied power adapter.
7 VGA - In Port (Optional)
The DB15-pin female connector is provided.
8 USB Port
- The USB (Universal Serial Bus) port is provided for attaching USB
devices such as mouse, keyboard, printer, scanner, camera, PDA or
other USB-compatible devices.
9 E-SATA Port (Optional)
The E-SATA (External-SATA) port is provided for E-SATA hard disk
drives.
Overview
1-6
Overview
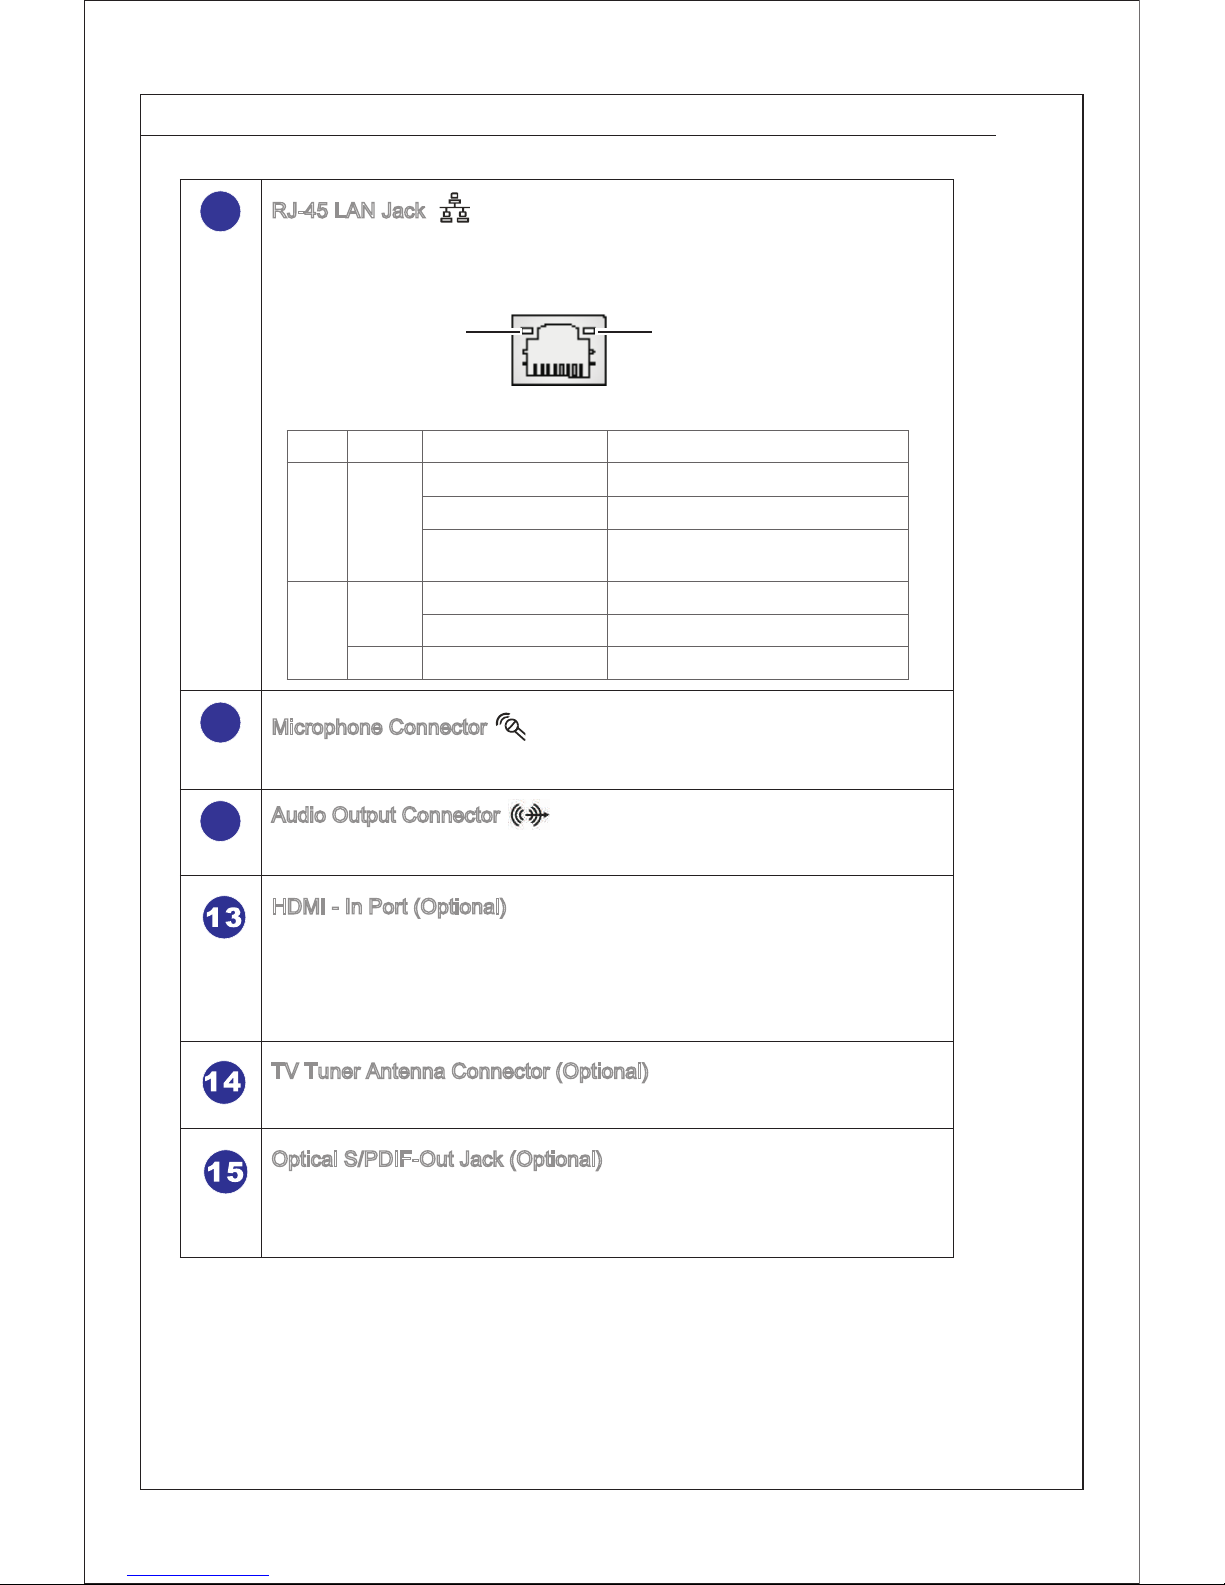
10 RJ-45 LAN Jack
- The standard RJ-45 LAN jack is provided for connection to the Local
Area Network (LAN). You can connect a network cable to it.
Green/ OrangeYellow
LED Color LED State Condition
Left Yellow Off LAN link is not established.
On (steady state) LAN link is established.
On (brighter & pulsing) The computer is communicating with
another computer on the LAN.
Right Green Off 10 Mbit/sec data rate is selected.
On 100 Mbit/sec data rate is selected.
Orange On 1000 Mbit/sec data rate is selected.
11 Microphone Connector
- This connector is provided for microphones.
12 Audio Output Connector
- This connector is provided for headphones or speakers.
HDMI - In Port (Optional)
- The High-Definition Multimedia Interface (HDMI) is an all-digital audio/
video interface capable of transmitting uncompressed streams. HDMI
supports all TV format, including standard, enhanced or high-definition
video, plus multi-channel digital audio on a single cable.
TV Tuner Antenna Connector (Optional)
- This connector is for TV antenna.
Optical S/PDIF-Out Jack (Optional)
- This S/PDIF (Sony & Philips Digital Interconnect Format) jack is pro-
vided for digital audio transmission to external speakers through an
optical fiber cable.

1-7
1
2
3
4
5
Side View
1 Optical Disk Drive
- A DVD Super-Multi drive is integrated for your home entertainment
(Blue-ray is optional).
2 Eject Button
- Press the eject button to open the optical disk drive.
3 Eject Hole
- Insert a thin, straight object (such as a paper clip) into the eject hole to
open the optical disk drive manually if the eject button does not work.
4 Card Reader Drive
- The built-in card reader may support various types of memory card,
such as XD (eXtreme Digital), SD (Secure Digital), SDHC (SD High
Capacity), MS (Memory Stick), MS Pro (Memory Stick Pro) or MMC
(Multi-Media Card) cards that usually used in devices like digital cam-
eras, MP3 players, mobile phones and PDAs. Contact the local dealer
for further information and please be noted that the supported memory
cards may vary without notice.
7
8
9
10
11
6
Overview

1-8
Overview
5 USB Ports
- The USB (Universal Serial Bus) port is provided for attaching USB
devices such as mouse, keyboard, printer, scanner, camera, PDA or
other USB-compatible devices.
6 System Power Button/LED
- Press the system power button to turn the system on or off.
The power LED glows when the system is turned on and goes off when
the system is shut down.
In terms of power saving, the LED blinks in S3 (Suspend to RAM)
mode and goes off in S4 (Suspend to Disk) mode. Pressing the system
power button will wake the system up from power saving mode.
7 MENU Button
- Press this button to view the OSD menu or enter into the sub menu.
8 Right Button
- This button indicates the cursor movement or OSD manual selection
in incremental values.
9 Left Button
- This button indicates the cursor movement or OSD manual selection
in decremental values.
10 AUTO Button
- Press this button to view the video mode menu or exit the submenu.
11 LCD Power Button
- Press this button to power ON/OFF the monitor.
Table des matières
Manuels Écran tactile populaires d'autres marques


IBASE Technology
IBASE Technology ASTUT-152-RE1S Manuel utilisateur

YASKAWA
YASKAWA TP 610C Manuel utilisateur

B&R
B&R Power Panel C Series Manuel utilisateur

Beijer Electronics
Beijer Electronics X2 control Manuel utilisateur

AXIOMTEK
AXIOMTEK GOT321W-521 Manuel utilisateur

TRIDONIC.ATCO
TRIDONIC.ATCO x-touchBOX Manuel utilisateur


