Havener Enterprises EVEN CUT Manuel utilisateur

1
Sept. 10th 2023

2
TABLE OF CONTENTS
About This Manual ................................................................................................................3
Warranty Statement ..............................................................................................................4
Safety Information .................................................................................................................5
Operation of Equipment ........................................................................................................6
Assembly
Attaching The Handle ....................................................................................................7
Fill Engine With Oil ........................................................................................................ 7
Installing The Throttle Wire ........................................................................................... 8
Fuel Specification .......................................................................................................... 8
Operating Your Edger/Trimmer
Correct Engine Operation ............................................................................................. 8
Adjusting Cutterhead Angle ...........................................................................................8
Clutch And Depth Lever Settings ..................................................................................9
Starting The Engine .......................................................................................................9
Engaging the Drive Belt ................................................................................................ 9
Stopping the Edger ........................................................................................................9
Wheel Positioning ........................................................................................................10
Curb Riding Position ....................................................................................................10
Correct Edger/Trimmer Usage
Operation of the Trimmer/Edger ..................................................................................11
Maintaining Your Edger/Trimmer
Maintenance Checklist ................................................................................................ 11
Spark Plugs ..................................................................................................................11
Blade Maintenance ......................................................................................................12
Changing Blades ......................................................................................................... 12
Lubrication ................................................................................................................... 12
Storage Instructions .................................................................................................... 12
Edger Illustrated Parts List ............................................................................................ 13-17
Troubleshooting Check List ...........................................................................................18-21
Product Registration ........................................................................................................... 22

3
About This Manual
This owner’s manual is considered a permanent part of the edger. It must be available to all of the
operators and/or person(s) servicing the edger. Should the unit be resold, this manual must remain
with the unit.
All information, illustrations, and specifications contained in this manual were in effect at the time of
publication. The Manufacturer reserves the right to change, modify, and/or discontinue
specifications and/or design without notice. If there is a change that has been made to your trimmer
which is not shown or reflected in this manual, please see your authorized dealer before operating
and/or servicing the equipment.
Congratulations on the purchase of your new Edger/Trimmer. We are confident that this edger will
provide you with years of excellent performance, durability, and trouble free service when operated
and maintained as directed in this manual.
Should you ever have any questions regarding the operation, maintenance, or safety of your
equipment, please contact your authorized dealer who has been specially trained on operation and
service of this unit.
A space has been provided below to record information about your new Edger/Trimmer. Please
take time to record such information for future reference, especially when you contact an authorized
dealer with questions.

4
Warranty Statement
This edger/trimmer is warranted for one (1) year from the original date of purchase against defects
in material or workmanship, when operated and maintained in accordance with the Owner’s Manual.
The Manufacturer will replace or repair, free of charge, any part of the original equipment returned
to us or our authorized servicing representative with transportation or postage prepaid and which
upon examination shall be defective. The cost of replacing items that are subject to normal wear,
such as but not limited to: air filters, belts, blades, oil filters, and tires, will be borne by the
purchaser/owner unless such wear was caused by a defect in material and workmanship.
This warranty does not cover any unit that has been subject to neglect, negligence, misuse, or
accident, or that has been operated in any way contrary to the operating instructions as specified in
the Owner’s Manual. This warranty does not cover any edger that has been altered or modified
changing performance or durability. In addition, the warranty is not extended to repairs made
necessary by the use of parts or accessories which, in the reasonable judgement of the
Manufacturer are compatible with the edger or adversely affect its operation, performance, or
durability. This warranty is not transferrable.
The Manufacturer assumes no responsibility or incidental, consequential, or other damages
including, but not limited to: expense for gasoline, expense of delivering the equipment to an
authorized dealer and expense of returning it to the owner, mechanic’s travel time, telephone or
communication charges, rental of a like product during the time warranty repairs are being
performed, travel, loss or damage to personal property, loss of revenue, loss of the use of the time
or inconvenience. There are no other expressed or implied warranties and liability for consequential
damages under this warranty and are excluded to the extent exclusions are permitted by law.
No warranty service will be authorized until your registration card has been received by the
Manufacturer.
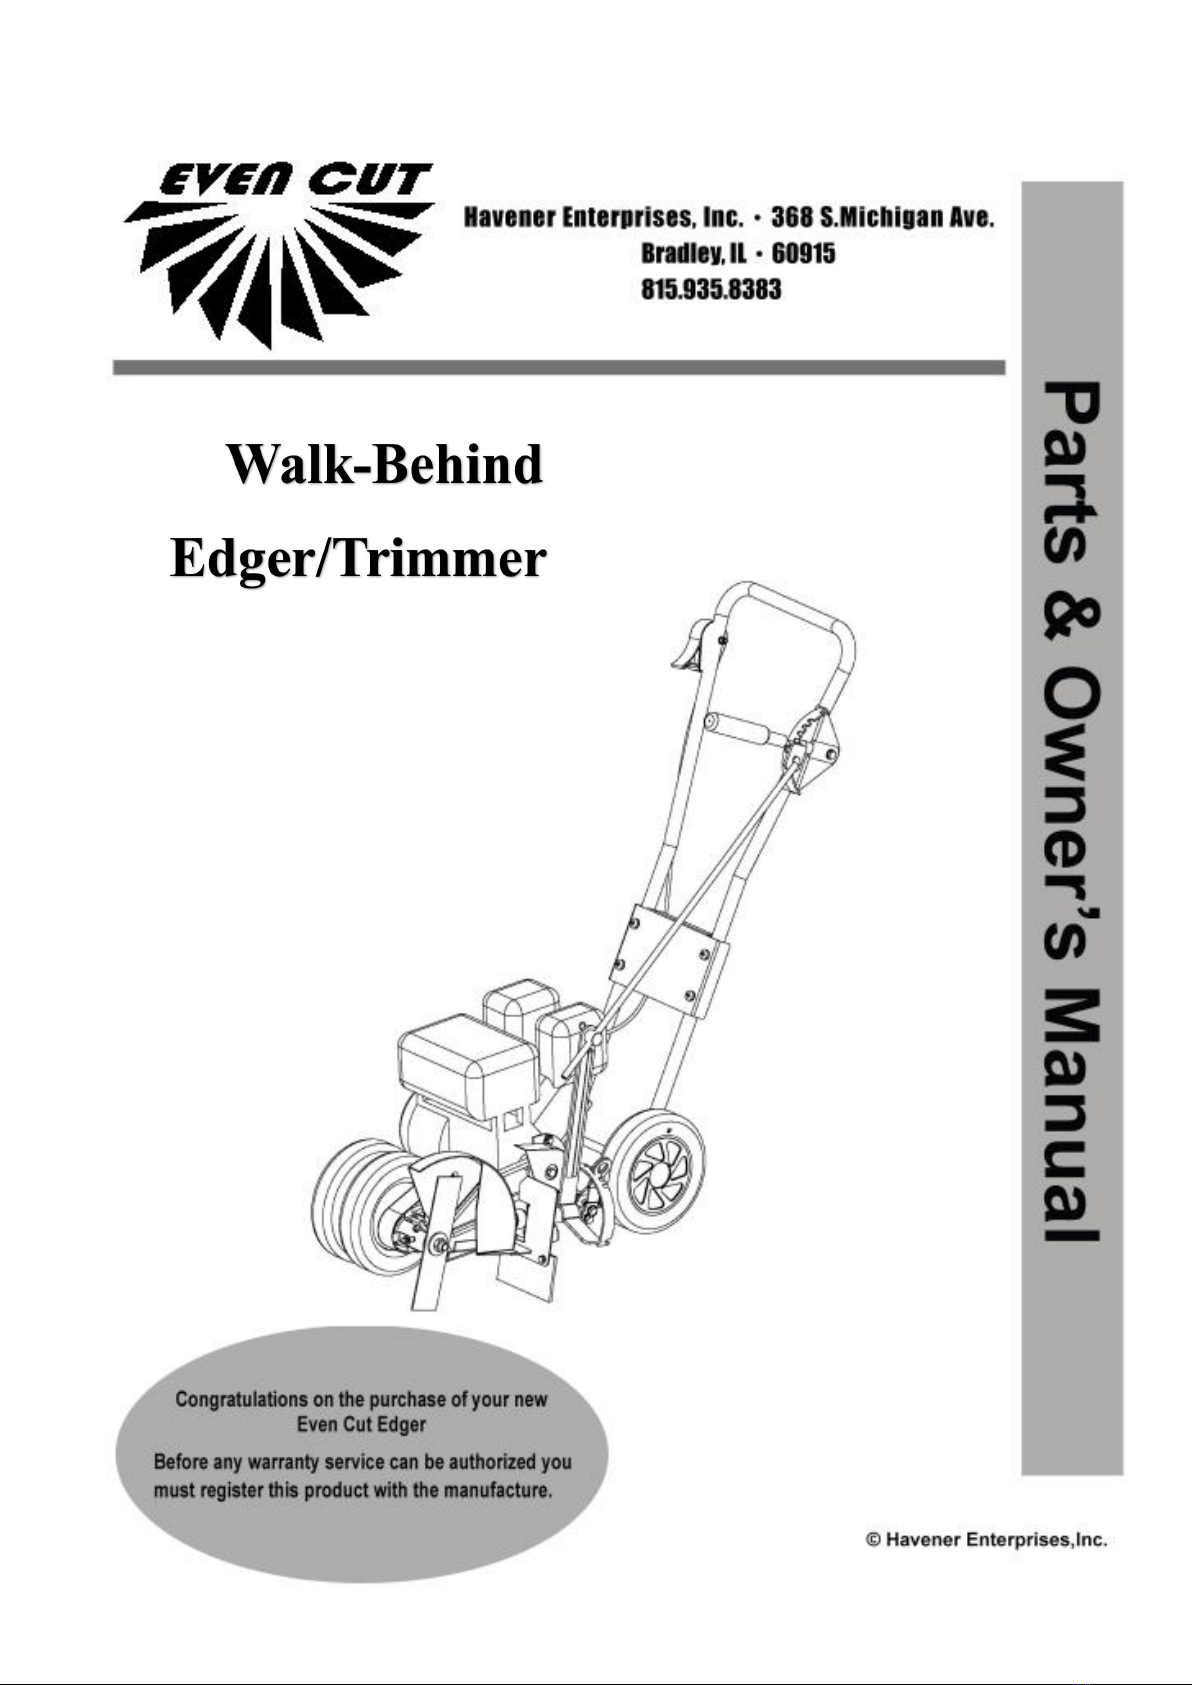
Main technical parameter
Engine: 4HP gasoline
starting mode: Recoil starting
Transmission Type: soft belt
Blade: 1 8-3/4" x 2", 1/2" center hole
Noise: ≤70db
Net Weight: 31kg;68-1/2lbs
Cutting angle: Adjustable by 5 shifts from 20°-0°/0°-20°
Wheels-Front/Rear: 8"x1-3/4"
Outer Dimension(L x W x H): 1030x460x900mm
Outer Dimension(L x W x H):40-1/2"x18-1/10"x35-1/2"
Packing Measurement(L x W x H):700x460x410mm
Packing Measurement(L x W x H):27-1/2"x18-1/10"x16"

5
Safety Information
Read This Manual Carefully And Thoroughly Before Operating The Edger!
Training
1. Carefully and thoroughly read the owner's manual. Allow adequate time to fully understand the
controls and operation of the equipment.
2. Never allow anyone to operate the edger that has not read and fully understood the owner's
manual.
Never allow children to operate the edger.
3. Keep area of operation clear of all persons, particularly small children and pets.
Before Use of Equipment
Operator:
Wear protective clothing while edging. Long trousers and safety glasses will help reduce the risk of
injury from thrown objects. It is recommended that steel toe shoes with thick soles or some other
type of substantial footwear be worn to help protect your feet and maintain traction on slopes or
uneven ground. Always wear hearing protection.
Edging Area:
Thoroughly inspect the area where the equipment is to be used. Look for items such as stones,
sticks, wire and other foreign objects. When struck by the edger, these and other objects may
become projectiles that could lead to serious injury and/or death.
Operation:
For your safety and the long life of your equipment, always inspect the edger before each use.
Before inspection, make sure it is on a flat and level surface, the blades are disengaged, the ignition
switch off with the key removed, and the spark plug wire is off of the spark plug(s) and hidden so
that accidental contact can not be made.
General Condition:
·Walk around the edger looking for any fluid spills or leaks on or underneath the edger. Remove
any and all excessive debris, dirt, and/or fluids.
·Look for signs of damage or excessive wear. Check the tightness of all nuts, bolts, pins, and
screws. Tighten any that may be loose and replace any that may have been lost during use.
·Be sure the safety interlock controls are operating properly so that the engine can not be
started unless the ground speed control lever is in neutral and the blades disengaged.
·Check the edger blades for any damage or abnormal wear and replace in sets so that they are
balanced.
·Check all belts for proper wear and correct tension.
·Check engine oil and air filters

6
Operation of Equipment
DANGER: GASOLINE IS HIGHLY FLAMMABLE AND EXPLOSIVE. DO NOT ADD
FUEL WHILE THE ENGINE IS RUNNING OR IS HOT. KEEP OPEN FLAMES,
SPARKS, AND HEAT AWAY FROM THE FUEL AND STORE FUEL IN CONTAINERS
SPECIFICALLY DESIGNED FOR THAT PURPOSE. ADD FUEL OUTDOORS ONLY
AND IF THE FUEL IS SPILLED, DO NOT START THE ENGINE. MANUALLY PUSH
THE EDGER AWAY FROM THE SPILLAND IMMEDIATELY WIPE UP.
Do not operate the engine in a confined space where dangerous carbon monoxide fumes can
collect. Carbon monoxide is odorless, tasteless, and can be fatal.
Edge only in daylight.
Disengage cutterhead drive before attempting to start the engine.
Watch for traffic when crossing surfaces other than grass, (i.e. transporting,) loading a trailer or
vehicle, or when the edger is not in use.
Never operate the edger unless the blade guard, belt guards, and debris guards are properly
in place.
Reduce speed on slopes to avoid tipping or loss of control.
Do not change the governor settings or over speed the engine.
Always stop the engine whenever you leave the edger, even for a moment.
Never direct discharge of material toward bystanders nor allow anyone near the machine while
in operation
To help reduce the risk of a fire hazard, keep the engine and the area around the engine free of
grass, leaves, or any other type of foreign material.
Beware of cutting edges. Always wear gloves for safety when performing blade maintenance
activities. Beware on multiple blades units since the rotation of one blade may cause the
rotation of the other blade.
Always stop the blade when crossing gravel driveways, roads, or walk ways.
Never store the edger with gasoline in the tank in a building where fumes may reach an open
flame or spark. Be sure engine has cooled before storing.

7
Assembly
NOTE: Reference to Left or Right side of the machine is from the operator's position at the handle,
facing for-ward.
The edger, except the handle and throttle control is fully assembled, packed and shipped in one
carton.
Attaching The Handle
1. Remove handle brace, nuts, and bolts. Align the handle, lower support, ad handle brace holes.
Use all six nuts and bolts. Leave bolts loose until steps 2 and 3 are completed (Figure 1).
2. Install control rod into upper and lower pivot holes and secure with cotter pins (Figure 1). Oil
pivots lightly before installing rod.
3. Move clutch-depth lever into rear notch of quadrant on handlebars. Move cutterhead angling
lever to top notch of quadrant.
4. Remove spark plug wire from spark plug. Move throttle to “OFF” position. Check clutch
operation by pulling recoil starter rope. If blade turns when depth lever is in top notch, loosen
handles bolts and pull towards operator. Tighten bolts and check clutch operation again.
5. Slip on handle grips.
NOTE: Make sure blade does not turn when lever is in top notch-disengaged.
Figure 1
Fill Engine With Oil
NOTE: There is no oil in engine crankcase.
1. Follow instructions in the engine manual for correct grade of oil, oil filling and oil changing
2. Do not mix oil with gasoline.

8
Installing The Throttle Wire
1. If the throttle cable is not attached tot he engine carburetor, follow the instructions in the engine
operating manual. Some throttle cables can not be attached before shipping.
Fuel Specification
1. Follow fueling instructions in the engine manual.
DANGER: GASOLINE IS HIGHLY FLAMMABLE AND EXPLOSIVE. DO NOT ADD FUEL
WHILE THE ENGINE IS RUNNING OR IS HOT. KEEP OPEN FLAMES, SPARKS, AND HEAT
AWAY FROM THE FUEL AND STORE FUEL IN CONTAINERS SPECIFICALLY DESIGNED
FOR THAT PURPOSE. ADD FUEL OUTDOORS ONLY. REPLACE GAS CAP SECURELY AND
WIPE UP ALL SPILLED FUEL.
2. Always clean area around fuel cap before removing it to prevent excessive amounts of dirt from
entering fueling system. Also insure that the fuel storage container you are using is clean and in
good condition.
Engine Operation
CAUTION: Before starting engine, become totally familiar with all controls. Read this
Operator’s Manual thoroughly. Always check engine oil level before starting engine.
Operating Your Edger/Trimmer
Correct Engine Operation
CAUTION: Always disengage edger/trimmer blade and shut engine off when leaving the
edger/trimmer unattended, even for just a few minutes. Don’t allow children or un
authorized persons to operate this machine.
Adjusting Cutterhead Angle
Before starting the engine you must adjust the cutterhead angle. The cutterhead angling lever
enables the operator to position the blade horizontally for trimming or edging in several vertical
positions. The lever is located on the left hand side of the frame.
Never adjust cutterhead angle when engine is running
Cutterhead Angle Adjustment

9
Clutch And Depth Lever Settings
The clutch and depth lever is used to engage and disengage the drive belt which operates the
blade. It is also used to regulate the depth of edging and height of trimming.
Starting The Engine
1. Be sure the clutch lever is in the rear DISENGAGED position before starting the engine.
2. Manually pull out choke on engine.
3. Grasp the recoil starling handle and pull quickly. Return the handle slowly. If the engine fails to
start after three or four polls, lower the throttle to the detent full throttle (Fast) position
4. Once the engine starts, push the choke to the “OFF” position. Use the SLOW position to idle
the engine.
CAUTION: Always start the edger/trimmer slowly. Sudden starts can be damaging to the
equipment and could cause loss of operator control.
Engaging the Drive Belt
1. Move clutch and depth lever forward to engage drive belt and blade.
2. The notches in the base of the base of lever allow adjusting for depth or cut or height for
trimming.
Stopping the Edger
1. Disengage edger/trimmer clutch and depth lever.
2. Move the throttle control to “STOP” position. Make sure the engine is stopped and blade is not
rotating before leaving the operating position.

10
Wheel Positioning
The wheel adjusting spacer should be centered between the wheels when edging in the vertical
position. Wheels must be in the dual position to the right when edging with cutterhead in an angle
position or trimming (horizontal position).
DANGER: DO NOT CHANGE THE WHEEL POSITION WHEN THE ENGINE IS RUNNING.
1. Remove the spacer from between the wheels by lifting on the spacer with open side down.
2. Slide the left front wheel on the axle toward the right wheel and install he spacer on the axle
between the frame and the wheel.
CAUTION: Before starting the engine be sure the wheels and cutter head are positioned
so the blade will not strike the wheels.
Curb Riding Position
1. Remove the spacer from between the front wheels. Slide the right wheel toward the left wheel
and replace the spacer between the wheel and right frame. Only vertical edging can be done in
this position.
NOTE: As pictured above, wheels are positioned to the right for trimming. The wheels are
positioned to the left for curb trimming/edging.
Table des matières


