Happy HCD-1501 Guide d'installation

Training Workbook: HAPPY HCD-1501 Operation and Maintenance
Education Department
Chapter 2: Machine Setup & Orientation 1
Machine Setup
Control Panel 2
Design Transfer
Training:
HAPPY HCD-1501
Operations & Maintenance
Chapter 2: MACHINE SETUP & ORIENTATION
–Proper Machine Setup
• Machine environment page 2
• Upper threading page 3
• Bobbin threading & Tensioning page 5
–Control Panel 2
• Sewing controls, what your machine is telling you on the main screen page 6, 7
• Function Menu page 9
• 6 Important Main Menu functions in detail: Pattern, Setting, pages 10-27
Needle, Read, Frame, Position
–Transferring Designs into the machine, detailed steps
• Transfer by USB cable connection from a PC page 29
• Transfer by Compact Flash or USB jump drive page 33
Updated 5/20/2010: Screenshotss and procedures updates for firmware version 1.24

Training Workbook: HAPPY HCD-1501 Operation and Maintenance
Education Department
Chapter 2: Machine Setup & Orientation 2
Machine Setup
Control Panel 2
Design Transfer
Proper Machine Setup: Environment
Temperature and Humidity-Controlled Environment
Set up/store your machine in a temperature and humidity-controlled environment to prevent
long-term corrosion and to protect the electronics. Don’t keep your machine anywhere you
wouldn’t keep a laptop or desktop computer !
Clean, Protected Electrical Power
grounded outlets: Your machine uses standard 110v household
current. Be sure you connect it to a grounded 3-prong outlet like
the one shown here. This is standard in most U.S. homes and
businesses today, but some older buildings may only have 2-
prong outlets.
Steady Table / Mounting Surface
Your machine will perform better (especially at higher speeds)
when operated on a strong, level and steady mounting surface.
Although on wheels, the optional stand provides plenty of
stability, and even more when the wheel brakes are applied at all
4 corners.
Machine Setup
surge protection: Protect your machine against occasional power
spikes (from electrical storms or electrical wiring problems) with at
least a basic surge protector. The electronics on your machine
can be very expensive to replace. Higher-end surge protectors
and UPS units are able to protect against higher energy strikes,
and often come with a guarantee.
Basic surge
protector
Standard
3-prong
110v
outlet
Optional machine stand with accessory
shelf, casters and wheel brakes

Training Workbook: HAPPY HCD-1501 Operation and Maintenance
Education Department
Chapter 2: Machine Setup & Orientation 3
Machine Setup
Control Panel 2
Design Transfer
Proper Machine Setup: Upper Thread
General Thread Route
Thread must pass up from cones through guide
holes in thread tree and through every specific
point along the face of the sewing head. Thread
must be “docked” at the thread holder spring.
UPPER THREAD
-Proper Thread Routing: All threads must be
routed correctly at all points along the path through
the sewing head.
Layout of Cone/Needle Sequence
Needle numbers are arranged right to left, lowest number to highest.
Needle
1
Needle
2
Needle
3
Needle
4
Needle
5
Needle
6
Needle
8
Needle
7
Needle
9
Needle
10
Needle
11
Needle
15
Needle
14
Needle
13
Needle
12
Machine Setup

Training Workbook: HAPPY HCD-1501 Operation and Maintenance
Education Department
Chapter 2: Machine Setup & Orientation 4
Machine Setup
Control Panel 2
Design Transfer
Proper Machine Setup: Upper Thread
Upper Tensioner
Thread only makes ½ turn
– make sure it passes to
the left between the 2
metal discs.
Lower Tensioner
Thread makes 1 full turn
clockwise around the base
of the knob – make sure it
runs in the V-shaped
groove of the spoked
wheel.
Thread Break Sensor
Thread this like the upper
tensioner – ½ turn to the left.
Make sure the thread falls in the
groove as shown.
UPPER THREAD – complete route through moving head
-Proper Thread Routing: All threads must be routed
correctly at all points along the path through the sewing
head.
-Practice good thread “Discipline”: After threading
all needles, ensure there is no slack anywhere along
the thread path. Make sure to:
-Pull all threads – to ensure thread feeds
smoothly and turns the break sensor, and all
slack is removed from around thread cones
-“Dock” all thread ends from each needle onto
the thread-holding spring. Prevents thread from
coming loose and catching where not desired.
Take-Up Levers
Thread makes 1 full turn clockwise
around the base of the knob – make
sure it runs in the V-shaped groove of
the spoked wheel.
Machine Setup
Training Workbook: HAPPY HCD-1501 Operation and Maintenance
Education Department
Chapter 2: Machine Setup & Orientation 5
Machine Setup
Control Panel 2
Design Transfer
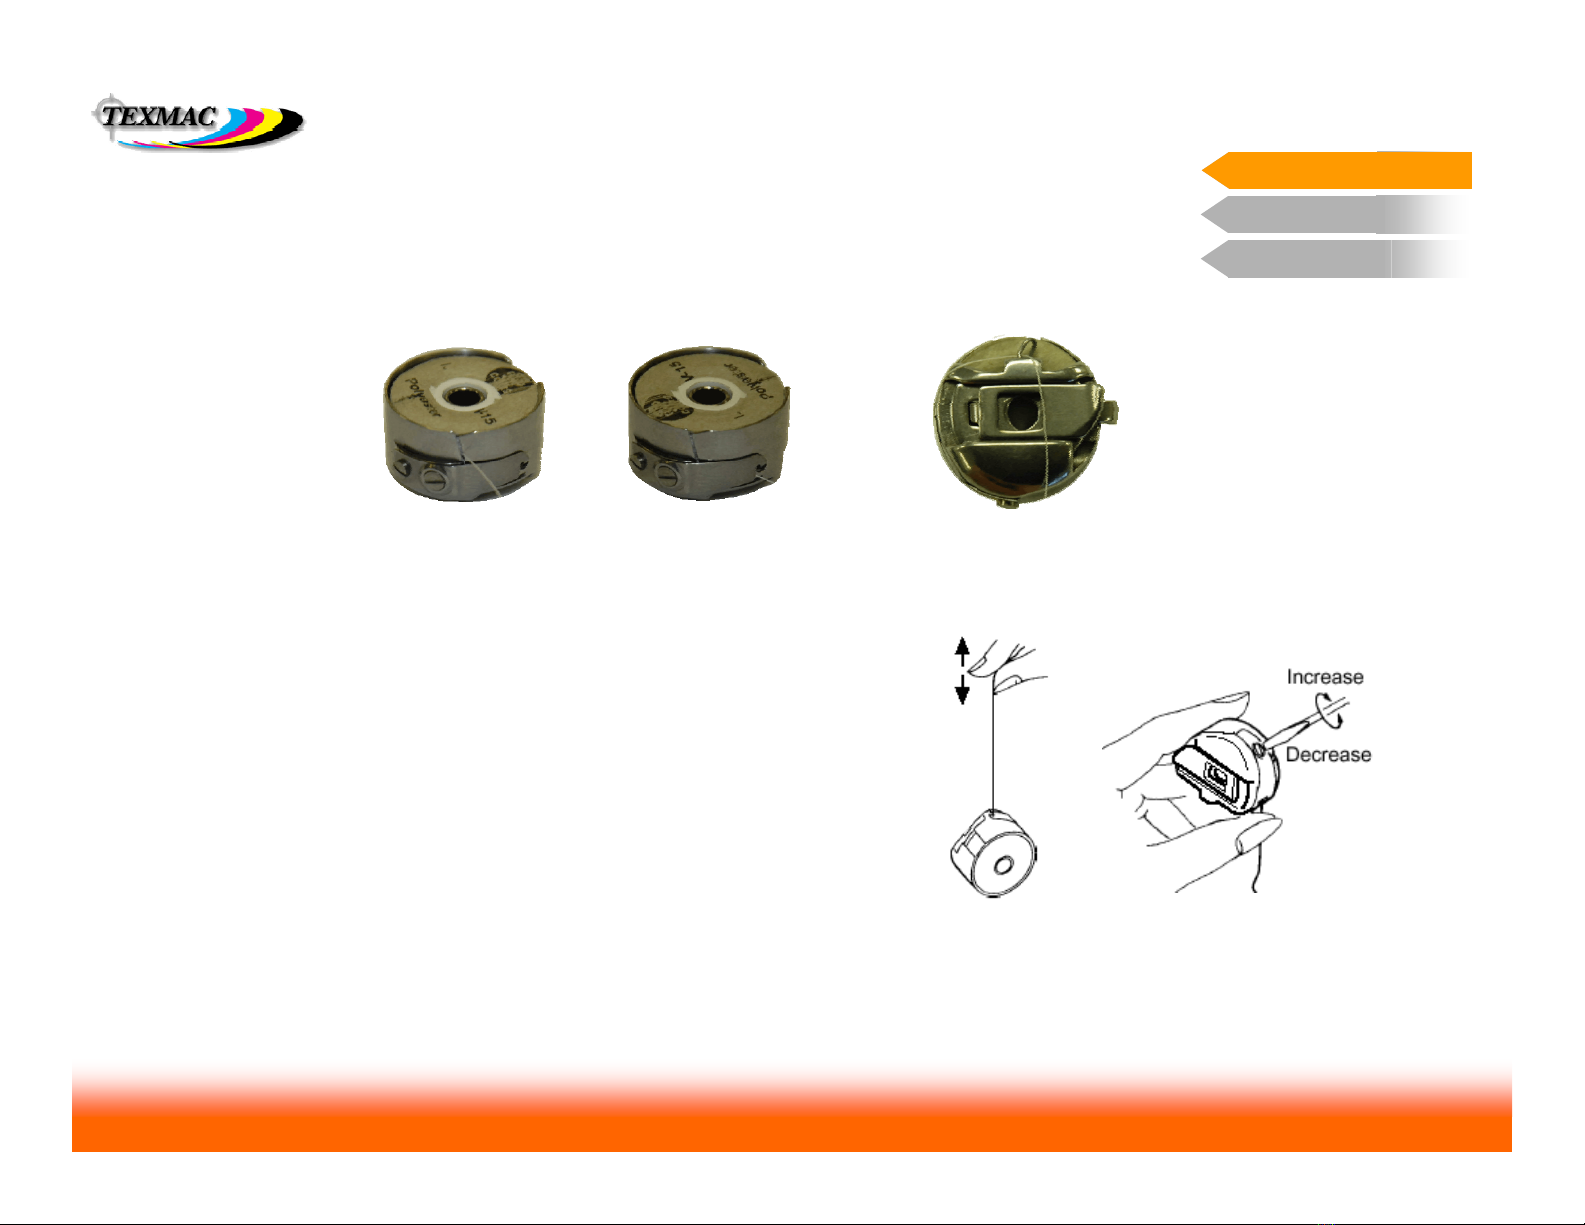
Proper Machine Setup: Bobbin loading
and Tension check/ adjustment
RE-LOADING THE BOBBIN CORRECTLY
The bobbin will need to be replaced frequently, allowing only 30,000 to 60,000 stitches
per spool. This has to be done correctly every time.
1.Ensure bobbin turns
clockwise. Pull thread
through this slit.
2. Feed thread through
eye at the end of the
tension flap.
3. Pass thread under wire
loop at the top front of
the bobbin case.
•The “yo-yo” test is very exact in checking tension. Perform this quick
check each time you re-load the bobbin. Practice until you are comfortable
doing this.
•Check bobbin tension frequently when changing bobbins.
TAKE CARE TO RE-INSERT THE RELOADED BOBBIN CASE FULLY!
Your machine will not sew any stitches unless this is done. At worst, the
needle & needle bar may strike the side of a poorly-inserted bobbin case,
breaking the needle and possibly putting needle depth out of adjustment
for that needle.
CHECKING TENSION
Machine Setup
Make small adjustments
– no more than a ¼ or
½ turn in either
direction before re-
checking tension.

Training Workbook: HAPPY HCD-1501 Operation and Maintenance
Education Department
Chapter 2: Machine Setup & Orientation 6
Machine Setup
Control Panel 2
Design Transfer
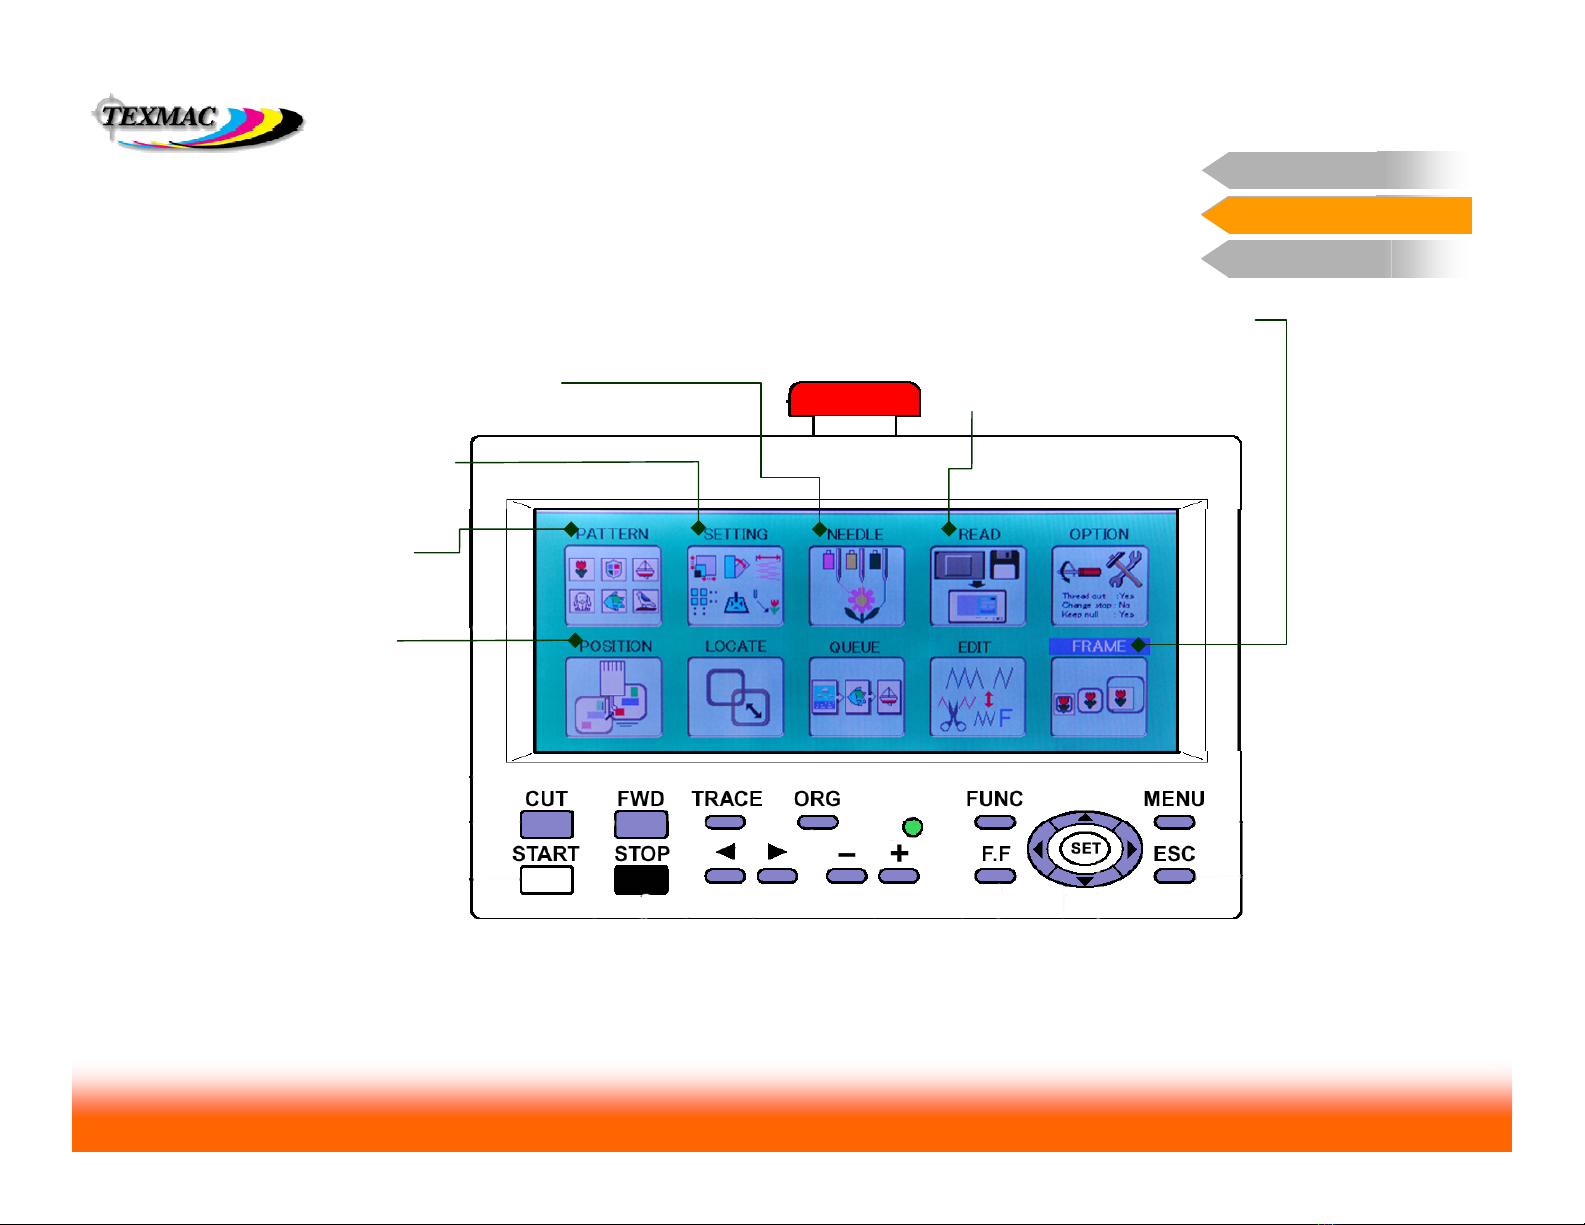
•Sewing Controls
Understand the functions
of these key sewing
controls.
Sewing Controls
Basic Sewing Controls
On this page, learn the function of the important
sewing controls.
CUT cuts current thread and tucks
end into thread holder.
START starts sewing. Bypasses
trace. Sews in “creep” mode when
held down.
FWD advances sewing position
forward while machine is stopped.
STOP stops sewing. Also when stopped
moves sewing position backwards.
Useful after thread breaks.
Needle Select Keys change the currently-selected needle while machine is stopped.
TRACE only traces when design is
at Origin. Does slow trace when
held continuously.
ORG returns the sewing arm and
the sewing position to design Origin
point. Origin symbol re-appears.
Speed control – adjusts
max sewing speed. Sewing arm movement
move pantograph arm with
the 4 blue arrow keys, hold
FF at same time for quick
movement
Color Code
Items in black – function only when
machine is stopped.
Items in red – function when machine is
running or stopped.
Control Panel 2

Training Workbook: HAPPY HCD-1501 Operation and Maintenance
Education Department
Chapter 2: Machine Setup & Orientation 7
Machine Setup
Control Panel 2
Design Transfer
Control Panel 2
Information Display on the main Drive screen
This screen shows information about the design, its
position and fit, and current sewing status # of Stitches in design
current stitch position in design
Total # of color blocks in the design
current block #
origin indicator –
indicates that sewing
position is at the
design origin, before
the trace.
Main Screen Information Control Panel 2
next 4 colors in sequence
Max allowed speed – set this with the + and –
keys up to 1200 spm.
Actual sewing speed – machine sews at
speeds up to max allowed speed, but varies
according to stitch length. Longer stitches
take more time, requiring a slower speed.
Indicator lights: serve as reminders for any edits that may have been
done to the design from the control panel (in order from left to right,
scale, rotate, satin pull compensation, repeat, auto origin return, offset
Current Hoop:
shows what type of
hoop is currently in
use on the machine.
Show design position & fit in hoop: pressing
FAST at this screen shows a map on the right
side of the design position & size(in blue)
against the sewable area of the hoop (in red)
Active needle:
shows the currently
selected needle #

Training Workbook: HAPPY HCD-1501 Operation and Maintenance
Education Department
Chapter 2: Machine Setup & Orientation 8
Machine Setup
Control Panel 2
Design Transfer
In many of the screens accessed from the main menu, there are additional
options that can be accessed in the same way. In the sample screen shown
below, we’ve illustrated a few simple rules:
Sub-menu: Contains
additional options for a
given screen.
Control Panel 2
General Tips in Navigating Main Menu Screens
Press MENU to
access the sub-menu.
You’ll see the
uppermost icon
highlight in blue.
View Design: This
option displays the
design full-screen with
any current changes
you’ve made to it.
Press ESC to exit the
sub-menus and return
the cursor to the rest
of the Needle screen
(example shown here)

Training Workbook: HAPPY HCD-1501 Operation and Maintenance
Education Department
Chapter 2: Machine Setup & Orientation 9
Machine Setup
Control Panel 2
Design Transfer
Frame position
Frame Type
O Set
Top
Needle Jump
Log – in
Turn-off
The FUNC menu allows quick access for key machine functions directly in the
main drive screen.
O Set: Positions the
origin (design) at the
current arm position.
TOP positions the hoop at
the top of the pattern.
Repeating returns hoop to
previous position.
Frame Type select here to tell the machine
to switch between tubular, cap, or border
frame sewing modes.
Access this
menu by
pressing the
FUNC key.
LOG-IN: Set this to
log the machine on to
a Happy machine
network.
The Function Screen Control Panel 2
TURN-OFF: Always
try to power down the
machine from this
option, not at the
power switch.
CENTER centers
the hoop.
FRAME OUT
CENTER DESIGN
centers the hoop
and centers the
design in the hoop.
POSITION moves hoop
to current stitch position.
FRAME POSITION displays the submenu
shown. Functions are shown below.
Needle Jump alternatively
disengages (jump mode) or
engages (drive mode)
needle bar
Training Workbook: HAPPY HCD-1501 Operation and Maintenance
Education Department
Chapter 2: Machine Setup & Orientation 10
Machine Setup
Control Panel 2
Design Transfer
Important Main Menu Features
The options on the first page of the main menu have
the most important, useful functions.
Pattern Menu helps
manage designs
Setting Menu allows you
to make useful changes to
the design.
Needle Screen is most important – for
assigning thread colors to the design. Read Screen allows you to read in
designs from the compact flash card.
Position Function
lets you jump to any
point in the design
Frame Function allows you to fit and
locate a design in a selected hoop.
The 6 Important Main Menu Screens Control Panel 2
Table des matières
Autres manuels Happy Machine à coudre

Happy
Happy HCH Manuel utilisateur

Happy
Happy HCS2-1201-30 Manuel utilisateur

Happy
Happy HCH Manuel utilisateur

Happy
Happy HCS Manuel utilisateur

Happy
Happy HCS2-1201 Guide de dépannage

Happy
Happy HCG Series Manuel utilisateur

Happy
Happy HCS-1201-30 Manuel utilisateur

Happy
Happy HCH-701 Manuel utilisateur

Happy
Happy HCH Series Manuel utilisateur

Happy
Happy HCD Feuille d'instructions


