Hama 00178242 Manuel utilisateur

00178242
00178243
Induktivladeempfänger
Inductive Charging Receiver
D
GB
Operating Instructions
Bedienungsanleitung

A
C
B
D

2
GOperating instruction
Connection types
00178242: Micro-USB plug (output)
00178243: USB Type-C plug (output)
Thank you for choosing a Hama product.
Take your time and read the following instructions and information completely. Please keep
these instructions in a safe place for future reference. If you sell the device, please pass these
operating instructions on to the new owner.
1. Explanation of Warning Symbols and Notes
Warning
This symbol is used to indicate safety instructionsor to draw your attentionto
specichazardsandrisks.
Note
This symbol is used to indicate additional information or important notes.
2. Package Contents
•Inductive charging receiver for smartphones
•These operating instructions
3. Safety Notes
•The product is intended for private, non-commercial use only.
•Protect the product from dirt, moisture and overheating, and only use it in a dry
environment.
•Do not drop the product, do not expose it to any major shocks and do not bend the
product.
•Do not operate the product outside the power limits given in the specications.
•Do not open the device or continue to operate it if it becomes damaged.
•Do not use the product in areas where the use of electronic devices is not permitted.
•Dispose of packaging material immediately according to locally applicable regulations.
•Do not modify the product in any way. Doing so voids the warranty.

3
Do not put any bank cards or similar cards with magnetic strips, or other magnetically
sensitive objects, on the product. The data on the cards could be damaged or deleted.
Warning
Ensure that there are no metal parts (for example, metal plate for magnetic holder)
between the product and an inductive charger. Metal may heat up signicantly in the
eld of the induction charger, causing damage to the product, your terminal device and/
or the charger.
4. Mounting and getting started
Note
•The Micro USB port / USB Type-C port is not installed the same way in every device.
Therefore, please check beforehand whether the inductive charging receiver is suitable
for your terminal device. If in doubt, consult the operating instructions for your terminal
device or contact the manufacturer directly.
•Note that the presence of mobile phone cases, covers or other materials between the
inductive charging receiver and an inductive charger can interfere with charging or
even prevent it.

4
Note – Adhesive surface
•Ensure that the mounting surface to which the adhesive strip is to attach (such as the
back of a smartphone) is free of dustand grease. Use a suitable cleaning agent from a
specialised dealer to clean the surface.
•Various environmental factors such as ambient humidity, sunlight or cold can impair
the durability of the adhesive pad.
•We cannot guarantee that residue will not be left on the mounting surface after the
adhesive pad is removed.
•Remove the protective foil from the adhesive side of the inductive charging receiver;
then press the inductive charging receiver on the adherend surface (for example, back
of a smartphone) for a few seconds. (A)
4.1 Mounting options
You have two mounting options, depending on whether or not you protect your terminal
device with a cover/case.
•Simply squeeze the inductive charging receiver in between your terminal device and its
case or cover. (D)
•You can ax the inductive charging receiver to the back of your terminal device using the
receiver’s adhesive strip.
4.2 Getting started
•Connect the Micro-USB/USB Type-C plug of the inductive charging receiver to the Micro-
USB/USB Type-C input on your terminal device. (B)
•When tting the inductive charging receiver between your terminal device and its case,
or when attaching it to the back of your terminal device, make sure that the cable is laid
such that there is enough free play to pull out the plug if the product is not being used.
(C)
•Before axing the inductive charging receiver, check whether the charging coil is
positioned correctly, in order to sustain contact on the inductive charger used.
Warning
•Only use suitable charging devices or USB connections for charging.
•As a rule, do not use charging devices or USB connections that are defective and do
not try to repair them yourself.

5
•Charging starts as soon as an effective induction eld has been generated. The current
charging status appears on your terminal device.
•If no connection can be established through induction, you may have to change the
position of the inductive charging receiver.
•Charging stops automatically once your device’s battery is fully charged.
•Remove your terminal device from the inductive charger and unplug the inductive
charging receiver from your terminal device.
5. Care and Maintenance
Only clean this product with a slightly damp, lint-free cloth and do not use aggressive
cleaning agents.
6. Warranty Disclaimer
Hama GmbH & Co. KG assumes no liability and provides no warranty for damage resulting
from improper installation/mounting, improper use of the product or from failure to observe
the operating instructions and/or safety notes.
7. Service and Support
Please contact Hama Product Consulting if you have any questions about this product.
Hotline: +49 9091 502-115 (German/English)
Further support information can be found here:
www.hama.com
8. Technical Data
InductionCharger
Input 5V max. 1.0A
Output5V max. 800mA
Dimensions 110 x 44 x 6mm

6
9. Recycling Information
Note on environmental protection:
After the implementation of the European Directive 2012/19/EU and 2006/66/EU
in the national legal system, the following applies: Electric and electronic devices
as well as batteries must not be disposed of with household waste. Consumers
are obliged by law to return electrical and electronic devices as well as batteries
at the end of their service lives to the public collecting points set up for this
purpose or point of sale. Details to this are defined by the national law of the respective
country.
This symbol on the product, the instruction manual or the package indicates that a product
is subject to these regulations. By recycling, reusing the materials or other forms of
utilising old devices/Batteries, you are making an important contribution to protecting our
environment.
10. Declaration of Conformity
Hereby, Hama GmbH & Co KG declares that the radio equipment type [00178270,
00178271, 00178272] is in compliance with Directive 2014/53/EU. The full text
of the EU declaration of conformity is available at the following internet address:
www.hama.com->00178270, 00178271, 00178272->Downloads.
Frequency band(s) 128kHz
Maximum radio-frequency
power transmitted 5.51 x 10⁻¹⁰ mW

8
DBedienungsanleitung
Anschlusstypen
00178242: Micro-USB-Stecker (Ausgang)
00178243: USB Type-C-Stecker (Ausgang)
Vielen Dank, dass Sie sich für ein Hama Produkt entschieden haben!
Nehmen Sie sich Zeit und lesen Sie die folgenden Anweisungen und Hinweise zunächst ganz
durch. Bewahren Sie diese Bedienungsanleitung anschließend an einem sicheren Ort auf, um
bei Bedarf darin nachschlagen zu können. Sollten Sie das Gerät veräußern, geben Sie diese
Bedienungsanleitung an den neuen Eigentümer weiter.
1. Erklärung von Warnsymbolen und Hinweisen
Warnung
Wird verwendet, um Sicherheitshinweise zu kennzeichnen oder um Aufmerksamkeit auf
besondere Gefahren und Risiken zu lenken.
Hinweis
Wird verwendet, um zusätzlich Informationen oder wichtige Hinweise zu kennzeichnen.
2. Packungsinhalt
•Induktivladeempfänger für Smartphones
•diese Bedienungsanleitung
3. Sicherheitshinweise
•Das Produkt ist für den privaten, nicht-gewerblichen Haushaltsgebrauch vorgesehen.
•Schützen Sie das Produkt vor Schmutz, Feuchtigkeit und Überhitzung und verwenden Sie es
nur in trockenen Umgebungen.
•Lassen Sie das Produkt nicht fallen, setzen Sie es keinen heftigen Erschütterungen aus und
knicken Sie das Produkt nicht.
•Betreiben Sie das Produkt nicht außerhalb seiner in den technischen Daten angegebenen
Leistungsgrenzen.
•Öffnen Sie das Produkt nicht und betreiben Sie es bei Beschädigungen nicht weiter.
•Benutzen Sie das Produkt nicht in Bereichen, in denen elektronische Produkte nicht erlaubt
sind.

9
•Entsorgen Sie das Verpackungsmaterial sofort gemäß den örtlich gültigen
Entsorgungsvorschriften.
•Nehmen Sie keine Veränderungen am Produkt vor. Dadurch verlieren Sie jegliche
Gewährleistungsansprüche.
Legen Sie keine EC- oder ähnliche Karten mit Magnetstreifen sowie magnetisch
empndliche Gegenstände auf das Produkt. Die Daten auf den Karten können beschädigt
oder gelöscht werden.
Warnung
Stellen Sie sicher, dass sich zwischen dem Produkt und einem Induktivladegerät keine
Metallteile (z.B. Metallplatte für Magnethalter) benden. Metall erwärmt sich im Feld
des Induktionsladegerätes sehr stark und kann das Produkt, Ihr Endgerät und/oder das
Ladegerät beschädigen.
4. Montage und Inbetriebnahme
Hinweis
•Der Micro-USB-Anschluss / USB Type-C-Anschluss ist nicht bei allen Endgeräten
gleich eingebaut. Bitte prüfen Sie daher im Vorfeld, ob der Induktivladeempfänger
für Ihr verwendetes Endgerät geeignet ist. Im Zweifelsfall ziehen Sie dazu die
Bedienungsanleitung Ihres Endgerätes zu Rate oder wenden Sie sich direkt an den
Hersteller.
•Beachten Sie, dass Handytaschen, Cover, etc. und sonstige Materialien zwischen dem
Induktivladeempfänger und einem Induktivladegerät den Ladevorgang stören oder
sogar verhindern können.

10
Hinweis – Klebeäche
•Beachten Sie, dass die gewünschte Klebeäche (z.B. Rückseite Smartphone, etc.)
staub- und fettfrei sein muss. Verwenden Sie dazu einen geeigneten Reiniger aus dem
Fachhandel.
•Diverse Umwelteinüsse wie z.B. Luftfeuchtigkeit, Sonneneinstrahlung, Kälte etc.
können die Dauerhaftigkeit des Klebepads beeinträchtigen.
•Mögliche Rückstände auf der Klebeäche nach Entfernung des Klebepads können nicht
ausgeschlossen werden.
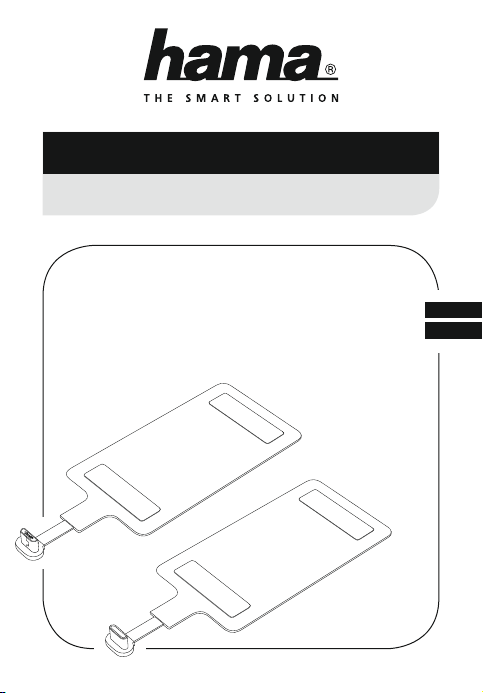
•Entfernen Sie die Schutzfolie der Klebeseite des Induktivladeempfängers und drücken
Sie diesen für einige Sekunden an der gewünschten Klebeäche (z.B. Rückseite
Smartphone) an. (A)
4.1 Montagemöglichkeiten
Sie haben zwei Montagemöglichkeiten, je nachdem, ob Sie Ihr Endgerät durch ein(e) Cover/
Hülle schützen oder nicht.
•Klemmen Sie den Induktionsladeempfänger einfach zwischen das Endgerät und die
verwendete Hülle bzw. das verwendete Cover. (D)
•Wahlweise xieren Sie den Induktionsladeempfänger durch direktes Aufkleben auf die
Rückseite Ihres Endgerätes. Verwenden Sie hierzu die auf dem Empfänger angebrachten
Klebestreifen.
4.2 Inbetriebnahme
•Verbinden Sie den Micro-USB-Stecker / USB Type-C-Stecker des Induktivladeempfängers mit
dem Micro-USB-Eingang / USB Type-C-Eingang Ihres Endgerätes. (B)
•Achten Sie beim Einbau zwischen dem Endgerät und Hülle beziehungsweise beim
Aufkleben auf der Rückseite des Endgerätes darauf, dass die Verlegung des Kabels
ausreichend Spiel lässt, um den Stecker bei Nichtgebrauch abziehen zu können. (C)
•Bitte prüfen Sie vor der Fixierung, ob die Ladespule in der richtigen Position platziert ist,
um auf dem verwendeten Induktivladegerät Kontakt zu erhalten.
Warnung
•Verwenden Sie nur geeignete Ladegeräte oder USB-Anschlüsse zum Auaden.
•Verwenden Sie defekte Ladegeräte oder USB-Anschlüsse generell nicht mehr und
versuchen Sie nicht, diese zu reparieren.
Ce manuel convient aux modèles suivants
1
Table des matières
Autres manuels Hama Récepteur

Hama
Hama Nano 00053330 Manuel utilisateur

Hama
Hama Dekti 2000 T Manuel utilisateur

Hama
Hama 179507 Manuel utilisateur

Hama
Hama 00053187 Manuel utilisateur

Hama
Hama 0014159 Manuel utilisateur

Hama
Hama 00040234 Manuel utilisateur

Hama
Hama 00053174 Manuel utilisateur

Hama
Hama GPS Receiver Manuel utilisateur

Hama
Hama 00136691 Manuel utilisateur

Hama
Hama 00014168 Manuel utilisateur


