Goodview M Series Manuel utilisateur

User Manual
M*****
Digital Signage Menu Board

Please read the instructions carefully before using the product.
1> Connect the power cord correctly and use a properly grounded
electrical outlet.
2> Do not change or replace any components without authorization.
3> Do not use two-core plug, ensure the power supply is AC100-
240V, 50/60Hz.
4> There are AC 220V high voltage parts inside the machine. Do
not open the shell without authorization.
5> Please keep the machine away from any heat sources such as
electric radiators or direct sunlight.
6> Place the display in a stable and well-ventilated place.
7> Please unplug the power supply in the following occasions.
A. When removing or resembling any parts.
B. In rainy days or in humid environment.
C.Disconnect or reconnect any electrical plug to the device.
8> Do not attempt to repair this product yourself!
Improperly disassembly of the product may
invalidate the warranty and lead to possible danger!
9> Keep the machine away from any chemical reagent.

NOTICE:
1. For your safety, please do not use this product during thunderstorms.
2. This product has an operating temperature range of 10°C~+40°C and a storage
temperature range of -10°C~+60°C. Extreme temperatures can affect the device's
performance and service life.
3. Although the product has been tested to withstand harsh operating environments, do
use the product in an improper manner.
4. Please do not disassemble this product. In case of failure, please send to our autho-
rized service centers to proceed with repairs.
5. After the device has reached the end of its service life, please discard in a proper way
to avoid environmental pollution.
6. When replacing the battery or during the use of an external power supply, shut down
the device completely before removing the battery or disconnecting the external power
supply to prevent damage.
CAUTION: The connection to usb interfaces has to be limited to usb 2.0 version or
higher. The connection to so called power usb is prohibited.
Importer: [Name:AllSee Technologies Limited ]
[Address :Unit 5, 88 Kettles Wood Drive, Woodgate Business Park, Birmingham,
United Kingdom B32 3DB]
Manufacturer: [Name:Shanghai Goodview Electronics Technology Co., Ltd.]
[Address:Room 866,NO.888,West Huanhu 2 Road,NanhuiXincheng Town,Pud-
ong,201306]
Radiofrequency radiation exposure Information:
This equipment complies with the radiation exposure limits set forth for an uncon-
trolled environment. This equipment should be installed and operated with minimum
distance of 20 cm between the radiator and your body. This transmitter must not be
co-located or operating in conjunction with any other antenna or transmitter.
Hereby, [Shanghai Goodview Electronics Technology Co., Ltd.] declares that the radio
Equipment type [M*****] is in compliance with Directive 2014 / 53 /EU.
The full text of the EU declaration of conformity is available at the following internet
address: http://XXXXXXXXXXXXX

1
I. Overview
1.1 Brief Introduction........................................................................... 2
1.2 Product Structure........................................................................... 2
II. Installation ....................................................................................... 3
2.1 Machine Unboxing.......................................................................... 3
2.2 Installation Guide........................................................................... 4
2.1.1 Wall Mount .................................................................................. 4
III.User Guide
3.1 Power on.......................................................................................... 5
3.2 Remote Control .............................................................................. 6
IV.OSD Menu
4.1 System Setting................................................................................. 7
4.1.1 Language ...................................................................................... 8
4.1.2 Switch Screen Mode .................................................................... 8
4.1.3 Resolution..................................................................................... 9
4.1.4 Real Time Clock .......................................................................... 9
4.1.5 Play Log........................................................................................9
4.1.6 USB............................................................................................... 9
4.1.7 Scroll Text....................................................................................9
4.1.8 Touch Aids .................................................................................. 10
4.1.9 Sync Setting................................................................................. 10
4.1.10 Restore to Factory Setting .......................................................11
4.1.11 Auto Start..................................................................................11
4.2 System Control .............................................................................. 11
4.3 Network Setting ............................................................................ 15
4.4 Date and Time ............................................................................... 19
4.5 Timing Power on/off ..................................................................... 21
4.6 Timer Strategy .............................................................................. 23
4.7 File Management ........................................................................... 24
4.8 Single (Stand-alone) publishing.................................................... 25
V.Troubleshooting.............................................................................. 26
VI.Service Policy................................................................................. 28
Ⅴ.Normal Mode RF Power Range(WLAN,Bluetooth).................... 29

2
I. Overview
1.1 Brief Introduction
Digital signage adopts LG original IPS commercial panel, 450 cd/ , the wider color
range and high restoration showing professional image quality in any lighting
environment. Anti-spot tech ensures a long-term well performance without black
spot. Built-in GTV publishing system makes multi-terminals remote control comes
true. The intelligent power on & off function save more cost for you. Reliable and
high compatibility, the product is widely applied in shopping malls, supermarkets,
commercial chains, convenience stores, restaurants and so on.
1.2 Product Structure
Schematic drawing and external port: M43SAQ
(Front View)(Side View)(Back View)
01. AC IN
02.AC Switch
03.LAN
04.HDMI

3
05.VGA
06.AUDIO IN
07.USB
08.USB
09.WIFI
II.Installation
2.1 Machine unboxing
not place the product face down without a protective
Due to the large size and heavy weight, we suggest at least two people in handling.
Since the display panel is fragile and easily scratched, please handle it gently. Do
pad. After unpacking, check
that the carton contains the following items:
Power cord*1
Quick start guide*1
Remote control*1
Warranty card*1
Certificate*1
Panel*1
AAA battery*2
WIFI antenna
Safety and environment
protection considerations *1
4
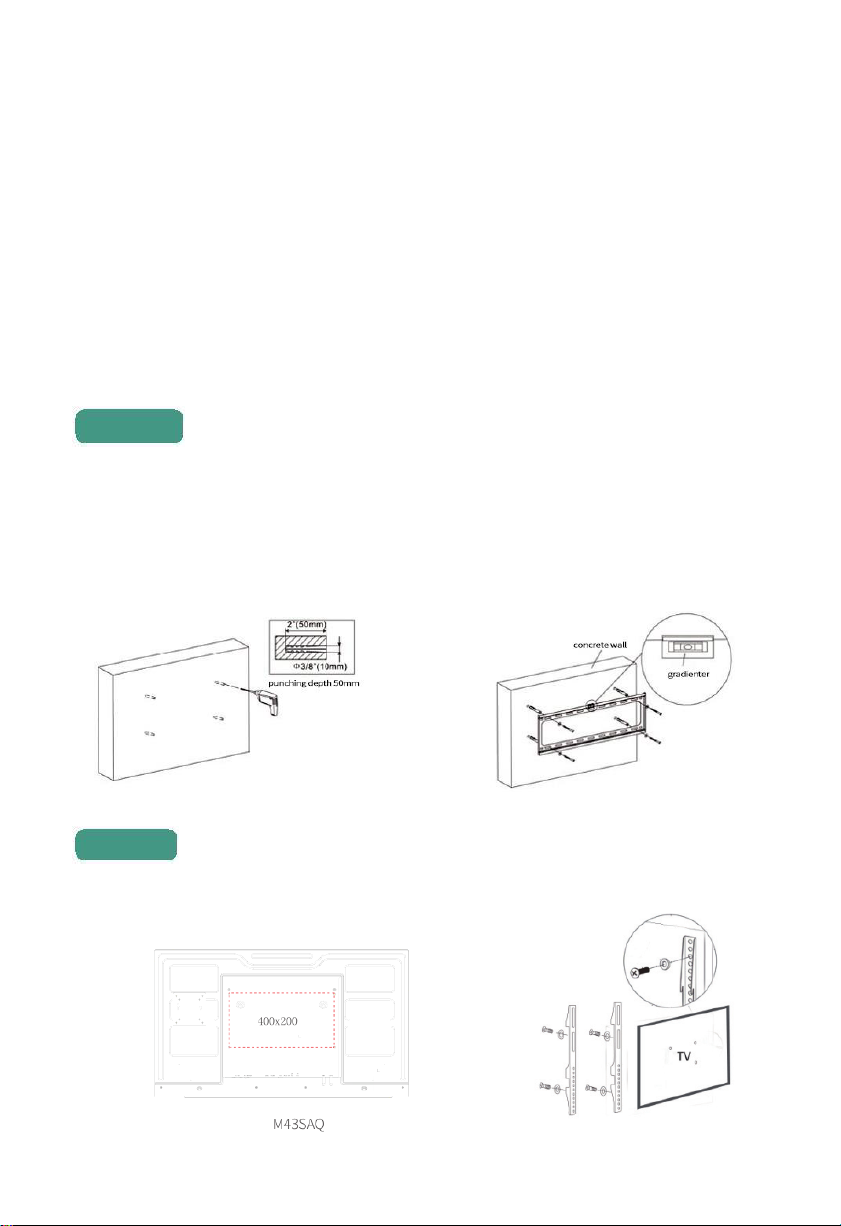
2.2 Installation Guide
The manufacturer shall not be liable for installation by non-professionals. To avoid
shortening the service life of electronic components, do not install in a humid
environment such as kitchen, bathroom, and etc. Please save the packing cases for
future transportation.
2.2.1. Wall mount
Select the appropriate location on the wall, determine the installation hole and install
the hanging board on the wall (in the use of hanging board on the wooden wall,
make sure that the thickness of the wooden wall is at least 3 cm, bearing weight is
100 kg)
Fix the hook at the back of the machine.
Step 2
Step 1

5
Hang the machine with hook fixed to the hanging board and
tighten the safety screw.
III. Operation Guide
3.1 Power on
Turn on the switch when powered on. (picture below is interface of M43SAQ for
reference)
Step 3

6
3.2 Remote control
Note: Only on the home page can you call out the OSD menu by pressing SETUP.

7
V. OSD Menu
Use the remote control to open the OSD menu to set system parameters. Press STOP
on the remote to stop the current playback and present the home page as shown below.
The middle of the top displays the current playing status, the bottom from the left to
right are time, date and local storage (including apk version, firmware version, local
storage). The working mode is LAN by default.
4.1. System Setting
Navigate to System Settings on the main menu and press on the remote to open it.
Ce manuel convient aux modèles suivants
1
Table des matières
Autres manuels Goodview Affichage numérique


