
GILMAN gemini GAF1300 Manuel utilisateur

1
MODEL NO.: GAF1300 / GAF1300V
1200-1400W
DIGITAL
ARIA FRYER
A GILMAN GROUP BRAND
電子控制無油煎炸鍋

2
Please read and retain for future reference.
• Ensure the appliance is in placed on a horizontal, even and stable surface.
• Verify that the mains voltage is the same as that indicated on the rating plate
on the appliance before use.
• Make sure that you always use a grounded wall socket to connect the appliance.
• Always remove the plug from the wall socket when the appliance is not in use.
• Remove the plug from the wall socket by pulling the plug, not the power cord.
• Make sure that the appliance, the power cord and plug do not make contact
with water.
• Make sure that the appliance, the power cord and plug do not make contact
with hot surface, such as a hot hob or naked ame.
• Check the appliance’s power cord regularly to make sure it is not damaged.
Do not use the appliance if the power cord is damaged. If the power cord is
damaged, it must be replaced by an electrical technician or a person with
similar qualication, in order to avoid any hazards.
• Never use the appliance in the vicinity of ammable material.
• Certain part of the appliance may get hot, such as air outlet. Do not touch
these part to prevent scalding yourself.
SAFETY INSTRUCTION - GENERAL
SAFETY INSTRUCTION - ELECTRICITY AND HEAT
• Use this appliance solely in accordance with these instructions.
• This appliance is for household use only, not for commercial purpose.
• Remove all packaging material from the appliance before use.
• This appliance shall not be used by children of 0 to 8-year old.
• This appliance can be used by children older than 8-year old and persons
with reduced physical, sensory or mental capabilities or lack of experience
and knowledge, but only if they have been given supervision or instruction
concerning use of the appliance in safe way and understand the hazards
involved.
• Children should be supervised to ensure that they do not play with the appliance.
• Cleaning and maintenance must not be done by children.
• Have any repairs carried out solely by a qualied electrician. Never try to repair
the appliance yourself.
• Do not handle the plug or appliance with wet hands.
• Do not immerse the main body in water.
• Children shall not play with the appliance.
• Do not leave the appliance unattended when connected to the mains supply.
• Keep hair, loose clothing, ngers and all parts of the body away from openings
of the appliance.
• Only use the attachments/accessories supplied with the product.

3
• Do not place the appliance against a wall or against other appliance, it should
be placed with a minimum distance of 10cm away.
• During operation, hot steam is released through the air outlet. Keep your
hands and face at a safe distance away from the steam and the air outlet.
Also be careful of hot steam and air when you remove the frying basket from
the appliance.
• Pay attention to any accessible surfaces that may become hot during use.
• Slight smoke on the rst use is a normal occurrence. It will disappear shortly
afterwards.
SAFETY INSTRUCTION - DURING OPERATION

4
Aira Fryer
Touch screen control panel
1. Touch screen with LCD display panel
2. Upper housing
3. Main cord
4. Body case
5. Window door
6. Air outlet
7. Air inlet
8. Bake tray/ Oil collection tray
9. Mult-functional grill rack
10. Frying basket with detachable handle
11. Food seperator
12. Kebab sticks (4 pieces)
13. Bread toast rack
1. TouchcontrlpanelwithLCDdisplay
2. Temperature(65℃-200℃)/
Timersetting(1-30mins)
3. Increasebutton
4. Decreasebutton
5. Start/Stopbutton
6. PowerON/OFF/Cancelbutton
7. Cookingprograms:
(DIY,Meat,Fries,Toast,Chicken,Fish)
PRODUCT OVERVIEW
5
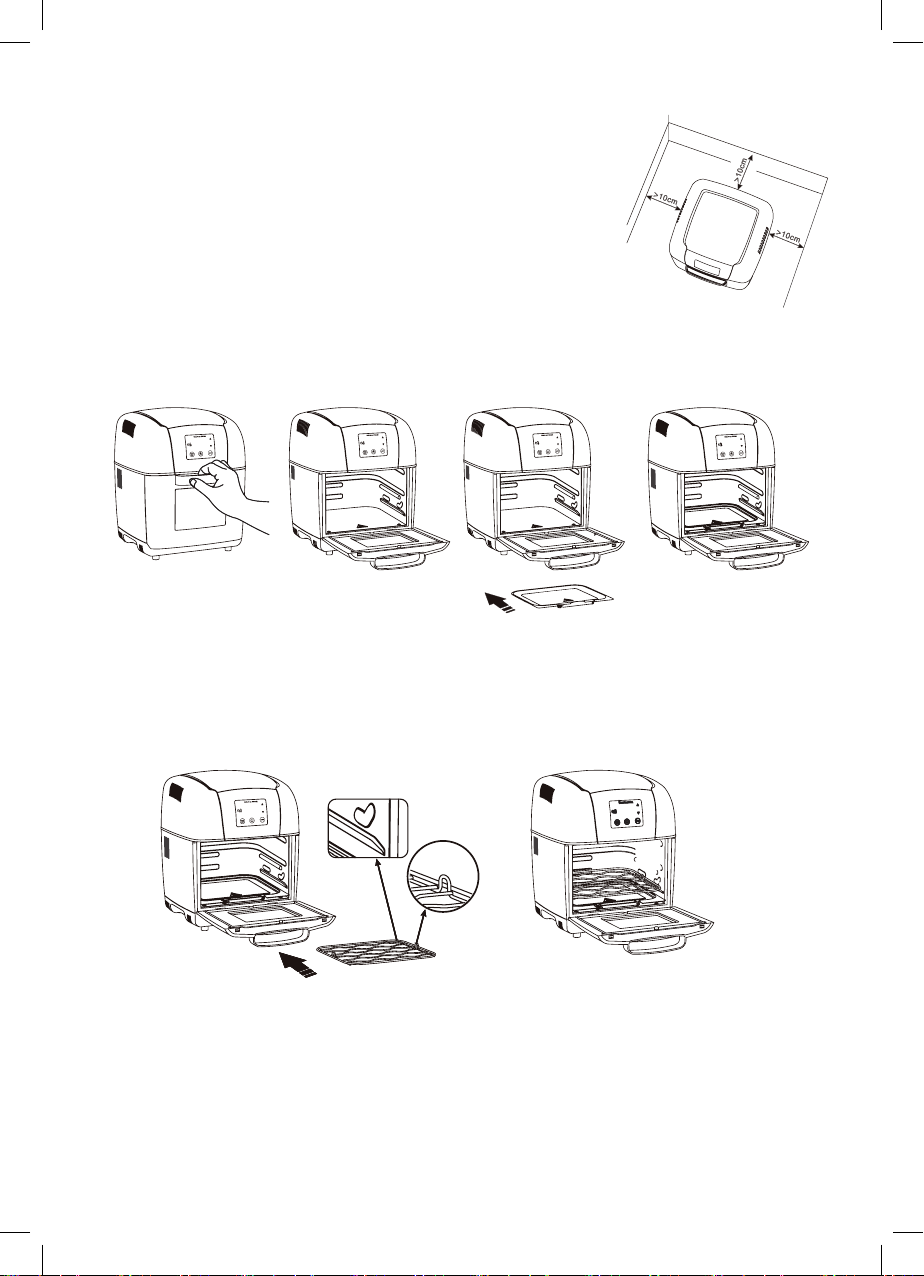
• Place the appliance on a stable, horizontal and level surface.
Leave at least 10cm free space on the back and sides, and
pay attention away from curtains, wall covering and other
combustible materials.
• Firstly, open the front door, slide the bake tray into the fryer on the inner base.
(See Pic.1 - 4)
• Insert the Multi-functional grill rack in along the guiding groore that built on the sides
of inner wall. (See Pic.5 - 6)
• Please always keep the bake tray stay in the lowest layer for gathering oil from fried
ingredients.
• Choose proper accessories for different cooking.
• Please use the GLOVE to take out the mult-functional grill rack or bake tray after cooking
nished.
NOTE:
ASSEMBLY INSTRUCTION
Side Side
Back
Pic.1 Pic.2
Pic.5 Pic.6
Pic.3 Pic.4
Bake tray/ Oil collection tray :

6
Basket with detachable handle:
Basket :
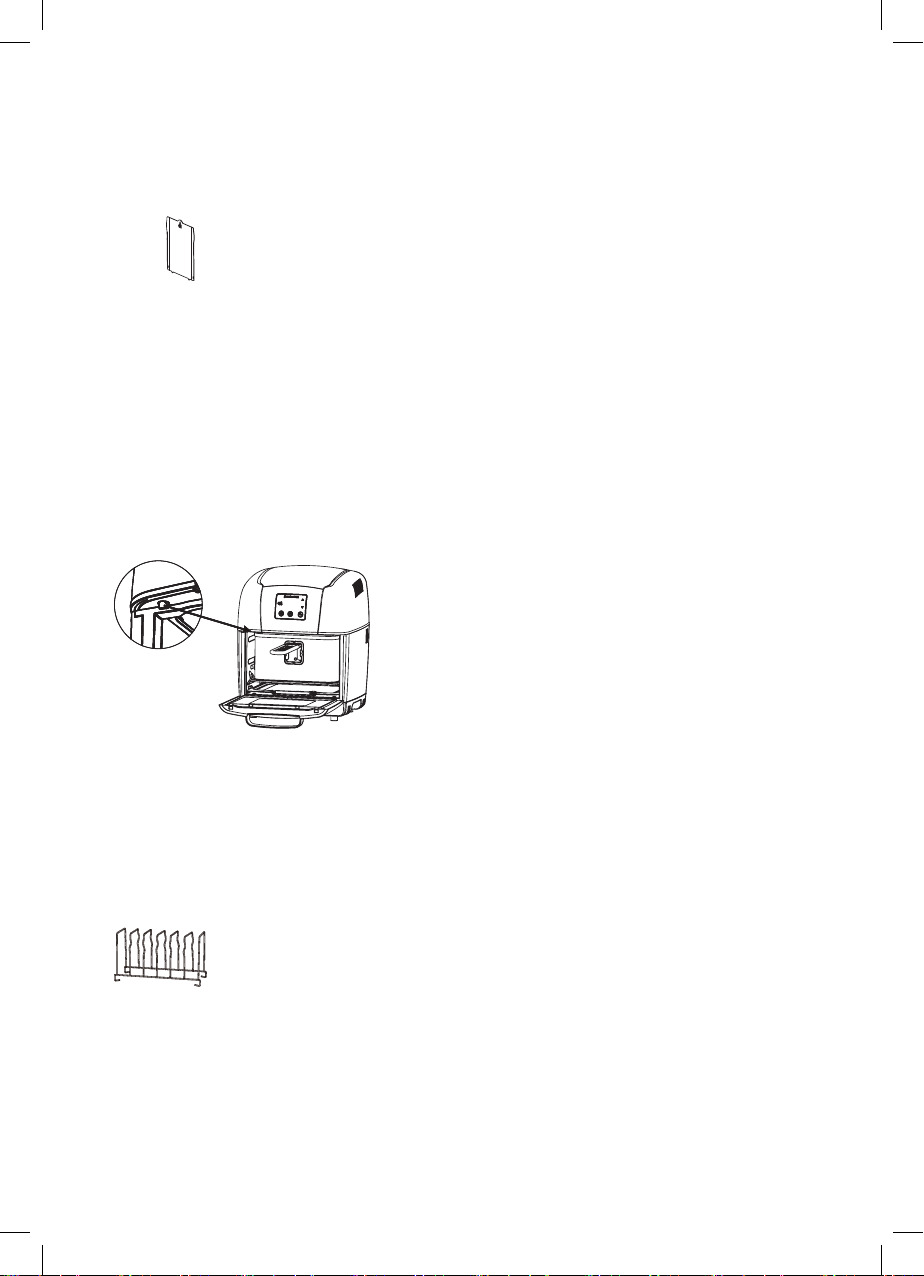
The handle should always be used when taking the basket in and out of the unit. The
metal locking hook needs to be in place before lifting the basket. (See Pic. 7 - 8)
After ll ingredients into the well-assembled Basket with its handle, put the basket into
the inner chamber, then dismantle the handle from basket and close the front door.
(See Pic.12 - 15)
To place the handle on the basket, squeeze the handle together in the open position
(See Pic.9). Then attach it to the basket with the hooks facing down and bottom-up
installation (See Pic.10), lock in place with metal hook securely before hold up the basket.
(See Pic.11)
Open hook Locked hook
Pic.9
Pic.7
Pic.10
Pic.8
Pic.13 Pic.14
Pic.11
Pic.12 Pic.15
(Metal locking
hook must be
locked in place)
7
Pic.16
Pic.17
Food separator :
Bread toast rack :
Insert a food separator in the middle of the frying basket to separate the different
ingredients. (See Pic.16)
Place the slide breads into the toast rack on the bake tray (Max 6 slices); Then put the
bake tray together with breads and toast rack into the inner chamber; And then close the
front door before toasting.
• Please always keep the bake tray stay in the lowest layer for gathering oil from fried
ingredients.
• Do not let food exceed the basket. If the ingredients may be expansion after heating,
count the amount according to the heated volume.
•
There is a safety switch for operating safety. (See Pic.17)
• When the front door closed properly, and machine can only start operation.
NOTE:

8
Kebab sticks :
Mode Choosing
Place meat or vegetable on the skewers then place them on top of the mult-functional
grill rack inside the unit, slide the bake tray into the fryer on its inner base.
• Connet the the unit to the wall socket, the Power button will light twinkly with a long
“beep” sound at same time.
• Press the Power button slightly, the digital panel will light all, and the screen show
the default time and temperature alternately, “30:00 ” 200ºC ”
• At this time, there are two kinds of operating modes for users to choose. The rst is
Menu mode, the second is Manual mode.
• Menu mode: The appliance has been set in ve common foods menu for users to
choose.
• Manual mode: Choose DIY menu, allows the users to set according to different foods,
set temperature and frying time. Set the temperature from 65ºC to 200ºC and time up
from 1 to 30 minutes manually.
OPERATING INSTRUCTION
• If you want to stop the program for a while and continue later, you can press the “Start/
Stop” button to pause the process, and can press the “ start/ stop” button again to
continue the program.
• If you press the “Start/ Stop” button during cooking and then open the door, the operation
will be pause. When you close the door within 3 minutes, the program will continue
with your previous setting. The program will stop if door keeps opening more than 3
minutes and need to reset your menu again.
• If you need pre-heat, choose DIY menu, adjust the required time manually.
NOTE:

9
Cooking setting
Cooking nish
• Menu mode: In the menu recipes, there are SIX kinds of function menu, respectively:
DIY, Meat, Fries, Fish, Chicken, Toast.
• Press “MENU” button once, the rst recipes of “DIY” start ashing, click the “MENU”
button once more, the next recipe light ashing, and press the “MENU” button one by
one. The recipe will ash one by one.
• While a recipe is ashing, press the START/STOP button, the appliance begins to
work under the default temperature and time. The preset cooking time and timperature
are listed in the table below.
• When the appliance is nished cooking, it will be heard 5 “BEEP” sounds, its heater
has stopped heats up, but its fan need to work continuously until the temperature of
center of the Inner Chamber drop to 120ºC.
• Open the front door, then assemble and lock the handle on the basket, and make
sure the handle and basket are fastened tightly together with the metal hook. Hold the
handle, take out the basket.
DIY Meat Fries Toast Chicken Fish
Times(Minutes) 3 10 20 6 20 14
Temperature(°C) 180 160 180 190 180 180
• Manual mode: When you need to set different temperature and time to cook different
foods, recommend to use the manual mode. i.e. DIY menu setting.
• Press the (time/temperature) switch button ,
,
,
, the default time/tempsetting ashes,
when the time indicator lights on, press the or button to adjust the time. After
adjusting time and then press the ,
,
,
button again to set the temp, the temperature
display is blinking, the temperature indicator lights on, press the or button to
increase or decrease the temperature.
• After time and temperature setting done, press “START/STOP”button to start the
cooking process.
• In the process of cooking, regular or irregular ip food, to help to cooking more evenly.
• Press the or button for a long time, can quickly adjust the time and temperature.
• As ingredients differ in origin, size, shape and brand, please adjust the best cooking
time and temperature accordingly for your ingredients.
• During cooking, the basket, toast rack, grill rack, sticks and tray’s temperatures are
very high. Pay attention to the hot surface and do not touch them with bare hands;
• Every time when you pull out the basket to ip the foods need to use handle, then push
the Basket into the Inner chamber again, and press “START/STOP” button to continue
working.
• When take out the basket from the appliances, never try to
unlock the Handle and the Basket. It’s dangerous.
CAUTION:
DANGER:
10
• The Basket may be high temperature, never try to touch it with bare hand to avoid
injuries.
• If the ingredients are not well cook yet after cooking, simply put the basket back into
the appliance and add few more minutes of extra cooking time again.Certain part of
the appliance may get hot, such as air outlet. Do not touch these part to prevent scald-
ing yourself.
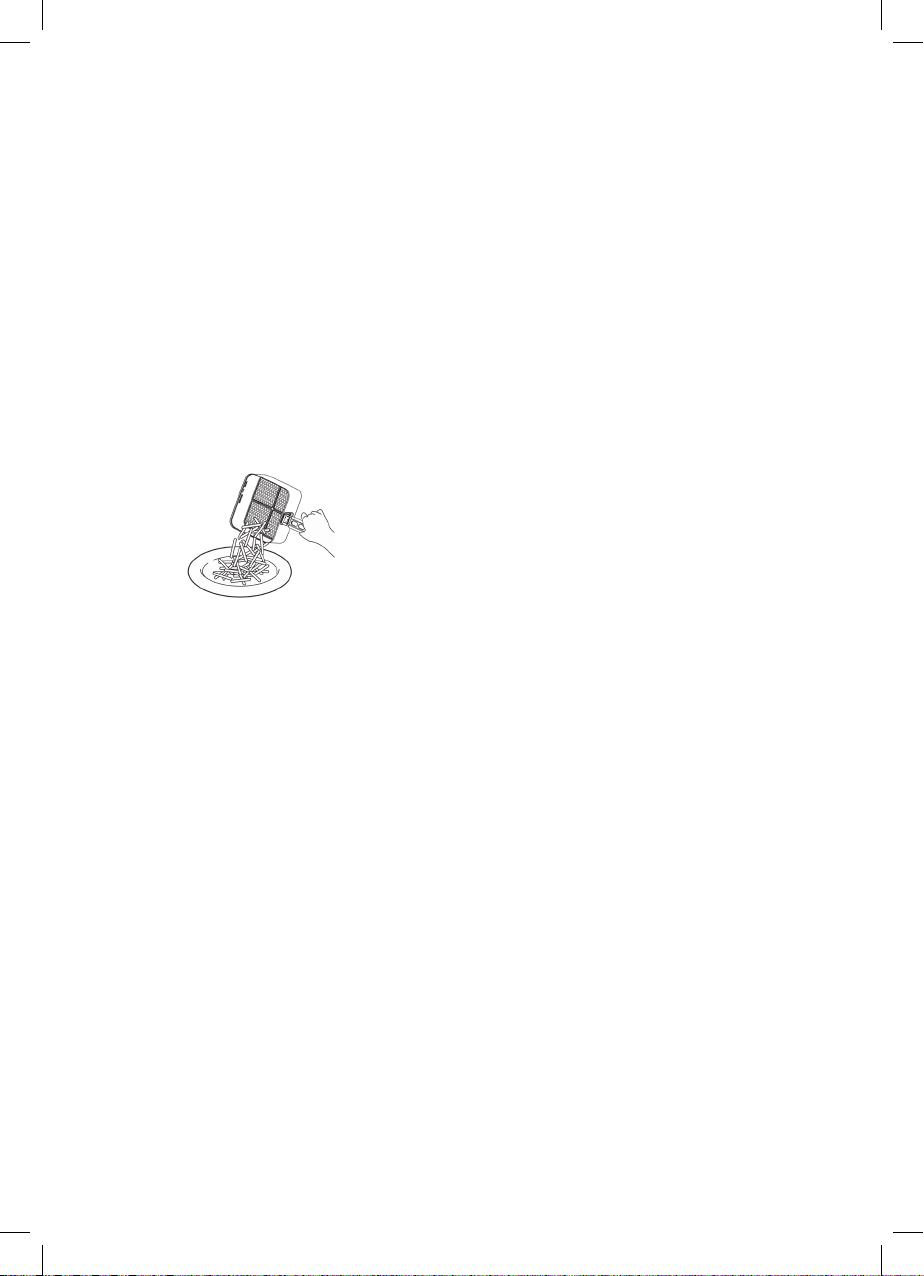
• Remove the cooked ingredients on a plate or tableware. (See Pic.18)
• Ater cooking nished, unplug the power cord from wall to wait the unit chill down for
safety cleaning and storage.
• To prolong the service life of the Aria fryer and its components, please let the fryer cool
down when operate continuously for around 30 minutes and start another cook work.
• All accessories are dishwasher-proof.
• Unplug the appliance and let it cool down completely before storage
• Make sure all parts are cleaned and dry before storage.
CAUTION:
TIP:
NOTE:
Pic.18
Clean the appliance after every use. Do not clean the frying basket and the interior of the
appliance by metal kitchen utensils or abrasive cleaning materials, as this may damage
their non-stick coating.
• Remove the plug from the socket and let the appliance cool down completely.
• Wipe the exterior of the appliance with a moist cloth.
• Clean the accessories with hot water, some detergent and a non-abrasive sponge.
• Remove any remaining dirt by degreasing liquid.
CLEANING AND STORAGE
Ce manuel convient aux modèles suivants
1
Table des matières
Autres manuels GILMAN Friteuse


