Gerber Instruments Micro 3 Manuel utilisateur

Centrifuge Micro III
OPERATING INSTRUCTIONS

Operating Instructions Centrifuge Micro III
Gerber Instruments AG 1 Version 1.2 (03/2021)
Table of contents:
1. Introduction 3
1.1 Use 3
1.2 Description 3
1.3 Ambient conditions 3
2. Safety instructions 3
2.1 Symbols of the operating instructions 3
2.2 General safety 4
2.3 Informal safety instructions 4
2.4 Safety instructions for centrifugation 5
2.5 Safety instructions for cover lock 5
2.6 Safety instructions for unbalance switch-off 5
3. Description of centrifuge Micro III 6
4. Unpacking/Device control 7
4.1 Unpacking 7
4.2 Device control 7
4.3 Control accessories 7
4.4 Avoiding damages on the device 7
5. Description of operating unit 8
5.1 Segment display 8
5.2 LED-displays 8
5.3 Button functions 9
6. Commissioning 10
6.1 Initial start 10
6.2 Setting the preheating function 10
6.3 Setting time and temperature 11
7. Daily work
11
8. Cleaning and maintenance 12
8.1 General notes for cleaning and maintenance 12
8.2 Notes for cleaning with glass breakage 12
9. Checking the unbalance switch-off 12
10. Disturbances 13
10.1 Error table 13
10.2 Emergency release of the lid on power interruption 13

Operating Instructions Centrifuge Micro III
Gerber Instruments AG 2 Version 1.2 (03/2021)
11. Packaging 14
12. Disposal 14
13. Technical service 14
14. Warranty 15
15. Order numbers centrifuge Micro III 16
16. Order numbers accessories Micro III 16
17. Technical data Micro III 17

Operating Instructions Centrifuge Micro III
Gerber Instruments AG 3 Version 1.2 (03/2021)
Warning symbol: Attention, possible dangerous situation
Warning symbol: Dangerous electrical voltage
1. Introduction
1.1 Use
The small centrifuge Micro III is used for the determination of fat in milk and dairy products
according to Gerber or Babcock.
1.2 Description
The centrifuge Micro III has high safety standards and reliability and following
product features:
Strong sheet steel housing with an acid-resistant paint work
Cover lock to prevent opening of the centrifuge during operation
Motor with elastic bearing for a smooth run
NEW: Increased precision thanks to the controlled speed
NEW: Preheating option
NEW: Unbalance switch-off in case of uneven filling or sudden glass breakage
1.3 Ambient conditions
Permissible ambient temperature +10 °C to +40 °C
Max. humidity 80 %
Lowest storage and transport temperature -20 °C
2. Safety instructions
2.1 Symbols of the operating instructions

Operating Instructions Centrifuge Micro III
Gerber Instruments AG 4 Version 1.2 (03/2021)
2.2 General safety
Before connecting the device to a fused and properly earthed AC outlet it is
necessary to compare the indications on the type plate of the centrifuge or by means
of the technical data (item 17) with your mains connection.
The proper function and operational safety of the device can only be ensured by
complying with among the mentioned ambient conditions (item 1.3).
If the device is transported from a cold to a warm environment some malfunction may
occur due to the formation of condensation. In this case, it is necessary to wait untill
the temperature of the device adapts to the room temperature before recommissioning
the device.
The centrifuge should only be operated by authorized persons.
Anyone who is under the influence of health disturbances, medications, drugs,
alcohol or over fatigue must not operate the device. Users must be familiar with the
contents of the operating instructions.
Do not use the device with a damaged cable or plug.
The use of accessories which are not original spare parts from Gerber Instruments
results in loss of warranty.
Switch off / disconnect the device from the mains, if it is not being used, if parts are
replaced and if the device is being cleaned.
If you no longer can work properly with the device, then it needs to be
decommissioned and secured against recommissioning by labelling it.
Contact the technical service of Gerber Instruments AG (item 11).
2.3 Informal safety instructions
Read the operating instructions carefully before installation. The non-observance of
these instructions may result in malfunctions or damages to the centrifuge or persons.
A claim under guarantee cannot be granted.
The operating instructions are a part of the device. Keep these during the life of the
centrifuge.
Pass the instructions on to any subsequent owner or user of the centrifuge.
The operating personnel must have read and understand the operating instructions.

Operating Instructions Centrifuge Micro III
Gerber Instruments AG 5 Version 1.2 (03/2021)
2.4 Safety instructions for centrifugation
Please check that the centrifuge is set up properly (see 4.1)
Please check before commissioning the centrifuge, rotor and accessories for visible
damage (see 4.2)
The rotor must be loaded symmetrically at equal weights (see 6.1 and 7.).
Avoid corrosion on centrifuge and accessories by careful maintenance (see 8).
Open the centrifuge when it is not in use so that moisture can evaporate.
The centrifuge can be stopped at any time. Press the START/STOP button.
2.5 Safety instructions for cover lock
The centrifuge may only be operated with the cover closed. A cover lock blocks the
cover closure during the run and allows you to open only at standstill.
In case of cut-off of electricity the lid may be opened manually (see 10.2).
2.6 Safety instructions for unbalance switch-off
The centrifuge stops automatically in case of strong vibrations. The switch-off
sensitivity is set at the factory.
If an unbalance switch-off took place, the centrifuge is stopped immediately and a
message appears on the display.
Open the cover and remove the causes of the unbalance.
Close the cover and press START/STOP again.

Operating Instructions Centrifuge Micro III
Gerber Instruments AG 6 Version 1.2 (03/2021)
3. Description of centrifuge Micro III
Cover
Housing
Main switch and mains plug connection
Rotor with inserts
Operating unit
1
2
3
4
5
1
2
5
4
3

Operating Instructions Centrifuge Micro III
Gerber Instruments AG 7 Version 1.2 (03/2021)
4. Unpacking/Device control
4.1 Unpacking
Make sure that the packaging has not been damaged.
Take the device and the inserts out of the packaging box.
Remove the remaining packaging material.
Remove the foam material in the centrifuge, see 6.1.
Place the device on a flat and dry substructure.
4.2 Device control
Control the centrifuge according to the following criteria:
Transportation damages
Other irregularities
If one of these criteria applies, immediately inform the forwarding agent or the supplier.
4.3 Control accessories
Check with the delivery note and your order if the scope of delivery is complete:
Type of centrifuge
Sleeves
Specific country cable
Fork key
Wire for emergency unlocking
Operating instructions
4.4 Avoiding damages on the device
Do not drop or disassemble the device.
The centrifuge must always be placed on a firm and dry substructure.
During transport from cold to warmer places, condensation water will collect inside the
centrifuge. It is important to allow sufficient time for drying before the centrifuge can be
used again.

Operating Instructions Centrifuge Micro III
Gerber Instruments AG 8 Version 1.2 (03/2021)
5. Description of operating unit
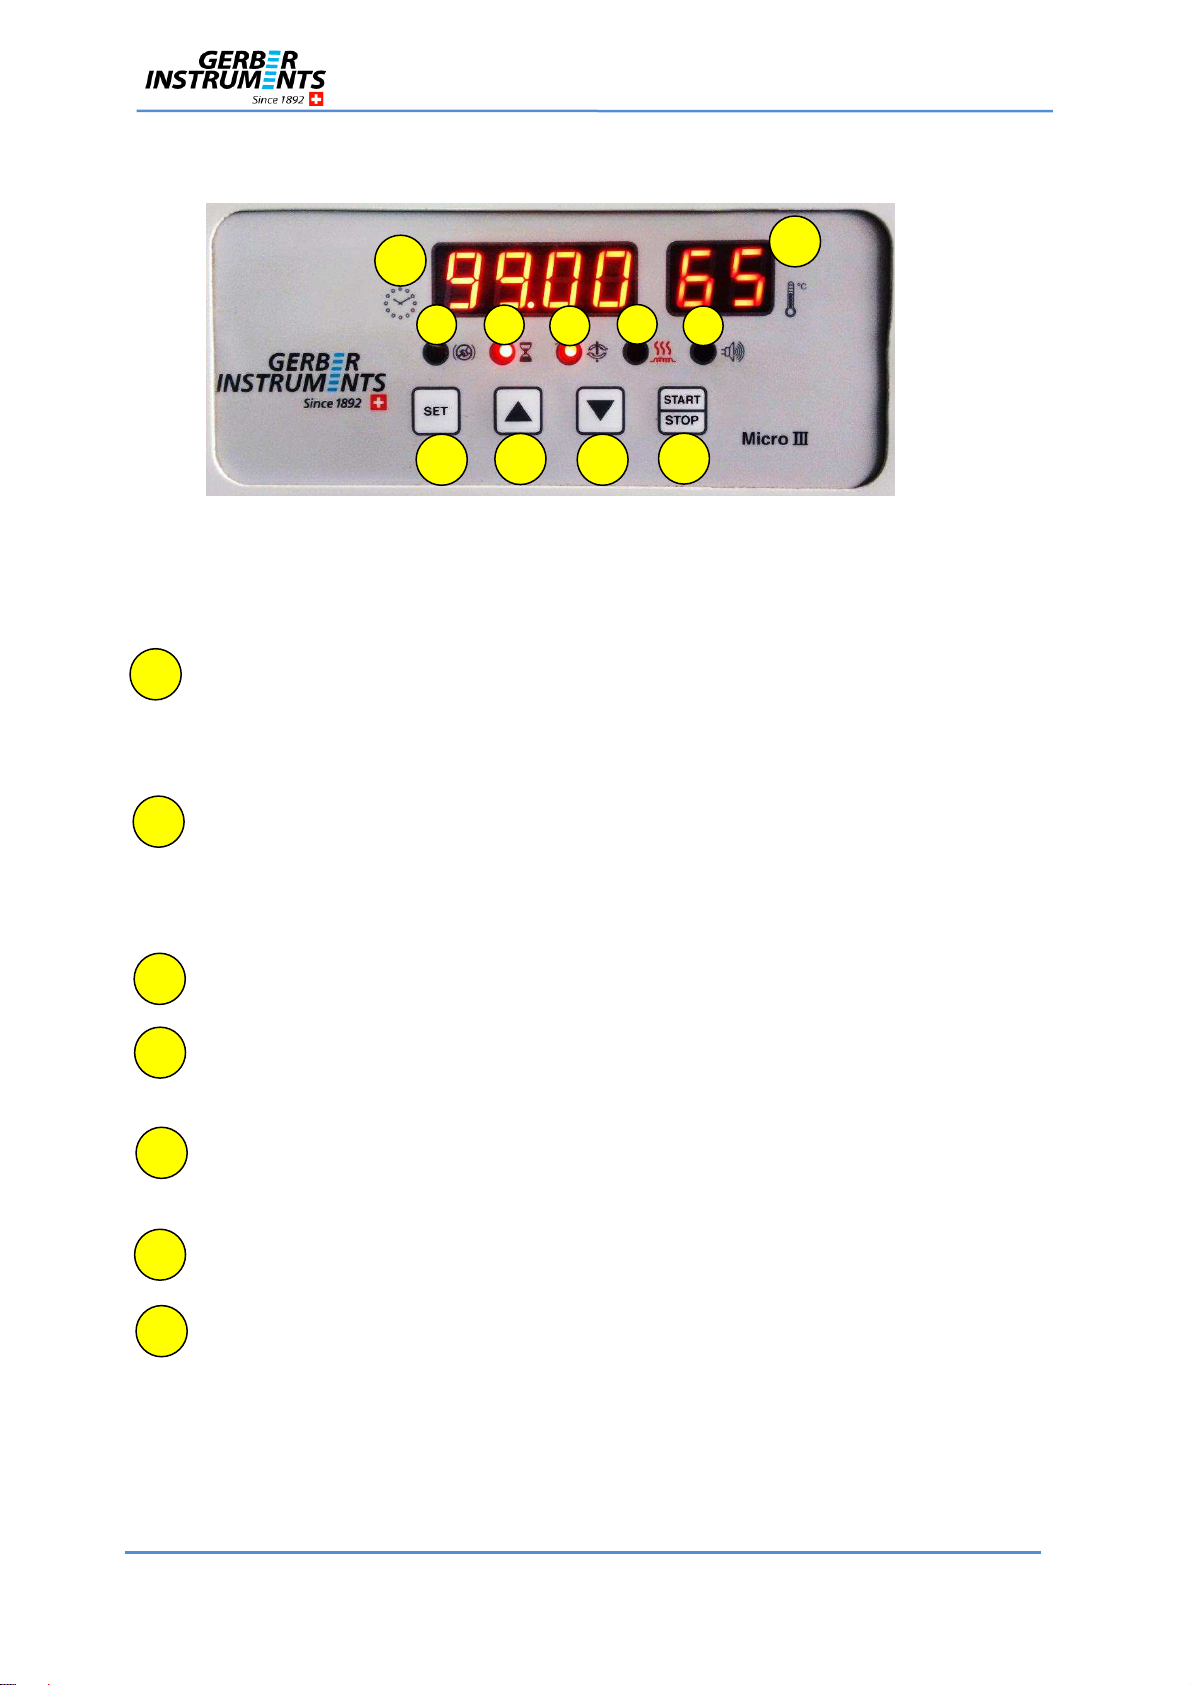
The control unit consists two segment displays, 5 LED’s and 4 buttons.
5.1 Segment display
Time display
It is a 4-digit display showing the set time in the standby mode and the elapsed
time in the operating mode (centrifugation).
Factory setting: 5 minutes
Temperature display
It is a 2-digit display showing the set temperature in the standby mode and the
actual temperature in the operating mode (centrifugation).
Factory setting: 55 °C, as the reaction milk + sulphuric acid also generates heat.
5.2 LED displays
LED Brake
This LED is simple and lights up red shortly before the end of the braking process.
LED Time
This LED is dual. In standby mode it lights up red. In the operating mode
(centrifugation) it lights up green and starts flashing.
LED Rotor
This LED is dual. In standby mode it lights up red. In the operating mode
(centrifugation) it lights up green.
LED Heating
This LED is single and flashes red in operating mode (centrifugation).
LED Alarm
This LED is single and flashes red when a failure occurs.
1
3
2
8
9
10
11
1
2
3
4
5
6
7
4
5
6
7

Operating Instructions Centrifuge Micro III
Gerber Instruments AG 9 Version 1.2 (03/2021)
5.3 Button functions
Button SET
Setting temperature and time (Setup mode)
Button
Increase of temperature and time
Button
Reduction of temperature and time
Button START/STOP
Start the centrifuge, stops the centrifuge before the set time has elapsed.
Pre-heating function
8
9
10
11
Table des matières
Autres manuels Gerber Instruments Équipement de laboratoire
Manuels Équipement de laboratoire populaires d'autres marques

Agilent Technologies
Agilent Technologies 5800 ICP-OES Manuel utilisateur

Endress+Hauser
Endress+Hauser Cleanfit CPA875 Manuel utilisateur

NI
NI PXI-5422 Manuel

Collomix
Collomix Aqix Manuel utilisateur

SPEX SamplePrep
SPEX SamplePrep 6875 Freezer/Mill Series Manuel utilisateur

Ocean Insight
Ocean Insight FLAME-NIR+ Manuel utilisateur