GeoVision PN300 Manuel utilisateur

PN300 & SQP133
User’s Manual
PN300SQP133V101-A

© 2012 GeoVision, Inc. All rights reserved.
Under the copyright laws, this manual may not be copied, in whole or in part,
without the written consent of GeoVision.
Every effort has been made to ensure that the information in this manual is
accurate. GeoVision, Inc. makes no expressed or implied warranty of any kind
and assumes no responsibility for errors or omissions. No liability is assumed
for incidental or consequential damages arising from the use of the information
or products contained herein. Features and specifications are subject to
change without notice. Note: no SD/SDHC card slot or local storage function
for Argentina.
GeoVision, Inc.
9F, No. 246, Sec. 1, Neihu Rd.,
Neihu District, Taipei, Taiwan
Tel: +886-2-8797-8377
Fax: +886-2-8797-8335
http://www.geovision.com.tw
Trademarks used in this manual: GeoVision, the GeoVision logo and GV
series products are trademarks of GeoVision, Inc. Windows and Windows XP
are registered trademarks of Microsoft Corporation.
February 2012

iii
Content
Chapter 1 Introduction ........................................................................................................1
1.1 Features ....................................................................................................................1
1.2 Packing List ................................................................................................................1
1.2.1 PN300 .........................................................................................................1
1.2.2 SQP133.......................................................................................................1
1.3 Optional Accessories..................................................................................................2
1.4 Overview ....................................................................................................................3
1.4.1 PN300.........................................................................................................3
1.4.2 SQP133.......................................................................................................5
1.5 The IR Remote Control ..............................................................................................7
Chapter 2 Getting Started ...................................................................................................9
2.1 Connecting the Device ..............................................................................................9
2.1.1 Connecting the PN300 ................................................................................9
2.1.2 Connecting the SQP133 ...........................................................................10
2.2 Installing Wall Mount ................................................................................................11
2.3 Installing VESA Monitor Mount.................................................................................12
2.4 Playing the Slideshow ..............................................................................................13
Chapter 3 System Setup ...................................................................................................14
3.1 The Setup Menu.......................................................................................................14
3.2 Setting Video Output and Resolution .......................................................................15
3.3 Setting Slideshow Display Effect..............................................................................16
3.4 Looking Up Device Information ................................................................................17
3.5 Setting the System Time ..........................................................................................18
3.6 Setting the Network ..................................................................................................19
3.6.1 Wired Network Connection .......................................................................19
3.6.2 Wireless Network Connection...................................................................20
3.7 Setting the Device Name..........................................................................................21
3.8 Copying Files from the USB Storage Device............................................................21
3.9 Upgrading the Firmware...........................................................................................22
3.10 Restoring to Factory Default Settings.....................................................................23
Chapter 4 Content Designer .............................................................................................24
4.1 Minimum System Requirements ..............................................................................24
4.2 Installing the Content Designer ................................................................................25
4.3 The Menu Bar...........................................................................................................26
4.4 Creating a Project.....................................................................................................27
4.5 Playing the Project on PN300 or SQP133................................................................34

iv
Chapter 5 Content Schedule.............................................................................................35
5.1 Installing the Schedule .............................................................................................35
5.2 Setting the Content Schedule...................................................................................36
Chapter 6 CMS Lite............................................................................................................43
6.1 Additional System Requirements .............................................................................44
6.2 Installing the CMS Lite .............................................................................................46
6.3 Connecting the Devices to CMS Lite........................................................................47
6.4 The Main Screen......................................................................................................48
6.5 Uploading Video and Image Files ............................................................................50
6.6 Uploading the Scenario............................................................................................51
6.7 Uploading the Schedule ...........................................................................................52
6.8 Uploading the Firmware ...........................................................................................53
6.9 Uploading the Scrolling Ticker..................................................................................54
6.10 Changing the Device Name ...................................................................................55
Chapter 7 CMS Server .......................................................................................................56
7.1 System Requirements ..............................................................................................57
7.1.1 Minimum System Requirements ...............................................................57
7.1.2 GV-USB Dongle ........................................................................................57
7.2 Installing CMS Server...............................................................................................59
7.3 Connecting the Devices to CMS Server...................................................................60
7.4 Starting CMS Server.................................................................................................61
7.5 Getting Started .........................................................................................................64
7.5.1 Preparing the Package..............................................................................64
7.5.2 Transferring the Package ..........................................................................65
7.5.3 Uploading the Package.............................................................................67
7.5.4 Applying the Scrolling Ticker.....................................................................68
7.6 Information ...............................................................................................................69
7.6.1 Device Information ....................................................................................69
7.6.2 System Information ...................................................................................69
7.6.3 User Information........................................................................................70
7.6.4 Package Information .................................................................................70
7.7 Device Setup ............................................................................................................71
7.8 Event Query .............................................................................................................73
7.8.1 Behavior Log Query ..................................................................................73
7.8.2 Behavior Log Analysis...............................................................................74
7.8.3 Device Event Query ..................................................................................75
7.8.4 Device Event Analysis (Counts) ................................................................76
7.8.5 Device Event Analysis (Elapsed Time)......................................................77

v
7.9 Server Setting...........................................................................................................78
7.9.1 User Account.............................................................................................78
7.9.2 Network Setting.........................................................................................79
7.9.3 Email Service ............................................................................................80
7.9.4 Package Management ..............................................................................82
7.10 Upgrading the Firmware.........................................................................................83
Chapter 8 Dynamic DNS....................................................................................................84
8.1 Installing the Dynamic DNS......................................................................................84
8.2 Registering Domain Name .......................................................................................85
8.3 Starting Dynamic DNS..............................................................................................87
Specifications .......................................................................................................................88
PN300 ...............................................................................................................................88
SQP133 ............................................................................................................................89
Appendix ..............................................................................................................................90
Definitions of Folder Names..............................................................................................90
Warranty Policy ....................................................................................................................91


Chapter 1 Introduction
The PN300 and SQP133 are digital media players designed to deliver uninterrupted playback
of Digital Signage presentations.
1.1 Features
•Multimedia support
•Video resolution up to 1080p and Video outputs of High Definition and VGA (PN300 only)
•Panel resolution of 1280 x 800 (SQP133 only)
•Built-in speaker (SQP133 only)
•SD card and USB storage
•Content Schedule and Content Designer
•Content Management System (CMS Server and CMS Lite)
•IR remote control
•Wireless connectivity (GV-WiFi USB Adapter required)
1.2 Packing List
1.2.1 PN300
1. PN300 device × 1
2. IR remote control × 1
3. AC/DC adapter × 1 (12 V, 3 A, 36 W)
4. Power cord x 1
5. Software CD x 1
1.2.2 SQP133
1. SQP133 device × 1
2. IR remote control × 1
3. Magnetic hinge x 1
4. Screw x 4
5. AC/DC adapter × 1 (12 V, 3 A, 36 W)
6. Power cord x 1
7. Software CD x 1

2
1.3 Optional Accessories
•Wall mount kit: (For PN300)
2 L-type brackets and 4 screws included
•VESA monitor mount kit: (For PN300)
1 VESA monitor mount bracket, 2 L-type brackets, 4 large screws and 8 small screws
included
•GV-WiFi USB Adapter
Introduction
3
1
1.4 Overview
This section identifies the components of the PN300 and SQP133.
1.4.1 PN300
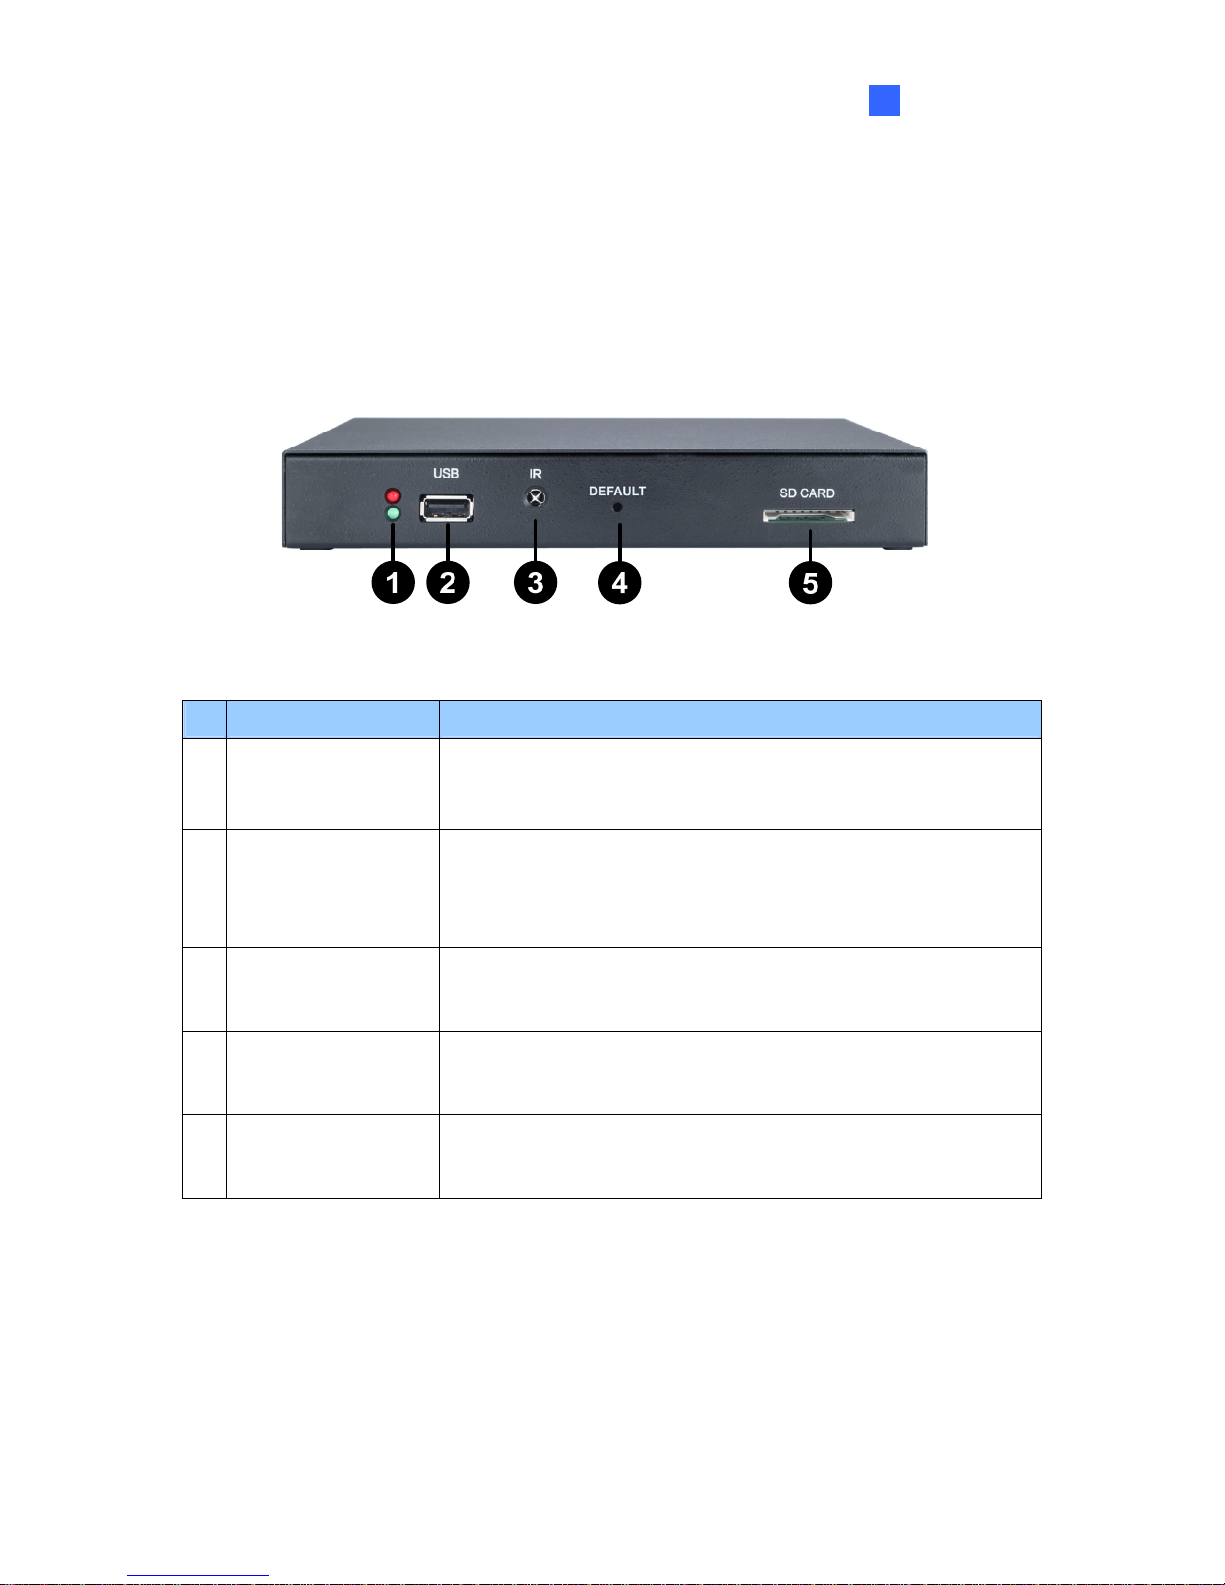
Front View
Figure 1-1
No. Name Function
1 LED Indicators The green LED indicates the system is ready.
The red LED indicates the power is supplied.
2 USB
Connect to a USB storage device for local storage and GV-WiFi
USB Adapter. Note the removal of the USB storage device will
cause the PN300 to automatically reboot.
3 IR Built-in IR receiver to receive the IR signals from the IR remote
control.
4 Default Reset the PN300 to the default factory settings. See 3.10
Restoring to Factory Default Settings.
5 SD Card Connect to a SD card for local storage. Note the removal of the
SD card will cause the PN300 to automatically reboot.

4
Rear View
Figure 1-2
No. Name Function
1 Ethernet Connect to an Ethernet.
2 SPDIF Reserved (not enabled).
3 High Definition Connect to a High Definition supported display device.
4 VGA Connect to a VGA monitor.
5 L/R Connect to a speaker.
6 Power OFF/ON Switch the power on or off.
7 DC 12V Connect to power by using the supplied power adapter.
Autres manuels pour PN300
2
Ce manuel convient aux modèles suivants
1
Table des matières
Autres manuels GeoVision Lecteur multimédia


