Geermarc CLEARSOUND AMPLICALL 16 Manuel utilisateur

0

1
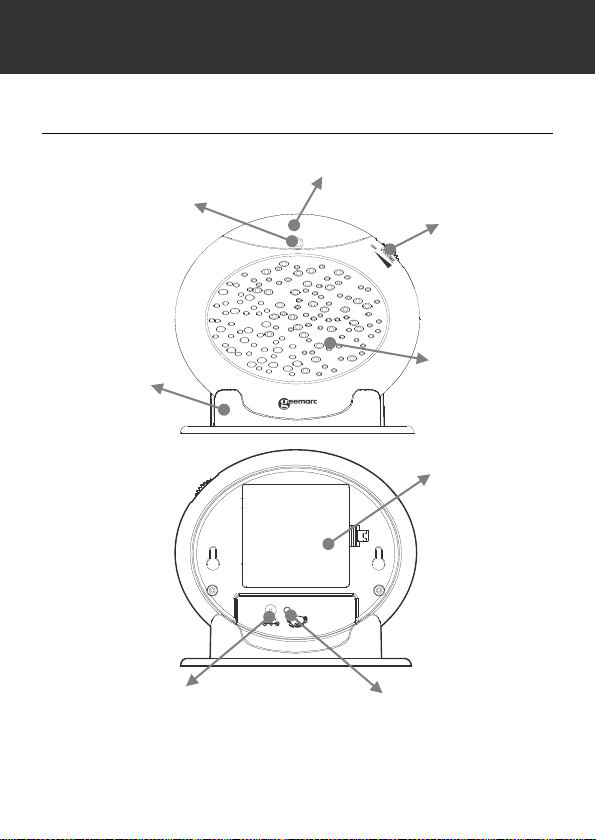
Description
DESCRIPTION
Adaptor jack
(OPTION)
batteries
compartment
(4 X AA )
REAR
Pairing/Testing
button
FRONT
Volume control
Speaker
Low battery indicator
Table mounting
Strobe flasher

2
Installation (See drawing)
1 - Insert the 4 battery type AA in the compartment
(option).
2 - Connect the adaptor 7.5V DC/1A (option).
Electrical connection : The apparatus is designed to
operate from a 230V 50Hz supply only. (Classified as
«hazardous voltage» according to EN60950 standard).
The apparatus does not incorporate an integral power
on/off switch. To disconnect the power, either switch off
supply at the mains power socket or unplug the AC
adaptor. When installing the apparatus, ensure that the
mains power socket is readily accessible.
INSTALLATION
AC adaptor (option)
230V
Door Bell
Door Bell button

3
Telephone connection : Voltages present on the
telecommunication network are classified TNV-3
(Telecommunication Network Voltage) according to the
EN60950 standard.
Setting up Door bell
1. The door bell can be take with the people who need
the assistance.
2. The door bell can be fixed on the wall or door
surround, drill two holes horizontally, 14mm apart,
put the supplied anchor into the two holes, hang the
door bell on to the two anchors and then instert and
tighten screws, and then stick the blank sticker on the
two holes.
3. The door bell can be stick onto a door, window using
the supplied strong adhesive tape. Remove the
protective paper from the adhesive tape on the back
of the door bell and stick to the required window.
Wall Mounting
1. Drill two holes horizontally, 96mm apart, and leave the
screws protruding from the wall by 5mm.
2. Hang the base on to the two screws and pull the base
down to lock it on.
INSTALLATION

4
Table Mounting
If you want to mount the unit on the table, only put it into
the base cradle, and then place the base cradle on the
table.
Change the Battery of the indoor unit
(option)
The unit requires 4×AA batteries
1. Open the battery door.
2. Insert four AA batteries into the compartment.
3. Snap the battery compartment door back into place.
Note: when the indicator keep flashes,replace the batteries.
You can add one adaptorin option (contact 01 707- 384438)
Change the Battery of the Door bell
The door bell is supplied with a 23A 12V battery. The
Door bell is supplied ready to use, it is not necessary to
open the bell push when you first install the Amplicall 16.
To replace the battery, unscrew the door bell from the
wall, unscrew the five screws located on the base and
open the box to get access to the battery compartment.
Replace the battery, replace back and remount.
INSTALLATION

5
Note: Do not use a rechargeable battery. Do not put the
used battery into the household rubbish, pay attention to
battery regulations regarding battery disposal.
Volume Control Slide Switch
Set the volume of the alarm sound or power on/off.
The Pairing Procedure:
The supplied door bell have been paired with the base, it
is no need to pair. If the door bell is not linked to the base
or you want to pair with other door bell, please follow
below procedure to pair.
Press and hold the Pairing/Test button of the unit and the
Door bell button until the strobe flasher LED flashes, the
unit makes a beep sound to confirm pairing successfully.
To check whether the device is working properly and has
been paired correctly, press the pairing/testing button
once. The device should sound the alarm and flash.
Operation
Once the Amplicall 16 and the Door bell have been
placed in the required locations and all required batteries
have been inserted, you are ready to use the device.
To use the device, the person who needs assistance
must press the door bell button of the door bell.
INSTALLATION

6
Trouble shooting
Symptom
Solution
It makes sounds of
“Dingdong”or sounds
continuously without
remote operation.
1) Check if the batteries
contact well.
2) Check if the power
adaptor connects
normally.
3) Turn off the power
switch for 10 minutes
and then turn it on.
When the power supply
works normally, the low
battery LED flashes
automatically.
1) Check if it is low
battery.
2) Turn off the power
switch for 10 minutes
and then turn it on.
When the batteries and
power adaptor connect
well, but it doesn’t make
sound of “Dingdong”
during remote operation.
1) Check if the battery is
too low.
2) Check if the battery of
the door bell is too low.
3) Turn off the power
switch for 10 minutes
and then turn it on.
INSTALLATION

7
From the moment your Geemarc product is purchased,
Geemarc guarantee it for the period of one year. During
this time, all repairs or replacements (at our option) are
free of charge. Should you experience a problem then
contact our helpline or visit our website at
www.geemarc.com. The guarantee does not cover
accidents, negligence or breakages to any parts. The
product must not be tampered with or taken apart by
anyone who is not an authorised Geemarc
representative.The Geemarc guarantee in no way limits
your legal rights.
IMPORTANT: YOUR RECEIPT IS PART OF YOUR
GUARANTEE AND MUST BE RETAINED AND
PRODUCEDIN THE EVENT OF A WARRANTY CLAIM
Please note : The guarantee applies to the United
Kingdom only.
Declaration : Hereby Geemarc Telecom SA declares
that this product is in compliance with the essential
requirements and other relevant provisions of the Radio
and Telecommunications Terminal Equipment Directive
1999/5/EEC and in particular article 3 section 1a, 1b and
section 3.
The declaration of conformity may be consulted at
www.geemarc.com
GARANTIE

8
Recycling directives : The WEEE (Waste Electrical and
Electronic Equipment) has been put in place for the
products at the end of their useful life are recycled in the
best way.When this product is finished with, please do
not put it in your domestic waste bin.Please use one of
the following disposal options:
- Remove the batteries and deposit them in an
appropriate WEEE skip. Deposit the product in an
appropriate WEEE skip.
- Or, hand the old product to the retailer. If you purchase
a new one, they should accept it. Thus if you respect
these instructions you ensure human health and
environmental protection.
For product support and help visit our website
at www.geemarc.com
Telephone 01707 384438
Or fax 01707 832529
GARANTIE
9
Descriptif
DESCRIPTIF
Prise adaptateur
(option)
Compartiment
des batteries
(4 X AA)
ARRIERE
Bouton d’enregistrement
sonnette/Bouton de test
Flash lumineux
Réglage du volume
Sonnerie
Indicateur de
batterie faible
Socle
AVANT
Table des matières
Langues :
Autres manuels Geermarc Accessoires


