GEENI SENTRY Mode d’emploi

SMART WI-FI
FLOODLIGHT
CAMERA
START GUIDE

Contents
Mount and Wire 2-5
Download & Register 6-8
Connect to App 9
Connect (Easy Mode) 10-11
Connect (QR Code Mode) 12-13
Live View & Playback 14-15
Settings 16-17
Questions, Troubleshooting, Notices 18-21
What’s in the Box
Get Ready
• Smart Floodlight + Security Camera
• Bracket + Internal Grip
• Mounting Screws
• Mounting Bracket
• Waterproof Connector
• Allen Wrench
• Wire Nuts
• Reset Pin
• User Manual
• Know your Wi-Fi network and password
• Locate a suitable mounting location
• Make sure your mobile device is running iOS®9 or higher or
Android™ 5.0 or higher
• Make sure you’re connecting to a 2.4GHz Wi-Fi network
(Geeni can’t connect to 5GHz networks)
Thank you for purchasing your GEENI smart home product.
Get started using your new devices by downloading Geeni, one
convenient app that manages everything straight from your
phone or tablet. Easily connect to your home Wi-Fi and control
multiple devices from the touch of your fingertips.
SMART WI-FI
OUTDOOR
CAMERA
START GUIDE

32
1 Mount and Wire
Shut off power at the circuit breaker for the switch that you
are replacing. More than one disconnection may be required
to turn off power. Use a non-contact voltage tester to ensure
that power is off.
*If the wires are placed in an outdoor environment, it is
suggested to install the included waterproof connector
(instead of using the wire nuts).
WARNING: Risk of electric shock
Mounting Breakdown
Mounting
Bracket
Screws
Wire Nuts
Bracket
Bracket
Screws
• AC 100~240V Power connection. Verify that the supply voltage is correct
• Disconnect Power before operation. Use your home’s circuit breaker to
switch off power. This protects you and your camera.
• Properly ground fixture
• Always follow code standards when installing wired connections
• Consult an electrician if necessary
CAUTION: Risk of fire, do not install near combustible surfaces
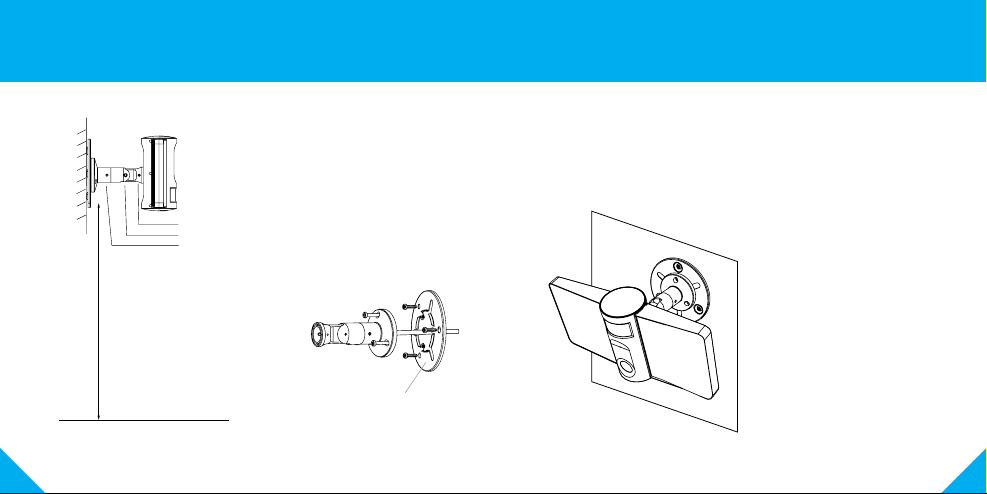
STEP 2.
Place adhesive interior grip
inside of bracket and use
the included 3 screws and
3 wall anchors to mount the
camera wherever you like.
STEP 1.
Feed floodlight wires through
the bracket and connect Line,
Neutral, and Ground (if needed)
Wires with provided Wire Nuts.
ON
OFF
Line Neutral Ground
*Optional Installation:
Waterproof Connector
54
STEP 3.
Attach the floodlight to the
mounted bracket. Camera
should be 9 Ft from the ground
for optimal sensor detection.
STEP 4.
Finally, use included allen wrench and
adjust allen screws to ensure the device
has the optimal viewing angle.
Now your device should be
powered and ready to pair
with the Geeni app.
1 Mount and Wire (Continued)
NOTE:
A. Fix the camera position
B. Adjust the angle
C. Adjust the direction and
fix the camera position
9 Ft
A
B
C
Mounting
Bracket
Optional:

76
3 Register an account on your Geeni app.
STEP 1.
Enter your mobile phone number
or email address.
STEP 2.
Enter the verification code
and create a password.
2 Download the Geeni app from App Store or Google Play.

98
STEP 3.
Login to the App.
5 Connect to App.
How do I reset my device?
A reset button is located under the cover on the bottom of your floodlight.
Reset the camera by removing the cover and holding down the button for
several seconds.
Note: The camera will appear inactive while booting up—allow two minutes
for the light to activate.
What does the blinking sensor light mean?
4 Login to the Geeni App.
Solid Red
Starting up
Blinking Red
Ready to connect
Blinking Blue
Connecting
Solid Blue
Connected
Reset Pin
Reset Button
(Close Up View)
(Bottom View)

1110
STEP 1.
In the Geeni app, on the top
corner of the Devices screen,
click (+).
Choose “Video Camera“.
STEP 2.
Make sure the indicator light on the
device is blinking Red, indicating the
device is ready to connect. If not, follow
instructions to Reset the device so that
indicator light is blinking red,
then press “Next Step”.
STEP 3.
Enter your Wi-Fi network and
password.
*If the connection fails, try to reset and connect directly using QR Code Mode.
STEP 4.
The Geeni app will try to connect
your device.
During this time, the camera will
beep, continue blinking Red, and
then turn solid Blue.
6 Add device. Method 1: Easy Mode
NOTE: Geeni can’t connect to 5GHz networks.

1312
QR Code
STEP 1.
Make sure the device is blinking red.
(see reset instructions on p. 9)
STEP 2.
In the Geeni app, on the top corner
of the Devices screen, click (+).
Choose “Video Camera“.
Choose “QR Code” in the top corner.
STEP 3.
Click Next and enter your
Wi-Fi details.
STEP 4.
Scan the QR Code with the
camera.
STEP 5.
If you heard the camera beep,
press “I heard the beep“ and it will
add your camera.
7 Add device. Method 2: Backup QR Code Mode

1514
Live View Playback
Hear what’s happening around
the camera Hear what’s happening around
the camera
Activate buzzer to scare intruders
and alert neighbors
Full screen
Full screen
Save the live camera footage
onto your phone memory
Press to activate the microphone
and speak through the camera.
Activate push notifications to be
notified of any movement (see p. 17)
Activate floodlight manually or
at scheduled times
Save a screenshot of live video
onto your phone memory
Play back recorded footage
(microSD card required)
Change date of video playback
Save the playback footage
onto your phone memory
Jump to recent motion events.
Save a screenshot of playback
footage onto your phone memory
Playback
Buzzer
FloodlightMotion

1716
Settings
Indicator Light: By default, the camera lights up to show it’s on. Switch
“Indicator Light” off to hide the light.
Flip: If you mount your camera upside down, toggling the “Flip” function
will rotate the image so that it’s right side up.
Time Watermark: Turn the time watermark on to always see a time
stamp of when video is taking place.
Motion Detection: When turned on, you’ll receive notifications to your
phone whenever the camera senses motion. Press to turn Motion
Detection off, schedule motion alerts and/or control floodlight duration.
Night Vision: The camera is set to automatically activate night vision in
the dark. Toggle here to manually turn night vision on or off.
SD Card Settings:
SD Card options includes erasing your microSD Card.
Access Camera Settings:
From your main device list, click on the camera you want to edit, then
press “ “ button on the top right for advanced settings.
Device Name: Press to rename your device to something like “Backyard”
or “Driveway”.
Device Sharing: Let friends, spouse, roommates, or family keep an eye
on what your cameras see. Whether it’s the patio or the side entrance, you
can decide who gets to check in, access the camera, and set notifications.
Remove Device:
Delete the camera from your account. Until it’s deleted, it will always be
linked to your account.
IR Night Vision
Schedule
Floodlight
Auto
Motion
Security Camera
Device Info
Device sharing
Device
SD Card Settings
Basic Feature Settings
Firmware Info
Customer Support
Ce manuel convient aux modèles suivants
1
Table des matières
Autres manuels GEENI Domotique


