GEENI DOORSCREEN Mode d’emploi

DOORSCREEN
START GUIDE
ENGLISH
Pour les instructions en français,
veuillez consulter la page 33

1
Contents
Product Diagram 2-3
Download & Register 4-5
Install 6-13
Connect: Easy Mode & QR Code Mode 14-23
Settings 24-25
Live View & Playback 26-27
FAQs 28-29
Troubleshooting 30
Notices & Support 31
What’s in the Box
Get Ready
Smart Wi-Fi Doorbell
Extension Connector & Wires
Chime Adapter
Security Release Tool
Security Screw
Reset Pin
2 Wall Anchors
2 Mounting Screws
User Manual
Please Note:
Line drawings
are not to scale
• The DOORSCREEN requires an existing,
working, wired doorbell with chime that is
connected to a 16V or 24V AC and 10VA
minimum transformer
• Geeni app requires a mobile device running iOS
8 or higher or Android 4.1x or higher
• The DOORSCREEN operates on a 2.4GHz
Wi-Fi network
• A microSD card is required to record footage
— see page 28 [FAQ section 2] for help
with storage size
DOORSCREEN
START GUIDE
Thank you for purchasing
your Geeni smart home product.
Get started using your new devices by
downloading Geeni, one convenient app that
manages everything straight from your phone
or tablet. Easily connect to your home Wi-Fi
and control multiple devices from the touch
of your fingertips.
Support:
If you encounter any issues, please call (888) 232-3143
(Toll Free) or email support@mygeeni.com for help.
Support is available seven days a week.
WARNING: RISK OF ELECTRIC SHOCK OR FIRE.
Please follow all safety instructions on page 31 before
installing, servicing, or removing your DOORSCREEN.
A
F
A
B
H
G
C
I
E
D
D
CB
E
G
F
HI

3
2
Exterior Cover
Security Screw
Exterior Cover
Security Screw
Connection
Terminals
for Wiring
Speaker Microphone
Doorbell
Button
IR Sensors
for Night Vision
Camera Lens
Screw Hole for
Wall Mounting
LED Status Light
Blinking Red:
Ready to Connect
Steady Blue:
Connected
Screw Hole for
Wall Mounting
Screw Hole for
Wall Mounting
Screw Hole for
Wall Mounting Reset Button
(On Right Side,
Under Cover)
Exterior Cover Front View Back View
microSD
Card Slot
Micro USB
Backup
Power Input
Product Diagram

5
4
Register a Geeni account:
enter your mobile phone number or email address.
Download the Geeni app. Enter the verification code and create a password.
Download & Register1
STEP 2
STEP 3
STEP 4
STEP 1
Enter your information to log in.

7
6
Install2
STEP 1Locate your existing chime within your home.
Typically, the chime is a rectangular box that
produces the sound when your doorbell is
pressed. It may (or may not) be mounted
immediately inside your front door.
An easy way to locate the chime is to ring
your doorbell and locate where the sound is
coming from.
STEP 2Once you have located your chime, shut off
power at the circuit breaker for your existing
wired doorbell and chime. Ring your existing
doorbell to verify that power is off.
Remove your chime’s cover - unscrew the
cover if necessary - to determine if your
chime is mechanical (there will be moving
parts that create the ringing sound) or
digital (no moving parts).
ON
OFF
Example of a
Mechanical Chime
These
parts
move to
make the
ringing
sound
STEP 3
9
8
Install (cont’d)2
STEP 4
Locate the Chime Adapter included in the smart
doorbell’s packaging, and the terminals
on the inside of the chime.
Connect one of the Chime Adapter’s prongs to the
transformer terminal
(usually labeled TRANS, T, AC, or 0).
Connect the other prong to the chime’s front
terminal (usually labeled FRONT, F, 1, or C1).
Either prong on the Chime Adapter can be
connected to either of the terminals on the chime.
If you determined that you have a digital
chime, you are required to install the Chime
Adapter. NOTE: This step is optional if you
have a mechanical chime. Secure the chime adapter to your existing
chime using a small piece of adhesive. Be
careful not to interfere with any of the
chime’s moving parts. Mount on the outside
of the chime if there is not enough room to
mount inside.
Replace your chime’s cover.
STEP 5
STEP 6
Apply some adhesive,
such as tape or a glue dot,
to secure the chime connector.

11
10
Install (cont’d)2
Remove your existing doorbell, and detach
the wires connected to it.
TIP: Tape or bend the wires so they don’t fall
back into the wall.
Locate the extension connector & wires
included in the DOORSCREEN’s packaging.
Connect the 2 wires from your previous
doorbell setup to the extension connector,
as shown below:
Push down
on the top lever
to insert the wire.
The cover snaps
into grooves
on either side
Either wire from your
existing doorbell can
be plugged into either
input on the connector.
STEP 9
STEP 8
STEP 7Gently remove the
exterior cover of the
DOORSCREEN.
NOTE: The
DOORSCREEN will
not come with the
security screw pre-
installed.
TIP FOR LATER: To remove
your DOORSCREEN’s cover
once installed, remove the
security screw, then use
either the security tool or a
small flat-head screwdriver
to gently pry the cover off
via the security screw hole.

13
12
Install (cont’d)2
Align your DOORSCREEN to where you
would like to mount it, and mark the location
of the top and bottom screw holes.
Remove the DOORSCREEN from the area,
and use a drill to drill 2 holes on the marked
locations.
If you are mounting the DOORSCREEN to
stucco, brick, or concrete, use the wall anchors
to make sure your DOORSCREEN will be
securely mounted.
Then, screw in your DOORSCREEN.
STEP 13
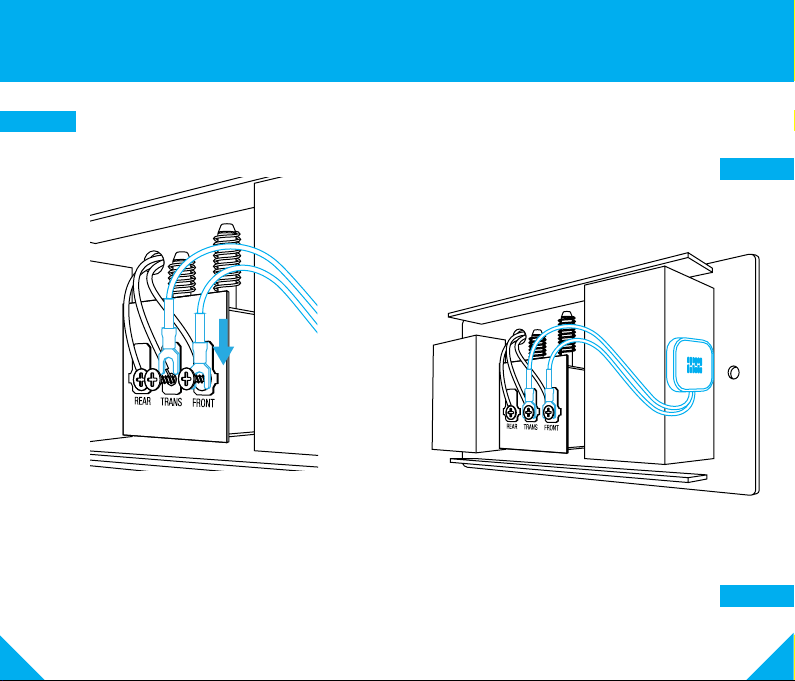
Locate the connection terminals on the back
of the DOORSCREEN, and loosen the screws
that are attached. Then, slide each of the
extension connector’s prongs underneath
each screw, and re-tighten the screws.
TIP: You do not need to fully remove the
screws in order to complete this step.
Flip the circuit breaker back on to establish
power for the DOORSCREEN.
Ensure that the DOORSCREEN is receiving
power—it may take up to a minute—by
testing the button and listening for a chime.
If you hear a chime, and the DOORSCREEN
functions as desired, then continue to
Step 13. If not, please see pg. 30 for
Troubleshooting, or contact Support.
STEP 10
STEP 11
STEP 12

15
14
Connect to Geeni App:
Easy Mode3
Once your DOORSCREEN is installed and
connected to power, the ring around the
doorbell button will rapidly flash a red light.
If the red light does not rapidly flash, reset
the device by inserting the reset pin into the
reset button and holding for ten seconds.
STEP 1
STEP 2
Reset
Button Reset
Pin
LED Ring
STEP 3
STEP 4
In the Geeni app, on the top corner of the Devices
screen, click (+). Choose “Video Doorbell”.
Enter your Wi-Fi network and password.
NOTE: Geeni only works with 2.4GHz networks.
The ring will turn blue once the DOORSCREEN
connects to the Geeni app.

17
16
Connect to Geeni App:
Easy Mode (cont’d)3
NOTE:
If the connection failed, try to connect
using QR Code Mode (on the next page),
before proceeding to the below step.
Your DOORSCREEN is now ready to use!
STEP 7
Replace the DOORSCREEN’s cover and
secure with the security screw.
STEP 6
STEP 5
Optional:
Insert your MicroSD card into the microSD port.
This is not necessary for live view, but is required
to record and play back footage.
Insert microSD
card into the
microSD port
IMPORTANT: Select which type of chime you have,
as determined on pg 7 during installation.
Table des matières
Langues :
Autres manuels GEENI Accessoires


