Geemarc iBT10 Manuel utilisateur
Bluetooth Amplified Hands-free kit
Kit main libre BlueTooth Amplifié
Verstärkte Bluetooth-
Freisprecheinrichtung
Kit manos libres Bluetooth amplificado
English P1
Français P25
Deutsch P52
Español P77

1
Please refer to our website: www.geemarc.com
for an up to date user guide, as there may be
important updates and changes you need to be
aware of.
CONTENTS ··············································1
GENERAL ················································3
Introduction ···············································3
Unpacking the Telephone·····························4
DESCRIPTION ··········································5
General Description ····································5
STEP 1: FIT AND CHARGE THE BATTERY····7
Fitting the Battery ·······································7
Charging the Battery ···································8
Low Battery···············································9
STEP 2: PLUG IN THE EARPHONE HEADSET
OR NECK LOOP········································9
Earphone Headset (non-hearing aid users) ······9
Neck Loop (iBT10 LOOP)·····························9
STEP 3: PAIRING THE iBT10····················· 11
How to pair the iBT10 to your smartphone······11
How to Pair the iBT10 to a Smart TV············· 12
How to Pair the iBT10 to a device that doesn't
have a display / menu································13
Using the iBT10 with Two Devices················13
CONTENTS

2
STEP 4: LISTEN TO AUDIO / TV FROM A
PAIRED DEVICE······································ 15
Volume Adjustment ··································· 16
Tone Adjustment·······································17
USING WITH NECK LOOP ························ 18
Microphone ············································· 18
MAKING / RECEIVING CALLS···················19
How to Make a Call via the iBT10·················19
Receiving a Call ······································· 19
RECEIVING A CALL WHILE PLAYING MUSIC
/ LISTENING TO THE TV··························· 20
TURNING OFF THE iBT10 AND ECO MODE 21
TECHNICAL SPECIFICATION···················· 21
TROUBLESHOOTING GUIDE ···················· 21
BATTERY SAFETY & DISPOSAL ··············· 22
GUARANTEE·········································· 23
RECYCLING DIRECTIVES························· 24
Contents

3
INTRODUCTION
Congratulations on purchasing your Geemarc
iBT10 amplified Bluetooth digital headset.
This user guide is for iBT10 with earphone headset
and the iBT10 LOOP for use with hearing aids that
have a T (Telecoil) setting.
The iBT10 / iBT10 LOOP can be paires to other
devices that have BluetoothTM including smartphones,
smart TVs, tablets and computers.
The iBT10 is rechargeable ans supplied with a
Type CUSB charging cable.
To get the best use from your iBT10, please read
all steps and sections of this user guide.
Keep the user guide in a safe place for future
reference.
Warning: For Users with a Pacemaker
If you have a pacemaker, we recommend
that you speak with your doctor or qualified
health advisor before using this product.
Note:It is important that you read the instructions
below in order to use your iBT10 to their full
potential. Keep this user guide in a safe place for
future reference.
GENERAL
4
Unpacking the iBT10
The following parts are included with the iBT10:
ziBT10 BluetoothTM device
zEarphone Headset with rubber ear cushions
z3.7V Li-ion Rechargeable Battery
zUSB type C / USB A cable for recharging
zMagnetic Neck Loop (iBT10 LOOP option)
zLanyard (option)
zA belt clip
z1 User Guide
For product support and help visit our website at
www.geemarc.com
E-mail: [email protected]
Telephone: 01707 387602
lines are open 09h00 to 16h00 Mon to Fri
Parc de l’Etoile, 2 Rue Galilée, 59760 Grande-
Synthe, France
Made for Geemarc Telecom S.A. in China
General
5
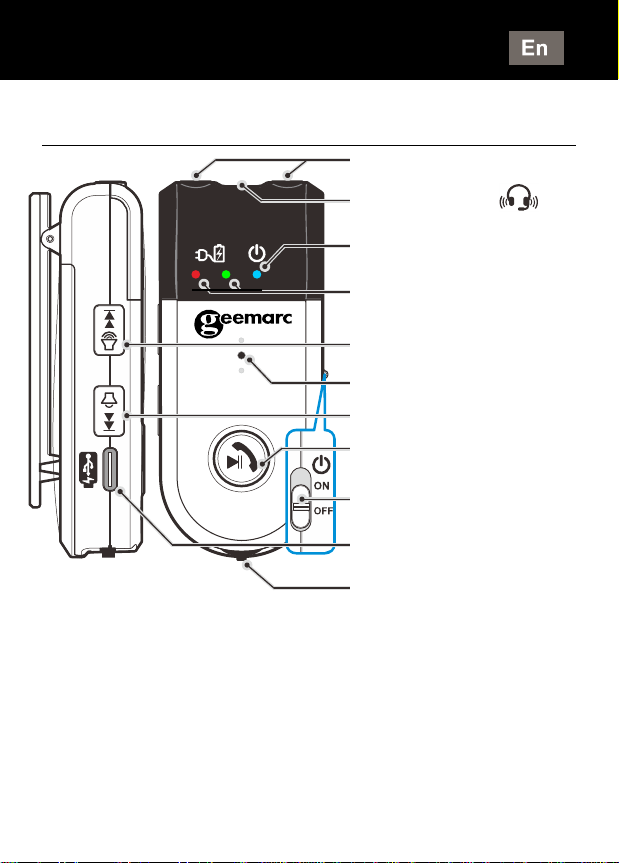
Controls, Connections and Indicators
(LEDs).
NOTE (Indicators):
●OFF: LEDisoff
●ON: LED is Blue
●Low battery: LED is Red
●Battery Charging: LED is Red
●Full charged: LED is Green
●Pairing: Red and Blue LED is flashing
DESCRIPTION
Neck Loop port
Headset port ( )
Power ON indicator
(Blue)
Charge indicators
Red:charging,Greeen:full
Volume + / Next
Internal microphone
Volume - / Previous
Multi-function button
(Play / Call)
Power On/Off switch
Charging port USB
type C 5.0V DC
Tone adjustment
wheel
6
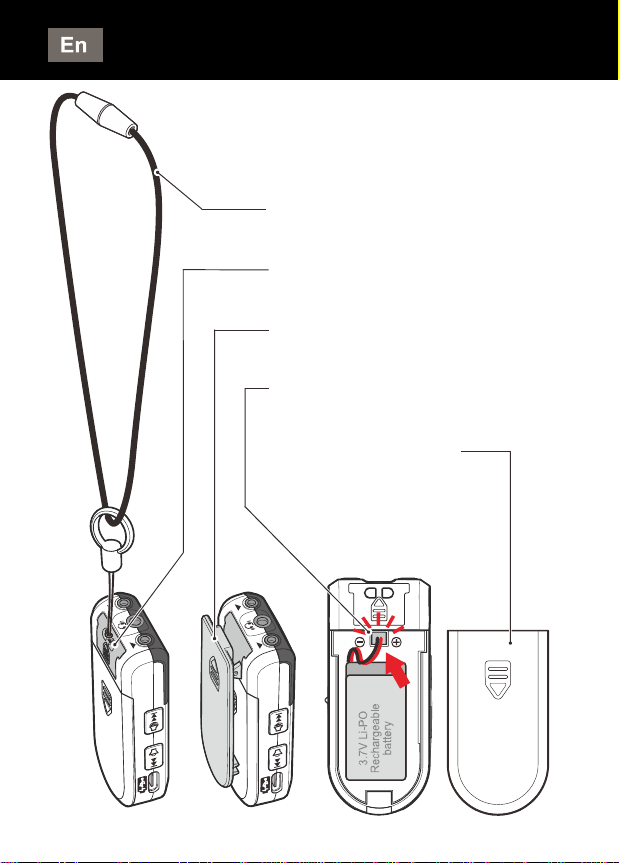
Description
Lanyard
Lanyard eyelet
Belt Clip
Plug for the battery pack
Battery Compartment
Cover
7
STEP 1: FIT AND CHARGE THE BATTERY
The iBT10 is supplied with a Lithium rechargeable
battery.
NOTE:●Do not use any other type of rechargeable
battery with this product.
●The battery must be charged for 7 hours
before first time use.
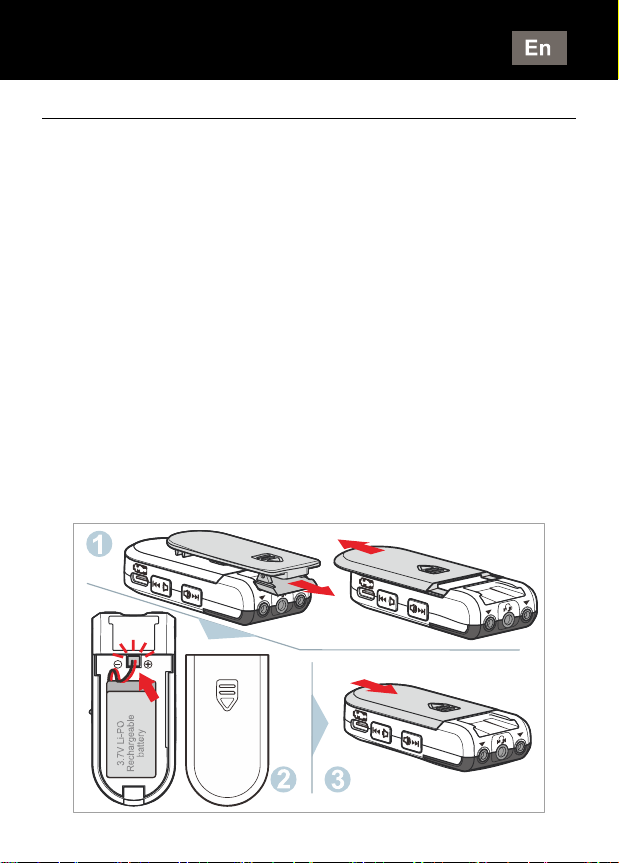
Fitting the Battery
IMPORTANT: Before fitting the battery, make
sure the ON/OFF switch on the side of the iBT10
is set to the OFF position.
zTake off Belt clip and slide open the battery cover.
zCarefully connect the short black (–) and red (+)
lead from the battery to the socket inside the
battery compartment (marked –and +).
zReplace the battery cover.
POWER SUPPLY
8
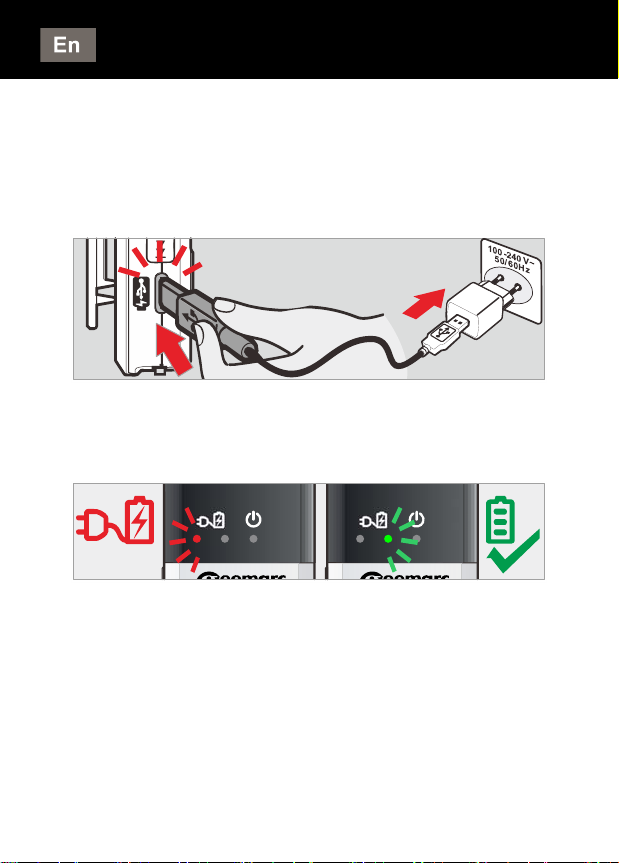
Charging the Battery
Connect the supplied USB cable, to the USB Type
-C connector on the side of the iBT10. Connect the
other end of the cable to an approved standard
USB 5V mains adapter (not supplied).
Plug the USB adapter into a mains electrical outlet
socket. The charge indicator LED on the iBT10 will
show RED. This means the battery is charging.
Continue charging until the charge indicator on the
iBT10 shows GREEN. This means the battery is
now fully charged.
Disconnect the USB charging cable from the iBT10.
NOTE :We recommend you also switch off and
remove the USB adapter from the main electrical
outlet socket.
Power supply
9
Low Battery
When the battery is low and needs charging, you'll
hear 5 audible 'beeps' through the earphones /
neck loop.
To avoid reducing the life of the battery charge it
as soon as possible.
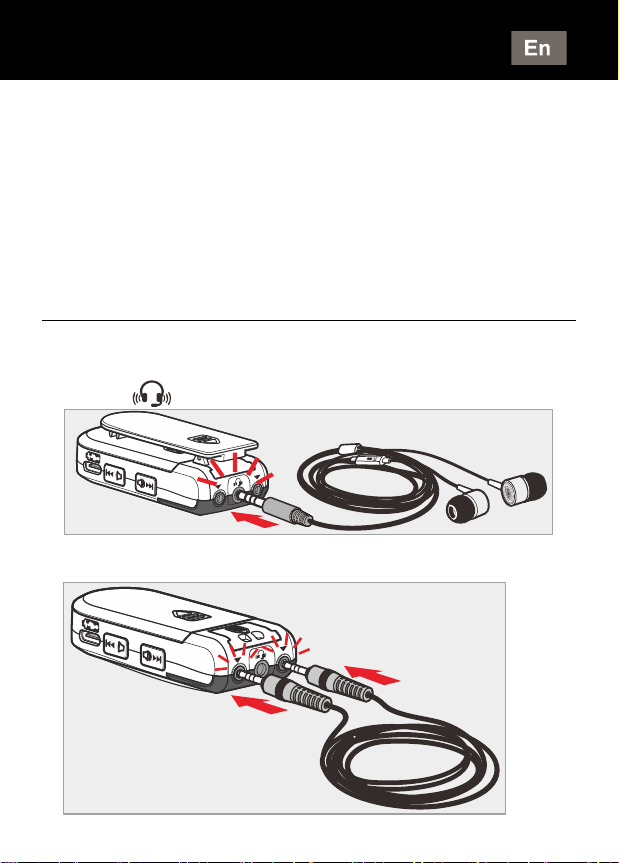
STEP 2: PLUG IN THE EARPHONE
HEADSET OR NECK LOOP
Earphone Headset (non-hearing aid users)
Plug the earphone headset into the 3.5mm jack
socket [ ] at the top of the iBT10.
Neck Loop (iBT10 LOOP)
CONNECTING
Ce manuel convient aux modèles suivants
1
Table des matières


