GE 2-9920 Manuel utilisateur
1
GETTING STARTED ................................ 2
BEFORE YOU BEGIN .......................... 2
MODULAR JACK REQUIREMENTS ...... 2
DESKTOP INSTALLATION ...................... 3
WALL MOUNT INSTALLATION .............. 4
CORDLESS PHONE BASICS ...................... 5
MAKING ACALL ............................... 5
INUSE INDICATOR ......................... 5
REDIAL(RE/PA) ............................ 5
RECEIVING ACALL ............................ 5
FLASH BUTTON ................................ 6
VOLUME .......................................... 6
PWR/RING (POWER AND RINGER)
SWITCH ....................................... 6
SELECTING ARING SOUND ................. 7
MUTE BUTTON ................................. 7
TEMPORARY TONE ............................ 7
PAGING THE HANDSET ....................... 8
ADVANCED FEATURES ............................ 8
CHANNEL BUTTON (CHAN) .............. 8
THE MEMORY FEATURE ..................... 8
STORING ANUMBER IN MEMORY ..... 8
CHANGING ASTORED NUMBER........ 9
STORING AREDIAL NUMBER ............. 9
STORING APAUSE IN MEMORY ....... 9
DIALING ASTORED NUMBER ........... 9
CHAIN DIALING FROM MEMORY ..... 10
CHANGING THE BATTERY ...................... 11
BATTERY SAFETY PRECAUTIONS ........ 11
TROUBLESHOOTING GUIDE ................... 12
CAUSES OF POOR RECEPTION ............... 14
GENERAL PRODUCT CARE .................... 14
SERVICE ............................................ 15
INDEX ............................................... 16
ACCESSORY ORDER FORM ................... 17
LIMITED WARRANTY ............................ 18
INTRODUCTION
Your GE 900 MHz Cordless Telephone is designed to give you flexibility in
use and high quality performance. To get the most from your new cordless
telephone, we suggest that you take a few minutes right now to read
through this instruction manual.
WARNING:
TO PREVENT FIRE
OR ELECTRICAL SHOCK HAZARD,
DO NOT EXPOSE THIS PRODUCT
TO RAIN OR MOISTURE.
SEE MARKING ON BOTTOM / BACK OF PRODUCT
CAUTION
RISK OF ELECTRIC SHOCK
DO NOT OPEN
THE EXCLAMATION
POINT WITHIN THE
TRIANGLE IS A
WARNING SIGN
ALERTING YOU OF
IMPORTANT
INSTRUCTIONS
ACCOMPANYING
THE PRODUCT.
THE LIGHTNING
FLASH AND ARROW-
HEAD WITHIN THE
TRIANGLE IS A
WARNING SIGN
ALERTING YOU OF
"DANGEROUS
VOLTAGE" INSIDE
THE PRODUCT.
CAUTION: TO REDUCE THE
RISK OF ELECTRIC SHOCK,
DO NOT REMOVE COVER
(OR BACK). NO USER-
SERVICEABLE PARTS IN-
SIDE. REFER SERVICING
TO QUALIFIED SERVICE
PERSONNEL.
2
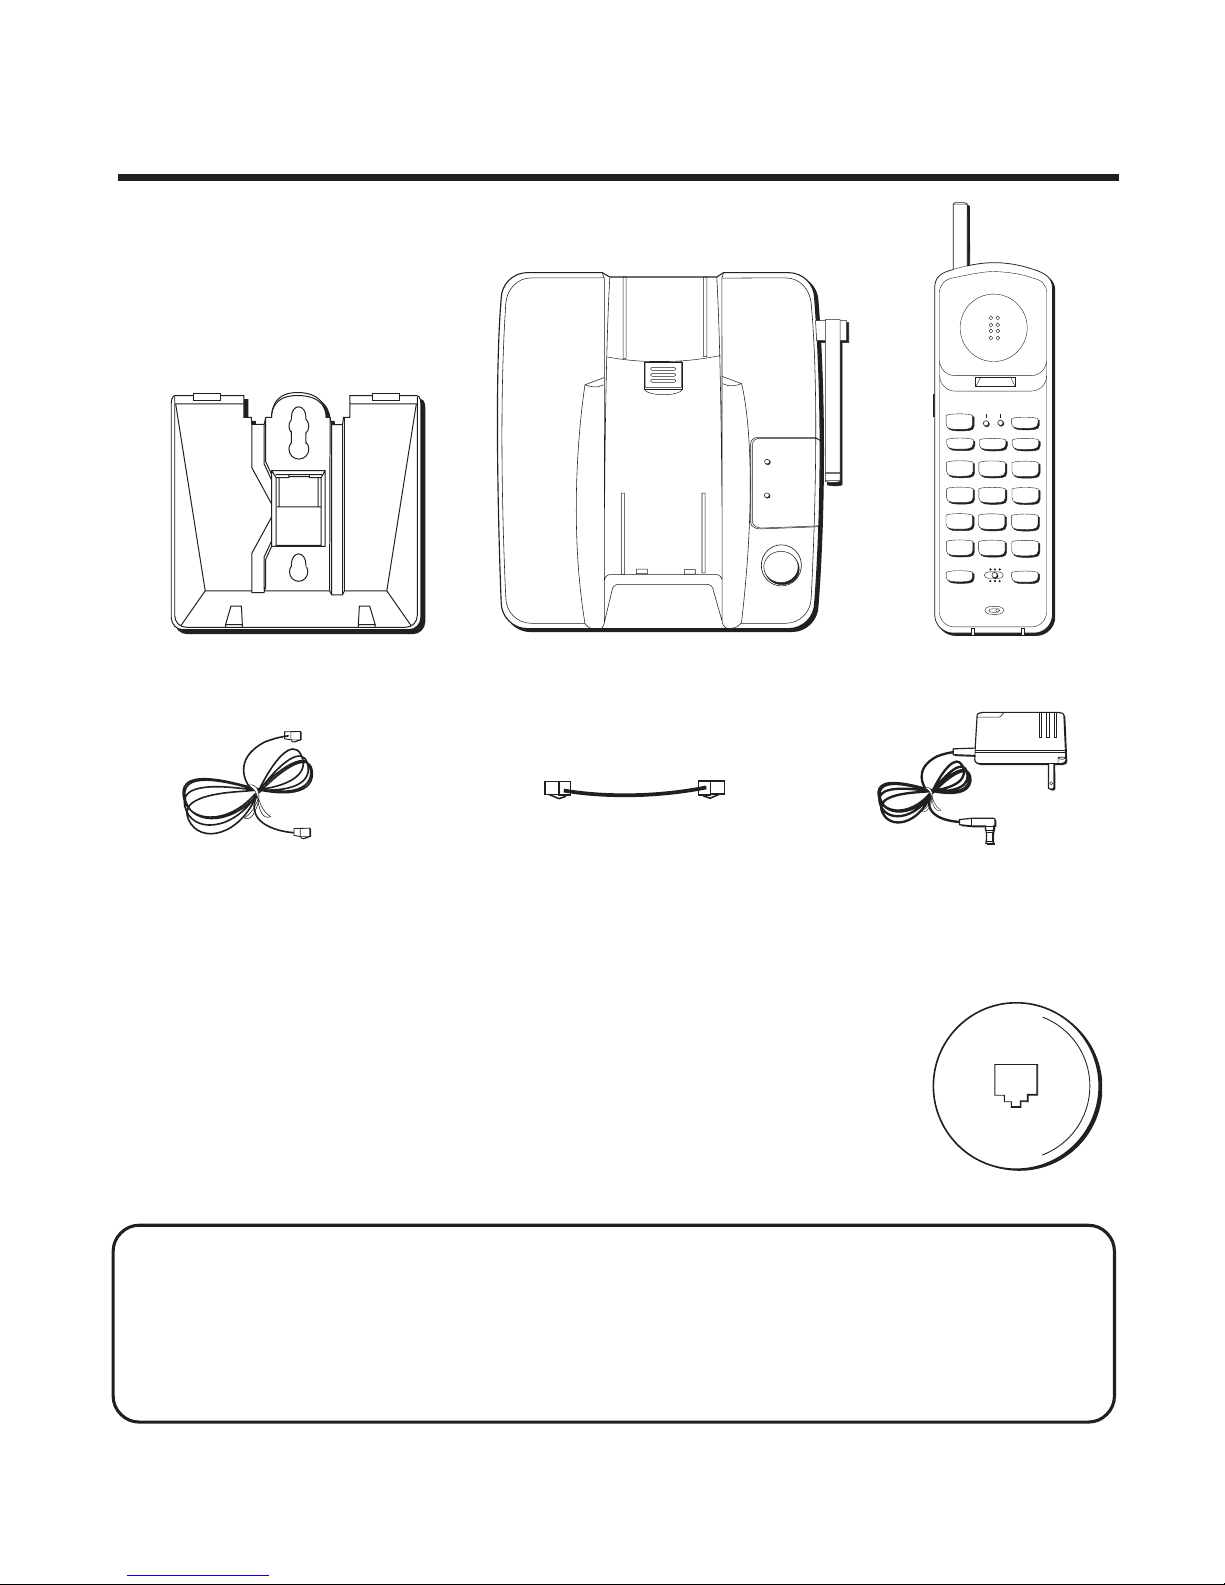
GETTING STARTED
Make sure your package includes the items shown here.
AC power adapterTelephone line cord
BEFORE YOU BEGIN
MODULAR JACK REQUIREMENTS
You need an RJ11 type modular jack, which is the most
common type of phone jack and might look like the one
pictured here. If you don’t have a modular jack, call your
local phone company to find out how to get one installed.
INSTALLATION NOTE: Some cordless telephones operate at frequencies that
may cause interference to nearby TVs and VCRs. To minimize or prevent such
interference, the base of the cordless telephone should not be placed near or on
top of a TV or VCR. If interference continues, moving the cordless telephone
farther away from the TV or VCR will often reduce or eliminate the interference.
Short telephone
line cord
Handset
Base
TUV
1
456
GHI
7
PQRS
89
WXYZ
OPER
0#
*
23
TONE
JKL MNO
ABC DEF
RE/PA FLASH MUTE
TALK
CHAN
PGM MEM
ON OFF–RING
PWR–ON OFF
IN USE BAT LOW
PAGE
IN USE
CHARGE/
PAGE
Base plate
3
NOTE: Use only the Thomson power supply that came with this unit
(5-2420A or 5-2420B ). Using other adapters may damage the unit.
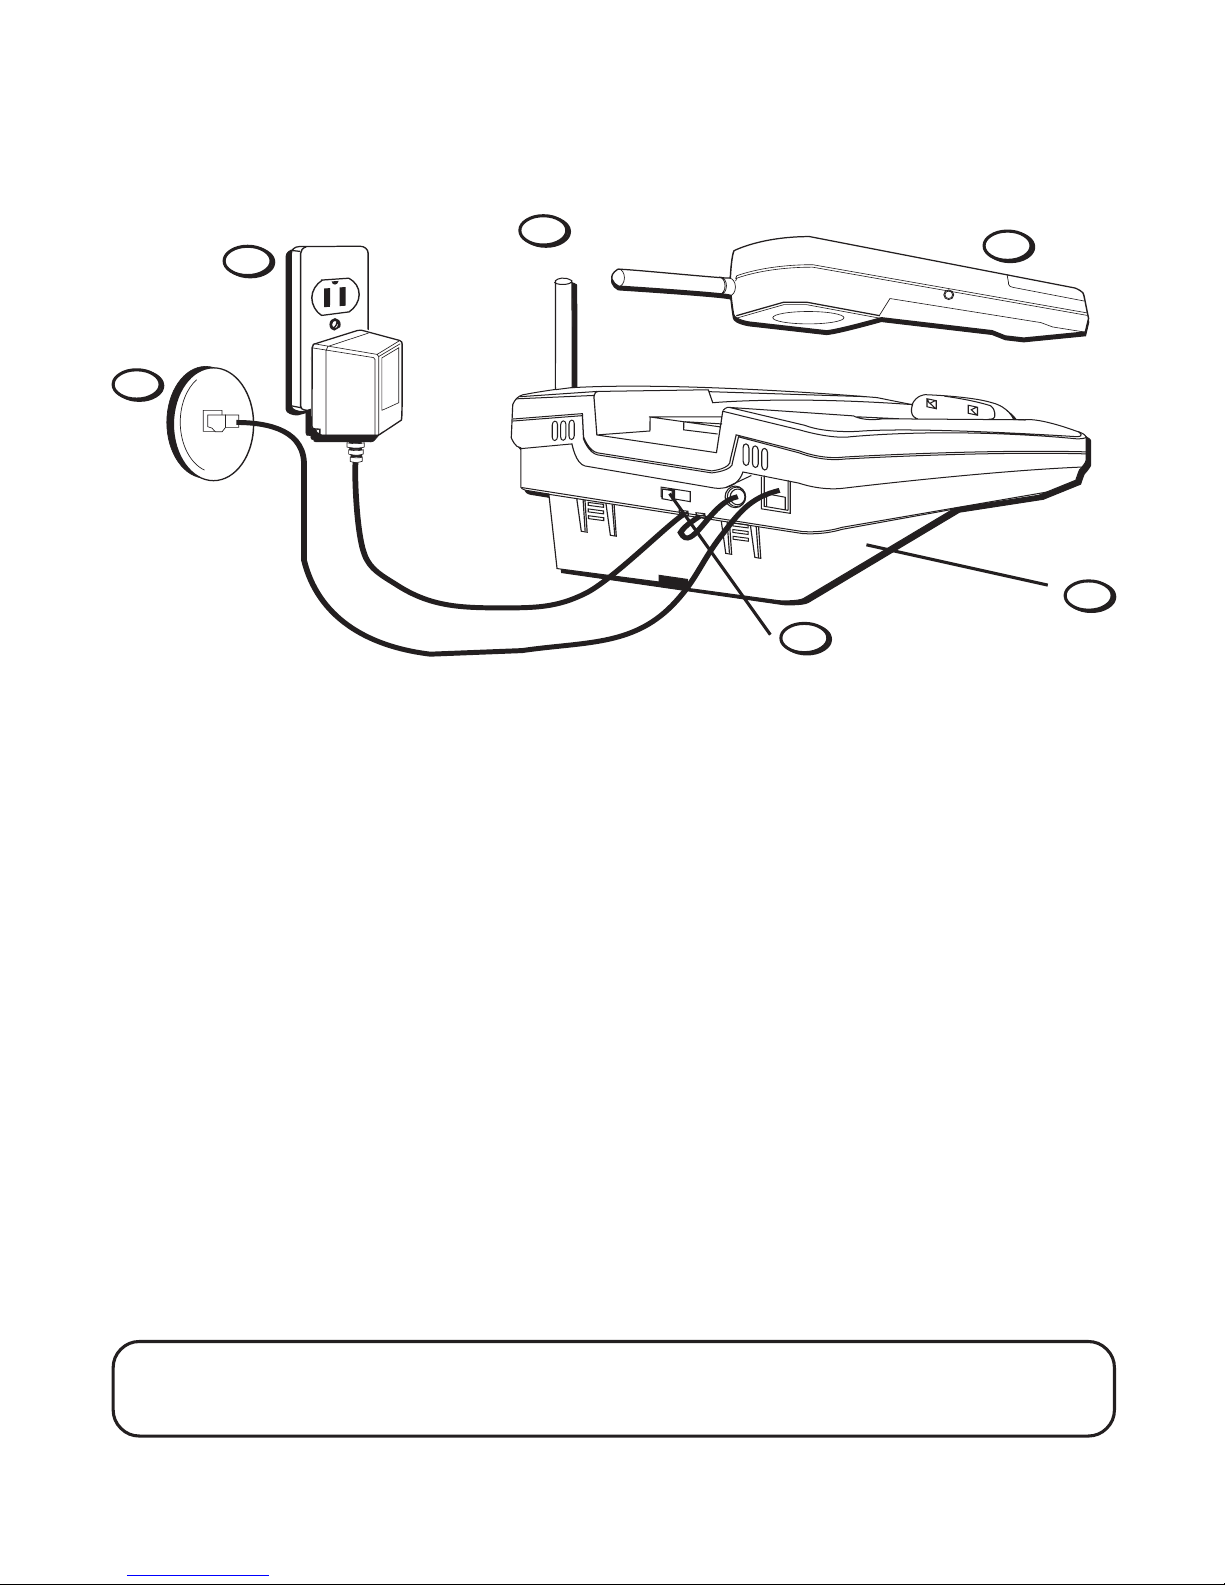
DESKTOP INSTALLATION
2
T/P switch
4
67
3
1. Attach the base plate.
2. Plug the telephone line cord into the PHONE LINE jack on the base and
into a modular jack.
3. Plug the power supply cord into the POWER 9V DC jack on the base and
into an AC outlet.
4. Set the T/P switch to T for touch-tone service, or P for pulse (rotary)
service. If you don’t know which type of service you have, check with
the phone company.
5. Set RING switch (on the handset) to ON.
6. Raise the base antenna.
7. Place handset in the base to charge for 12 hours. The CHARGE/PAGE
light (on the base) comes on to indicate that the battery is charging. If
you don’t charge the handset battery properly (for 12 hours) when you
first set up the phone, its long-term performance will be compro-
mised.
1
4
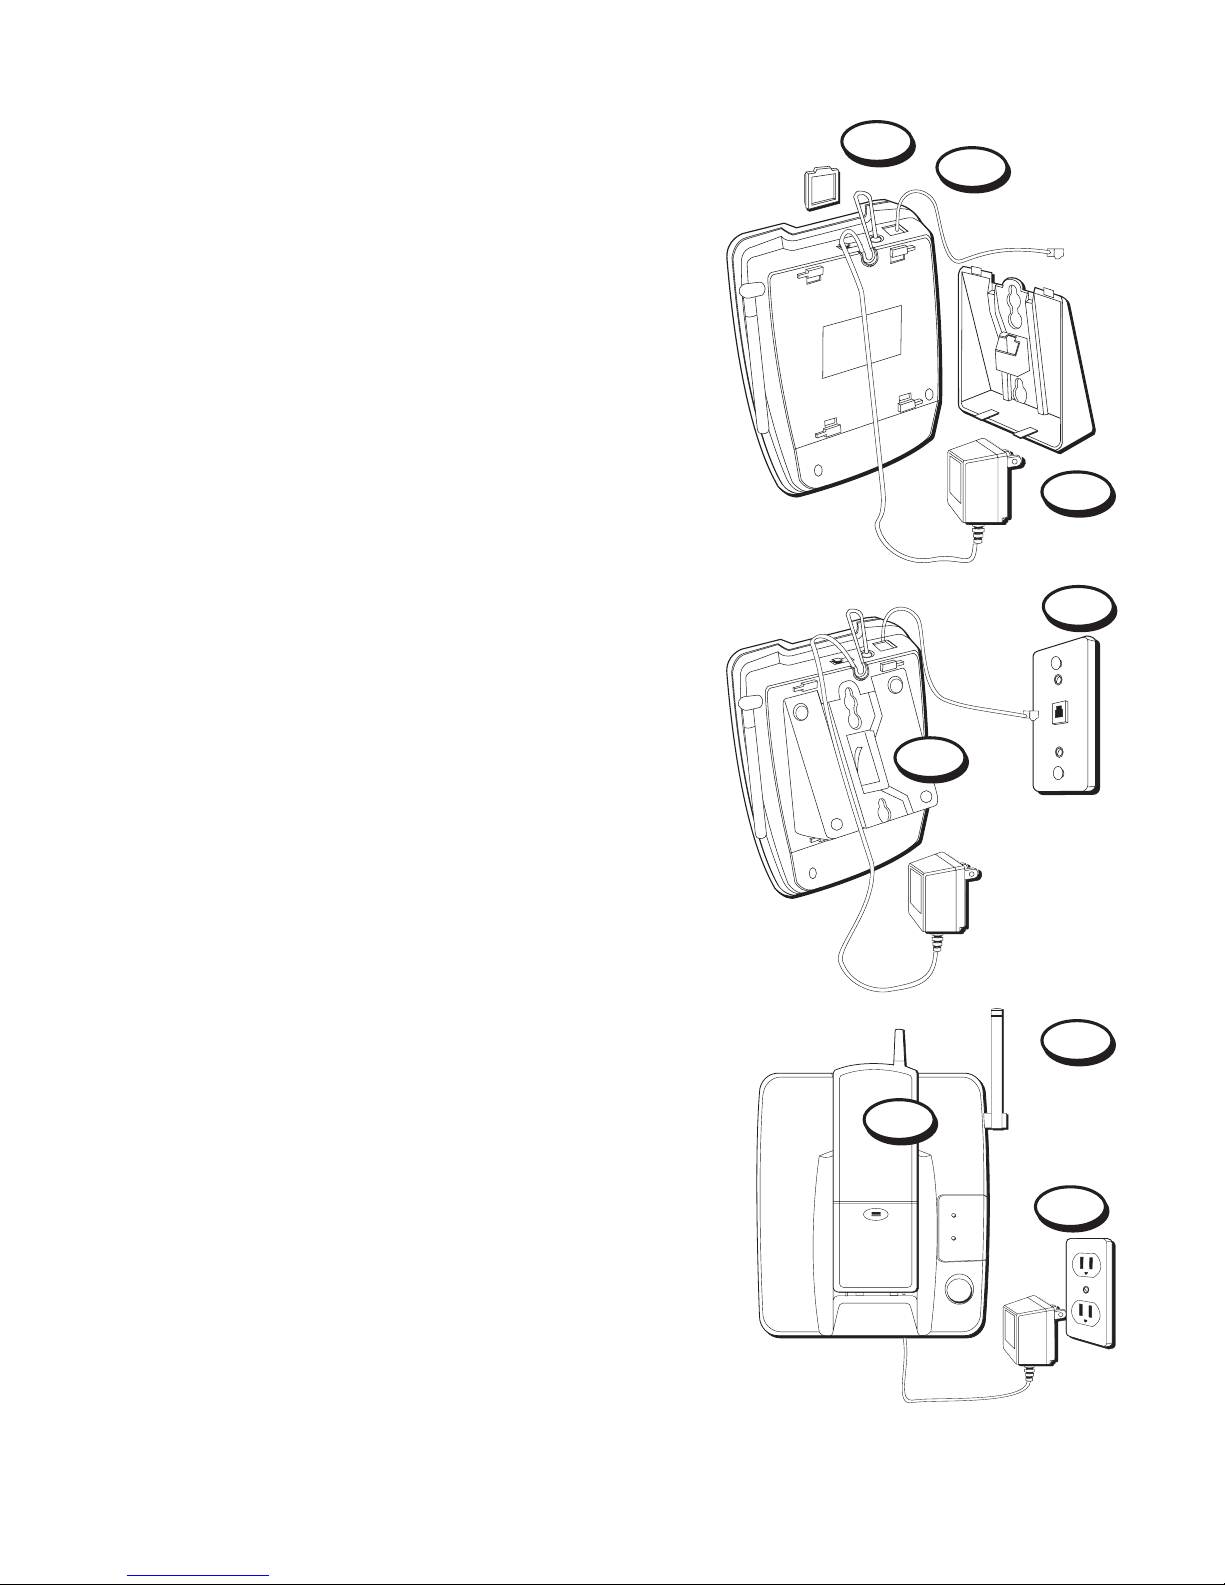
WALL MOUNT INSTALLATION
1. Remove the handset hook; turn it
upside down, and put it back in the
slot. You need to do this so the handset
doesn’t fall out of the base.
2. Plug the short telephone line cord into
the jack marked PHONE LINE on the
back of the unit and plug the other end
into a modular wall jack.
3. Connect the power adapter to the
POWER 9V DC jack on the phone.
4. Install the base plate by putting the
tabs into the slots on the top of the unit
first, and then snapping the bottom
tabs into place.
5. Slip the mounting holes over the wall
plate posts and slide the unit down
firmly into place. (Wall plate not
included.)
6. Set the T/P switch to T for touch-tone
service, or P for pulse (rotary) service. If
you don’t know which type of service
you have, check with the phone
company.
7. Plug the other end of the power
adapter into an AC outlet.
8. Set RING switch to ON.
9. Raise the base antenna.
2
1
3
5
9
7
PAGE
IN USE
CHARGE/
PAGE
10
4
5
10. Place handset in the base to charge for 12 hours. The CHARGE/PAGE
light comes on to indicate that the battery is charging. You must
charge the handset battery continuously (without using the
phone) for 12 hours when you set up the phone.
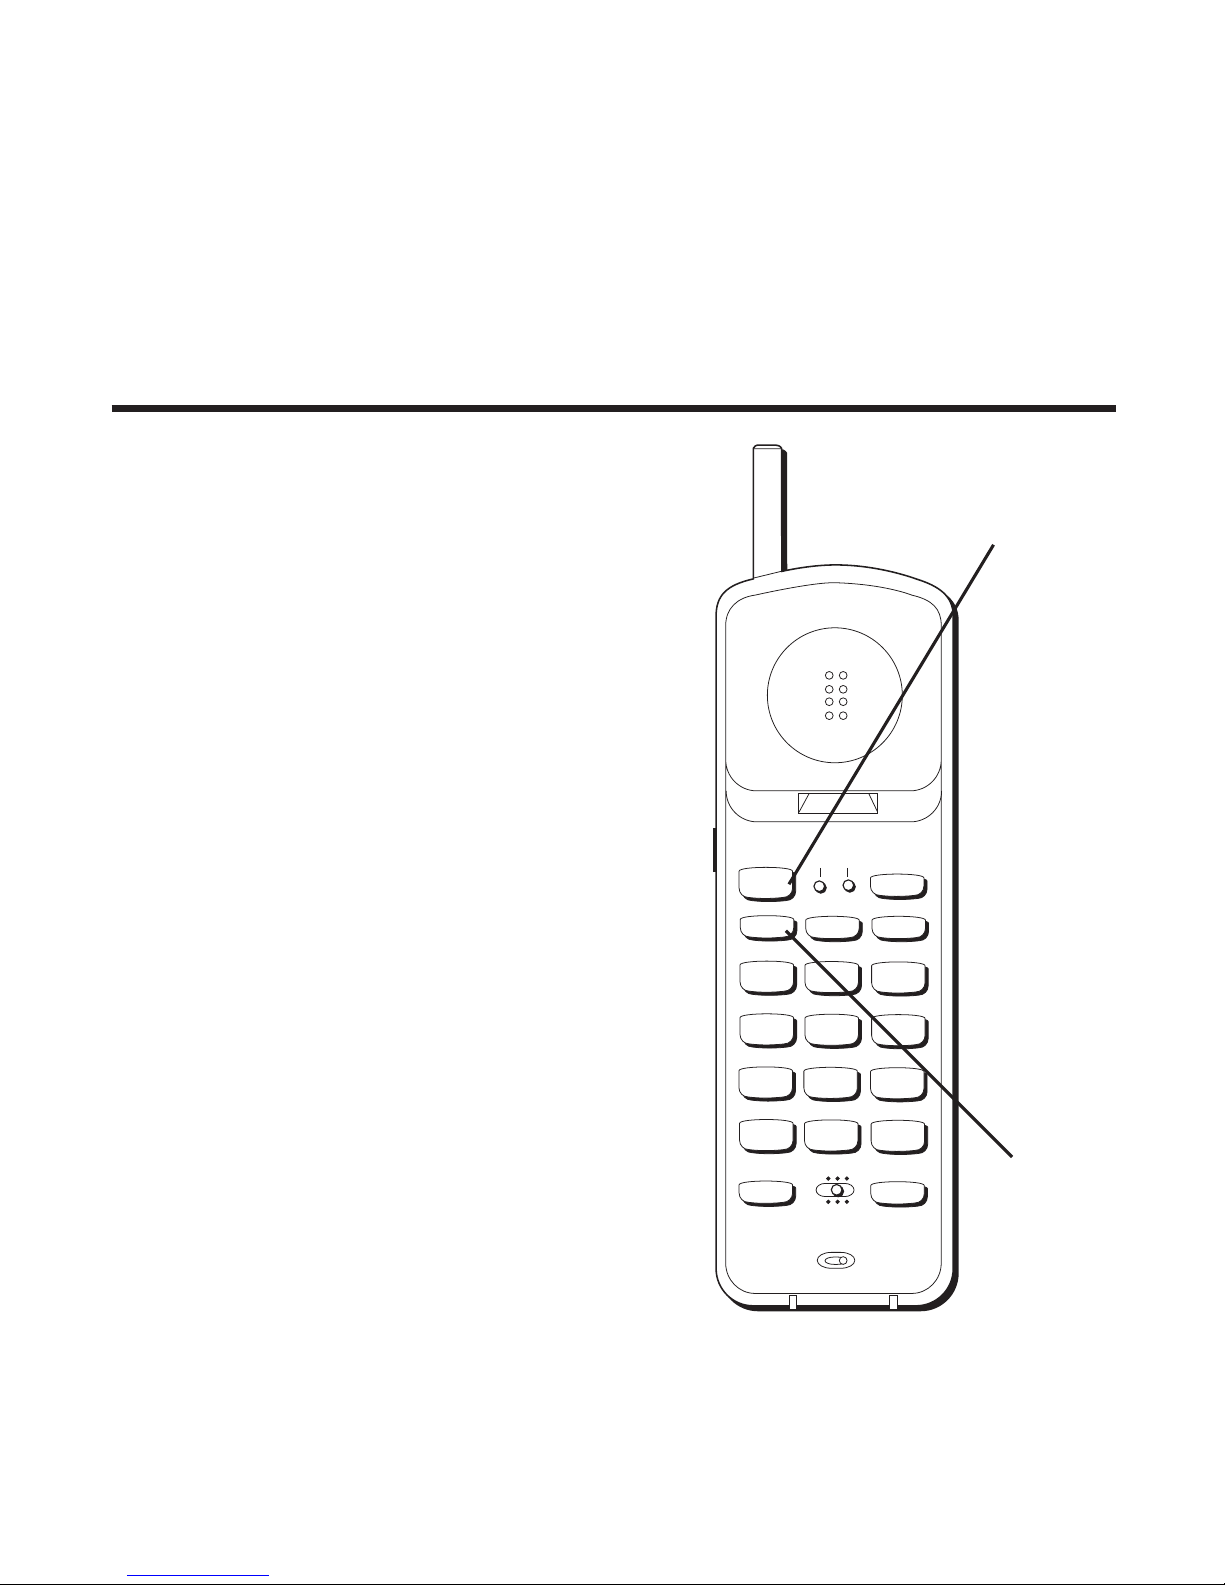
CORDLESS PHONE BASICS
RE/PA
Redial/Pause
button
MAKING ACALL
After initial set up, put handset in the
base for 12 hours to charge the battery.
The only two things you need to know to
make a call are:
• Press the TALK button before you dial.
• Press TALK or place the handset in the
base to hang up.
INUSE INDICATOR
You know the phone is on when you see
the IN USE indicator on the handset light.
REDIAL(RE/PA)
Press the TALK button, then press the RE/
PA (redial/pause) button to redial the last
number you called (up to 32 digits).
RECEIVING ACALL
To answer a call when the handset is out
of the base, you must press the
TALK button before you can talk.
TALK button
TUV
1
456
GHI
7
PQRS
89
WXYZ
OPER
0#
*
23
TONE
JKL MNO
ABC DEF
RE/PA FLASH MUTE
TALK
CHAN
PGM MEM
ON OFF–RING
PWR–ON OFF
IN USE BAT LOW
6
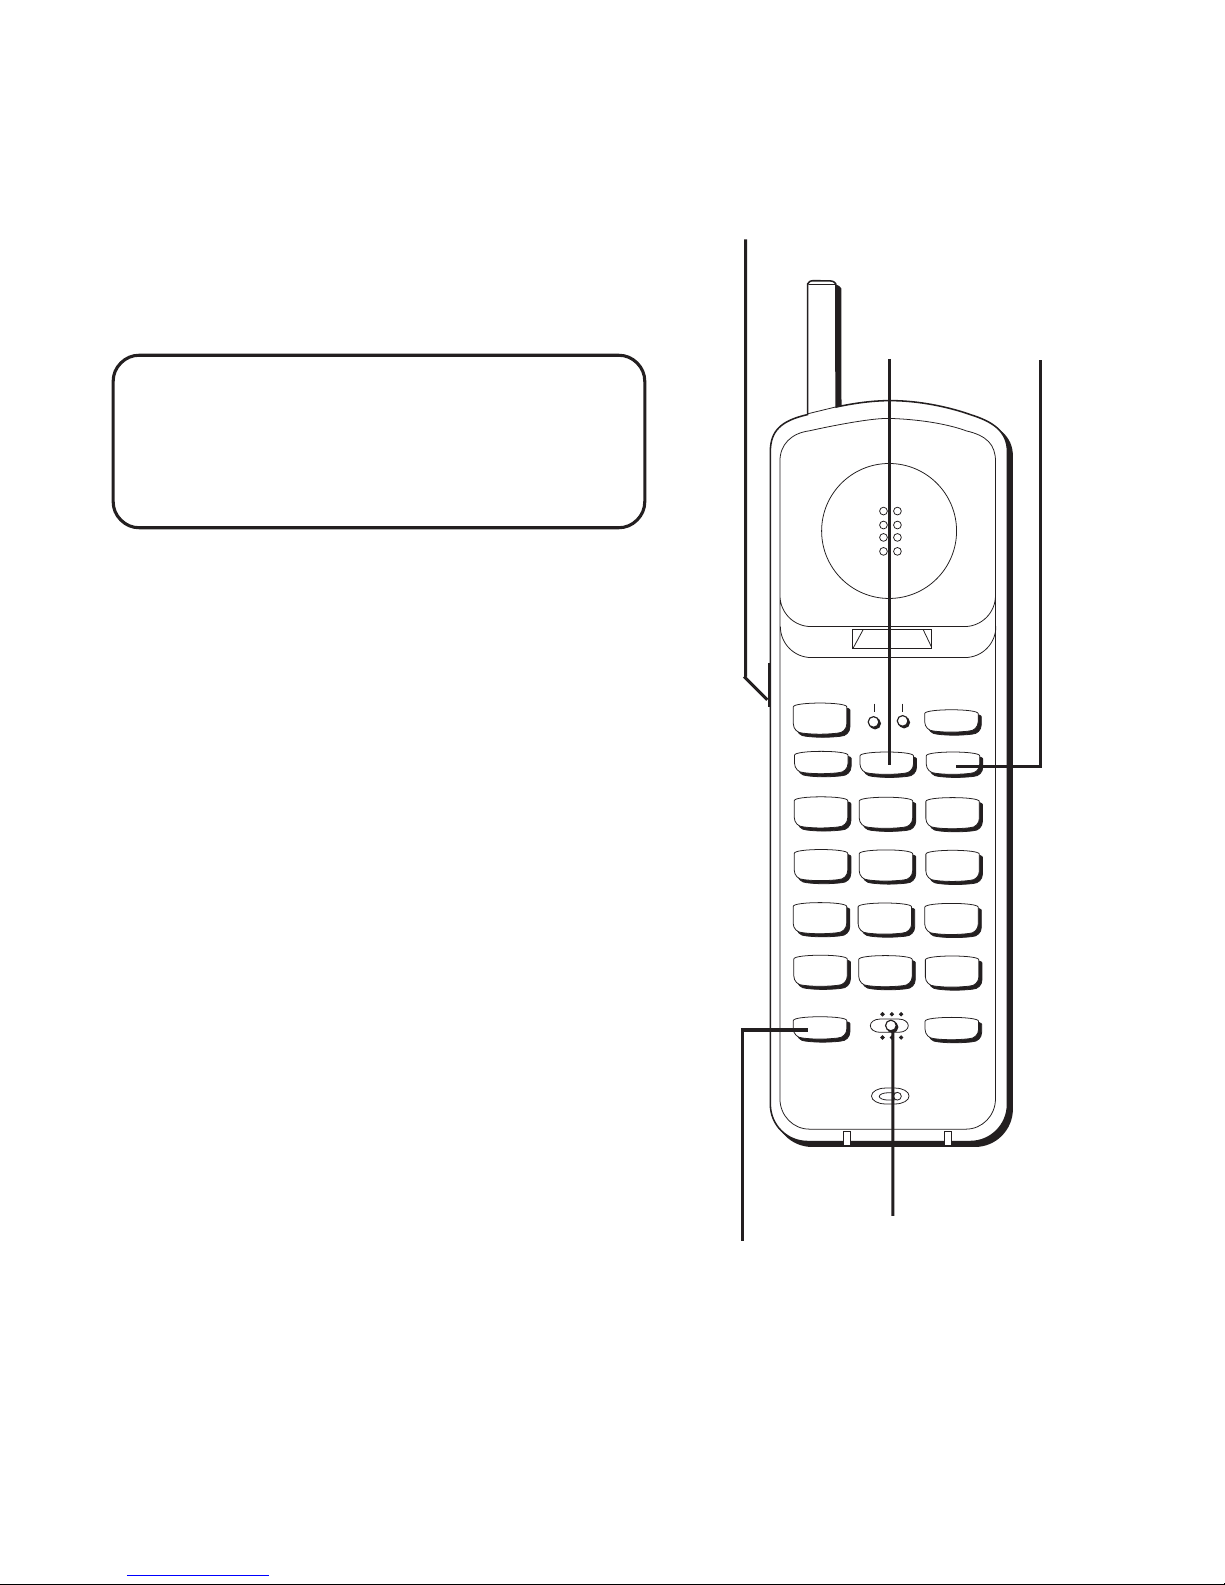
FLASH BUTTON
Use the FLASH button to activate custom
calling services such as call waiting or call
transfer, which are available through your
local phone company.
VOL (VOLUME) SWITCH
Controls the volume of the handset's
earpiece.
RING/PWR (RINGER AND
POWER) SWITCH
This is a 3-position switch that controls
the ringer and handset power.
When you move the switch to the left,
the power is on and the ringer is on.
When you move the switch to the middle
position, the power is on, but the ringer
is off.
When you move the switch to the far
right, the power is off and the ringer is
off which saves battery power. You must
turn PWR to ON (by sliding the switch to
the middle or left position) in order to
make calls or receive calls.
TIP: If you press the TALK button to
activate custom calling services such as
call waiting, you’ll hang up the phone.
Press FLASH instead.
TUV
1
456
GHI
7
PQRS
89
WXYZ
OPER
0#
*
23
TONE
JKL MNO
ABC DEF
RE/PA FLASH MUTE
TALK
CHAN
PGM MEM
ON OFF–RING
PWR–ON OFF
IN USE BAT LOW
FLASH
button
VOL (volume) switch
(on the side of the handset)
MUTE
button
PWR– ON OFF and
RING– ON OFF
switch
PGM
button

7
SELECTING ARING SOUND (PGM BUTTON)
You can choose between two different ring sounds. To choose the first ring
sound:
1. Press PGM.
2. Press 1.
3. Press PGM.
To choose the second ring sound:
1. Press PGM.
2. Press 2.
3. Press PGM.
To check your current ring sound selection, press PGM, press 3, and press
PGM again.
MUTE BUTTON
Use the MUTE button to interrupt a phone conversation to talk privately
with someone else in the room.
1. Press MUTE to activate mute feature (the BAT LOW light blinks).
2. Press MUTE again to turn it off.
TEMPORARY TONE
This feature enables pulse (rotary) service phone users to access touch-
tone services offered by banks, credit card companies, etc., by pressing
the TONE button to temporarily make the phone touch-tone compatible. To
get information about your bank account, for example, you would:
1. Press the TALK button.
2. Call the bank’s information line.
3. Press the TONE button after your call is answered.
4. Follow the voice instructions to complete your transaction.
5. Hang up when finished. The phone returns to pulse (rotary) service.
8
ADVANCED FEATURES
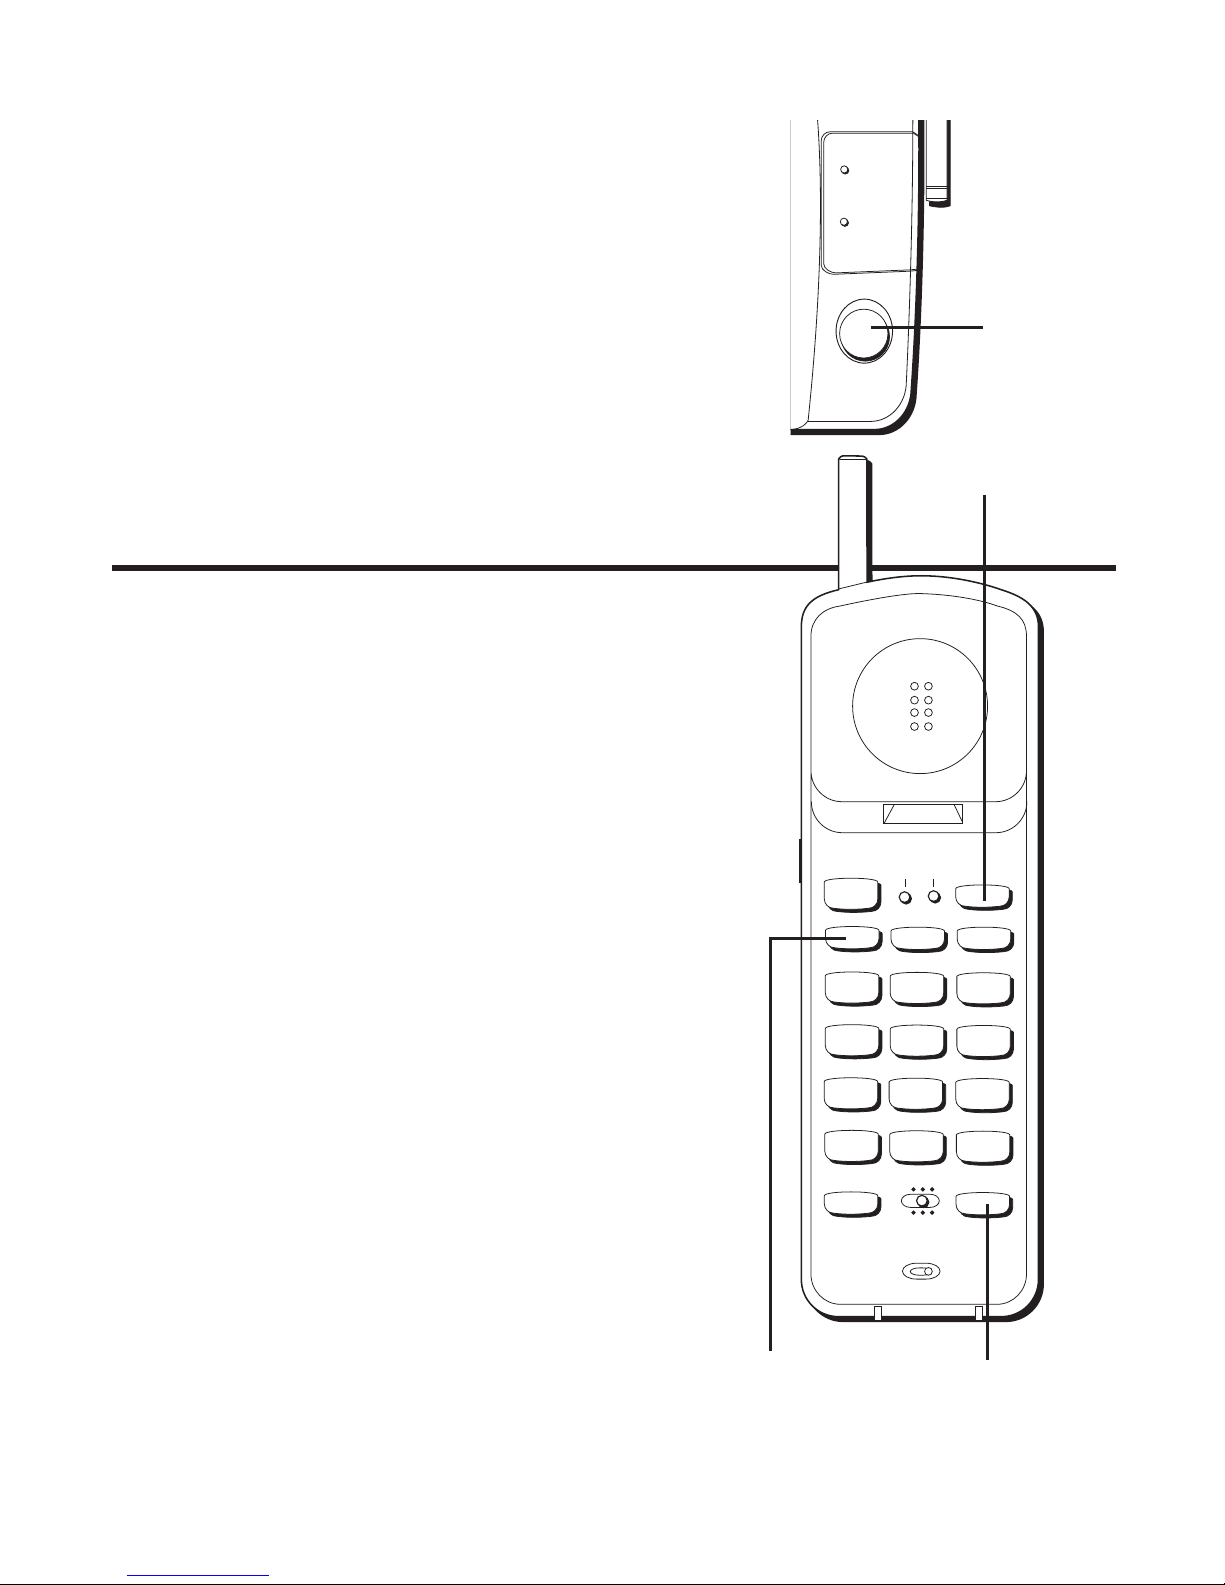
PAGING THE HANDSET
Press the PAGE button on the base to
locate a misplaced handset. When you
press the PAGE button, the handset
beeps. Press the TALK button when you
locate the handset. Remember that the
ringer must be ON in order for the
handset to ring.
MEM
button
TUV
1
456
GHI
7
PQRS
89
WXYZ
OPER
0#
*
23
TONE
JKL MNO
ABC DEF
RE/PA FLASH MUTE
TALK
CHAN
PGM MEM
ON OFF–RING
PWR–ON OFF
IN USE BAT LOW
CHAN button
RE/PA (redial/
pause) button
PAGE
button
PAGE
IN USE
CHARGE/
PAGE
CHANNEL BUTTON (CHAN)
If you ever experience any interference or
don’t have clear voice quality, press the
CHAN button on the handset to advance
to another channel.
THE MEMORY FEATURE
Store up to 10 numbers in memory for
quick dialing.
STORING ANUMBER IN MEMORY
The phone must be OFF (PWR button
ON, but no dial tone).
1. Press the MEM button
2. Dial the number (up to 24 digits).
3. Press MEM.
4. Press any number key (0-9) to store
the phone number in that memory
location.

9
CHANGING ASTORED NUMBER
Use the same procedure to change a stored number as you do to store a
number— you’re just moving the phone number to a different memory
location.
S
TORING
A
REDIAL
NUMBER
The phone must be off (PWR button ON, but no dial tone).
1. Press MEM.
2. Press RE/PA (redial/pause).
3. Press MEM.
4. Press any number key (0-9) to store the phone number in that memory
location.
S
TORING
A
P
AUSE
IN
M
EMORY
Use the RE/PA button to insert a pause when a delay is needed in the
dialing sequence (for example, when you must dial a 9 to get an outside
line or when you must enter codes to access your bank’s information line).
If you need to dial 9 to get an outside line and want to store a number in
memory without having to dial 9 each time, you would:
1. Press MEM (phone must be off— PWR button ON, but no dial tone).
2. Press 9.
3. Press RE/PA (redial/pause).
4. Dial the phone number you want to store in memory.
5. Press MEM.
6. Press any number key (0-9) to store the phone number in that memory
location.
TIP: If you need a longer pause, press RE/PA button more times.

10
D
IALING
A
S
TORED
N
UMBER
1. Press the TALK button to get a dial tone.
2. Press MEM and then press the number for that memory location.
C
HAIN
D
IALING
FROM
M
EMORY
Use this feature to make calls which require a sequence of numbers, for
instance if you use a calling card for a frequently called long distance
number. Basically, you dial each part of the sequence from memory. The
following example shows how you can use chain dialing to make a call
through a long distance service:
The Number For Memory Location
Long distance access number 7
Authorization code 8
Frequently called long distance number 9
1. Press the TALK button to get a dial tone.
2. Press the MEM button and then press 7.
3. When you hear the access tone, press MEM and then press 8.
4. At the next access tone, press MEM and then 9.
Autres manuels pour 2-9920
2
Table des matières
Autres manuels GE Téléphone sans fil


GE
GE 27831FE1 Manuel utilisateur

GE
GE 2-9191 Manuel utilisateur

GE
GE 27957 Manuel utilisateur

GE
GE 900 MHz Manuel utilisateur

GE
GE 28112EE3 Manuel utilisateur

GE
GE 27831 Series Manuel utilisateur

GE
GE 26999 Manuel utilisateur

GE
GE 25951 Series Manuel utilisateur

GE
GE 25829 Manuel utilisateur

GE
GE 27977 Manuel utilisateur


