
GE Security PTZ Manuel utilisateur

g
GE
Security
1063759A
GE 16X PTZ
Installation Manual

Copyright Copyright © 2008 GE Security. All rights reserved.
This document may not be copied in whole or in part or otherwise reproduced without prior
written consent from GE Security except where specifically permitted under US and
international copyright law.
Document number/revision: 1063759A (October 2008).
Disclaimer The information in this document is subject to change without notice. GE Security (“GE”)
assumes no responsibility for inaccuracies or omissions and specifically disclaims any
liabilities, losses, or risks, personal or otherwise, incurred as a consequence, directly or
indirectly, of the use or application of any of the contents of this document. For the latest
documentation, contact your local supplier or visit us online at www.gesecurity.com.
This publication may contain examples of screen captures and reports used in daily operations.
Examples may include fictitious names of individuals and companies. Any similarity to names
and addresses of actual businesses or persons is entirely coincidental.
Trademarks and patents GE and the GE monogram are registered trademarks of General Electric Company.
Other trade names used in this document may be trademarks or registered trademarks of the
manufacturers or vendors of the respective products.
Intended use Use this product only for the purpose it was designed for; refer to the data sheet and user
documentation. For the latest product information, contact your local supplier or visit us online
at www.gesecurity.com.
FCC compliance This equipment has been tested and found to comply with the limits for a Class A digital device,
pursuant to part 15 of the FCC rules. These limits are designed to provide reasonable
protection against harmful interference when the equipment is operated in a commercial
environment. This equipment generates, uses, and can radiate radio frequency energy and, if
not installed and used in accordance with the instruction manual, may cause harmful
interference to radio communications.
Changes or modifications not expressly approved by the party responsible for compliance
could void the user’s authority to operate the equipment.
EU directives 2004/108/EC (EMC directive). Non-European manufacturers must designate an authorized
representative in the Community. Our authorized manufacturing representative is
GE Security B.V., Kelvinstraat 7, 6003 DH Weert, Nederland.
2002/96/EC (WEEE directive). Products marked with this symbol cannot be disposed of as
unsorted municipal waste in the European Union. For proper recycling, return this product to
your local supplier upon the purchase of equivalent new equipment, or dispose of it at
designated collection points. For more information, visit www.recyclethis.info.
Regulatory

iii
Contents
Preface. . . . . . . . . . . . . . . . . . . . . . . . . . . . . . . . . . . . . . . . . . . . . . . . . . . . . . . . . . . . . . . . . . . . . . . . . . . . . . . . . . . . . . . . . 1
Safety terms and symbols . . . . . . . . . . . . . . . . . . . . . . . . . . . . . . . . . . . . . . . . . . . . . . . . . . . . . . . . . . . . . . . . . . . . . . . . . 1
Product overview. . . . . . . . . . . . . . . . . . . . . . . . . . . . . . . . . . . . . . . . . . . . . . . . . . . . . . . . . . . . . . . . . . . . . . . . . . . . . . . . 2
Product contents . . . . . . . . . . . . . . . . . . . . . . . . . . . . . . . . . . . . . . . . . . . . . . . . . . . . . . . . . . . . . . . . . . . . . . . . . . . . . . . . . 2
Camera components. . . . . . . . . . . . . . . . . . . . . . . . . . . . . . . . . . . . . . . . . . . . . . . . . . . . . . . . . . . . . . . . . . . . . . . . . . . . . . 3
Junction board . . . . . . . . . . . . . . . . . . . . . . . . . . . . . . . . . . . . . . . . . . . . . . . . . . . . . . . . . . . . . . . . . . . . . . . . . . . . . . . . . . . 4
Connections . . . . . . . . . . . . . . . . . . . . . . . . . . . . . . . . . . . . . . . . . . . . . . . . . . . . . . . . . . . . . . . . . . . . . . . . . . . . . . . . . . . . 5
Monitor . . . . . . . . . . . . . . . . . . . . . . . . . . . . . . . . . . . . . . . . . . . . . . . . . . . . . . . . . . . . . . . . . . . . . . . . . . . . . . . . . . . . . . . . . . 6
Alarm input. . . . . . . . . . . . . . . . . . . . . . . . . . . . . . . . . . . . . . . . . . . . . . . . . . . . . . . . . . . . . . . . . . . . . . . . . . . . . . . . . . . . . . . 6
Power source. . . . . . . . . . . . . . . . . . . . . . . . . . . . . . . . . . . . . . . . . . . . . . . . . . . . . . . . . . . . . . . . . . . . . . . . . . . . . . . . . . . . . 7
RJ45 cable . . . . . . . . . . . . . . . . . . . . . . . . . . . . . . . . . . . . . . . . . . . . . . . . . . . . . . . . . . . . . . . . . . . . . . . . . . . . . . . . . . . . . . . 8
KTD-405/KTD-405A keypad. . . . . . . . . . . . . . . . . . . . . . . . . . . . . . . . . . . . . . . . . . . . . . . . . . . . . . . . . . . . . . . . . . . . . . . . 8
Connecting multiple GE 16X PTZ cameras in parallel . . . . . . . . . . . . . . . . . . . . . . . . . . . . . . . . . . . . . . . . . . . . . . . . 9
Installation . . . . . . . . . . . . . . . . . . . . . . . . . . . . . . . . . . . . . . . . . . . . . . . . . . . . . . . . . . . . . . . . . . . . . . . . . . . . . . . . . . . . 10
Removing the protective tape . . . . . . . . . . . . . . . . . . . . . . . . . . . . . . . . . . . . . . . . . . . . . . . . . . . . . . . . . . . . . . . . . . . . 10
Protocol and baud rate settings . . . . . . . . . . . . . . . . . . . . . . . . . . . . . . . . . . . . . . . . . . . . . . . . . . . . . . . . . . . . . . . . . . 11
Mounting the camera . . . . . . . . . . . . . . . . . . . . . . . . . . . . . . . . . . . . . . . . . . . . . . . . . . . . . . . . . . . . . . . . . . . . . . . . . . . . 15
Contacting us . . . . . . . . . . . . . . . . . . . . . . . . . . . . . . . . . . . . . . . . . . . . . . . . . . . . . . . . . . . . . . . . . . . . . . . . . . . . . . . . . . 36
Online resources. . . . . . . . . . . . . . . . . . . . . . . . . . . . . . . . . . . . . . . . . . . . . . . . . . . . . . . . . . . . . . . . . . . . . . . . . . . . . . . . . 36

GE 16X PTZ Camera
Installation Manual
iv
1
Preface
This is the GE 16X PTZ Camera Installation Manual for models GEC-DV-16FN, GEC-DV-16SN, GEC-DV-
16-FP, and GEC-DV-16SP. This document includes an overview of the product and detailed instructions
explaining how to install your camera.
There is also information describing how to contact technical support if you have questions or concerns.
To use this document effectively, you should have the following minimum qualifications:
• a basic knowledge of CCTV systems and components; and
• a basic knowledge of electrical wiring and low-voltage electrical connections.
Read these instructions and all other documentation entirely before installing or operating this product. The
most current versions of this and related documentation may be found on our website. Refer to Online
resources on page 36 for instructions on accessing our online publication library.
Note: A qualified service person, complying with all applicable codes, should perform all required hardware installation.
The following conventions are used in this document:
Safety terms and symbols
These terms may appear in this manual:
Bold Menu items and buttons.
Italic Emphasis of an instruction or point; special terms.
File names, path names, windows, panes, tabs, fields, variables, and other GUI elements.
Titles of books and various documents.
Blue italic (Electronic version.) Hyperlinks to cross-references, related topics, and URL addresses.
Monospace Text that displays on the computer screen.
Programming or coding sequences.
CAUTION: Cautions identify conditions or practices that may result in damage to the equipment or other property.
WARNING: Warnings identify conditions or practices that could result in equipment damage or serious personal injury.

GE 16X PTZ Camera
Installation Manual
2
Product overview
The GE 16X PTZ cameras are designed for installation in indoor/outdoor video surveillance systems. The
camera incorporates the digital signal processor, pan/tilt mechanism, a 16X zoom lens, and an RS-485
communication interface in a compact enclosure.
Product contents
The GE 16X PTZ Camera system consists of the following
• Camera
• Power and data cables
• Optional camera mounting bracket
• Safety wire
• Allen wrench
• Installation template
• Junction board
Mounting hardware
Pendant/surface type camera. This type of camera comes with three type of screws:
The pendant/surface type camera also comes with a lower surface-mount assembly bracket (1 piece), and
an upper assembly bracket (2 pieces).
Flush type camera. This type of camera comes with two types of screws:
The pendant/surface type camera also comes with a lower flush mount assembly bracket (1 piece), and an
upper assembly bracket (2 pieces).
Inspect the package and contents for visible damage. If any components are damaged or missing, do not use the
unit; contact the supplier immediately. If you need to return the unit, you must ship it in the original box.
M3 (2). Used for installing the safety cable bracket.
Screw #6 (4). Used for installing mounting bracket.
Screw #8 (3). Used for installing camera to bracket.
M3 (2). Used for installing the safety cable bracket.
Screw #6 (4). Used for installing mounting bracket.
3
Camera components
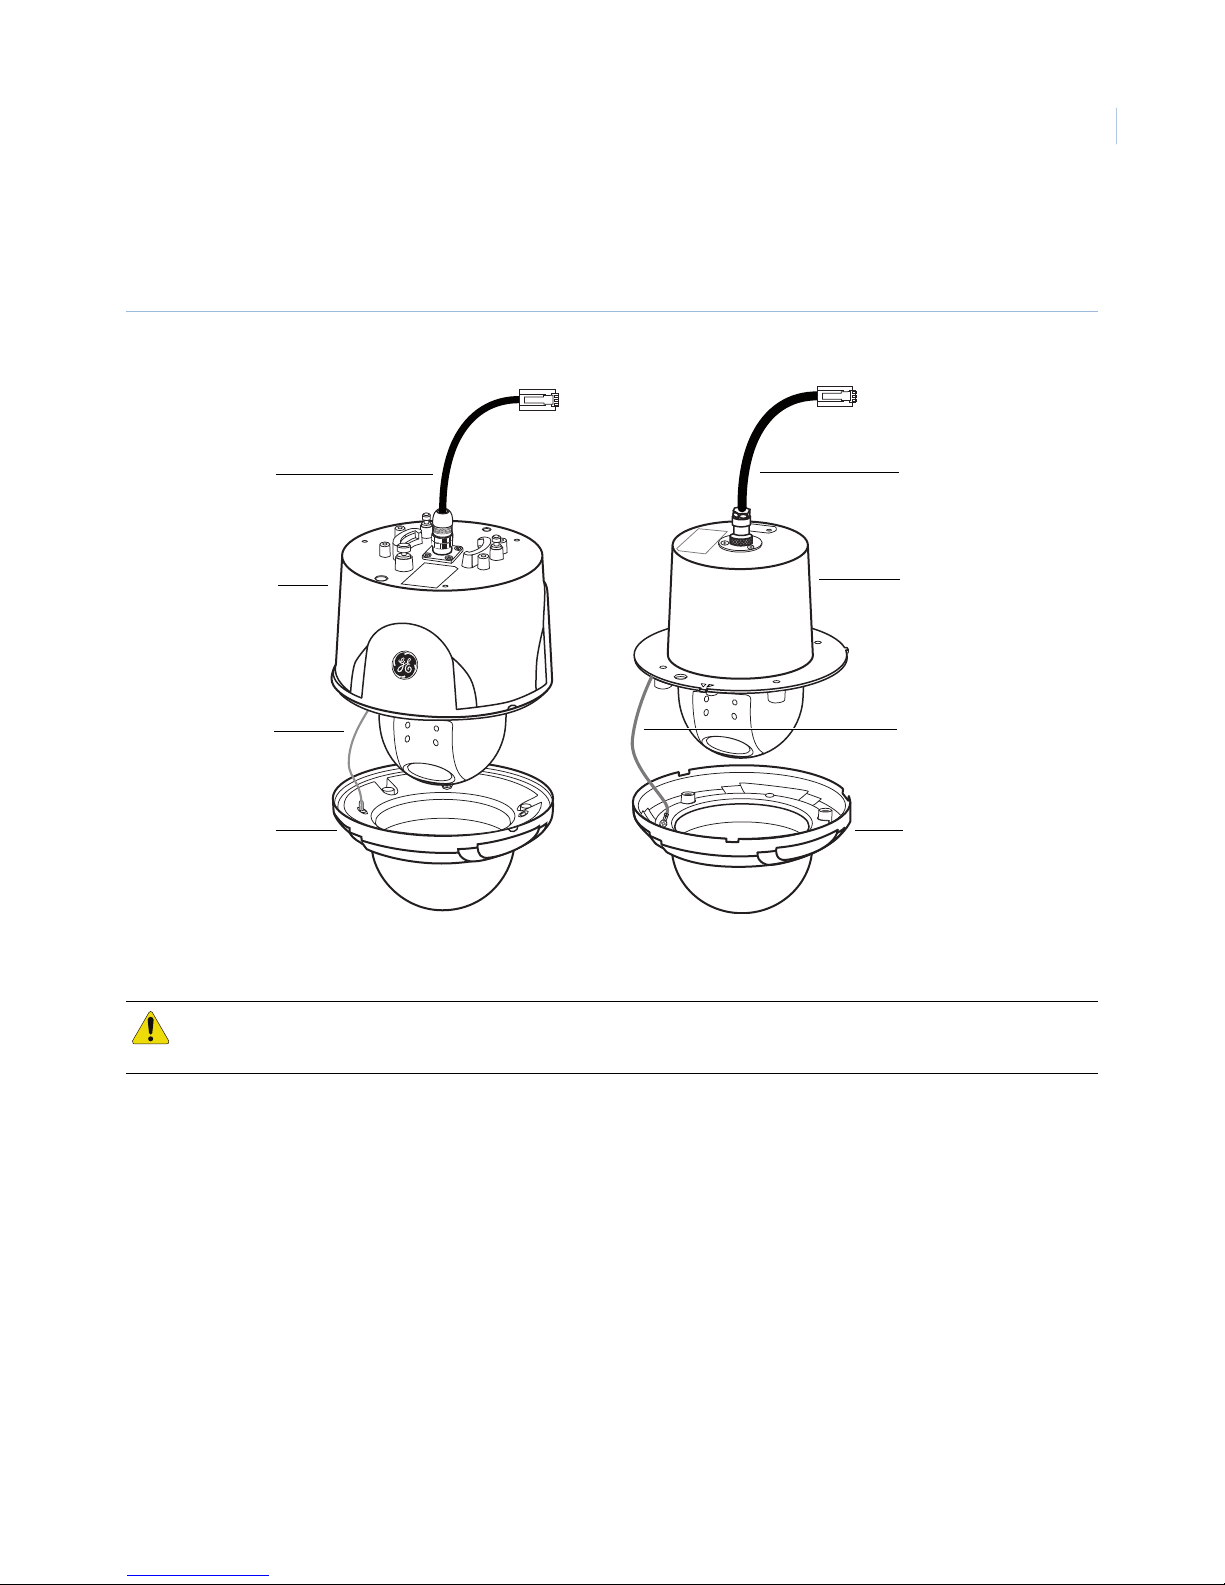
Figure 1 shows basic camera components. The camera mounting bracket is optional for surface installation.
Figure 1. Camera components
Note: Pendant-mount type configurations have an IP66 environmental rating. Flush-mount and surface-mount configurations
do not.
CAUTION: Do not expose the power and data cable to moisture, this may cause leakage into the housing and damage
the camera. If you must, please make sure that the connections are sealed tightly.
Power and
Dome
data cable
camera
body
Power and
data cable
Lanyard Lanyard
Dome coverDome cover
Dome
camera
body
Pendant/surface-mount type Flush mount type
GE 16X PTZ Camera
Installation Manual
4
Junction board
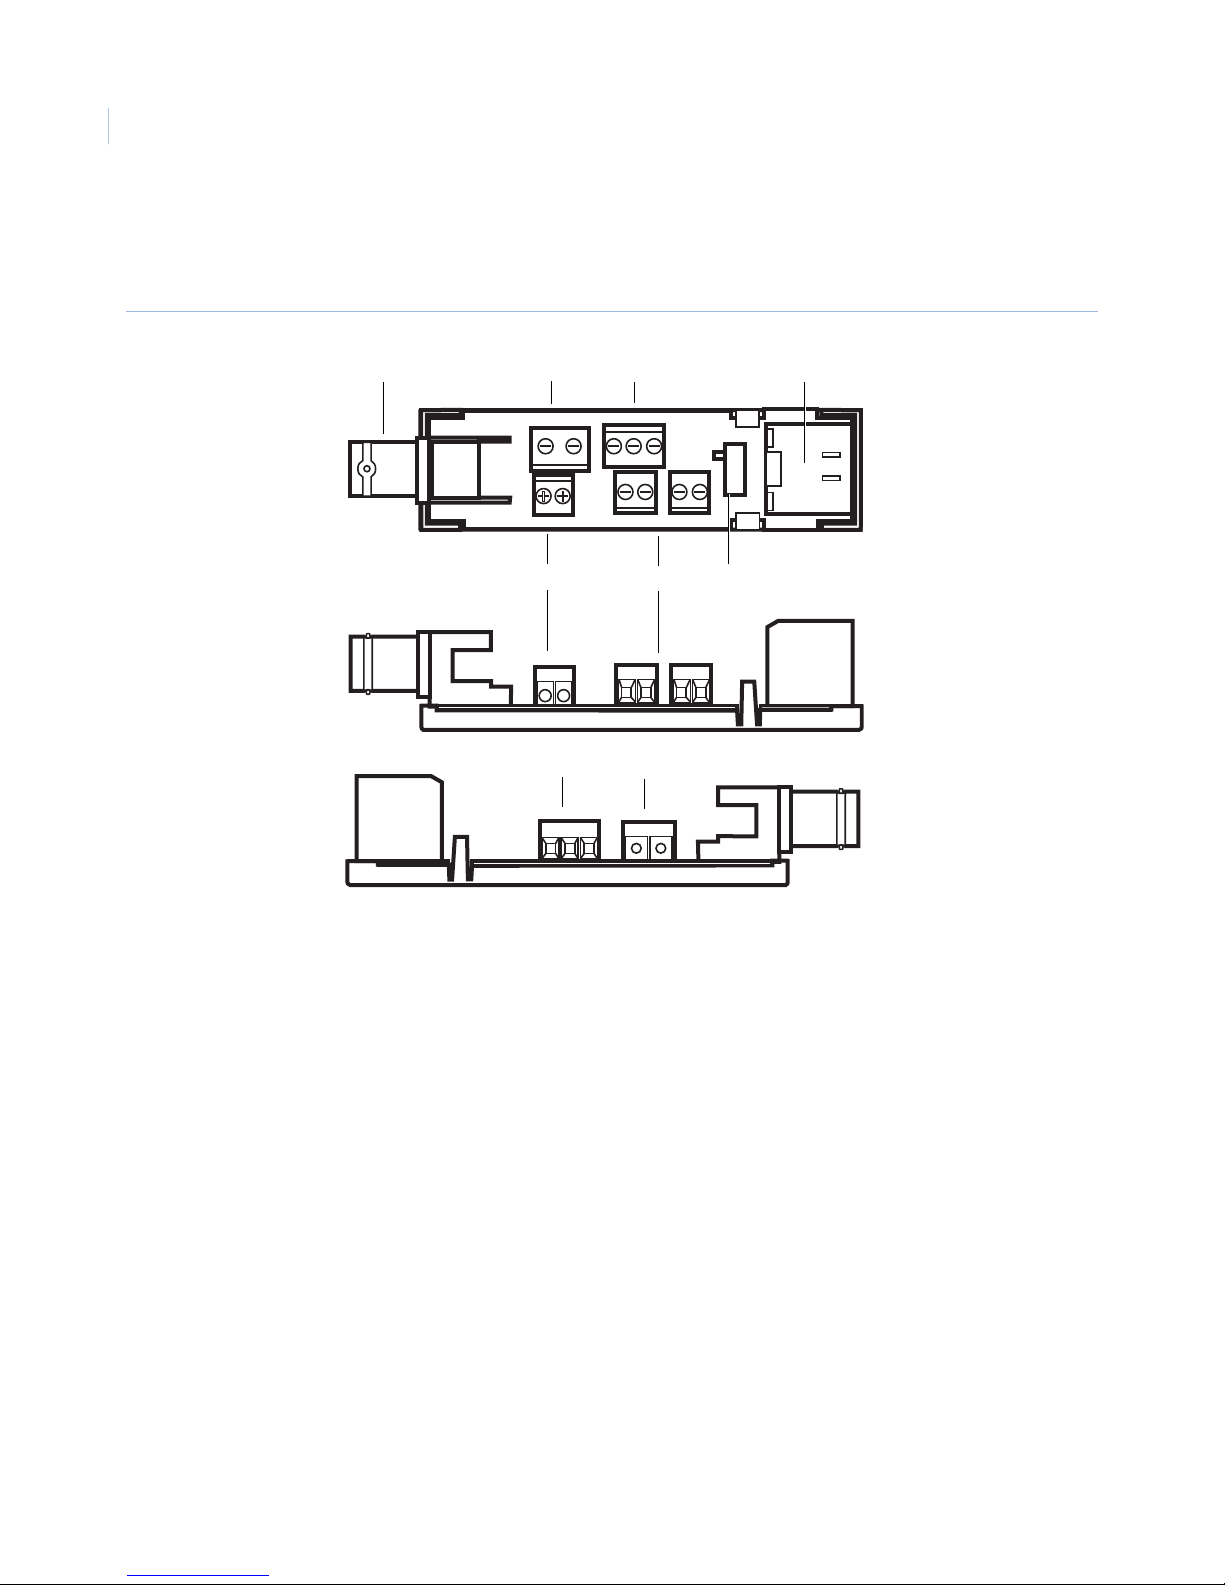
Figure 2 shows the junction board components.
Figure 2. Junction board
AVideo output jack with BNC connector
BVideo output terminal with UTP connector
CAlarm input (sensor input) terminal (A1: Alarm Input 1 / A2: Alarm Input 2)
DRJ45 connector
E24 VAC/24 VDC terminal (UL listed class 2 power supply only)
FData communication port
GDaisy chain termination on/off switch
UTP - UTP + A1 C A2
24VAC/DC B A B A
OFF
ON
ABC D
EG
CB
F
5
Connections
A qualified service person, complying with all applicable codes, should perform all required hardware
installation.
Note: Do not attempt to extend the power/data cable connection using RJ45 couplers and Cat5 cable. Only use the data cable
connection provided.
Note: Use 24 VAC / 24 VDC. (use a UL listed Class 2 power source only.)
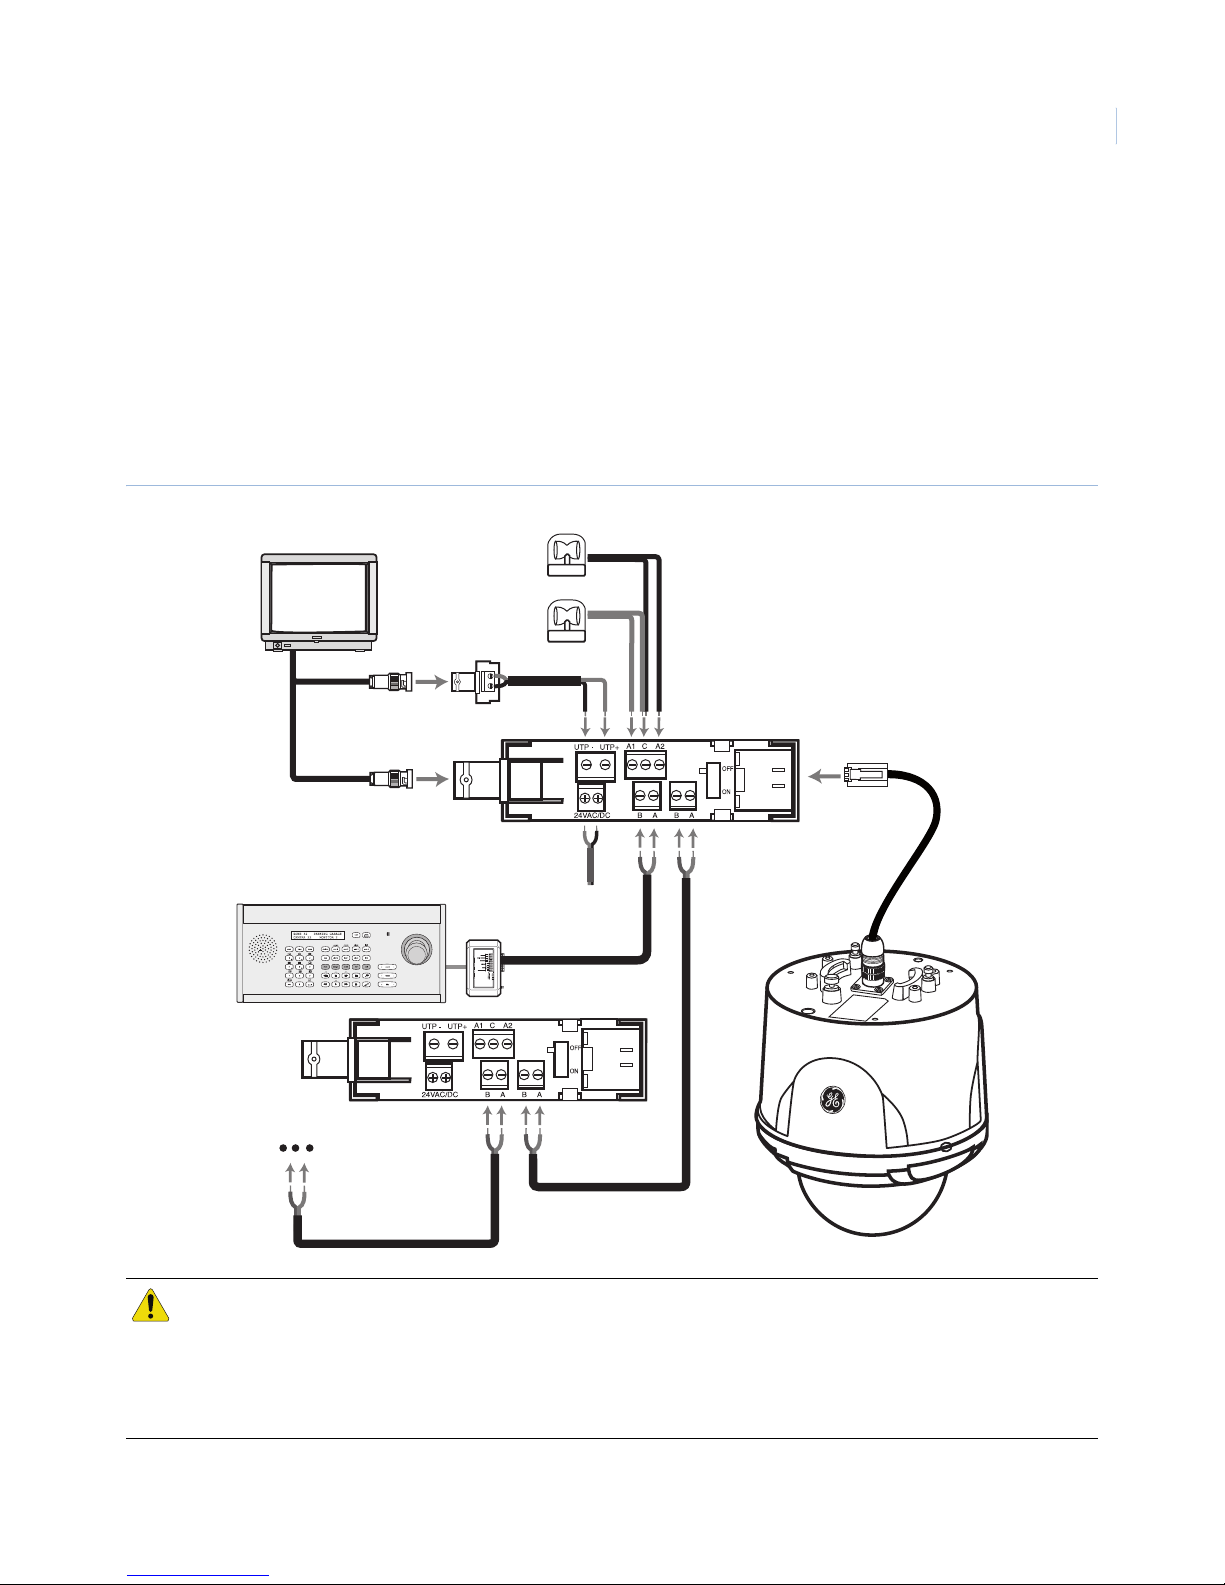
Figure 3 shows a typical camera installation.
Figure 3. Camera installation sample
CAUTION: Do not expose the power and data cable to moisture, which may cause damage to the camera. If you
cannot avoid installing the camera in a damp area, please make sure that the connections are sealed
tightly.
Pendant-mount configurations have an IP66 environmental rating. Flush-mount and surface-mount
configurations do not.
or
GE 16X PTZ Camera
Installation Manual
6
Monitor
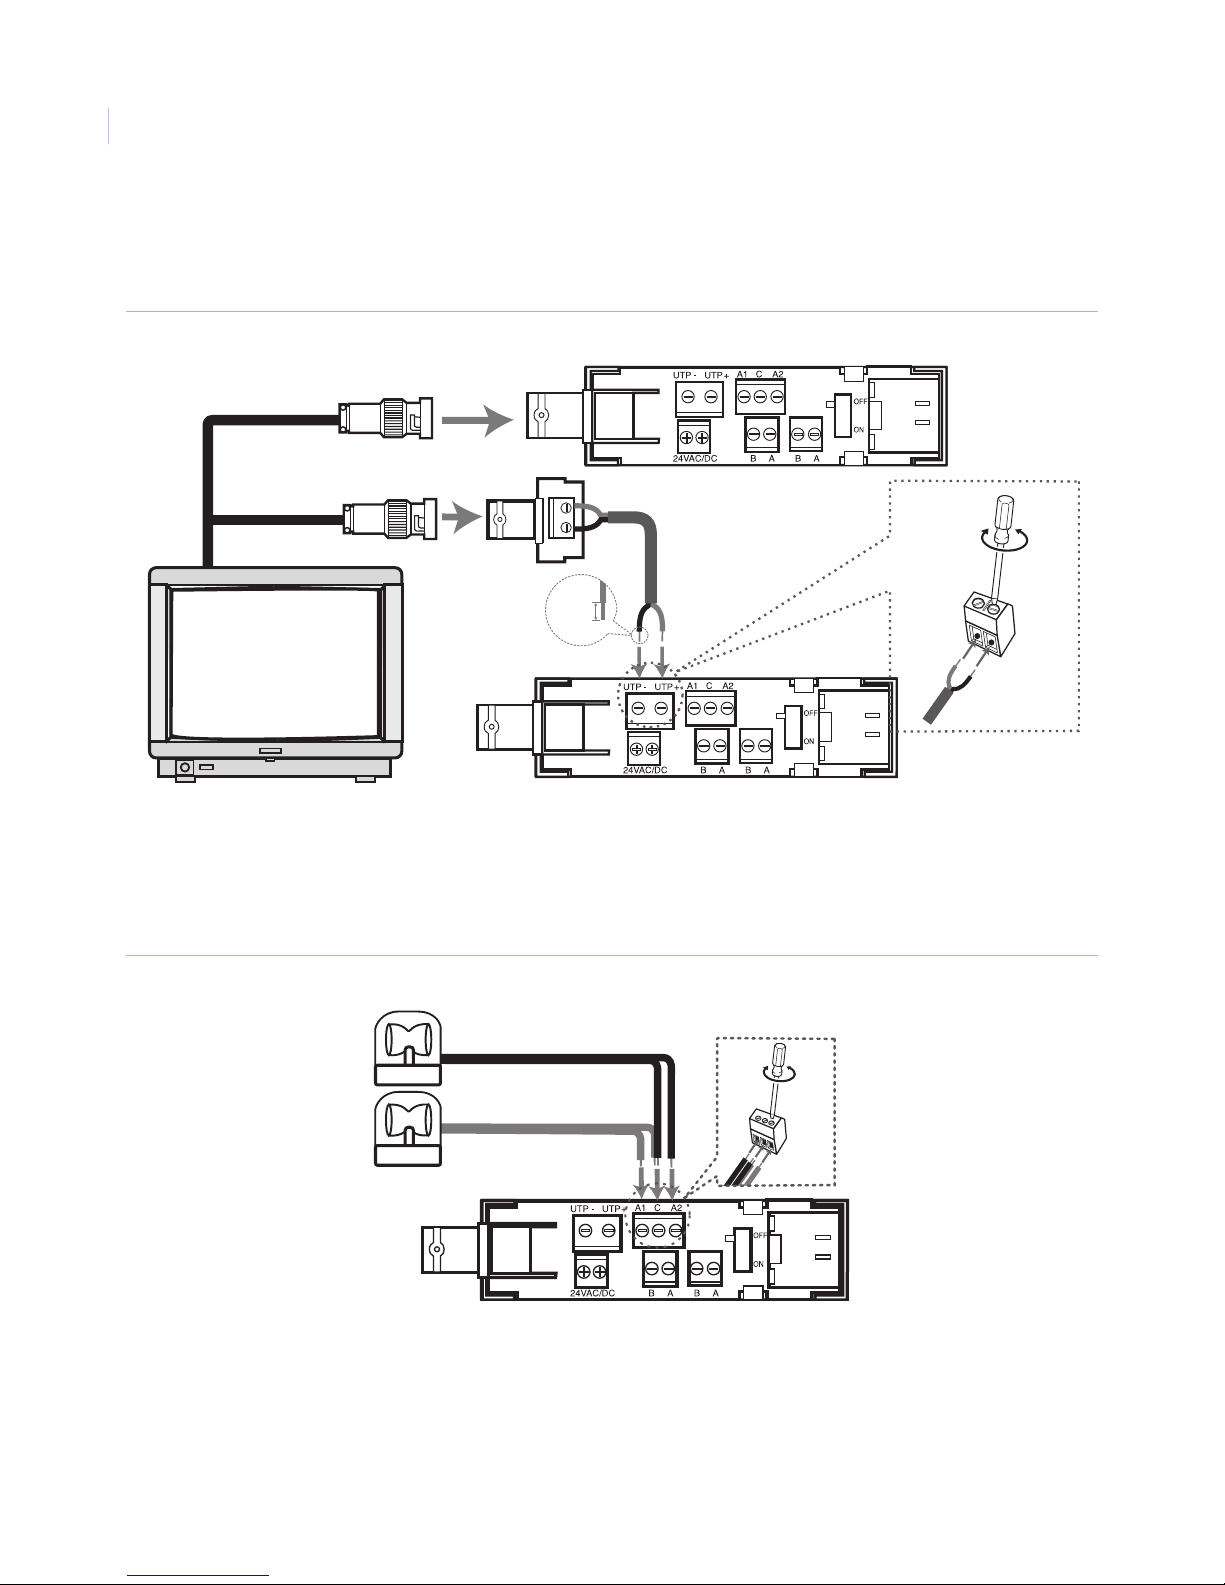
Figure 4 shows the video signal connection between the camera and the monitor.
Figure 4. Monitor connection
Alarm input
You can connect up to two alarm sensors to the camera (Figure 5). Connect each alarm sensor to C (Common).
You can adjust the signal state to NO (normally open) or NC (normally closed) through the setup menu.
Figure 5. Alarm input connections
5~7 mm
or
Ce manuel convient aux modèles suivants
4
Table des matières
Autres manuels GE Security Caméra de sécurité

GE Security
GE Security Legend IP Manuel utilisateur

GE Security
GE Security CyberDome II Manuel utilisateur

GE Security
GE Security Security Lend Camera Manuel utilisateur

GE Security
GE Security DM2 Manuel utilisateur

GE Security
GE Security GEC-EVR Manuel utilisateur

GE Security
GE Security CyberDome II Manuel utilisateur

GE Security
GE Security UVD-XP3DNR(-P) Instructions de montage

GE Security
GE Security TIR-300 Manuel utilisateur

GE Security
GE Security PTZ 12X Manuel utilisateur

GE Security
GE Security Security Lend Camera Manuel utilisateur


