TIME AND CALENDAR SETTING
If you are out of the reach of the Radio Controlled Transmitter or if the reception is not reachable,
the time can be set manually. As soon as the transmitter is received again, the clock will
automatically synchronize with received time.
1. In normal time mode, press and hold [ TIME ] key for 2 seconds to enter 12/24 hour format
setting.
2. Press [ + ] or [ - ] key to set your desired. (Press it without releasing to speed up the setting.)
3. Press [ TIME ] key again to step the setting items in this sequence: 12/24 hour format Hour
Minute Second Year MD/ DM Month Date ±23 hour offset
Language RC ON/OFF DST AUTO/OFF .
4. Press [ TIME ] key to save and exit the setting mode, or the clock will automatically exit the
setting mode 60 seconds later without pressing any button.
NOTE:
1. 7 selectable languages and setting orders: EN(English) FR(French) DE(German)
ES(Spanish) IT(Italian) NL(Dutch) RU(Russian)
ALARM ON/OFF
1. In normal time mode, press [ ALARM ] key to show the alarm time, press again to turn on/o
alarm function and alarm icon " " appearing/disappearing on display.
USING ALARM AND SNOOZE
1. In normal time mode, press and hold [ ALARM ] key for 2 seconds until alarm Hour digit flashes to
enter alarm time setting mode.
2. Press [ + ] or [ - ] key to change the value (Press and hold the key to speed up the setting.)
3. Repeat the above operations to set alarm time in this order: Hour Minute.
4. Press [ ALARM ] key to save and exit the setting, or the clock will automatically exit the setting
mode 60 seconds later without pressing any button.
NOTE:
1. The alarm will be automatically turned on when you set the alarm time with the icon “ ” displayed.
2. Press [ ALARM/SNOOZE ] button to stop the current alarm and enter snooze. Alarm icon will be flashing
continuously. The alarm will sound again in 5 minutes. Snooze can be operated continuously in 24 hours.
3. When the alarm is sounding, it will stop automatically without pressing any key in 2 minutes. Also
you can press and hold the [ALARM/SNOOZE] button key for 2 seconds or press [ ALARM ]
button to stop the current alarm. And the alarm will automatically sound again at the alarm time
next day.
LOW TEMPERATURE ALERT
When the outdoor temperature is 3°C or below, the ” ” icon will display.
COLOURFUL BACKLIGHT DISPLAY
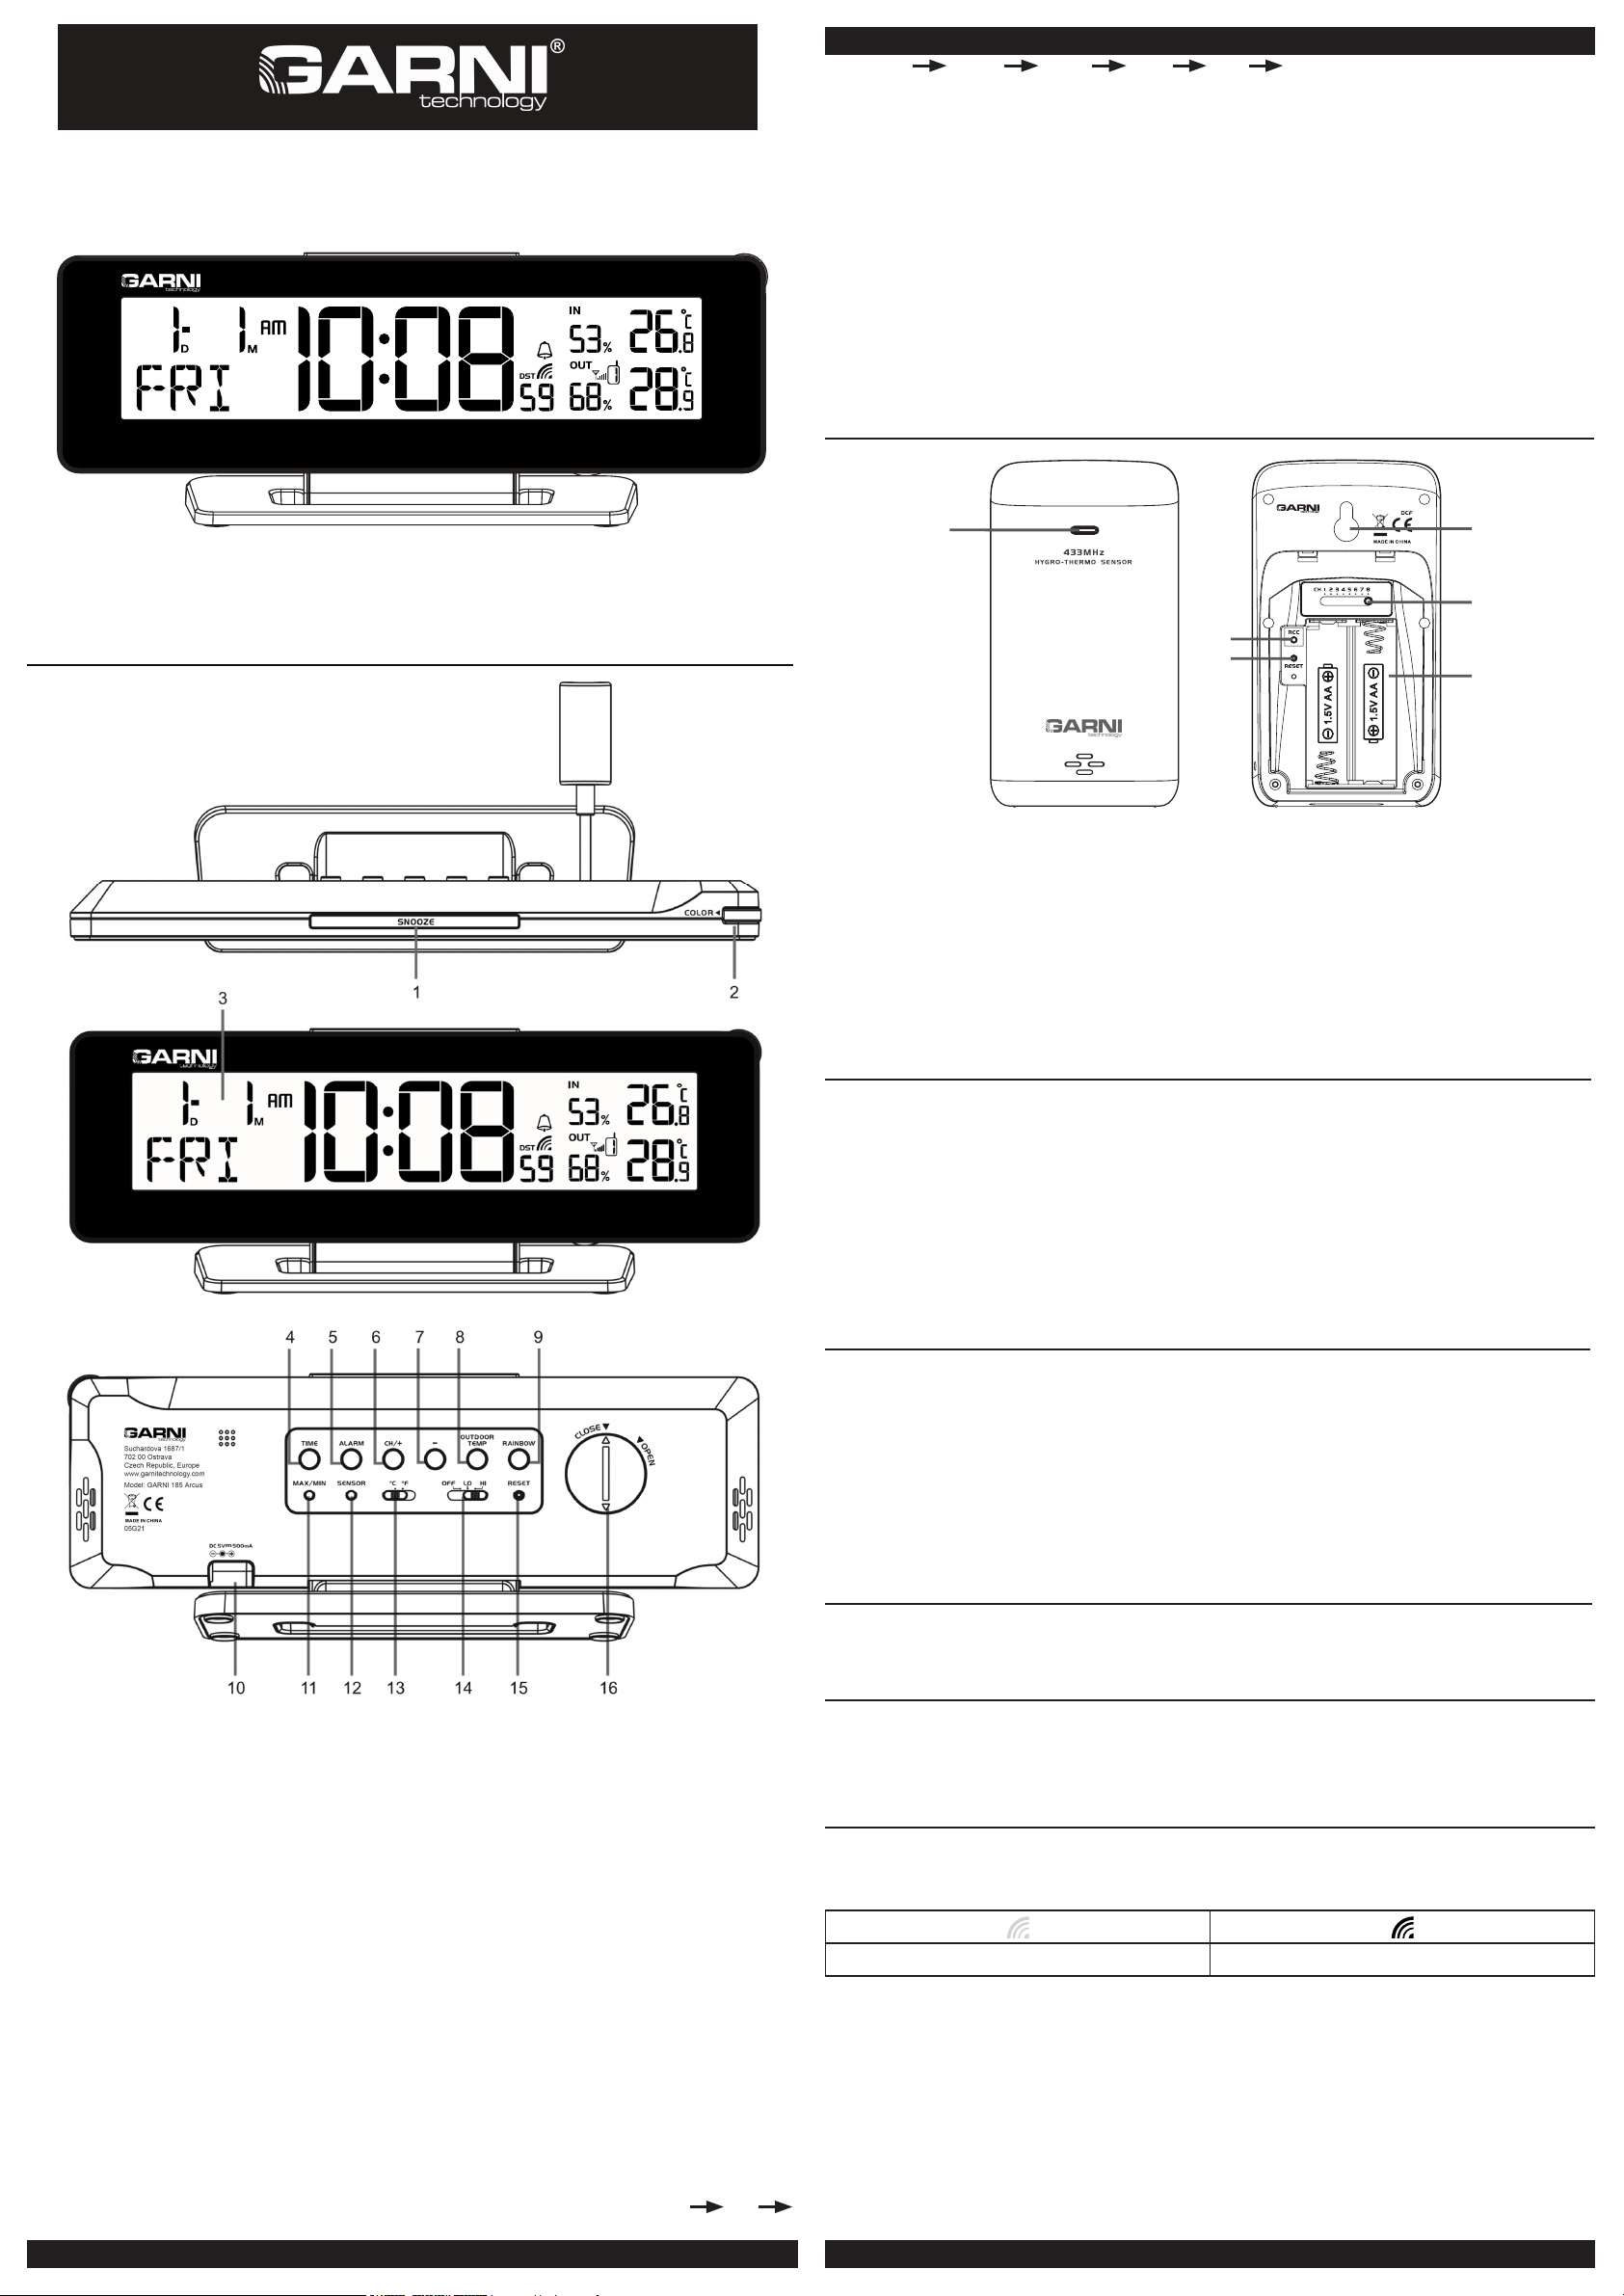
1. Slide [ OFF / LO / HI ] slide switch to the [ OFF ] position to turn off the backlight. Slide to th
[ LO ] position for the dimmer backlight. Slide to the [ HI ] position for the brighter backlight.
2. When the backlight is on, press [ RAINBOW ] key to change backlight colour. The backlight
colour changes in this sequence: white red orange yellow green cyan
blue purple.
3. Rotate [ COLOR ] knob clockwise or anticlockwise to tune the backlight with 256 colour.
Press [ COLOR ] knob to turn on or turn off the backlight colour chang .
Rotate [ COLOR ] knob Press [ COLOR ] knob
4. Press [ OUTDOOR TEMP ] key to enter Colour by temperature mode and change colour
according to the temperature value that received from the wireless sensors. It has 17 backlight
colors to display different temperature ranges
VIEWING THE CHANNEL
The default channel is CH 1. In normal time mode, press [ CH/+ ] key to view the channels from 1 to
8. if you have more than one sensor, the channels can automatically toggle by pressing and holding
[ CH/+ ] key for 2 seconds, with “beep” tone.
Temperature Range (°C) Colour
1-20.0℃Dark Blue
9.91-2 ℃- 11.0℃Light Blue
9.01-3 ℃- 5.0℃Dark Aqua
9.4-4 ℃- 2.0℃Light Aqua
9.1-5 ℃- 1.0℃White
1.16 ℃- 4.0℃Peak Green
1.47 ℃- 8.0℃Green
1.88 ℃-12.0℃Yellow
1.219 ℃- 16.0℃Light yellow
1.6101 ℃- 20.0℃Light orange
1.0211 ℃- 24.0℃Orange
1.4221 ℃- 28.0℃Light red
1.8231 ℃- 32.0℃Red
1.2341 ℃- 36.0℃Pink
1.6351 ℃- 40.0℃Light pink
1.0461 ℃- 45.0℃Purple
17 45.1℃Gray
CHECKING AND DELETING MAX/MIN TEMPERATURE AND HUMIDITY RECORDS
1. In normal time mode, press [ MAX/MIN ] key once to show the outdoor maximum temperature
with reord time of current channel that show on the LCD display
2. Repeat the above operations to show the record in below order:
outdoor maximum temperature outdoor minimum temperature outdoor maximum
humidity outdoor minimum humidity indoor maximum temperature indoor minimum
temperature indoor maximum humidity indoor minimum humidity normal time
mode.
3. Once display the MAX/MIN record, press and hold [ MAX/MIN ] key for 3 seconds to delete the
currect MAX/MIN temperature or humidity records of current channel or indoor that show on the
LCD display, with “beep” tone.
LOW BATTERY INDICATOR
If the low battery indicator “ ” appear in the outdoor temperature region, it indicates that the
battery power of the transmitter is not enough, and you should replace with 2 x AA size batteries at once.
if the low battery indicator “ ” appear near the time region, it indicates that the backup battery of
the main unit is not enough, and you should replace the CR2032 battery.
Low battery indicator for main unit Low battery indicator for wireless sensor
NOTE:
1. If the battery power of the transmitter is not enough, insert 2x AA size batteries and press [ RESET ] key
of transmitter and [ SENSOR ] key of the main unit so that it can receive the time and temperature
automatically.
2. Attention! Please dispose of used unit or batteries in an ecologically safe manner.
SAFETY INFORMATION
• This main unit is intended to be used only indoors.
• Do not subject the unit to excessive force or shock.
• Do not expose the unit to extreme temperatures, direct sunlight, dust or moist enviroment.
• Do not immerse in water.
• Avoid contact with any corrosive materials.
• Do not dispose this unit in a fire as it may explode
• Do not open the inner back case or tamper with any components of this unit.
• Please dispose of used unit or batteries in an ecologically safe manner.
SPECIFICATION
MAIN UNIT
Operating temprature range: -5°C ~ 50°C 23° F ~ 122°F
Temperature resolution: 0.1°C 0.1°F
Operating humidity range: 1% ~ 99%
Humidity resolution: 1%
Radio controlled signal: Received from wireless sensor
WIRELESS SENSOR GARNI 110H
Operating temperature range: -40°C ~ 60°C -40°F ~ 140°F (base on lithium battery)
Temperature resolution: 0.1°C 0.1°F
Operating humidity range: 1% ~ 99%
Humidity resolution: 1%
RF transmission frequency:
Max RF power
No. of remote sensors:
RF transmission range:
Radio controlled signal:
433MHz
7 dBm (5 mW)
up to 8 units
maximum 30 meters
DCF
POWER
Main unit:
Remote sensor:
AC / DC 5V, 1 A adapter, CR2032 lithium battery for backup
1.5V, AA x 2 (alkaline battery recommended)
DIMENSION
Main unit: 230(W) x 87.5(H) x 49(D) mm
Remote sensor: 61(W) x 113.6(H) x 39.5(D) mm
Company GARNI technology a.s. declares that the radio device model GARNI 185 Arcus -
complies with Directive 2014/53 / EU. The full text of the EU Declaration of Conformity is
available on the following website: www.garni-meteo.cz
DECLARATION OF CONFORMITY
www.garnitechnology.com
www.garnitechnology.cz
www.garni-meteo.cz
Instruction translated, edited and processed:
Copying this manual or its parts is forbidden without the author's permission