Garden Groom Midi Manuel utilisateur

.1.
a
Instruction manual
Manual de Instrucciones
Mode d’emploi
Bedienungsanleitung
Manuale di istruzioni
Manual de instruções
Gebruiksaanwijzing
Руководство по эксплуатации

.2.
English (Page 3)
Español (Página 12)
Français (Page 22)
Deutsch (Seite 32)
Italiano (Pagina 42)
Português (Página 52)
Nederlands (Pagina 62)
Pусски (стр. 72)

.3.
Contents
Meaning of symbols in instructions 04
Safety instructions 04
Warranty conditions 07
Product contents 07
Device overview 07
Prior to first use 08
Assembly 08
Mounting the collection system 08
Mounting the collecting bin 08
Operation 09
Troubleshooting 10
Technical data 10
Warranty 10
Disposal 11
Dear customer,
We are delighted that you have decided on the “Garden Groom Midi”. This electric safety hedge trimmer
cuts, mulches, and collects cuttings, all in one. The protected blades minimise the risk of injury and the risk of
accidentally cutting through the cord. Thanks to an ingenious switching system, the “Garden Groom Midi” only
operates when both hands are holding the device. The cuttings produced are very fine (1:10) and are conveyed
into the collecting bag. This makes ideal compost, which you can use as an environmentally-friendly fertiliser or
bark mulch substitute. We wish you plenty of enjoyment with your new “Garden Groom Midi”.
Prior to using the unit for the first time, please carefully read through the operating instructions
and store them in a safe place. The instructions are to accompany the device when it is passed
on to others. The manufacturer and importer assume no liability in the event the data in these
instructions has not been observed!
ENG

.4.
Meaning of symbols in instructions
All safety notices are marked with this symbol. Please carefully read through and obey the safety
notices in order to avoid injury to persons and property.
Tips and recommendations are marked with this symbol.
Wear ear protection!
Wear a protective mask!
Always wear protective eyewear
Safety instructions
Proper use
• The device is designed for trimming hedges (max. branch diameter of 10 mm) and is only
intended for use in the garden.
• The appliance is for private use and is not designed for commercial use. Use the appliance only
as described in the instructions. Any other use is considered to be improper use.
• This appliance is not intended to be used by people (including children) with physical, sensory,
or mental limitations and without experience and/or knowledge. Children must be supervised to
ensure that they do not play with the appliance.
Improper use
• All applications with the device that are not listed in the “intended use” are applied as a non-
intended use.
• For any resulting property damage and personal injury incurred due to any misuse thereof shall
be liable to the user of the device.
Remaining risks
• Even with proper use of the tool is always some residual risk that cannot be ruled out. From the
type and construction of the tool, the following potential hazards can be derived:
- Contact with the unprotected shear blade (cut-injury)
- Reaching into the running tool (cut-injury)
- Unforeseen, sudden movement of the cutting material (cut-injury)
- Sling out of parts of the cutting material (risk of injury)
- Damage to the hearing, if there is no prescribed hearing protection worn
- Inhalation of cutting material particle, if there is no prescribed mask worn
Workplace safety
• Keep your workplace clean and well lit while performing cleaning and maintenance tasks.
• Keep pets away from the appliance.

.5.
• Do not work in potentially explosive atmospheres containing flammable liquids, gases, or dusts
using electrical tools.
• Keep away children and people with physical, sensory, and mental limitations whilst using the
electrical tool.
Electrical safety
• The appliance must be connected only to mains sockets that have been properly installed. The
mains socket must still be accessible after the connection has been made. The mains supply must
comply with the technical data for the appliance. The plug may not be changed in any manner.
• The connector plug of the electric tool must fit in the socket. The plug may not be modified in
any way. Do not use any adapter plugs together with electric tools with protective earthing.
• Keep electric tools away from rain or moisture.
• Do not use the cord for purposes other than the intended one such as for carrying the electric
tool, hanging it up or for pulling the plug out of the socket. Keep the cord away from heat, oil,
sharp edges or moving parts of the device. Keep the cord away from the cutting area.
• If you are working with an electric tool outdoors, only use extension cords, which are also
suitable for outdoor use.
• If working with the electric tool in a moist environment cannot be avoided, use a fault-current
circuit breaker.
Personal safety
• Keep children away from the packaging materials. There is a danger of suffocation!
• Be careful, pay attention to what you are doing, and work sensibly with the electrical tool. Do
not use the electrical tool if you are tired or under the influence of drugs, alcohol, or medication.
• Do not work above eye level.
• Pay attention to a sufficient safety distance.
• Wear non-slipping, resistant work gloves that help you hold the handles securely.
• Wear as / in addition to personal safety equipment always safety goggles as well as a mask
and hearing protection.
• Avoid accidental start-ups. Make sure the electrical tool is switched off before you connect it to
the power supply and/or battery and before you pick it up or carry it.
• Avoid an abnormal posture. Make sure you are standing stably and keep your balance at all
times.
• Wear suitable clothing: long pants, long-sleeved shirt, and sturdy shoes with nonslipping soles.
Do not wear clothing that is too wide or short or jewellery. Keep hair, clothing, and gloves away
from moving parts.
• If dust extraction and collection equipment can be mounted, make sure that they are connected
and used properly.
• Keep all body parts away from the cutting blades. Do not try to remove cuttings or hold onto
the material being cut while the blades are running. Remove jammed cuttings only when the
appliance is shut off.
• Carry the device by the handle when the blades are at a standstill.
• Wait until the electrical tool has come to a standstill before putting it down.
• Heavy protective clothing can lead to fast tiring and possibly to a heatstroke. Perform heavy
work in the early morning or later evening hours when the temperature is not as high.
• Familiarise yourself with the appliance before first use. Especially make sure you know how to
switch it off.
• Keep all body parts away from the cutting head during activation.

.6.
• The specified vibration emission value limits the working hours. If you notice a tingling or
discolouration (white) of the fingers then stop working with the tool.
• Warning: The actual value of existing vibration emissions while using the machine may differ
from those in the manual respectively by the manufacturer. This can be caused by the following
factors to be considered before or during any of use:
- Is the machine used correctly?
- Is the method of cutting the material and how it is processed correctly?
- Is the state of use of the machine in the regulatory?
- Sharpness condition of cutting tool and proper cutting tool?
- Are the grips firmly mounted on the machine body?
• If you observe an uncomfortable feeling or a discolouration of the skin from your hands
while using the machine, please immediately stop working. Take adequate breaks from work.
In disregard of adequate work breaks, there may be a hand-arm vibration syndrome.
• There should be occur an appraisal of an utilization factor subjected to the work respectively of
usage the machine and place appropriate work breaks. In this way, the utilization factor during the
entire working time can be significantly reduced. Minimize your risk, you are exposed to vibration.
Maintain the machine following the instructions in the manual.
• Avoid the use of the machine at a temperature of T = 10 ° C or less. Make a work plan so that
the vibration load can be limited.
• A degree of noise from this machine is not avoidable. Postpone noisy operation at licensed
and certain time periods. As the case may be observe rest time periods and restrict the working
hours to a minimum. For your personal protection and protection of people working nearby, an
appropriate hearing protection is worn.
Use and handling of the electrical tool
• Do not overload the device. Use the electrical tool intended for your work.
• Do not use the electrical tool if its switch is defective.
• Remove the plug from the mains socket and/or remove the storage battery before making
adjustments to the appliance, changing accessory parts, or putting the appliance away.
• Keep unused electrical tools out of reach of children. Do not let people use the appliance who
are not familiar with it or who have not read its instructions.
• Keep cutting tools sharp and clean.
• Before use, make sure the cutting head is firmly attached.
• Handle electrical tools with care. Make sure moving parts function perfectly and do not jam and
check whether parts are broken or damaged in such a way that the function of the electrical tool is
impaired. Have damaged parts repaired before using the appliance.
• Always check the appliance for damage before putting it into operation. If the appliance, cable,
or plug show visible damage, they may not be used. Do not use the appliance if it shows signs of
a malfunction.
• If the appliance has a fault, do not attempt to repair it yourself. In the event of damage please
contact Customer Service (see section entitled “Customer Service”).
• Only have the device repaired by a qualified professional.
• Only use original accessories and original spare parts.
• Do not make any changes in the appliance.
• Use the appliance only when it is properly assembled and operational.
• Use the electrical tool, accessories, insert tools, and so on according to these instructions. In
the process, take the working conditions and task to be performed into consideration.
• Before use, familiarise yourself with the environment and pay attention to any sources of
.7.
danger. Avoid stones when using the appliance. During use, pay attention to any (undesired)
objects that should not be cut.
• Do not use the device to cut wet plants or plants with branches thicker than 10 mm so that the
blades to not jam .
• In case of jammed cuttings, switch off the device immediately, wait until the blades come to a
standstill, and then remove the jammed material.
Warranty conditions
The warranty excludes any defects caused by improper use, damage or by attempts by unauthorized persons
to make a repair. This also applies to normal wear of individual components. When using other or non-original
components on the device will void the manufacturer’s warranty.
Product contents
• 1 trimmer
• 1 collecting bin (approximately 5 l)
• 1 collecting bag (approximately 30 l)
• 1 collecting hose
• 1 adapter for mounting the collecting hose
• these operating instructions
Additionally, you will need an extension cord.
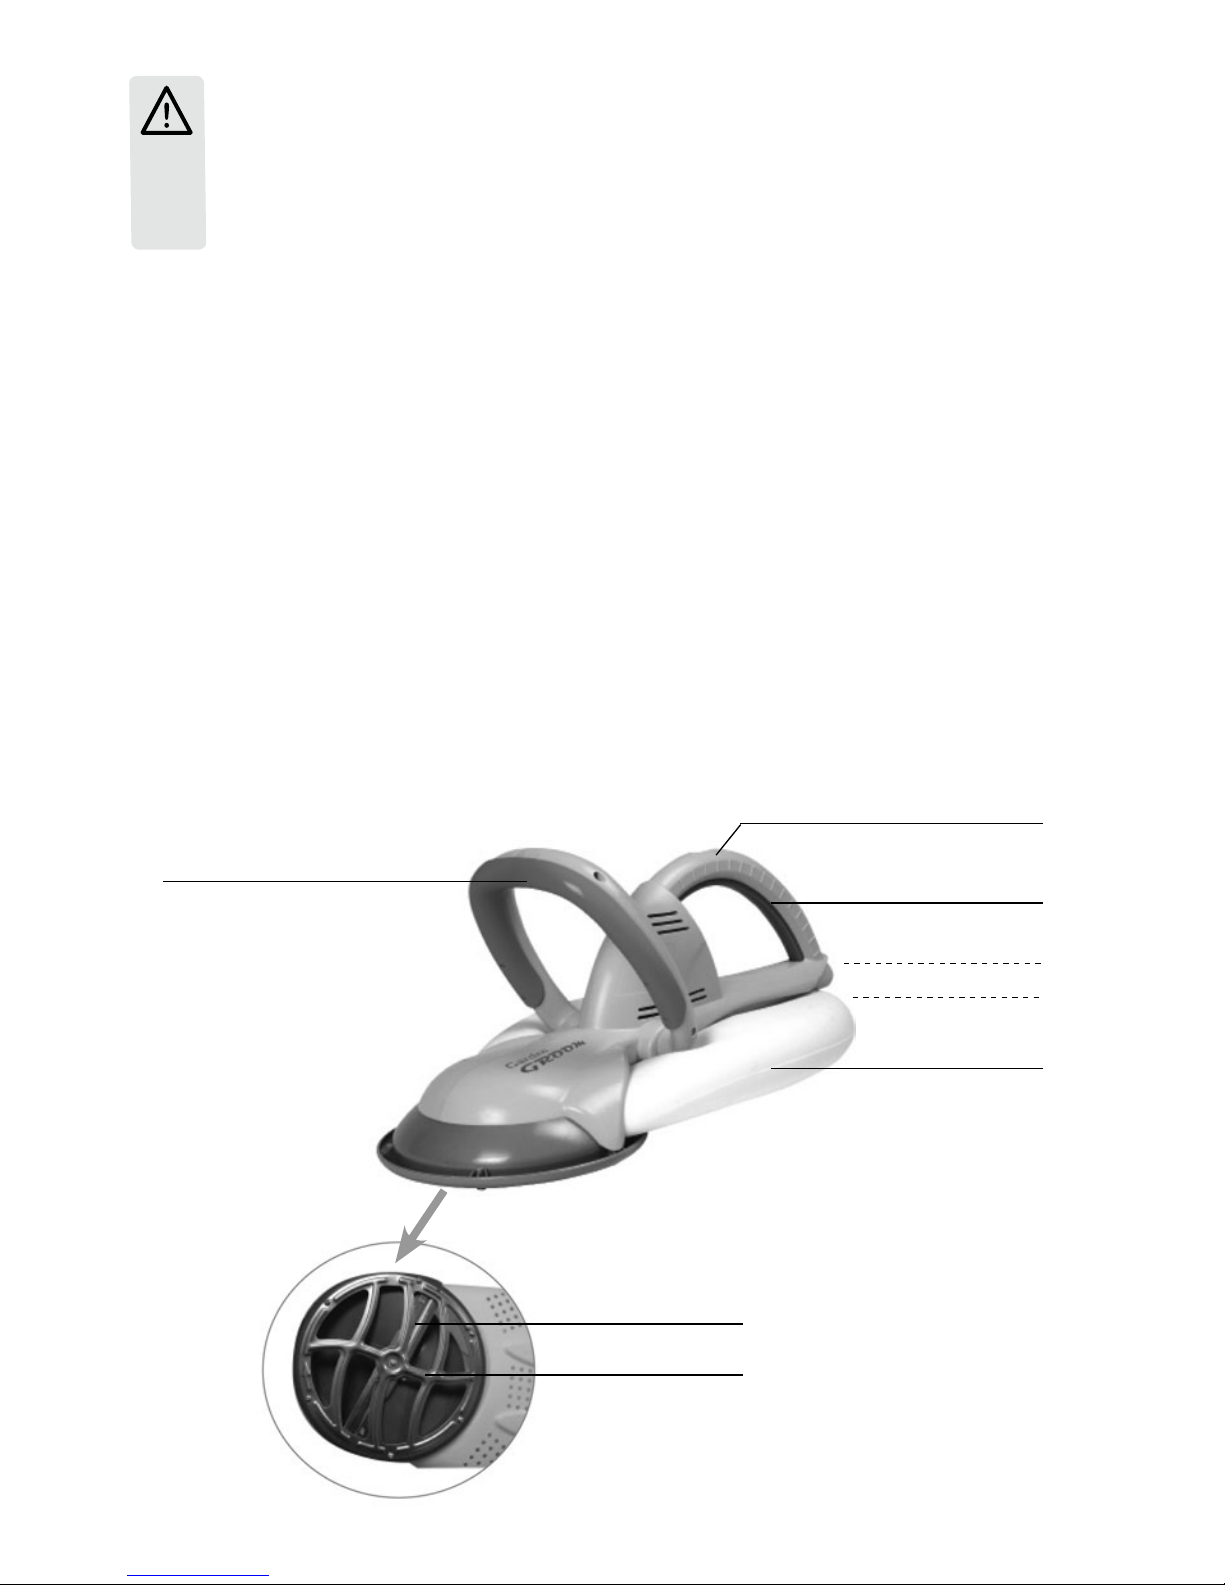
Device overview
Switch 2
Safety switch
Switch 1
Mains cord
Locking lever
Collecting bin
Cutting head
Rotary blade
Protective grate
.8.
Prior to first use
• The foil and bag pose a suffocation hazard. Keep children away from the packaging.
• Unpack the machine and the accessories. Using the list of product contents (see “Product contents” section),
check the contents for completeness and possible transport damage. Should you identify any transport
damages, please promptly consult the customer service (see section “Customer service”).
Assembly
• During assembly, do not reach into the cutting unit. The blade is very sharp, you could
injure yourself.
Before you start work, you have to attach the collecting bin (for smaller cuttings) or the collection system (for
larger areas) consisting of the adapter, hose, and collecting bag to the device.
Mounting the collection system
1. If the collecting bin is already mounted on the device, fold the locking lever to the outside and remove
the bin.
2. Set the device down so that the blade is pointing up and hold it in place with one hand on the handle.
3. If necessary, fold the locking lever to the outside with your other hand.
4. Carefully set the wider end of the adapter on the opening on the
side of the cutting head. Make sure that the adapter end is inserted in the
corresponding brackets on the cutting head.
5. Push the top of the adapter down so that the pin on the bottom of the
locking mechanism audibly locks into place.
6. Fold the lever back to its previous position and push it into the indentation
on the adapter.
7. Make sure that the adapter is securely seated.
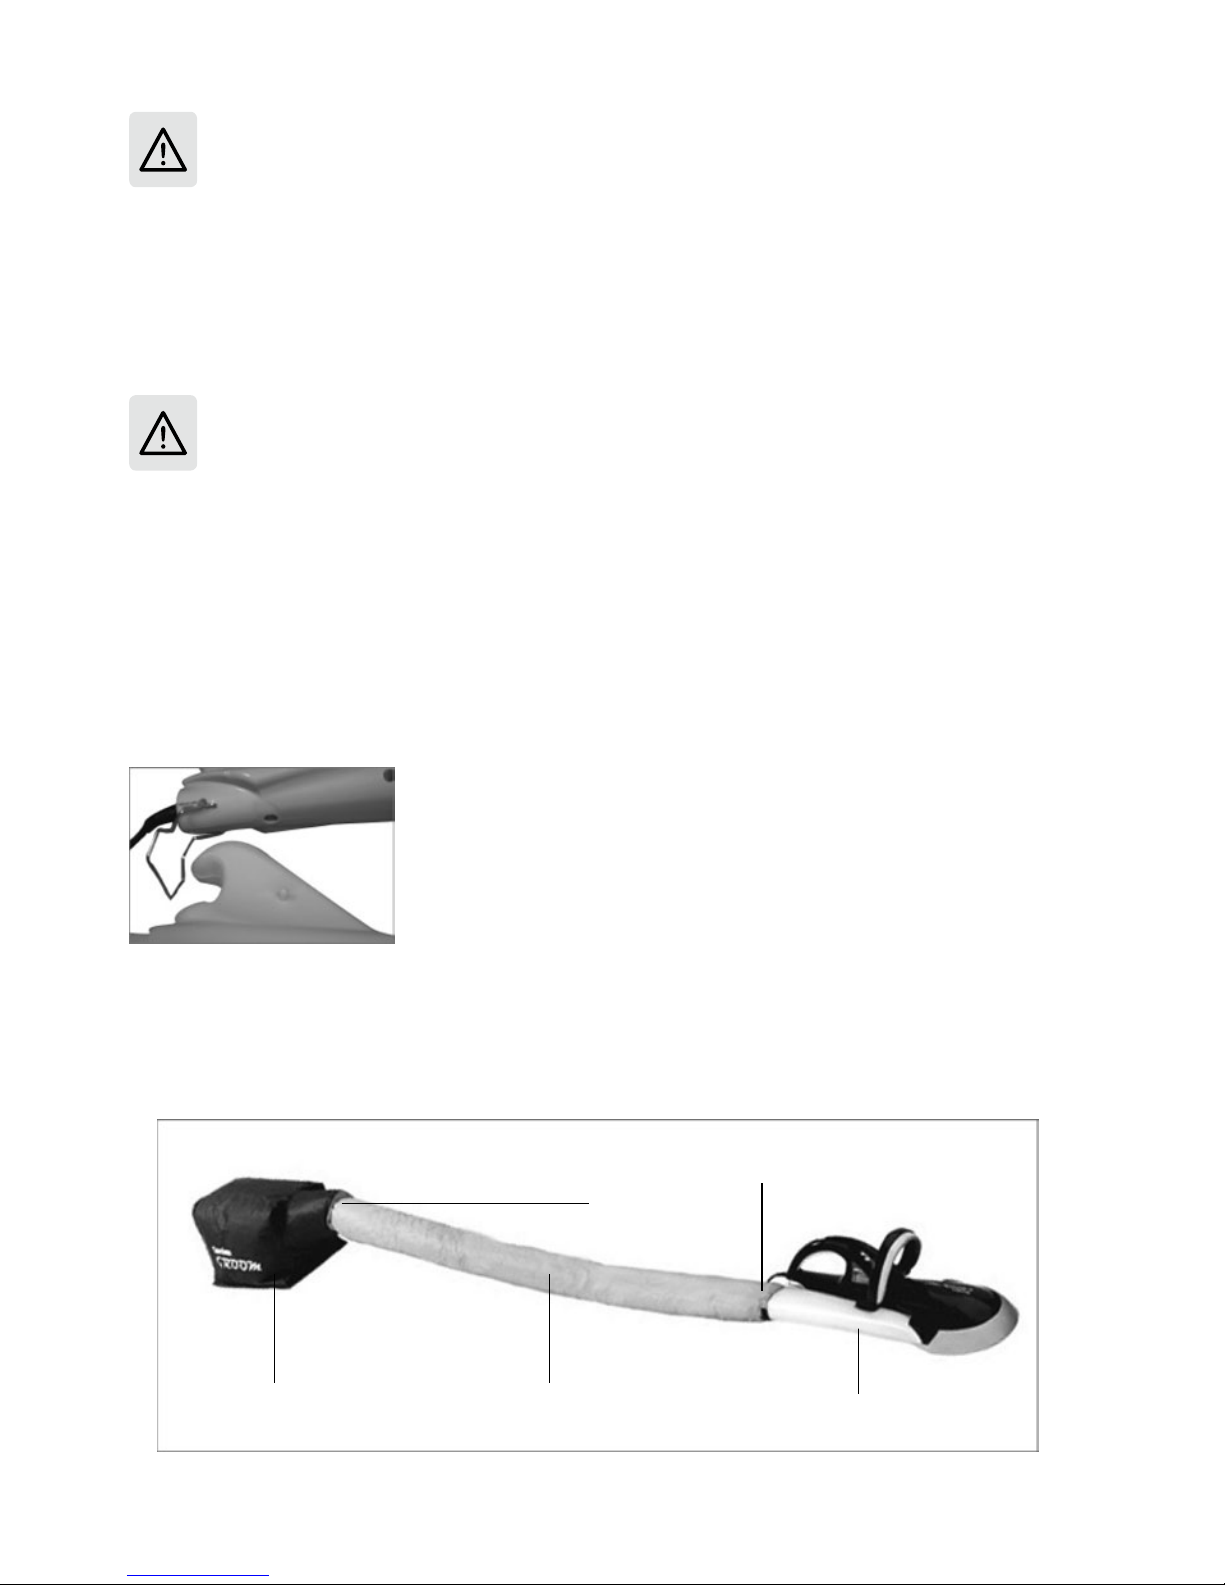
8. Fit the collecting hose on the adapter and apply the Velcro fastener. The fastener should be pulled as tight
as possible around the adapter to prevent the hose from slipping.
9. Connect the collecting hose and bag with the zipper.
Zipper
Collecting bag Collecting hose Adapter
Velcro fastener
(Similar to that shown)

.9.
Mounting the collecting bin
1. Set the device down so that the blade is pointing up and hold it in place with one hand on the handle.
2. Fold the locking lever to the outside with your other hand.
3. Set the collecting bin on the device with the vents up and the wider, open side pointing towards the
cutting head.
4. Push the bin under the cutting head until it locks into place and then push it down from above. A pin is
located on the bottom of the bin. It must audibly lock into the device’s locking mechanism.
5. Fold the lever back to its previous position and push it into the indentation on the adapter.
6. Make sure that the adapter is securely seated.
Operation
• Keep all body parts away from the cutting blades. Do not attempt to remove cuttings or
take hold of the material being cut when the blades are rotating. Only remove cuttings that
have accumulated in the device after you have deactivated the device and disconnected
the plug from the socket. Wear work gloves when doing so!
• Carry the hedge trimmer by the handle when the blades are not moving.
• Attention! This device generates noise up to 98 dB (A). For this reason, you should wear
adequate ear protection!
• For your safety wear a mask.
• This device runs with an integrated (electrical) motor brake for your convenience and safety. It
ensures that the cutting unit immediately stops when the switches are released.
• Always wear protective eyewear
1. Connect the power plug to an easily accessible socket using an extension cord. The socket must
correspond to the device’s technical data. If the collection accessories have been connected properly, the
operating light will turn on.
2. In order to activate the device, push the safety lock forward (this will release the main switch 1) and depress
the switches 1 and 2. After you have pressed switch 1, you can release the safety lock.However, as soon as
you release one of the switches, the device will deactivate.
3. Move the device evenly over the hedge and back and forth along its sides until you have shaped the hedge
as desired.
4. From time to time, shake any waste located in the hose down into the collection bag. Only in this way is it
possible to work without the cuttings causing a blockage.
5. After use, remove the collecting bin and/or collection system and empty them. Remove any cuttings jammed
in the device.
6. Stow the device and accessories in a place, which is not accessible for children, which is kept locked, and
is dry.

.10.
Troubleshooting
Problem
The device
doesn’t start.
The mains plug has not
been connected to a
socket.
Insert the plug into the socket.
The collection bin and/
or adapter has not been
properly mounted.
Remove the collection bin and/or adapter.
Remount it.
The fuse for the socket is
deactivated.
The collecting bin is full.
The hose of the collection
bag is blocked.
The adapter ejection
chute is blocked.
Check the fuse. Reinsert the fuse or switch it
back on.
Disconnect the mains plug.
Empty the collecting bin.
Disconnect the mains plug. Remove any cuttings
from the hose if necessary.
Disconnect the mains plug. Remove any cuttings
from the chute end.
Attention! Risk of Injury!
Immediately disconnect the device from the power supply. / Do not
activate the device! Consult the customer service.
The device does
not collect any
cuttings.
The blade is
damaged.
Possible Cause Solution
Technical data
Model: GG10
Input voltage: 230–240 V~, 50 Hz
Nominal output: 300 W
Speed without load (rpm): 3400/min
Sound power level LWA: 84 dB (A)
Sound power level LPA: 95 dB (A)
Vibration strength rear handle: 0.98 m/s2
Vibration strength front handle: 1.324 m/s2
Uncertainty factor: K=1.5 m/s2
Safety class: II, IP20
Suited for plants with a diameter of 10 mm.
The specified vibration emission value according to EN 60745.
WARRANTY
This product is covered by a warranty against manufacturing defects subject to the time periods stipulated by
the legislation in force in each country.
Autres manuels pour Midi
1
Table des matières
Langues :
Autres manuels Garden Groom Tondeuse

Garden Groom
Garden Groom Garden Groom "Midi" GG10 Manuel utilisateur

Garden Groom
Garden Groom GG01 Manuel utilisateur

Garden Groom
Garden Groom Garden Groom "Midi" GG10 Manuel utilisateur

Garden Groom
Garden Groom Midi Manuel utilisateur

Garden Groom
Garden Groom Volume Bag GG01 Manuel utilisateur

Garden Groom
Garden Groom GG21 Manuel utilisateur

Garden Groom
Garden Groom Garden Barber Manuel utilisateur

Garden Groom
Garden Groom Pro GG21 Manuel utilisateur


