G21 Gourmet Manuel utilisateur


Thank you for purchasing our product.
Before using this unit, please read this manual.
Important Safeguards
Prohibited matters
2. During operation it is
forbidden to touch or put
sharp objects into feeding
tube, pusher cannot be
replaced by any object.
1. Do not immerse the
main body into water or
other liquid. Do not wash
the main body under water
or other liquid directly.
3. Material of squeezing
screw is ceramic, because
ceramic is fragile, please
handle with care and pre-
vent dropping.
4. When squeezing juice,
you should gently push
food material into feeding
tube by the pusher. Force
should not be too strong.
6. Do not wash any part in
the dishwasher.
7. Do not put hot materials
(temperature higher than
60°C) into feeding tube.
5. Do not heat any part in
the microwave oven.
EN

Warning matters
1. The input voltage is 220-240 V, 50/60 Hz, please confirm it before using.
2. If the power cord is damaged, it must be replaced or repaired by authorized repair shop, do
not replace it with other power cord.
3. If product needs to be repaired, please contact customer service center or go to authorized
repair shop, do not repair it privately.
4. Please make sure to cut off the power before dismantling, installing or debugging the machine.
5. Before operating the appliance, please check the cord or plug, squeezing cone, squeezing
screw and other components. If any component has been damaged please discontinue using the
appliance and contact nearest service center. Please don’t dismantle and repair by yourself for
safety.
6. The appliance has intelligent protection chip, it will automatically stop after 20 minutes conti-
nuous work. To prolong the service life of the product, please stop for 20-30 minutes and let the
motor cool down.
7. Always disconnect the appliance from the power if it is left unattended and before assembling,
disassembling or cleaning.
8. Keep the appliance and its cord out of reach of children.
9. This appliance is not intended for use by persons (including children) with limited physical,
sensual or mental capabilities, or with lack of experience and knowledge, unless they have been
given supervision or instructions regarding use of the appliance by a person responsible for their
safety.
10. Children should not play with the appliance.
11. The product will automatically stop working and cease after reverse for a few seconds when it
overload or motor locked. While it gives the warning tone, you cannot continue to use the product
until warning tone stops. Before next use clean up material in feeding tube.
12. Cut ingredients into pieces which can be put into feeding tube. If materials have core hard
seed thick peel and hard shell please remove them before processing.
13. Before turning on the power, make sure that detachable parts have been installed. Feeding
tube and feeding tube cover should twist to tight to avoid falling off and spilling the content.
14. The parts which come into contact with food should comply with the requirements on materi-
als that may come into contact with food. The containers must be clean and wholesome.
15. It is normal phenomenon and not harmful for health if the squeezing screw, squeezing cone,
feeding tube, juice container and other parts may be colored by fruits.
16. Start machine after finishing throwing material into feeding tube in order to avoid damage
parts.
17. Do not use steel velvet, abrasive cleansers or corrosive liquid (for example Gas or Acetone) to
clean the appliance.
18. Do not heat any part.

Parts:
Parts for juice production:
1. Start / Stop
2. Main body
3. Tray
4. Tamper
5. Feeding tube (translucent)
6. Ceramic squeezing screw (white)
7. Squeezing cone (translucent)
8. Feeding tube cover (orange)
9. Juice outlet
10. Power cord
Parts for meat and noodles pro-
duction:
11. Feeding tube (dark)
12. Ceramic squeezing screw (grey)
13. Squeezing cone (dark)
14. Blade
15. 2 x metal mincing disc (meat)
16. Feeding tube cover (grey)
17. Multifunction feeding tube
18. 2 x plastic mincing disc (noodle)
19. Flour measuring cup
20. Water measuring cup
1
2
3
4
9
8
10
5 6
7
11 12 13 14 15
16
17
19 18
20

1
2
3
4
5
PLEASE CLEAN THE PARTS THAT CONTACT FOOD THOROUGHLY BEFORE EACH USE
OF THIS APPLIANCE.
Instructions
Start / Stop button
when you press this button the appliance starts to work. It automatically stops after 20 minutes. If
you need to stop in the midway, just press this button again.
Reversal button
if the appliance stops, press the reverse button. It is necessary to hold this button at least 3 se-
conds.
Lock
When you want to remove feeding tube from the main body, please keep pressing the lock catch
and revolve the feeding tube clockwise at the same time. If you don’t press this button, you will not
be able to discharge the feeding tube.
Method of use
Juice function
1. Connect the feeding tube with main body.
• Aim the feeding tube at the marking on main body.
• Revolve feeding tube counterclockwise from to . If you hear
click sound, it means that feeding tube has been installed correctly.
Aim the hexagonal screw shaft at the hole on main body, then push
it to the bottom.
2. Insert squeezing screw into the hole on the main body.
3. Insert squeezing cone into the feeding tube.
Pay attention to two salient on juice cone. Aim them at corresponding
indentation in feeding tube.
4. Install the cover of the feeding tube on feeding tube.
• Aim three Lock buckle on cover of feeding tube at three corre-
sponding gaps on feeding tube, then push feeding tube cover to the
bottom horizontally.
• Revolve feeding tube cover counterclockwise until marked on
the feeding tube cover aim at marked on the feeding tube.
Feeding tube cover must be installed in place, otherwise it could fall off
during working process.
5. Place Juice container with handle under the juice outlet.
• Put the juice container onto the plate.
Juice container should not be too full, otherwise juice could overflow
when you take out the juice container.
6. Put the pulp container under the pulp outlet nearing to juice con-
tainer.
7. Mount the tray on the top of the feeding tube. Tray is convenient to
add material, specially little granule food material like grapes, strawbe-
rries and so on.
8. Connect power cord. Power cord must be connected firmly avoiding
12
12

6
7
8
12
9
13
10 11
loosing that cause danger.
9. Pluck out the juice mouth cover to the left, open the mouth.
10. Wash the fruit and cut them into pieces which can be put into the
feeding tube.
if materials have core hard seed thick skin and hard shell please remove
them before processing.
11. Press the “Start / Stop” button, appliance starts to work. Appliance
has intelligent protection chip, it can automatically stop after working
20minutes. If you need stop working in the midway, press the button
again.
12. Put food materials into the feeding inlet, and then push them into
feeding inlet gently by using the food pusher.
13. After finishing, shut down switch and cut off the power when juice
outlet has no flowing juice, taking the juice container and pulp container
away the juice outlet and pulp outlet after motor and screw rod ceasing,
then you can enjoy the fresh juice.

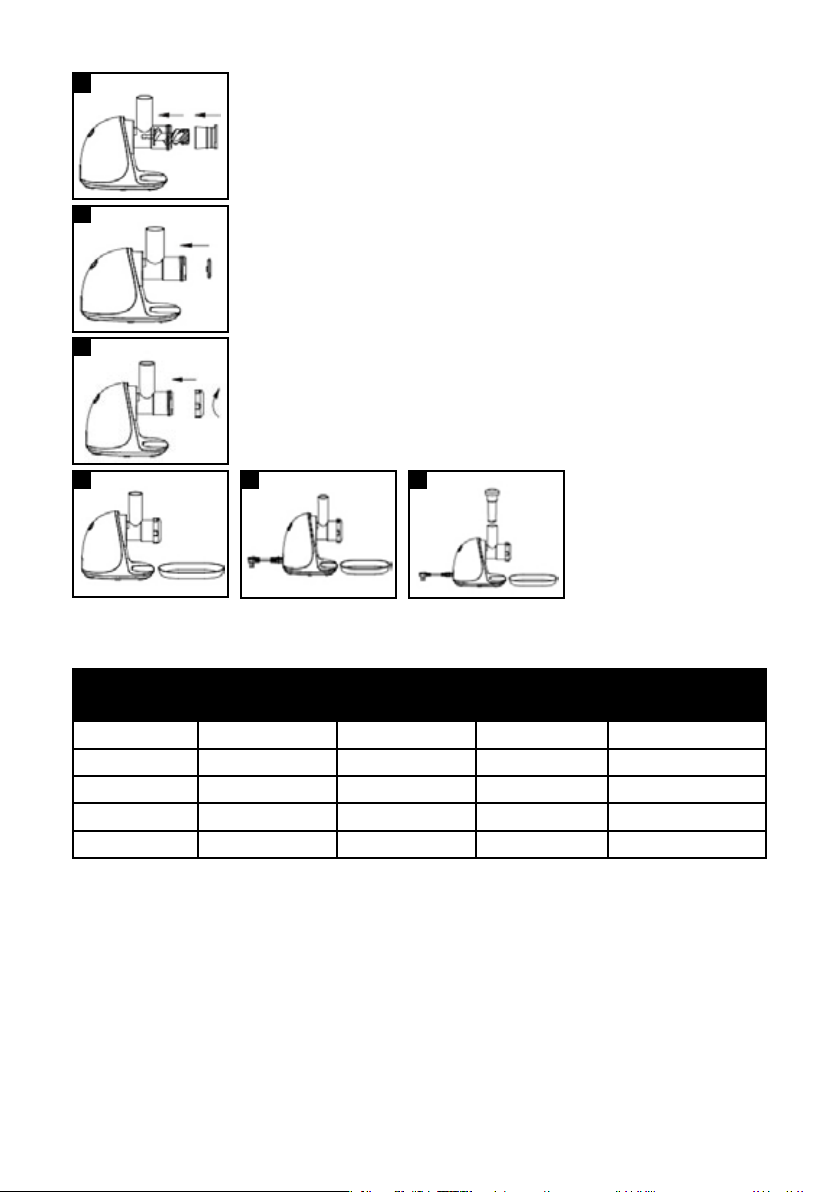
Mincing meat function
1. Connect feeding tube (dark)
• Attach the feeding tube and turn counterclockwise from
to , when you hear the click sound, it means that feeding tube is
installed.
2. Insert squeezing screw into the hole on the main body.
3. Insert squeezing cone into the feeding tube.
4. Connect blade (material is metal) with mincing disc (material is me-
tal). You can choose either mincing disc with thick hole or mincing disc
with thin hole.
5. Place mincing disc assembly in feeding tube.
6. Screw grey cover (screw thread inside) on the multifunction feeding
tube.
7. Place pulp container under the pulp outlet. You can use any suita-
ble container (dish, bowl,…).
8. Connect power cord.
• Press “start / stop” button, appliance starts to work. Product
has intelligent protection chip that will automatically stop the appli-
ance after 20 minutes. If you need to stop working in the midway,
press the button again.
9. Cut fresh clean meat into strips which can be easily put in feeding
hole of multifunctional feeding tube.
10. Place food material on top of multifunctional feeding tube, then
push food material slowly by using multifunctional food pusher.
When pushing food material, force should not be too strong.
Do not use fat meat.
Before processing remove all ribs, bones and skin.
Vegetables and meat can be processed together.
1
2
6
3
7
4
8
5
12
12
9, 10

Making Sausage function
1. Install feeding tube, multifunction squeezing screw and squeezing
cone respectively.
2. Attach the multifunction feeding tube (plastic).
3. Attach the cover on the multifunction feeding tube.
• Aim external cover of multifunctional feeding tube (screw thread
inside) at multifunctional feeding tube. Then turn clockwise.
4. •Placedishorothersuitablecontainerundersausagenozzle.
• Let sausage casings cover mouth of sausage nozzle, tie sausage
casings with thread.
5. •Putmeatstufnginfeedinginletofmultifunctionalfeedingtube.
• Press “start / stop” button. (Product has intelligent protection
chip, it will automatically stop the appliance after 20 minutes. If you
need to stop to work in the midway, press the button again.)
• Release sausage casings slowly.
Note: during process first insert the filling material into the feeding tube,
then switch on the appliance.
Flavored meat stuffing should be pickled for one hour before making
sausage.
Prepare thread to bind the sausages.
If sausages have bubbles, make some small holes.
Place sausages in shady ventilated place for air drying.
1
2
3
4
5
12
Making noodle function
1. Install multifunction feeding tube, multifunction squeezing screw and
squeezing cone.
2. Connect blade (material is metal) with mincing disc (material is me-
tal). You can choose either mincing disc with circular hole or mincing disc
with square hole.
3. Place the multifunction cover on the multifunction feeding tube.
4. Place the plate under the slag notch. Sprinkle plate with flour.
5. •Connectpowercord.
• Press “start / stop” button, product starts to work. Product has
intelligent protection chip, it will automatically stop the appliance af-
ter 20 minutes. If you need stop working in the midway, press the
button again.
6. •Divideandplacedoughontray.Putdoughintothefeedingtube
one by one.
• Sprinkle noodles with flour.
1
2
45 6
3
12
Prompt of kneading flour
The detailed percentage of flour and water:
Flour measuring cup
(for weighing flour)
Water measurement cup
(for weighing water, vegetable juice, eggs with water)
Flour Weight Water capacity Vegetable juice One egg with water
1 cup 200 g 65 ml 65 ml 75 ml
1,5 cup 300 g 95 ml 95 ml 105 ml
2 cup 400 g 130 ml 130 ml 140 ml
2,5 cup 500 g 160 ml 160 ml 170 ml
To make dough tastier, add a little oil and salt.
You can add a little bit of carrot or spinach juice - noodles will be tastier and more nutritious.
Table des matières
Langues :


