Futurecom 8A083X02 R9 Manuel utilisateur

Futurecom Systems Group, ULC
Battery Pack and Charger
User Guide

8A083X02 R9
Battery Pack and Charger User Guide
February 2023 Page 2
Document Revisions
Rev
Date
By
Notes & References
0
Dec. 2004
FC
Preliminary Release
1
Sept. 2007
FC
220V Voltage Added
2
May 2009
FC
Added user tips for prolonged battery life
3
Oct. 2010
FC
Fixed typo on spec sheet (Appendix 1)
4
Nov. 2012
FC
Added New Company Logo
5
July 2015
AJK/SN
New charger operation and indicators
6
Feb. 2019
AJK/SN
New FC template., Added PDR8000 and cable details
7
July 2019
AJK/SN
Added Backup time for TRS with Booster
8
Feb. 2023
KS
Updated Logo
9
June 2023
JP
Updated with Battery Life information
Proprietary Statement
©
2023, Futurecom Systems Group, ULC
Printed in Canada. All Rights Reserved
No part of this document, or any software included with it, may be reproduced and distributed without the prior
written permission of the copyright holder.
Futurecom Systems Group, ULC reserves the right to make changes or improvements to the equipment,
software or specification described in this document at any time and without prior notice. These changes will be
incorporated in the new releases of this document.
This document may contain technical inaccuracies or typographical errors. Futurecom Systems Group, ULC
waves responsibility for any labour, materials or costs incurred by any party as a result of using this document.

8A083X02 R9
Battery Pack and Charger User Guide
February 2023 Page 3
TABLE OF CONTENTS
About this Operator’s Manual .......................................................................................... 4
Notes, Cautions, Warnings, Dangers .............................................................................. 4
Notational Conventions.................................................... Error! Bookmark not defined.
Safety Information............................................................................................................. 5
Battery Pack Overview ..................................................................................................... 8
Principle of Operation...................................................................................................... 8
TRS and Battery Pack Block Diagram............................................................................. 8
Battery Pack Description.................................................................................................. 9
Battery Pack.................................................................................................................... 9
DC Input/Output Connector............................................................................................. 9
Battery Voltage Indicator................................................................................................10
Charging...........................................................................................................................11
Preparing to Charge.......................................................................................................11
Charging ........................................................................................................................12
Use....................................................................................................................................14
Cycle Life..........................................................................................................................15
Storage .............................................................................................................................16
Frequently Asked Questions...........................................................................................17
APPENDIX 1-Battery Pack and Charger Specifications ................................................18
NOTES ..............................................................................................................................19

8A083X02 R9
Battery Pack and Charger User Guide
February 2023 Page 4
About this Operator’s Manual
This Operator’s Manual provides detailed operating procedures for Battery Pack and
Battery Charger products.
This document is not intended to cover the operation details of the Repeater or the Mobile
Radio.
Notes, Cautions, Warnings, Dangers
Throughout this manual, you will see Notes, Cautions, Warnings and Dangers.
Their meaning is as follows:
Note:
A clarifying statement that expands on the text that follows.
IMPORTANT:
An important statement that must be considered and / or implemented in
order to achieve adequate equipment operation.
WARNING:
Describes a potentially hazardous situation, which may lead to equipment
damage, death or injury.
DANGER:
Describes an imminently hazardous situation, which if not avoided, will
result in death or serious injury.

8A083X02 R9
Battery Pack and Charger User Guide
February 2023 Page 5
Safety Information
DANGER!
There are NO user serviceable parts inside the Battery Pack or the Battery
Charger. DO NOT OPEN THE BATTERY PACK OR THE CHARGER AS
LETHAL VOLTAGES ARE PRESENT INSIDE! Only Futurecom Systems
Group can service the Battery Pack and the charger.
WARNING
To ensure that Radio Frequency (RF) energy exposure to bystanders
external to a repeater or mobile radio is lower than the recommended
safety standards, transmit with any repeater or mobile radio only when
bystanders are at least 2 meters away from a properly installed
externally mounted antenna for radios with less than 50 Watts output
power, or 3 meters away for radios with 50 Watts or greater power
output. Refer to the RF Safety Booklet for exact distances.
WARNING
Never use the Battery Pack or attempt to charge the Battery Pack if it is
damaged in any manner. If it is damaged, contact Futurecom Systems
Group.
Only use chargers provided by Futurecom Systems Group for the Battery Pack. Use
of any other charger could damage the Battery Pack or result in fire, electric shock or
electrocution.
DO NOT store or charge the Battery Packs in locations with a warm environment.
Keep the Battery Pack dry.
DO NOT incinerate the Battery Packs.
WARNING
DO NOT enclose the Battery Pack in an airtight casing or environment.
During charging and discharge the Battery Packs must have ventilation.
Airtight environment could cause explosion.

8A083X02 R9
Battery Pack and Charger User Guide
February 2023 Page 6
WARNING
DO NOT operate the Battery Packs in explosive atmospheres, i.e.,
presence of flammable liquids, gases, dust or in an area where the
Battery Pack could be exposed to sparks or any burning material.
Before disposing of the Battery Pack, check with your State/Province Environmental
Protection Agency.
If the Battery Pack should ever become warm when charging or if it should emit a
pungent odour, disconnect the charger from an AC outlet immediately and contact
Futurecom Systems Group.
IMPORTANT
Before each use and before charging the Battery Pack check ventilation
holes provided on the Battery Pack to make sure that holes have not been
blocked or obstructed. Clean or clear any obstruction such as dirt that
may obstruct ventilation.
WARNING
Do not operate charger with damaged AC power cords or DC output
cords or accessories - call manufacturer to have the charger replaced
immediately.
NEVER charge a frozen Battery Pack.
Locate the charger as far away from the Battery Pack as is allowed by the length of
the output cable harness.
NEVER set the charger on a surface constructed from combustible material.
The charger body and power cord are waterproof. However, do not expose the AC
and DC electrical connections at the ends of the power cords to rain or snow.
When handling electric power cords, always pull by the plug rather than by the cord.
This will reduce the risk of damage to both the plug and the cord, and it will minimize
the likelihood of electric shock resulting from that damage.
Make sure that all electric power cords are located so that they cannot be stepped
on, tripped over, or otherwise subjected to damage or stress.
When leaving a battery charger connected to the Battery Pack for extended periods
of time (weeks, months, etc.), periodically check the battery to see if it is unusually

8A083X02 R9
Battery Pack and Charger User Guide
February 2023 Page 7
warm, if it is releasing an excessive amount of gas, or is emitting an unpleasant
odour. If any of these things occur, disconnect the charger from the AC electrical
outlet and contact the manufacturer immediately.
WARNING
NEVER smoke or allow a source of electric spark or open flame in the
vicinity of the battery or charger.

8A083X02 R9
Battery Pack and Charger User Guide
February 2023 Page 8
Battery Pack Overview
Principle of Operation
The Suitcase can contain either a DVRS, a PDR8000, or a Booster Pack. The Suitcase
contains an internal 120V/220V AC to 13.8V DC power supply. NOTE: DVRS comes from
factory with only one of 120V or 220V while the PDR8000 and the Booster Pack are
compatible with both. The Battery Pack is used to supply nominal 13.8V DC power to the
Suitcase where AC supply is not available.
TRS and Battery Pack Block Diagram
Figure 1 shows the Suitcase and Battery Pack block diagram.
The Battery Pack consists of 3 components: the main Battery Pack enclosure, a DC output
cable (7W077X11-01 for DVRS Suitcase, or 7W077X12-01 for PDR8000 Suitcase) and the
Battery Charger (3P077B01-01).
Figure 1: Suitcase and Battery Pack Block Diagram
DVRS SUITCASE NOTE: It is not recommended to connect the battery pack when the DVR-LX
Suitcase is powered from AC. A discharged battery pack can be damaged. Connecting the battery
pack and AC at the same time voids battery pack warranty. This limitation does not apply to the
PDR8000 and Booster Pack.
SUITCASE
OR

8A083X02 R9
Battery Pack and Charger User Guide
February 2023 Page 9
Battery Pack Description
Battery Pack
The main Battery Pack enclosure contains batteries, a battery voltage indicator and a DC
input/output connector. The DC output connector is connected directly to the batteries
without any internal fuses.
The internal batteries are used to supply DC power to the Suitcase where AC supply is not
available.
The AC to DC battery charger is used to charge the internal batteries from a 120V AC
source. NOTE: A step-down transformer and an AC plug adapter (if required) are supplied
for countries with 220V to 240V AC mains.
Figure 2: Battery Pack
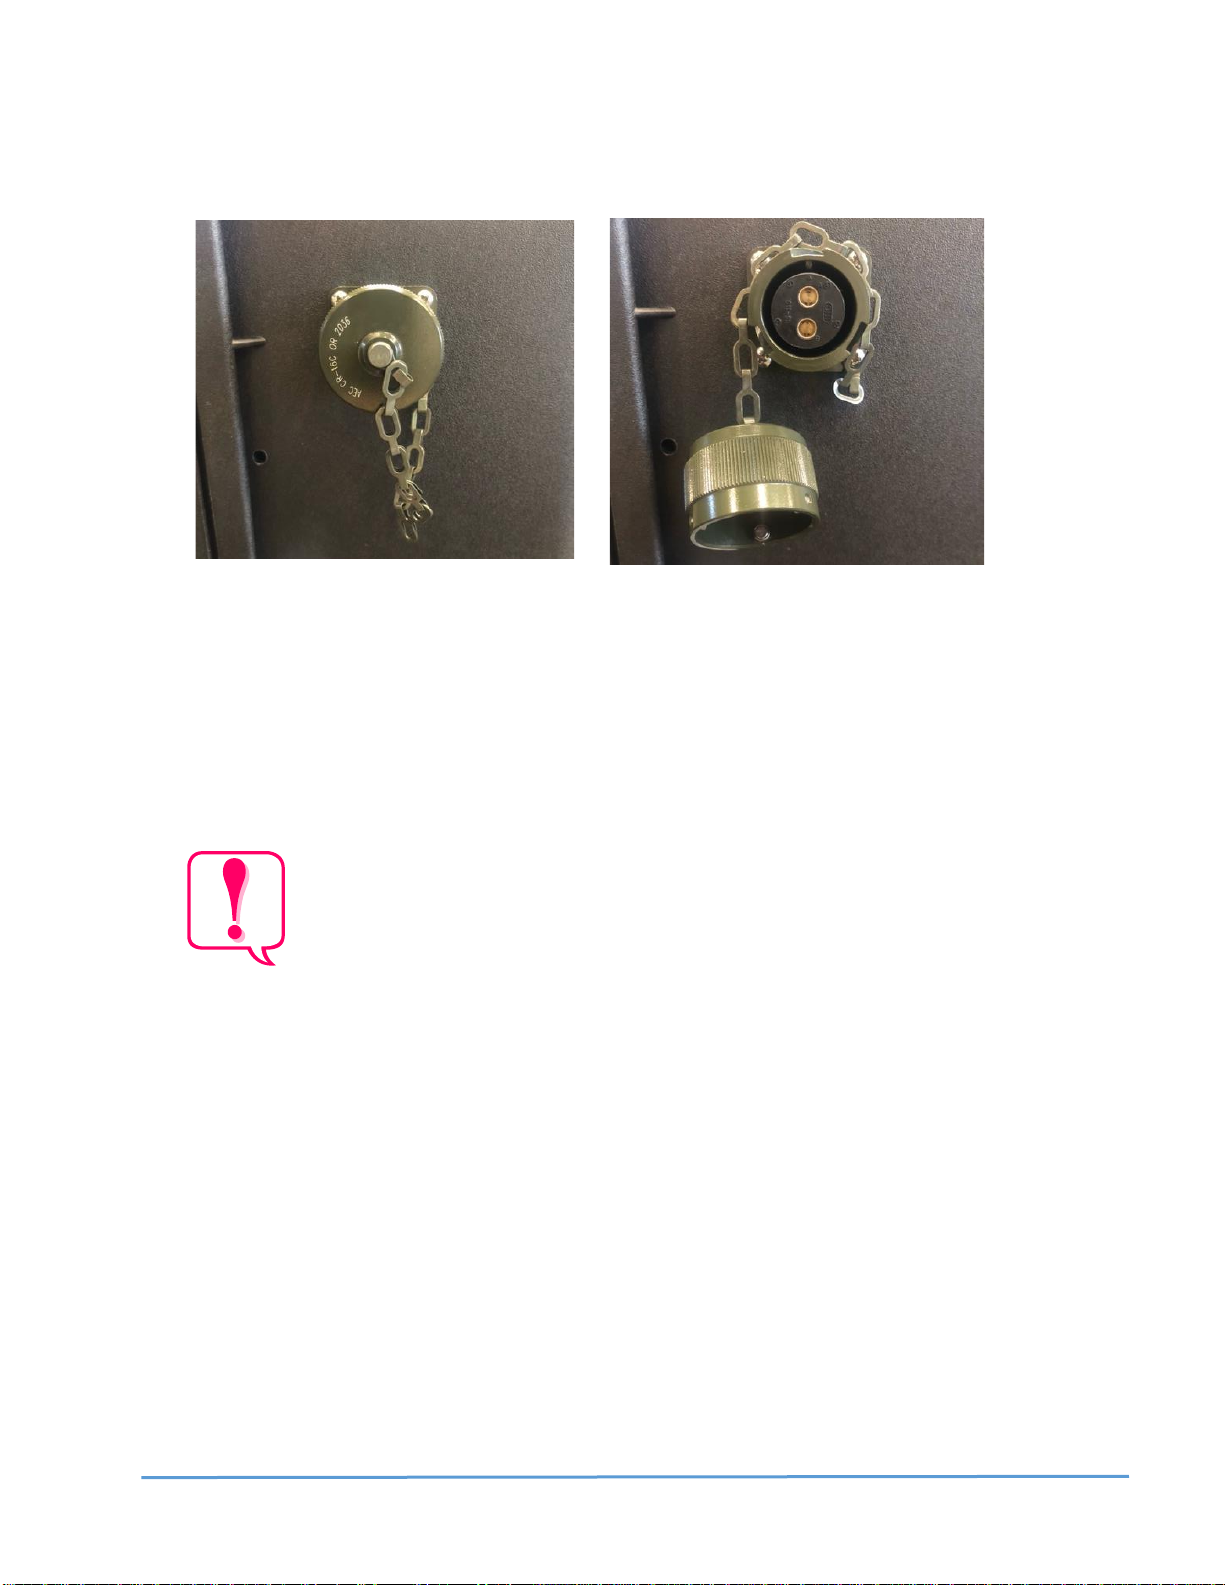
DC Input/Output Connector
The “MIL-C-5015” style 2-contact connector is located on the side of the Battery Pack. It
supplies power to the Suitcase. The DC cable (7W077X11-01 or 7W088X11-01) plugs into
this connector. The other end of the DC cable plugs into the Suitcase DC input connector.
The battery charger connects to this connector for charging.
8A083X02 R9
Battery Pack and Charger User Guide
February 2023 Page 10
Figure 3: DC Input/Output Connector
Battery Voltage Indicator
A Battery Voltage Indicator is located on the Battery Pack Cover. See indicator on top right
corner of front of case in Figure 2. The indicator shows the battery voltage:
•RED Flashing Indicator –battery voltage is less than approximately 10.9V.
Do not use the Battery Pack when the Battery Voltage Indicator is
Flashing RED. Recharge the Battery Pack as soon as possible! Using or
leaving the Battery Pack with RED Flashing Battery Voltage Indicator will
severely shorten the battery life and is not covered by the Battery Pack
warranty!
•GREEN Flashing Indicator - battery voltage is greater than 10.9V. This is the
normal operating range of the Battery Pack.
Table des matières


