FUJI TECOM PL-AP Manuel utilisateur

Application of Data Collection for PL series pipeline & cable locator
PL-AP OPERATION MANUAL
PL-G MAX Receiver
FOR THE PL-G PIPE LOCATOR
FOR ANDROID 9 AND BELOW

2
INTRODUCTION
This is the operation manual describing the Android application PL-AP that connects
with the PL-G-MAX pipeline & cable locator, to collect data, and create reports.
This manual details the many features of the PL-AP application. There are
accompanying videos for each chapter of the manual. The PL-G-MAX pipe locator
may also be referred to as the RECEIVER in this manual.
The Android device may also be referred to as the DEVICE in this manual.
OPERATING ENVIRONMENT
Supported Android Versions are currently: Android 6 up to Android 9 Smartphone
or Tablet.
1. Bluetooth and Wi-Fi functionality is required to fully benefit from this PL-AP
2. A USB Connection Cable is needed to connect to an external PC for data
collection
3. Wi-Fi: Wi-Fi is used for reading data
4. Bluetooth: Bluetooth is used for reading data
5. Once the PL-AP Application has been installed on an Android Device, the Device
can Pair with the PL-G-MAX Receiver .
PL-G-MAX Operating Instructions Detailed Operating Instructions for the PL-G-MAX
can be found in the separate publication: PL-G-MAX OPERATION MANUAL.

3
TABLE OF CONTENTS
1. Understanding The Basics ……………….…………………….….…. 5
1-1. Understanding the tablet ……………………………………….……….. 5
1-2. Understanding Android OS ……………………………………….…..… 6
2. Installing The PL-AP App ……………………………………………… 7
2-1. Installing the PL-AP app ………………………………………….…..… 7
2-2. Enabling PL-AP app permissions ……………………………..…….… 8
2-3. Understanding the PL-AP app ..…………………………………..….... 9
3. Using The PL-AP App and PL-G Receiver ………………...….... 10
3-1. How to connect and use a device with the PL-G receiver …….….… 10
3-2. How to access collected data within the PL-AP app ……………..…. 12
3-3. How to delete collected data within the PL-AP app ……………….... 13
3-4. How to create reports of collected data ……………………...……….. 14
4. Modifying Report Files On Android ….………………..…...….….. 15
4-1. How to access report files on Android …...…………………...…….... 15
4-2. How to transfer/share report files on Android ……………..……….... 16
4-3. How to rename report files on Android …………...……….……….… 17
4-4. How to delete report files on Android …………………….……….….. 18
5. Modifying Report Files On PC ………………………..……….….…. 19
5-1. How to access report files on PC …………..…………..………...…… 19
5-2. How to transfer/share report files on PC ……………..…………...…. 21
5-3. How to rename report files on PC ………………….……………….… 22
5-4. How to delete report files on PC ………………….……………….….. 23
6. Understanding The Report Files …………….………..……..……. 24
6-1. Understanding the types of report files …….….…………….……..... 24
6-2. Understanding the contents of report files ….…...………...….…….. 25
Contents continues on next page...

4
7. Troubleshooting ……………………………………………………….... 27
7-1. PL-AP app GPS error message ………………………………..….…. 27
7-2. PL-AP app Bluetooth error message ……………………………....… 27
7-3. PL-AP app not showing any receiver ID’s in reports/delete .……… 28
7-4. PL-G receiver not appearing in Bluetooth search ………….………. 28
7-5PL-G receiver keeps saying failed connection …………...….……… 29
7-6. Android device not displaying USB notification PC ………………… 29
5
1. UNDERSTANDING THE BASICS
1-1. UNDERSTANDING THE TABLET
This section of the manual only applies to to those using a Samsun Galaxy
Tab A, the tablet used by Fuji Pipe Locators. For those using their own
Android device, please skip to section (1-2) of the manual.
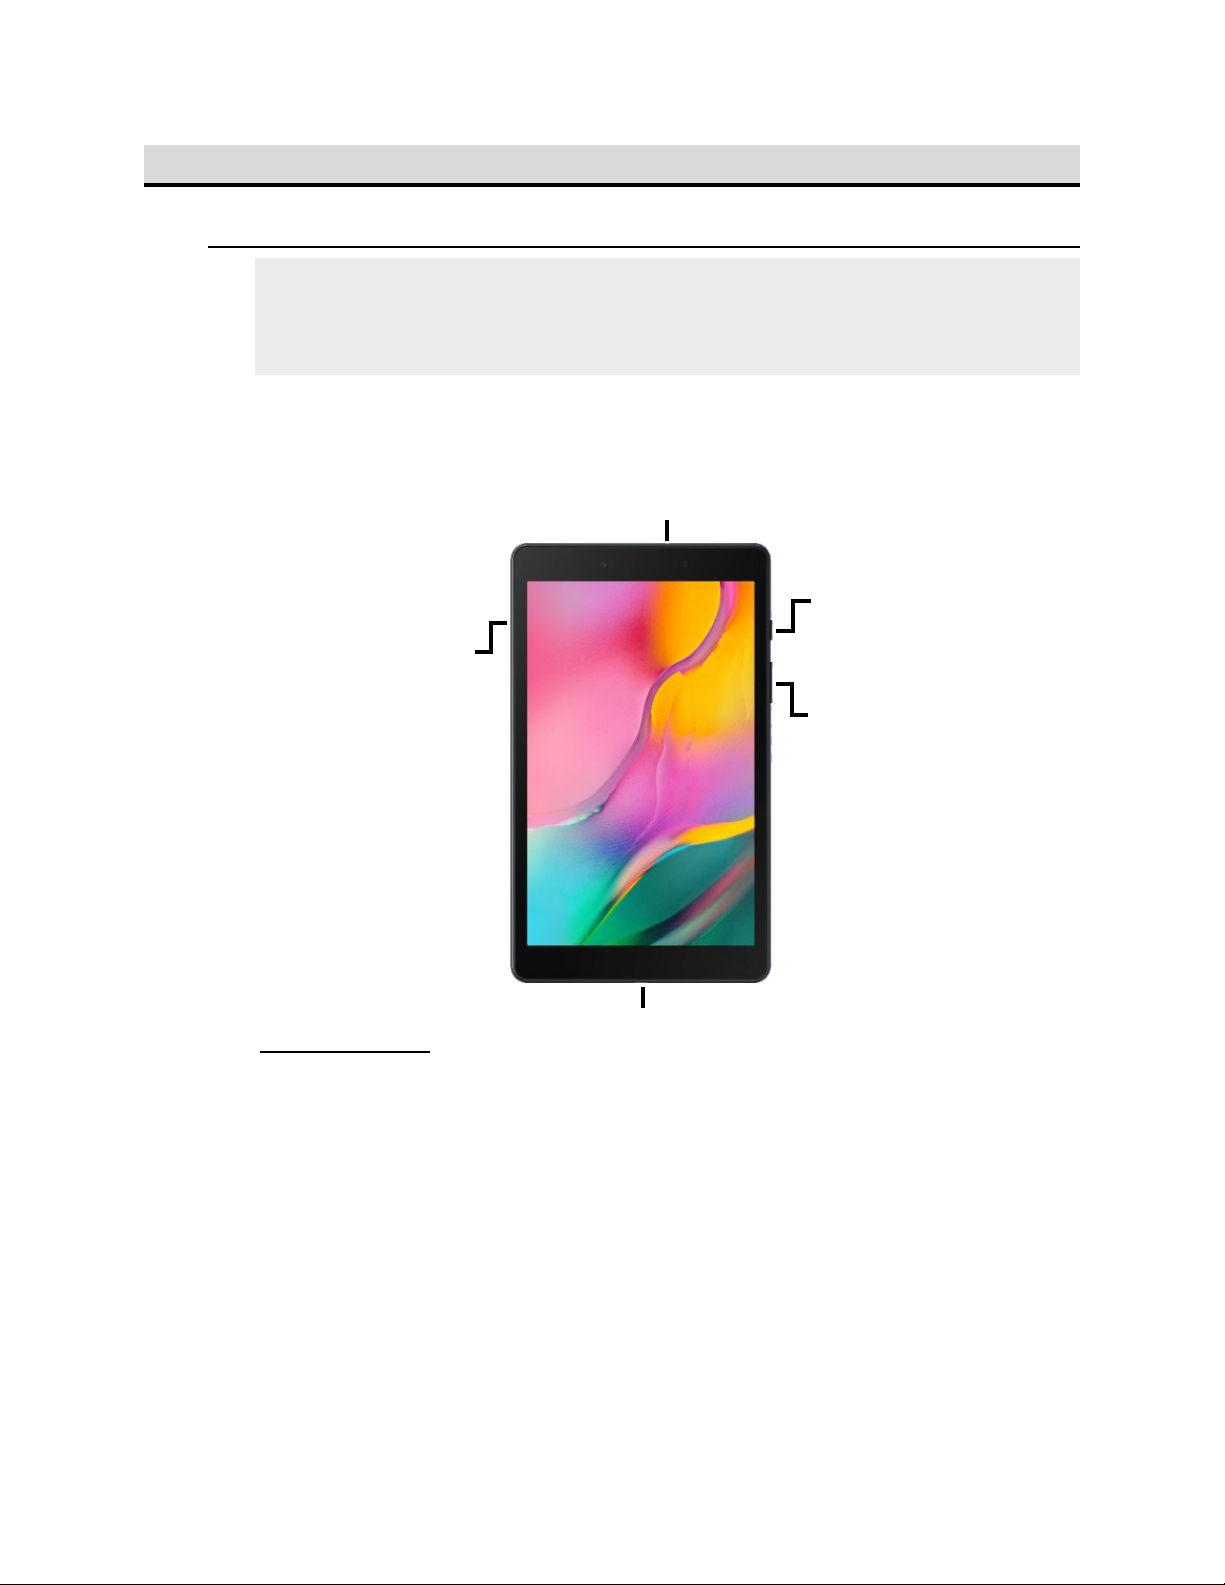
The tablet is a Samsung Galaxy Tab A (2019). Below is a diagram
displaying its various buttons and their corresponding functionality:
4 SIM Card Tray
○
1 Power Button
○
3 Charging Port
○
2 Volume Buttons
○
5 Audio Jack
Functionality
○
1 - The power button controls the power of the tablet. press to sleep / wake
the device, or hold to shut-down / turn-on the device.
○
2 - The volume buttons control the volume of the tablet.
○
3 - The charging port is where you plug the charging cable into. You can
also use this to connect to external devices, such as a Windows PC.
○
4 - The SIM card tray is where you can insert a SIM card for the device. It
is not necessary to have a SIM card installed to use the PL-AP app.
○
5 - The audio jack is used for external audio devices such as a headset.

6
1-2. UNDERSTANDING ANDROID OS
This section of the manual will briefly go over the Android operating system
(OS) and how to use it.
The App Drawer
The App drawer is where all your installed Apps can be found. Apps from
the App drawer can be added to the home screen and organized in any
way.
Home Screen
To find an installed App, open up the App drawer and enter the App
name into the search bar at the top.
App Drawer
Bluetooth Settings
Bluetooth is a wireless connection method that connects two devices
together.
To access this, find the Settings app on your Android device, then look for
“Bluetooth”. Some brand’s have Bluetooth already accessible from the
main Settings page, while other brands place the Bluetooth setting inside a
“Connections” page or similar. The Bluetooth settings allows you to
enable/disable Bluetooth, and choose which device to connect to via
Bluetooth.
Navigating Android
Most Android devices use three buttons for navigation. These buttons are
usually found at the bottom of the screen. The order and design may vary.
The button in the center is the home button.
The button that looks like an arrow is the back button.
The remaining other button is the app-view button.

7
2. INSTALLING THE PL-AP APP
2-1. INSTALLING THE PL-AP APP
The PL-AP app is pre-installed on Tablets supplied directly by Fuji Pipe
Locators. Those using their own Android devices will need to download and
install the PL-AP application (app).
In order to download the app, you will need to have access to a Google
account (e.g. Gmail).
The PL-AP app will only work on ANDROID 9 OR LOWER.
1. Open the app drawer and search for the Play Store app. Open it. To
learn how to search for apps, refer to section (1-2) of the manual.
2. If prompted, sign into your Google account. Then, search for “PL-AP”
in the search bar up top.
3. Select the PL-AP app from the list of results.
4. Select the Install button on the PL-AP app.
It may take a short while to install. Once it has been installed, you will be
able to find the PL-AP app in your app drawer.
8
2-2. ENABLING PL-AP APP PERMISSIONS
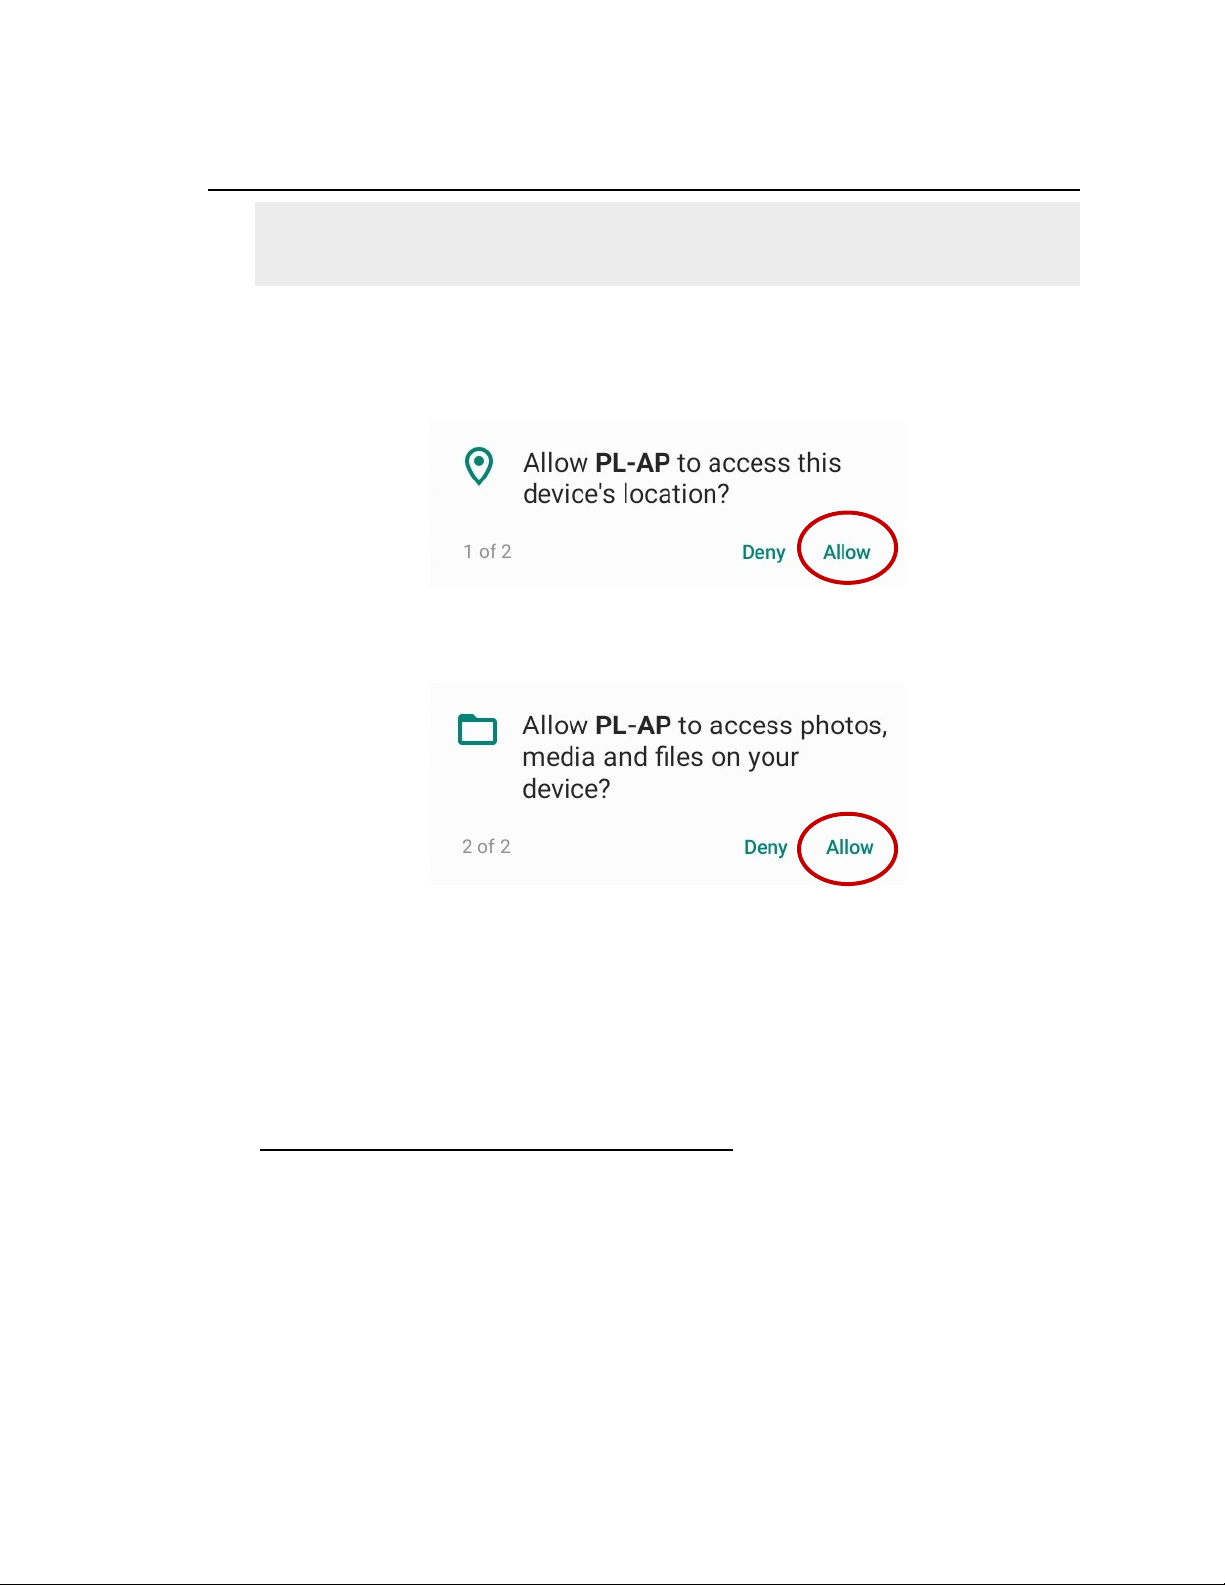
The PL-AP requires access to certain permissions for it to function correctly.
Please ensure you perform the following instructions accurately.
When opening the app for the first time, you will be prompted to give PL-AP
access to your device’s location. Select Allow.
Why Does PL-AP Need This?
GPS information is needed for PL-AP because it needs to know where you
are scanning for pipes. This data is also used in the reports.
File access is needed for PL-AP because it needs to access your storage in
order to create reports.
Then, you will be prompted to give PL-AP access to your device’s media
and files. Select Allow.
Ensure that you select Allow for these permissions. Selecting Deny will
result in the app not functioning properly, and you will need to re-install the
PL-AP app.
9
2-3. UNDERSTANDING THE PL-AP APP
This section of the manual will only briefly go over the app and its
functionality. The manual will explain how to fully use the app in later
sections. Please refer to the contents page for more details.
The PL-AP app is the companion app to the PL-G-MAX receiver. This app
allows the collection of data from the PL-G-MAX Receiver when
Connected/ Paired, and lets the user share this data via Reports that can
be created within the app.
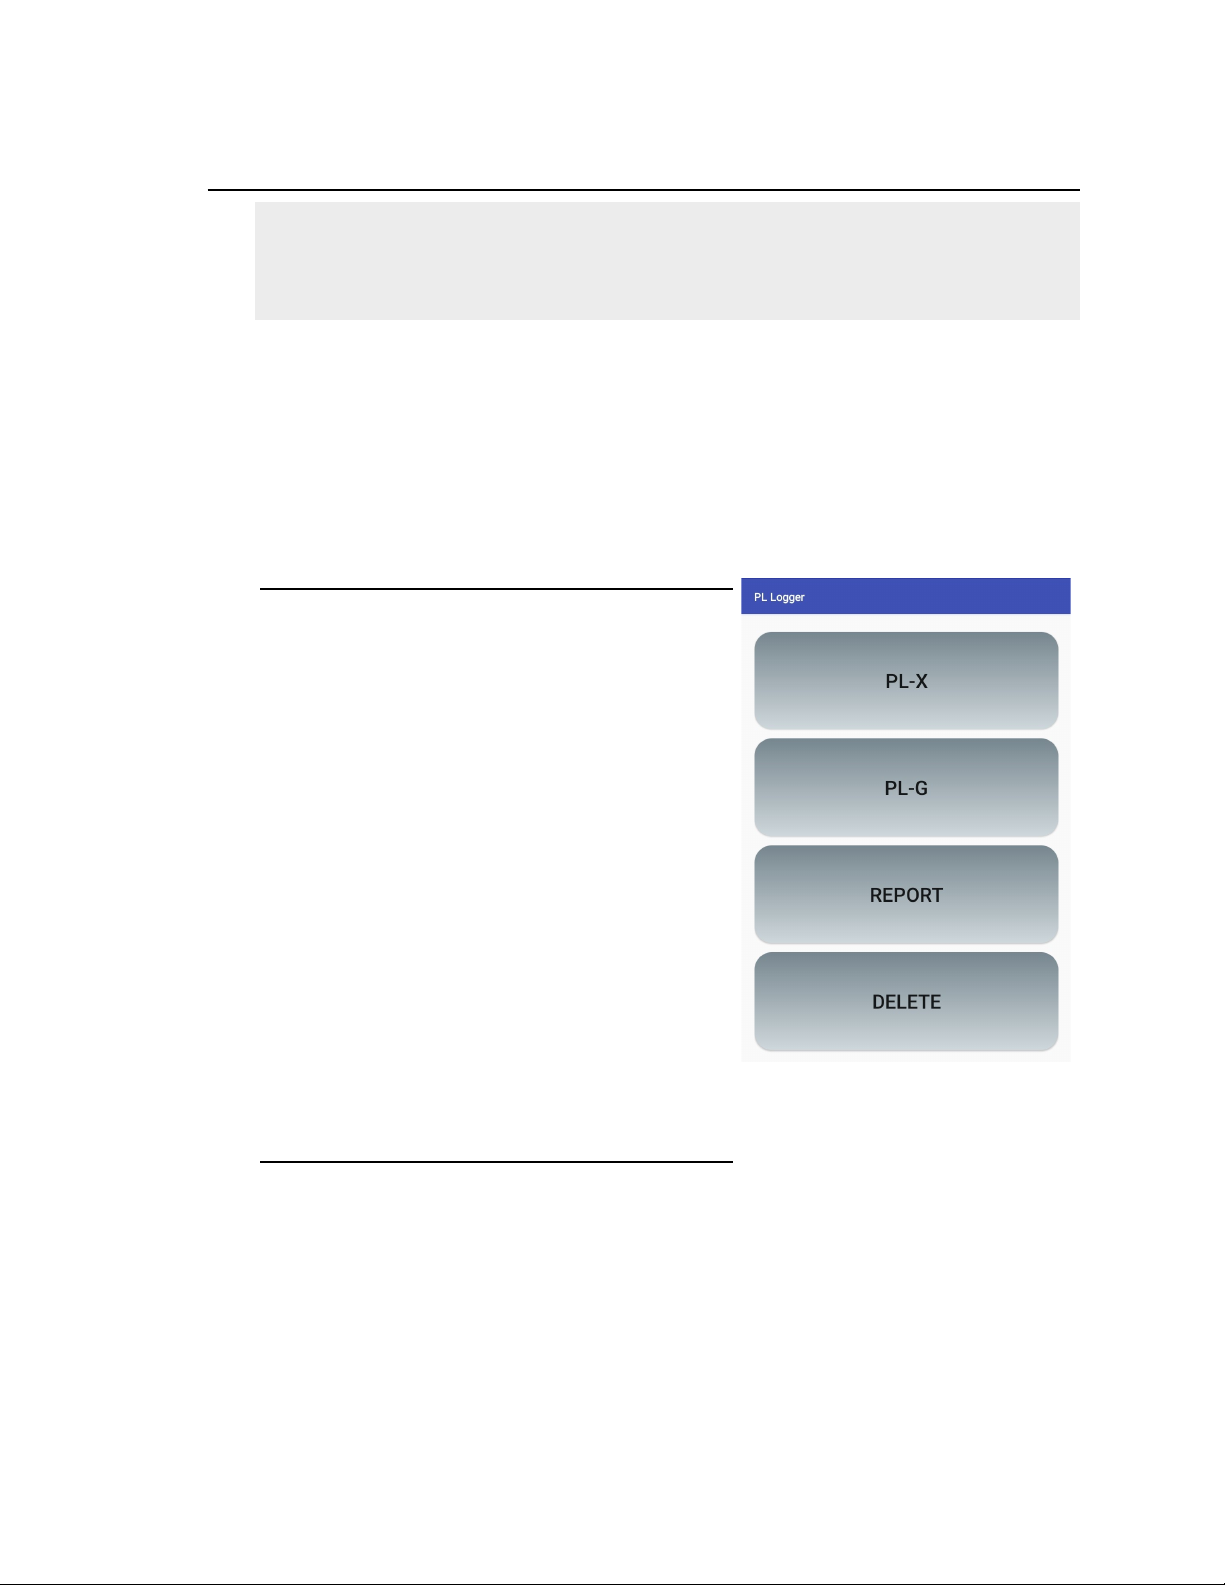
Home Screen
To the right is the main screen of the app.
The four buttons are for accessing different
functionalities of the app.
The PL-X is currently not available.
PL-G: This button is used to connect the PL
-G-MAX Receiver and collect data in real-
time.
REPORT: This button is used to view the
collected data and generate Reports.
DELETE: This button is used to delete data.
Accessing The Buttons
To access the PL-G button, the Tablet must be connected to the PL-G
receiver via Bluetooth. (refer to table of contents for instructions)
To access the REPORT button, the app must have collected data to view.
This button will remain blocked if there is no data to view.
To access the DELETE button, the app must have collected data to delete.
This button will remain blocked if there is no data to delete.

10
3. USING THE PL-AP APP AND PL-G RECEIVER
3-1. HOW TO CONNECT & USE A DEVICE WITH THE RECEIVER
Connecting
The PL-G-MAX Receiver will begin operating immediately after connecting
with the Android device.
1. Open Bluetooth settings on your Android device and have it ready.
Make sure it is still OFF in this step. Refer to page 6 to learn how to find
the Bluetooth settings.
2. Turn on the PL-G Receiver by pressing the red power button, and wait
until “Processing” is complete.
3. Hold down the “Depth” button on the PL-G until it says “<<Bluetooth>>
Wait Connection”.
4. Quickly, on your Android device, turn your Bluetooth on and connect
to “PL-G.MAX” as soon as it appears. If prompted, confirm the
connection by selecting PAIR or OK.
5. Quickly find and open the PL-AP app and select “PL-G”.
6. Quickly Select the “Data Transfer” button. This button should then turn
into a “Stop Transfer” button
7. The PL-G receiver will now say “Established Connection”, and you will
be instructed to immediately begin operating the Receiver.
Important Note
You must complete steps 4-6 within 60 seconds of completing step 3.
This is because the PL-G Receiver only gives you 60 seconds to perform
the connection process. The connection will fail to connect otherwise.
Go to the next page for measuring multiple times without disconnecting.
Table des matières


