Fiire FIIRE FIIRE REMOTE CONTROL UNIT Manuel utilisateur

FIIRE REMOTE CONTROL UNIT
User Manual
The next generation remote control

Introduction . . . . . . . . . . . . . . . . . . . . . . 2
Battery Installation and Information . . . 2
Battery Saver . . . . . . . . . . . . . . . . . . . . . 2
Gyro Operation . . . . . . . . . . . . . . . . . . . 3-4
Product Diagram. . . . . . . . . . . . . .. . . . . . 5
Button Cluster Locations. . . . . . . . . . . . . 5
RCU Mode Selection. . . . . . . . . . . . . . . . 5
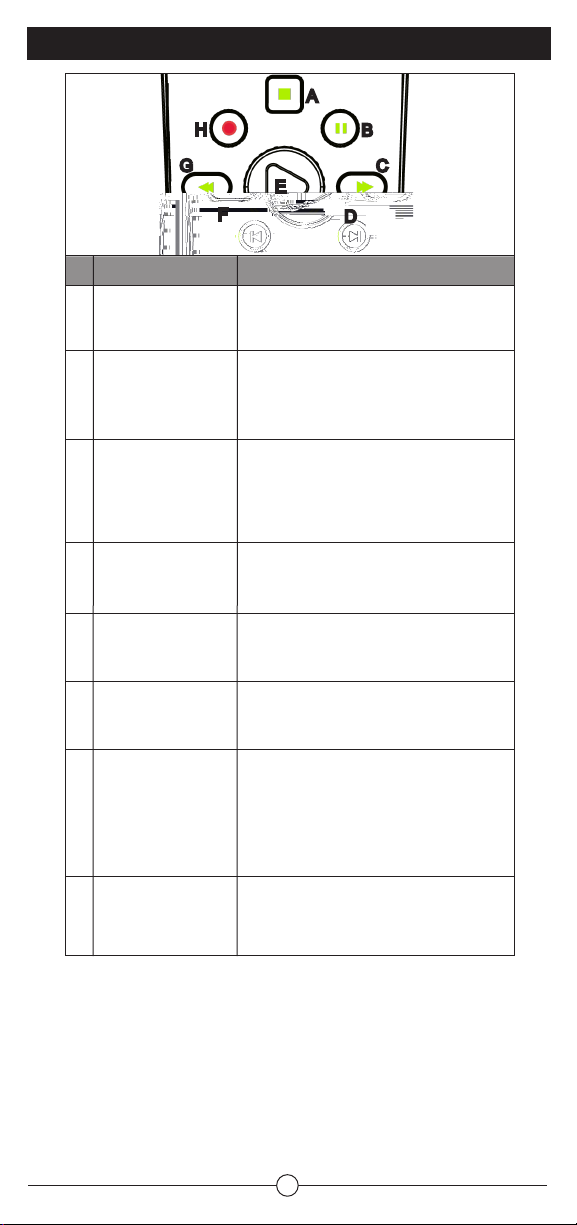
Transport Control . . . . . . . . . . . . . . . . . . 6
Menu Navigation . . . . . . . . . . . . . . . . . . . 7
Fiire Menu, Media Control, Ligths and
Volume, Gyro Activation . . . . . . . . . . . . . 7
Channel/Volume Control, Mute Volume,
Gyro Stop . . . . . . . . . . . . . . . . . . . . . . . .8
Fiire Shortcut Buttons . . . . . . . . . . . . . . .9
Numeric Keypad . . . . . . . .. . . . . . . . . . . 9
Follow me, Info&Help, Connect, Input, Av
Menu . . . . . . . . . . . . . . . . . . . . 9
Backlighting . . . . . . . . . . . . . . . . . .. . . . 10
ON/OFF Switch . . . . . . . . . . . . . . . . . . . 10
Receiver Installation . . . . . . . . . .. . . . . . 10
Table Of Contents
This users’ manual describes the operation of the Fiire Chief -- Remote Control Unit
(RCU) 4-in-1 (3 IR devices + 1 RF device). The RCU contains an embedded micro
gyro for motion sensing and in-air control of oating cursor. This RCU features IR code
database and IR learning capabilities to universally control standard home theater
devices such as TVs, VCRs, Digital Video Recorders (DVR), DVD players, CD players,
cable/SAT boxes, etc.
The RCU is also equipped with a 2.4 GHz RF transceiver to send cursor movement
information and other commands to the Fiire System via a USB transceiver. The radio
frequency (RF) transceiver delivers a range of up to 100 feet with no line-of-sight
requirement. The 800 possible channels of the RF transceiver provide high resistance to
interference from other radio devices.
Before using the Fiire Chief press the connect button on the remote to bind it to the
closest USB dongle. Do not press the connect button on the dongle.
Battery Installation and Information
The Fiire Chief RCU requires two AA Alkaline batteries. To install the batteries:
1. Remove the battery compartment cover.
2. Insert the batteries, matching the batteries to the (+) and (-) marks inside the battery
compartment.
3. Replace the battery compartment cover and snap it into place.
Note: Reprogramming may be required after batteries are replaced.
Battery Saver
The RCU saves battery power by automatically going into a low-power state if no button
is pressed after a few seconds.
Product Registration Information
Keep your sales receipt to obtain warranty parts and service and for proof of purchase.
Attach it here and record the serial number in case you need it. The serial number is
located on the product.
Introduction
Model Number _______________________________
Serial Number ______________________ Purchase Date _____________
Dealer/Address/Phone ________________________________________
Setting Up and Synchronizing a Gyration
Go mouse or keyboard and the
Transceiver . . . . . . . . . . . . . . . . . . . . . 11
Programming Methods . . . . . . . . . . . . . . 11
Using Automatic Code Search . . . . . . . 11
Using Direct Entry . . . . . . . . . . . . . . . 12
Using the Remote to Control Your
Components . . . . . . . . . . . . . . . . 12
Volume Punch Through . . . . . . . . . . .. . . 12
Learning . . . . . . . . . . . . . . . . . . . . . . . . . 13
Learning Tips . . . . . . . . . . . . . . . . . . . . . 13
Code Learning . . . . . . . . . . . . . . . . . . . . 13
Learning Commands . . . . . . . . . . . . . . . 13
Clearing an Individual Learned
Function . . . . . . . . . . . . . . . . . 14
Deleting All Learned Functions . . . . . . . 14
Troubleshooting . . . . . . . . . . . . . . . . . . . 14
Remote Code List . . . . . . . . . . . . . . 15-19
2

3
Gyro Operation
The RCU provides in-air control of the
Fiire system’s cursor via patented
gyroscopic motion sensing technology.
This means mouse-like cursor control,
from anywhere in the room, without the
need of a at surface.
The FiireChief controls both the
FiireEngine and FiireStation using
RF wireless. There is no line-of-sight
requirement so you don’t have to point
the RCU at the Fiire system you are
controlling. Remember the following
things when using the in-air cursor
control feature of the RCU:
• You can control every device in your
home using only the 3 buttons in the
middle and simple gestural motions.
The right button is for lights & volume.
Press it and wave the remote up and
down to move the cursor into the yellow
arrows to adjust the lights, or move left
and right into the blue arrows to adjust
the volume. Tap OK when the volume is
at the desired level.
Or press and hold the button, and don’t
let go while you move into the blue
arrows and keep the button held down
for absolute positioning. Now moving
your hand 45 degrees to the left is
mute, and 45 degrees to the right is full
blast. Let go of the button when it’s at
the desired level.
The left button replaces all your media
control. Press it and move up and down
for the ‘skip’ action, such as changing
channels while watching TV, tracks on a
CD, or chapters on a DVD. The faster
you move, the faster the media skips,
with your guide data and chapter list
presented visually.
Move left and right for the speed control,
like fast forward and rewind. You can
tap and release the button while you
move left and right for relative control,
meaning the further you move your
hand, the faster the speed changes.
When the pointer is in the middle of
the screen the media is paused. The
further you move to the right the faster
it goes, starting with slow motion and
going to very fast 400x forward. Move
the cursor to the left of center to make
the media go backwards, the further left

4
the faster it goes. Or press and hold the
button, and don’t let go while you move into
the blue arrows and keep the button held
down for absolute positioning.
Now moving your hand 45 degrees to the
left is the beginning of the media, and 45
degrees right is the end. Move back and
forth until you nd the part you want and
then let go of the button to resume normal
playback.
• When in LinuxMCE the OK button selects
whatever object is highlighted on screen,
and the X button makes whatever menu is
on screen go away.
When in a PC application, like KDE, the OK
button is the same as a left-mouse click,
and the X button is the same as a right-
mouse click.
• When you press one of the 3 gyro buttons
the gyro is activated and the on-screen
pointer is enabled. To reposition your hand
press and hold the gyro ‘stop’ button
to freeze the pointer. Double-click it to
de-activate the gyro. Then press it again,
or press one of the 3 gyro buttons, to re-
activate it.
• Move the cursor by exing your wrist, not
your arm or body, much as you would with
a ashlight; side to side and up and down.
Placing your arm on an armrest or on your
lap will make this motion more comfortable.
• The RF Transmit LED indicates when gyro
motion or other information is being sent
independent of which mode is selected on
the RCU.
• A few moments after the Fiire Station starts
to boot up a descending sequence of tones
will be heard from the inside Fiire system.
Then you can press the ‘AV menu’ button
on the bottom of Fiire Chief a few times,
until you hear a conrmation beep, which
indicates that the AV Wizard will start.
The AV Wizard default video settings are
640x480 on VGA port. When these settings
are applied a melody beep will be heard. If
you don’t use a VGA video connector and
you see nothing on the screen,
press these shortcuts:
Note: As soon as you choose one
option below, wait few seconds to
nish applying the new settings.
For a succesful resolution apply
an melody beep will be heard. If
you see nothing on the screen
(i.e. black screen) and you still
hear the melody beep, it means
that you have to try another
shortcut until you get video on the
screen.
1 is for 640x480 on DVI port
2 is for 640x480 on VGA port
3 is for 640x480 on Component
4 is for 640x480 on S-video
5 is for 640x480 on Composite
As soon as you get video on
the screen, select and press
‘Continue’.

Remote Control Unit
mode selection and power
Transport control
Menu navigation and
mouse buttons
Fiire main menu, Media
control, Volume and Ligths
control, Activate Gyro
Volume and Channel
control and Mute
Shortcuts
Alphanumeric keypad
Setup and Device Control
Selects device mode (PC, TV,
CAB/SAT, AUX). Powers
on/off selected device.
AV control for selected transport or for
Fiire System
Menu navigation: UP, DOWN, LEFT,
RIGHT and SELECT (similar to OK
button). Includes standard LEFT and
RIGHT mouse buttons, OK and X,
BACK and TV GUIDE.
Center button brings the MAIN MENU
of Fiire. The right button is for LIGHTS
& VOLUME. The left button replaces
all your MEDIA control. Each one of
these buttons also activates the gyro.
VOLUME up and down, CHANNEL up
and down. Volume mute.
Shortcuts buttons include:
PICTURES,
RECORDED TV,
MUSIC and VIDEOS.
Each of these lists can be scrolled by
waving the hand up and down.
0-9 keys with alpha characters,
plus *and #, CLEAR and ENTER
FOLLOW ME, INFO&HELP,
CONNECT, INPUT, AV MENU
Product Diagram
Button Cluster Locations
A
B
C
D
E
F
G
H
Button Cluster Function
A
B
C
D
E
F
G
H
RCU Mode Selection
Puts RCU into PC control mode for
communicating with Fiire via RF protocol.
Puts RCU into TV control mode for
communicating with TV via IR protocol.
Puts RCU into AUX control mode for communicating with additional learned device via IR
protocol.
Puts RCU into CAB/SAT control mode for communicating with cable or satellite set-top box
via IR protocol.
PC, TV, AUX or CAB/SAT mode: Powers on/off the selected device.
PC Mode: If the Fiire system is active, the rst button press issues a go to Power menu and
the second button press issues a power down command.
If the system is in inactive mode, a button press may awaken.
Transmit LED indicator for RF transmission
A
B
C
D
E
F
A B C D E
F
5

6
Transport Control
Puts selected device
into Stop mode, if
supported
Puts selected device
into Pause mode, if
supported
Puts selected device
into Fast Forward mode,
if supported
Skip command, if
supported by selected
device
Puts selected device
into Play mode, if
supported
Replay command, if
supported by selected
device
Puts selected device
into Rewind mode, if
supported
Puts selected device
into Record mode, if
supported
A
B
C
D
E
F
G
H
A
B
C
D
E
F
G
H
Stops media playback and brings the main
menu in front
First button press pauses the media at present
position. Subsequent button presses toggles
between pause and playback at present
position pointer.
First press speeds up the time base of the
media stream to the rst FF value (2X).
Subsequent button presses cycle through the
FF speed values looping through 1X (normal
speed) 4X, 6X, 8X, 16X, 32X, 64X.
Skips ahead an increment: CD and Playlists
skip to next song. DVD skips to next chapter.
Start (if paused, continue) playback of media at
present position.
Move back the position an increment:
CD and Playlist: skips back to previous song.
DVD: skips back to previous chapter.
First press speeds up the time base and
reverses direction of the media stream to the
rst rewind value (2X).
Second press cycles through the RWD speed
values looping through 1X (normal speed) 4X,
6X, 8X, 16X, 32X, 64X.
Records the TV show to disk. Starts recording
at the beginning of the show as dened by
on-screen TV program guide.
TV, AUX orCAB/SATmode
Fiire Mode

Menu Navigation
7
No action, or as
dened by selected
device
No action, or as
dened by selected
device
No action, or as
dened by selected
device
No action, or as
dened by selected
device
Menu Navigation Up
Menu Navigation
Right
Menu Navigation
Down
Menu Navigation Left
Performs action
indicated by focus
point
A
B
C
D
E
F
G
H
I
Goes back one screen to previous location
Invokes the on-screen TV program guide
Simulates a left-mouse button-click; OK
button selects whatever object is highlighted
on screen;
Simulates a right-mouse button-click; Cancel
button makes whatever menu go away;
Moves the focus point (highlights another
object) up one location
Moves focus point right one position
Moves the focus point down one location
Moves focus point left one position
Performs action indicated by focus point; Select
whatever object is highlighted on screen
AB
CD
E
F
G
H
Media button
Volume&Lights button
Menu button
A
B
C
AB
C

8
Channel/Volume Control, Mute Volume
Gyro stop
Gyro stop
Increment the current
channel by 1
Decrement the
current channel by 1
Mute selected
device, if applicable
Decrement the
current volume by
1 unit
Increment the current
volume by 1 unit
A
B
C
D
E
F
To reposition your hand press and hold the
gyro ‘stop’ button to freeze the pointer.
Double-click it to de-activate the gyro.
Then press it again, or press one of the 3
gyro buttons, to re-activate it.
Increment the current channel by 1. Move
one position up in playlist.
Decrement the current channel by 1. Move
one position down in playlist.
Mute the volume, toggle mute state.
Decrement the current volume by 1 unit.
If muted, un-mute the volume rst.
Increment the current volume by 1 unit.
If muted, un-mute the volume rst.
A
B
C
D
E
F
TV, AUX orCAB/SATmode
Fiire Mode

Acts as a shortcut to the “Pictures”
Acts as a shortcut to the “Recorded TV”
Acts as a shortcut to the “Music”
Acts as a shortcut to the “Videos”
A
B
C
D
AB C D
Numeric Keypad
Fiire Shortcut Buttons
Standard 1-9, alphanumeric
Inserts a * symbol, if supported by
the selected device
Inserts a # symbol, if supported by
the selected device
Clear, if supported by the selected
device
Enter, if supported by the selected
device
A
B
C
D
E
Standard 1-9, alphanumeric
*
#
Clear
Enter
9
Follow me, Info&Help, Connect, Input and AV Menu
Follow me
Press this button when you want to control
another Fiire system (like a Fiire Station).
You need to have an USB Dongle connected
to that Fiire Station too.
If you were watching a movie in previous
room, the movie will follow you.
Info & Help
Synchronizes the RF remote with the RF
receiver
Toggles between TV inputs
Brings up the Audio / Video Wizard.
When the Fiire System starts (boots up)
press this button when you hear a melody
beep.
A
B
C
D
E
ABCDE
A
BC
DE
TV, AUX orCAB/SATmode
Fiire Mode

Backlighting
The RCU Mode Selection buttons are backlit. One of these buttons lights up
whenever a button is pressed on the remote to indicate which Control Mode the
remote is in; PC, TV, AUX, or CAB/SAT. If the backlighting seems dim, the batteries
may need to be replaced. There is no backlighting on any other buttons.
ON/OFF Switch
This switch turns the selected device on or off. The device is selected with the RCU
Mode Switches; PC, TV, AUX and CAB/SAT.
In the PC mode, this button issues a Go to Power Menu. On the screen you have
options for powering off the whole house or only a particular device. At this time the
system is in not powering off, it waits for another command. Another press of the
Power button will turn the Fiire system off.
If the PC is in powered off, any button pressed on the RCU may wake up the PC.
10
Receiver Installation
The RCU requires a USB RF transceiver be plugged into a USB port in the Fiire box
in order to access RF and gyro functions. The USB extension cable can be used to
maximize the range of the RCU by placing the USB RF transceiver away from other
electrical components. A USB RF transceiver does not need to be plugged in to use
the IR remote functions. See the diagram below.
Ce manuel convient aux modèles suivants
1
Table des matières
Manuels Télécommande populaires d'autres marques

Panasonic
Panasonic EUR7622KB0 Manuel utilisateur

Bang & Olufsen
Bang & Olufsen Beo4 Manuel utilisateur

Sunwave Tech.
Sunwave Tech. RemoteComm SRC-7000 Manuel utilisateur

Multiplex
Multiplex PROFI TX 9 Manuel utilisateur

One Remote
One Remote RMB4 Manuel utilisateur

FUTABA
FUTABA 9ZAP - PART2 Manuel utilisateur


