Feelworld TX FT6 Manuel utilisateur

FT6 FR6
5.5″ Wireless Monitor Kit
HDMI/3D LUT/HDR
User Manual

1
Overview
Thank you for purchasing our wireless monitor kit. The kit is a set of
touch-screen monitors with built-in wireless modules. It supports the
resolution format of up to 1080P/60Hz in wireless mode. It comes with
H.264 codec to enable clearer video and lower latency.
Full HD color LCD monitor, which adopts advanced integrated DSP
circuits and energy-efficient IPS LED panel, delivers low power
consumption and stable performance. The kit comes with HDMI input
and output, reverse power(to cameras), touch screen, supporting 3D
LUT and HDR. It is portable, user-friendly. A wide variety of advanced
features is included, such as Histogram, Audio Meter, Focus Assist,
False Color, Zebra Exposure, Anamorphic.
The kit comes with dual battery slot, you can use the power adapter or
the external battery as power source.
To insure the best use of the unit, please read the
user’s manual carefully
CAUTION
● This product should not be exposed dripping or splashing.
● Please place the wireless monitor on a flat with hard and stable
surface.
● In order to reduce the risk of electric shock of fire, please do not
expose the receiver/ transmitter to rain or moisture.
● Please avoid the heavy impact and drop onto the ground when
move the product.

2
● The screen of this product is made of glass. Please do not drop the
screen towards the ground. Keep away from injury if the screen is
broken.
● Keep the product away from the heat source, and avoid the
prolonged exposures to the sun as the LCD screen will be
damaged.
● To avoid damaging the product, please do not take apart or repair
the unit by yourself without the adjustable components in the unit.
● In order to better maintain the LCD screen and protect the cover,
please follow the following ways to avoid damages.
1. Please refrain from using the hard objects to hit the screen.
2. Please do not force to wipe the screen.
3. Please do not use the chemical solutions to clean the screen.
4. Please do not spray any detergent on the screen.
5. Please do not write on the screen directly.
6. Please do not stick on the screen.
7. Please simply wipe with a clean soft cloth and make sure no
water on the screen.
Special Notice
● The impact of radio waves (such as the following environment may
cause the abnormal audio and video (blocked image, noise...etc.).
1) Transmit near the wall which is hard for the radio waves to get
through.
2) Quite close to the refrigerator, metal fitment and appliances, or
net to the crowded situation.
● This product has been tested and manufactured to comply with
national electrical safety rules, however, there will be noise caused by

3
the interference with other machines in rare cased. If the interference
is happened, please keep a certain distance away from other
machines.
● The product is susceptible to interference from 5GHz wireless local
area network or other wireless devices.
●Optimal range between transmitter and receiver is between 1 meter
and 30 meters with in line of sight indoor.
● It will take 30-40 seconds to boot the system before wireless
communication start, the media receiver can not be operated during
this time.
Features
Transmission range up to 250m/800ft (LoS);
Ultra-low latency: 70ms;
Up to 1080P60Hz;
Support APP monitoring;
Selectable channels to minimize interference;
Both the TX monitor and RX monitor support HDMI IN and HDMI
OUT, a second monitor can be working via HDMI LOOP OUT;
Can work as a monitor alone if the wireless module is deactivated;
5.5 inches 1920x1080 full HD IPS screen with touch function;
Support 3D LUT;
Support HDR monitoring;
A panoply of auxiliary functions, including histogram, focus assist
and many others, enabling optimized exposure and focus;
DC8V power out to power your cameras;
Attachable sunshade ensure better viewing in bright sunlight.

4
CONTENTS
1. Product Layout ------------------------------------------------ 5
1.1 Button Instruction --------------------------------------------- 6
1.2 Interface (bottom) --------------------------------------------- 6
1.3 Interface (right) ------------------------------------------------ 7
1.4 Power Supply Way ------------------------------------------- 8
1.5 Mounting -------------------------------------------------------- 9
1.6 Sunshade ------------------------------------------------------- 9
2. Menu Operation Instruction ------------------------------ 10
3. RTSP Mode Operation ---------------------------------------13
4. Menu Function Instruction ------------------------------ 16
5. Technical Specifications ----------------------------------- 20
6. Troubleshooting ---------------------------------------------- 22

5
1. Product Layout
Front
Back

6
1.1 Button Instruction
:Long press to turn on and off the power; short press to
turn on and off the screen touch function
MENU: Long press to open the main menu and short press to open
the shortcut menu. Rotate the wheel to select a menu item, press it
again to open the corresponding menu function.
(See details: 2.Menu Operation Instruction)
1.2 Interface (Bottom)
Type-C: For 3DLUT upload via type-c to USB and for firmware upgrade
DC OUT 8V: DC power output interface, polarity as the output power
7
Barrel output for powering your camera with a separately available
DC coupler via adaptor (NP-FW50 Sony & LP-E6
Canon&DMW-BLF19 Panasonic). More adapters coming soon.
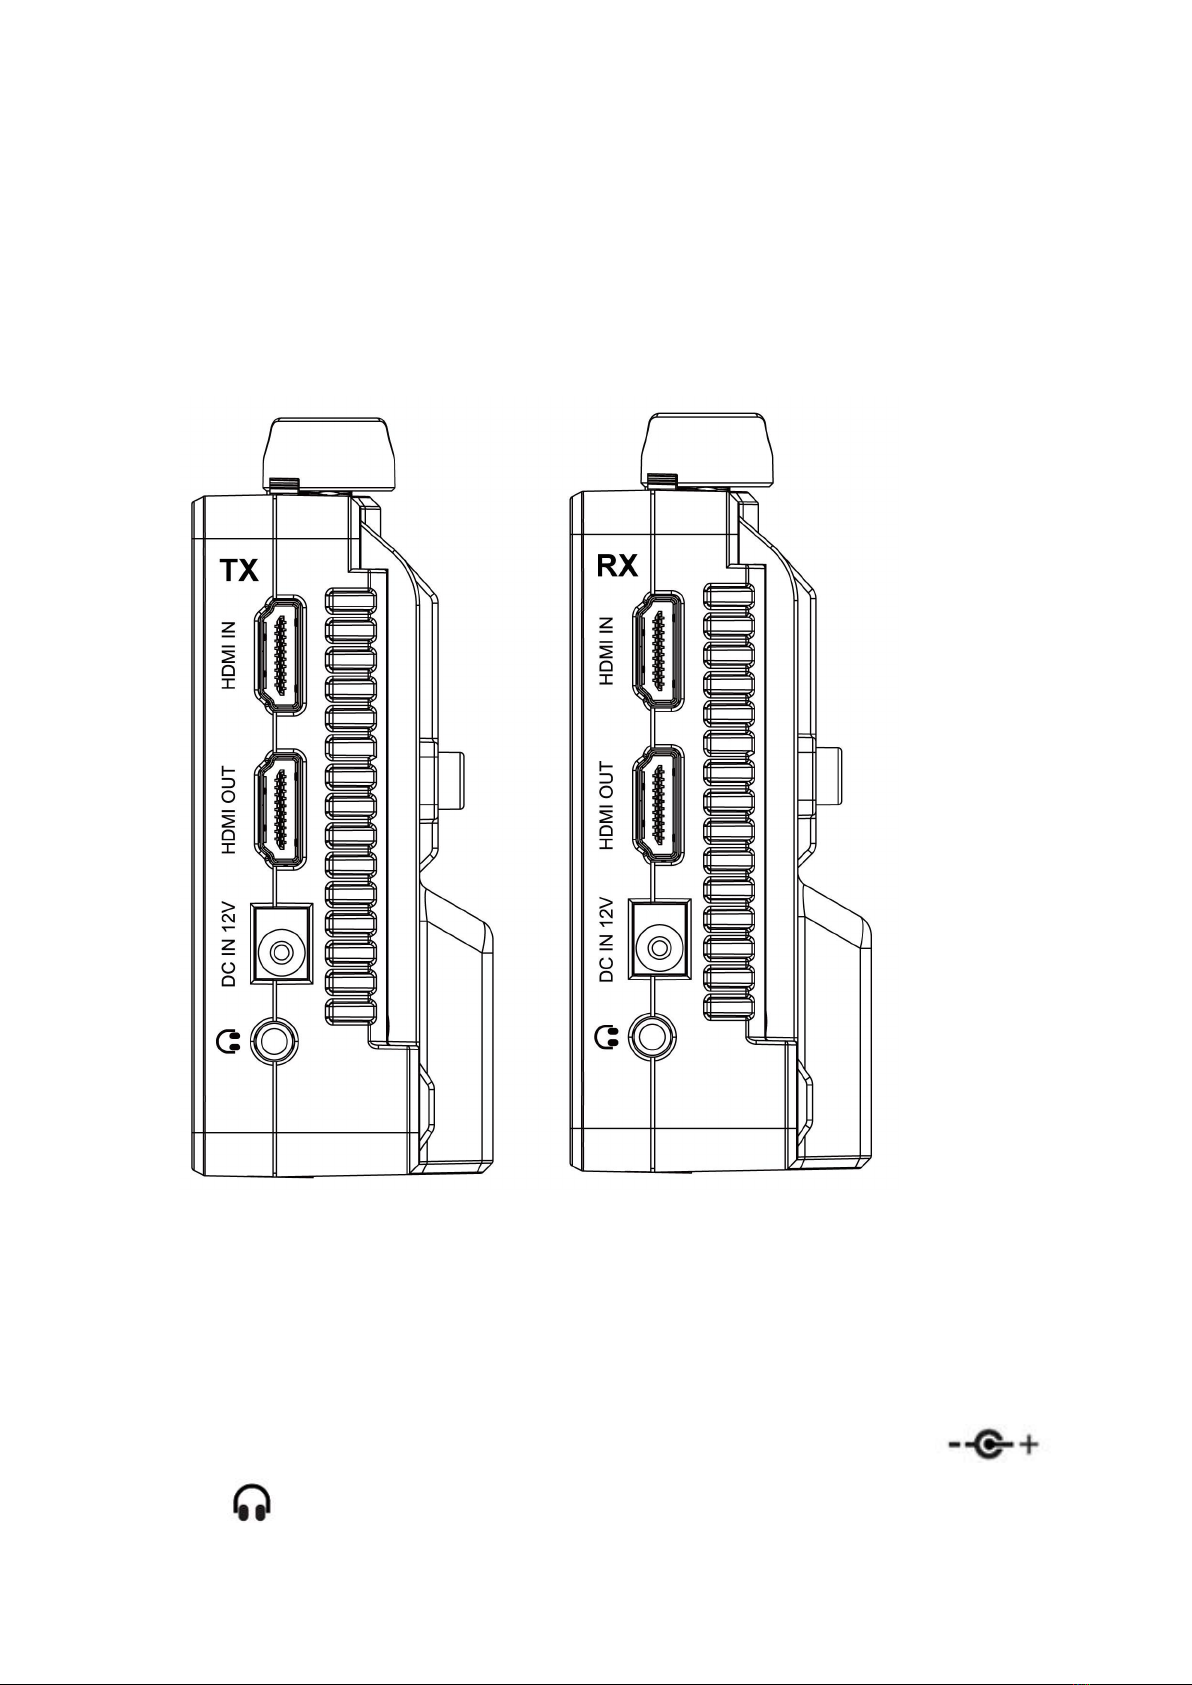
1.3 Interface (Right)
TX: Transmitter
RX: Receiver
HDMI IN: 1.4, HDMI signal input
HDMI OUT: 1.4, HDMI signal output
DC IN 12V: DC power input, polarity as the input power
:3.5mm earphone port output

8
1.4 Power Supply Way
(1) The rear cover of the monitor is equipped with F970 dual battery
plates, which is applicable to F970 series of batteries.
● Sony F970 battery plate for battery of Sony DV:
Sony F970 F960 F950 F930 F770 F750 F730 F570 F550 F530
series
●Battery switching instruction
When the battery/batteries is/are placed in the battery slot(s), battery
icon will appear on the upper right of the screen.
White battery icon: working; Gray battery icon: not working.
Double-tap the gray battery icon and it will be switched to a working
state in about 3 seconds, then it will be turned white.
(2) Barrel (5.5mm outer, 2.1mm inner) at the right of the
monitor, DC 7~24V Input.
Remark: It is recommended to use standard original F970 batteries.
Different specifications of the battery have different capability. The
working time for the monitor will be different. Higher capability
(working time) will be longer. Please take off the battery from the
monitor if you don’t use the monitor in a long time.
The battery not including, please purchase separately.

9
1.5 Mounting
There is a ¼-20 thread point on bottom can be easily connected to the hot
shoe mount, tripod fixed installation.
1.6 Sunshade
①Sunshade ②Sunshade Frame
Ce manuel convient aux modèles suivants
1
Table des matières
Manuels Écran tactile populaires d'autres marques


IBASE Technology
IBASE Technology ASTUT-152-RE1S Manuel utilisateur

YASKAWA
YASKAWA TP 610C Manuel utilisateur

B&R
B&R Power Panel C Series Manuel utilisateur

Beijer Electronics
Beijer Electronics X2 control Manuel utilisateur

AXIOMTEK
AXIOMTEK GOT321W-521 Manuel utilisateur

TRIDONIC.ATCO
TRIDONIC.ATCO x-touchBOX Manuel utilisateur


