Fastrax IV Manuel utilisateur


II
TO REDUCE THE RISK OF FIRE OR ELECTRIC SHOCK, DO NOT EXPOSE THIS PRODUCT TO RAIN
OR MOISTURE. DO NOT INSERT ANY METALLIC OBJECTS THROUGH THE VENTILATION GRILLS OR
OTHER OPENINGS ON THE EQUIPMENT.
EXPLANATION OF GRAPHICAL SYMBOLS
The lightning flash with arrowhead symbol, within an equilateral triangle, is intended to
alert the user to the presence of uninsulated "dangerous voltage" within the product's
enclosure that may be of sufficient magnitude to constitute a risk of electric shock to
persons.
The exclamation point within an equilateral triangle is intended to alert the user to the
presence of important operating and maintenance (servicing) instruction in the literature
WARNIN
G
CAUTION
accompanying the product.

III
FCC COMPLIANCE STATEMENT
CE COMPLIANCE STATEMENT
FCC INFORMATION: THIS EQUIPMENT HAS BEEN TESTED AND
FOUND TO COMPLY WITH THE LIMITS FOR A CLASS A DIGITAL DEVICE,
PURSUANT TO PART 15 OF THE FCC RULES. THESE LIMITS ARE
DESIGNED TO PROVIDE REASONABLE PROTECTION AGAINST HARMFUL
INTERFERENCE WHEN THE EQUIPMENT IS OPERATED IN A COMMERCIAL
ENVIRONMENT. THIS EQUIPMENT GENERATES, USES, AND CAN RADIATE
RADIO FREQUENCY ENERGY AND IF NOT INSTALLED AND USED IN
ACCORDANCE WITH THE INSTRUCTION MANUAL, MAY CAUSE HARMFUL
INTERFERENCE TO RADIO COMMUNICATIONS. OPERATION OF THIS
EQUIPMENT IN A RESIDENTIAL AREA IS LIKELY TO CAUSE HARMFUL
INTERFERENCE IN WHICH CASE THE USER WILL BE REQUIRED TO
CORRECT THE INTERFERENCE AT HIS OWN EXPENSE.
CAUTION: CHANGES OR MODIFICATIONS NOT EXPRESSLY APPROVED
BY THE PARTY RESPONSIBLE FOR COMPLIANCE COULD VOID THE USER'S
AUTHORITY TO OPERATE THE EQUIPMENT.
THIS CLASS A DIGITAL APPARATUS COMPLIES WITH CANADIAN ICES-003.
CET APPAREIL NUMÉRIQUE DE LA CLASSE A EST CONFORME À LA NORME
NMB-003 DU CANADA.
WARNING
THIS IS A CLASS A PRODUCT. IN A DOMESTIC ENVIRONMENT THIS
PRODUCT MAY CAUSE RADIO INTERFERENCE IN WHICH CASE THE USER
MAY BE REQUIRED TO TAKE ADEQUATE MEASURES.
CAUTION
DANGER OF EXPLOSION IF BATTERY IS INCORRECTLY REPLACED.
REPLACE ONLY WITH THE SAME OR EQUIVALENT TYPE.

IV
IMPORTANT SAFEGUARDS
1. Read these instructions.
2. Keep these instructions.
3. Heed all warnings.
4. Follow all instructions.
5. Do not use this apparatus near water.
6. Clean only with dry cloth.
7. Do not block any ventilation openings. Install in accordance with the manufacturer’s
instructions.
8. Do not install near any heat sources such as radiators, heat registers, stoves, or other
apparatus (including amplifiers) that produce heat.
9. Do not defeat the safety purpose of the polarized or grounding-type plug. A polarized
plug has two blades with one wider than the other. A grounding type plug has two
blades and a third grounding prong. The wide blade or the third prong are provided for
your safety. If the provided plug does not fit into your outlet, consult an electrician for
replacement of the obsolete outlet.
10. Protect the power cord from being walked on or pinched particularly at plugs,
convenience receptacles, and the point where they exit from the apparatus.
11. Only use attachments/accessories specified by the manufacturer.
12. Use only with the cart, stand, tripod, bracket, or table specified by
the manufacturer, or sold with the apparatus. When a cart is used,
use caution when moving the cart/apparatus combination to avoid
injury from tip-over.
13. Unplug this apparatus during lightning storms or when unused for
long periods of time.
14.Refer all servicing to qualified service personnel. Servicing is required when the
apparatus has been damaged in any way, such as power-supply cord or plug is
damaged, liquid has been moisture, does not operate normally, or has been dropped.
15. CAUTION – THESE SERVICING INSTRUCTIONS ARE FOR USE BY QUALIFIED
SERVICE PERSONNEL ONLY. TO REDUCE THE RISK OF ELECTRIC SHOCK DO
NOT PERFORM ANY SERVICING OTHER THAN THAT CONTAINED IN THE
OPERATING INSTRUCTIONS UNLESS YOU QRE QUALIFIED TO DO SO.
16. Use Certified/Listed Class 2 power source only.
17. Apparatus shall not be exposed to dripping or splashing and no object filled with liquids,
such as vases, shall be placed on the apparatus.

V
Table of Contents
Chapter 1 — Introduction..............................................................................................1
1.1 Features............................................................................................................................. 1
Chapter 2 — Installation and Configuration................................................................3
2.1 Package Contents............................................................................................................. 3
2.2 Basic Configuration of Fastrax IV Dome Camera System............................................ 4
2.3 Setting Dome Camera Termination................................................................................. 5
2.4 Fail-safe Network.............................................................................................................. 6
2.5 Setting Dome Camera Address (ID)................................................................................ 7
2.6 Setting Dome Camera Protocol....................................................................................... 8
2.7 Connections...................................................................................................................... 9
• Connecting to the RS485/ 422......................................................................................................... 9
• Connecting Video out connector.................................................................................................... 9
• Connecting Alarms .......................................................................................................................... 9
• Connecting the Power ..................................................................................................................... 9
2.8 Getting Started................................................................................................................ 10
Chapter 3 — Program and Operation ........................................................................11
3.1 Dome Camera Selection................................................................................................. 11
3.2 Accessing the On-Screen Menu Utility......................................................................... 11
3.3 How to control the On-Screen Menu Utility.................................................................. 11
3.4 Auto Scan (Shortcut: SCAN)......................................................................................... 12
3.5 Preset (Shortcut: PRST) ................................................................................................ 15
3.5.1 Event Function........................................................................................................................ 18
3.5.2 Motion...................................................................................................................................... 19
3.5.3. Tracking................................................................................................................................... 21
3.5.4 Cross ....................................................................................................................................... 22
3.5.5 Enter ........................................................................................................................................ 23
3.5.6 Abandon.................................................................................................................................. 24
3.5.7 Removal................................................................................................................................... 25
3.6 Shortcut of Preset Program......................................................................................... 266
3.7 Tour (Shortcut: TOUR)................................................................................................... 26
3.8 Pattern (Shortcut: PTRN)............................................................................................... 28
3.9 Alarm................................................................................................................................ 29
3.10 Schedule........................................................................................................................ 31

VI
3.11 Event History................................................................................................................. 32
3.12 Camera Menu Type 1.................................................................................................... 33
3.12.1 Auto Focus............................................................................................................................ 33
3.12.2 WB (White Balance) Control................................................................................................ 33
3.12.3 Auto Exposure...................................................................................................................... 34
3.12.4 DIS (Digital Image Stabilization).......................................................................................... 35
3.12.5 Camera Setup ....................................................................................................................... 36
3.13 Camera Menu Type 2.................................................................................................... 37
3.13.1 Auto Focus............................................................................................................................ 37
3.13.2 WB (White Balance) Control................................................................................................ 37
3.13.3 Auto Exposure...................................................................................................................... 38
3.13.4 DIS (Digital Image Stabilization).......................................................................................... 39
3.13.5 Camera Setup ....................................................................................................................... 40
3.14 OSD Setup.................................................................................................................... 41
3.15 Privacy Zone ................................................................................................................ 43
3.16 Time & Date Setup....................................................................................................... 44
3.17 Home Function Setup.................................................................................................. 44
3.18 View Angle.................................................................................................................... 45
3.19 Origin Offset................................................................................................................. 47
3.20 Dome Reset.................................................................................................................. 48
3.21 System Menu................................................................................................................ 48
3.22 Function Run................................................................................................................ 50
3.23 Initialize Data................................................................................................................ 51
3.24 System Information ..................................................................................................... 52
Appendix A — Specifications.....................................................................................53
Appendix B — Troubleshooting.................................................................................55
Appendix C — Glossary..............................................................................................56
Appendix D — Short Cut Key.....................................................................................59
FLUSH MOUNT HARDWARE ......................................................................................61
FLUSH MOUNT HARDWARE ......................................................................................65
DOME HOUSING..........................................................................................................69
Wall & Ceiling Mount Kit.............................................................................................76

1
Chapter 1 — Introduction
1.1 Features
The Fastrax IV dome camera and the keyboard controller make up the building blocks for
any surveillance/security system. Using multiple Keyboard Controllers and multiple dome
cameras, no place is too large for monitoring. Extensible and flexible architecture facilitates
remote control functions for a variety of external switching devices such as multiplexers and
DVRs.
•Built-in optical power zoom camera with True Night Shot function.
•240 Preset positions (Individual AE and Event).
•8 Tours consist of Preset, Pattern, Auto-Scan and other Tours can be programmed with
over 300 functions and Preset location. While moving, each Preset scan can be watched in
smooth Vector Scan mode.
•16 Auto Scans with the normal, the vector, and the random mode and the Endless Auto-
Pan with 13 speed steps.
•8 Patterns (up to 500 second) and 8 Privacy zones.
•Motion Detection (Bounding Box, Trace)
•Auto Tracking and Cross Tracking.
•Video Analytics Function (Cross, Enter, Abandon and Removal).
•DIS (Digital Image Stabilization) Function.
•Function Scheduling.
•16 Area Titles.
•8 Alarm inputs / 4 Aux outs (NC & NO).
•Variable speed from 0.1°/sec to 380°/sec.
Three Variable speed (SLOW, NORMAL, TURBO)
Turbo speed is Max 380°/sec with Ctrl key pressed.
•Pan / Tilt speed is inversely proportional to the zoom ratio with the option.
•Maximum speed is 380°/sec when preset command.
•Auto Calibration from 0.1°to 6°(Tilt range is 0°to 180°).
•Programmable user preferences (alarm, preset, title, etc.).
•180°Digital Flip or 90°Auto Flip depended on the model.
•Up to 999 selectable camera addresses (3999 by software setting).
•Multi-language Menu Display, Password Confirmation.
•Function Run menu using DVR without function key (Pattern, SCAN,..)
•Coaxial Communication with Coaxitron of Pelco & Fastrax
•Built-in RS-485/422 receiver driver.
•Optional Clear bubble with black liner (shelter) for concealing the camera.

2
•Optional Tinted Bubble, Indoor & Outdoor pendant housing with heater & blower, Indoor
Flush mount, Parapet mount & Roof Top mount.
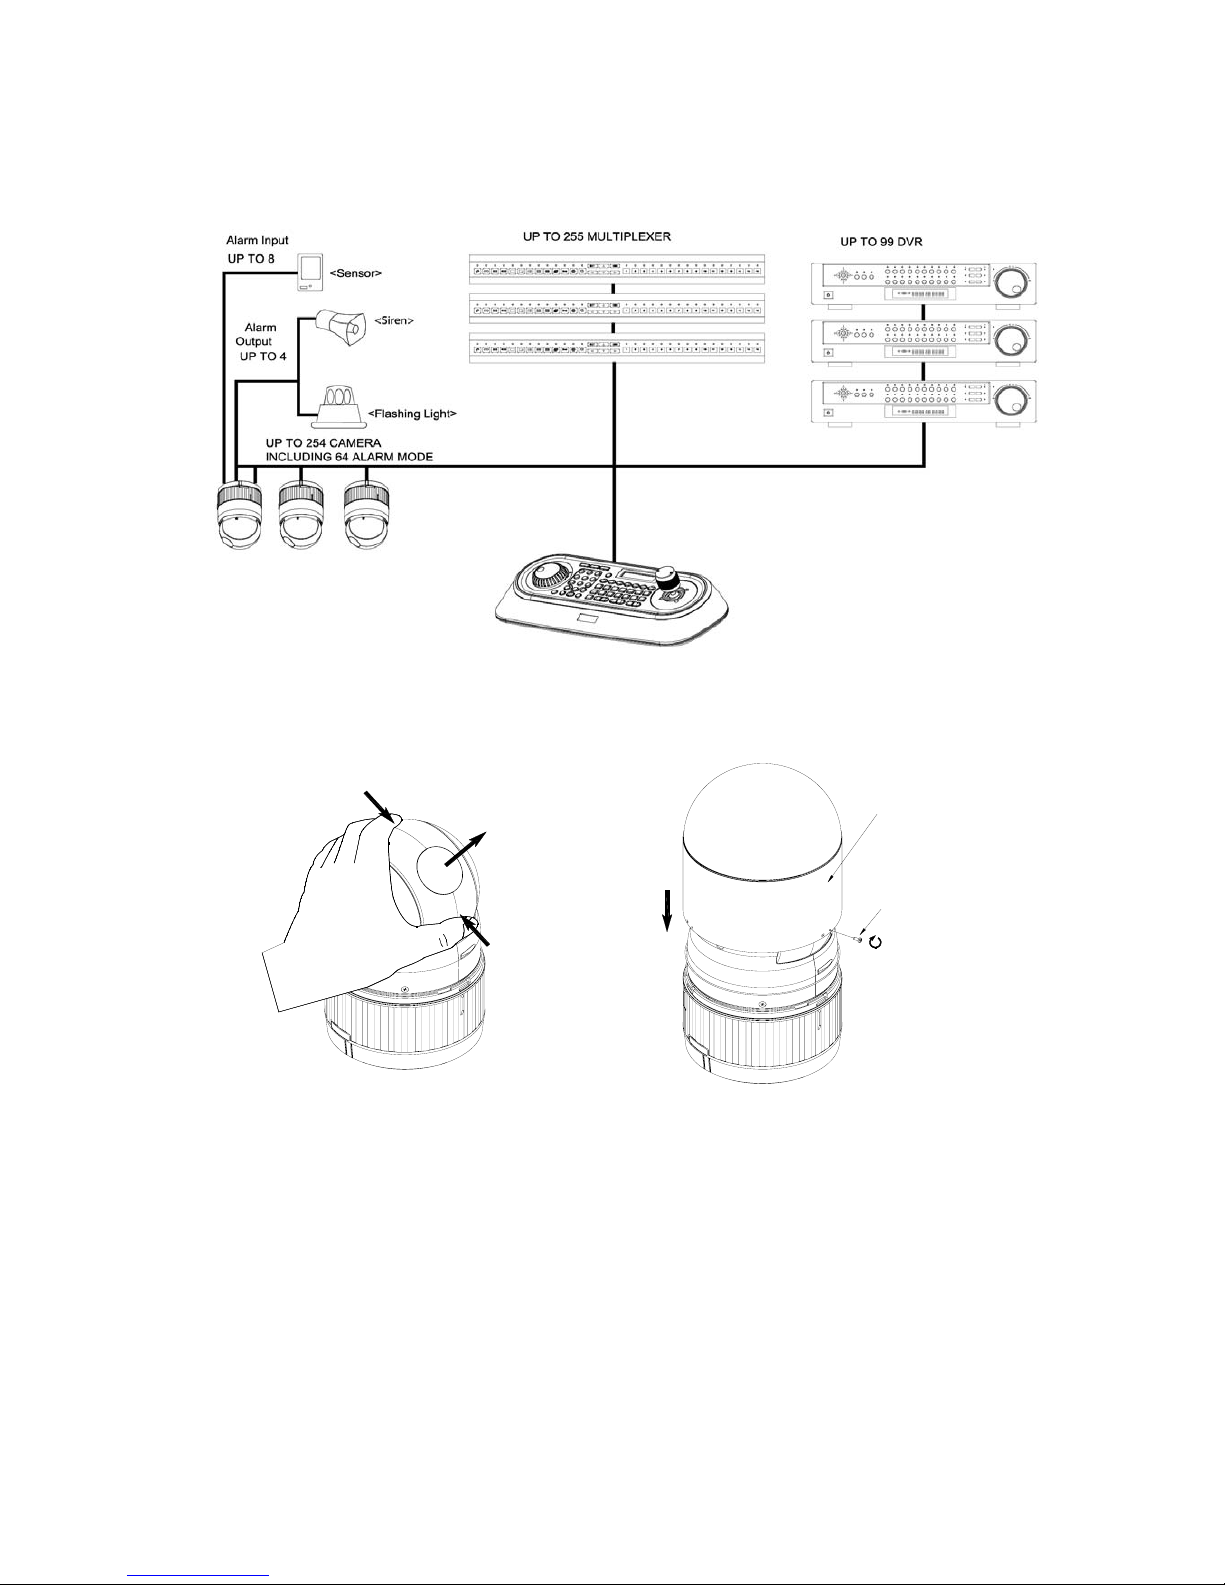
Figure 1 – Typical System Configuration
push
push
remove camera window
remove window assemble bubble ring ass'y
bubble ring ass'y
screw
Figure 2 –Assemble bubble ring ass’y (Optional)
Note : It is recommended to remove camera window for improving picture quality
when you use bubble ring ass’y.
CAUTION : When installing a Fastrax dome on a high pole outside, caution should be
taken to avoid vibration and shaking of Fastrax dome due to windload or
shock of passing heavy vehicles. If pole is not stable enough, it may
cause malfunction in accurate tilt positioning.

3
Chapter 2 — Installation and Configuration
2.1 Package Contents
The package contains the following.
Fastrax IV (Dome Camera) ………………………1
Bubble Ring ………………………1(Optional)
Instruction Manual (This Document) ………………………1
Assembly Screws for Attaching Fastrax IV ………………………3
Plastic Anchor ………………………3
10Pin Connector ………………………1
12Pin Connector ………………………2
CAUTION : Be sure to have caution labels (E version only) on both the body and the
base of the camera. Different version will not support input and output.
The dome camera is for use in surface mounting applications and the mounting surface
should be capable of supporting loads up to 10lb (4.5kg).
The dome camera’s base should be attached to a structural object, such as hard wood,
wall stud or ceiling rafter that supports the weight of the dome camera.
Unlock Lock
Lock BODY
BASE
A
lign extruded tap in the base to
the Keyhole on the pcb in the body
SURFACE(CEILING)
CABLE ENTRY
Figure 3 – Installation

4
2.2 Basic Configuration of Fastrax IV Dome Camera System
Figure 4 – Basic installation diagram
The dome camera must be installed by qualified service personnel in accordance with all
local and federal electrical and building codes. The system should be installed according to
Figures 4 through 9.
Table des matières
Autres manuels Fastrax Caméra de sécurité