Fantech SHR6904 Manuel utilisateur

Light commercial models
Commercial Heat Recovery Ventilators
Installation Manual
Item #: 427685
Rev Date: 2018-02-02
SHR6904 • SHR6905R • SHR8004 • SHR11004 • SHR11005R • SHR14104
Your ventilation system should be installed in conformance with the appropriate provincial requirements or, in the absence of
such requirements, with the current edition of the National Building Code, and / or ASHRAE’s “Good Engineering Practices”.
Fantech reserves the right to modify, at any time and without notice, any or all of its products’ features, designs,
components and specifications to maintain their technological leadership position.
Please visit our website www.fantech.net for more detailed technical information.
United States
10048 Industrial Blvd., Lenexa, KS, 66215
Tel.: 800.747.1762 • Fax: 800.487.9915
Canada
50 Kanalflakt Way, Bouctouche, NB, E4S 3M5
Tel.: 800.565.3548 • Fax: 877.747.8116

2
Note Warning/
Important
note
Information Technical
information Practical tip
PLEASE READ THIS MANUAL BEFORE INSTALLING UNIT
Before installation, careful consideration must be given to how this system will operate if connected to any other
piece of mechanical equipment, i.e. a forced air furnace or air handler, operating at a higher static pressure. After
installation, the compatibility of the two pieces of equipment must be confirmed by measuring the airflows of the
Heat / Energy Recovery Ventilator. It is always important to assess how the operation of any HRV/ERV may inter-
act with vented combustion equipment (i.e. Gas Furnaces, Oil Furnaces, Wood Stoves, etc.).
Never install a ventilator in a situation where its normal operation, lack of operation or partial failure may result
in the backdrafting or improper functioning of vented combustion equipment!!!
Products are designed and manufactured to provide reliable performance, but they are not guaranteed to be 100%
free of defects. Even reliable products will experience occasional failures, and this possibility should be recognized
by the user. If these products are used in a life support ventilation system where failure could result in loss or injury,
the user should provide adequate back-up ventilation, supplementary natural ventilation or failure alarm system, or
acknowledge willingness to accept the risk of such loss or injury.
Your ventilation system should be installed in accordance with the local building code that is in effect. In absence
of such requirements, it is recommenced to check with local authorities having jurisdiction in your area prior to
installing this product.

3
Understanding Fantech Product Numbers
SHR 6904
S = Side Ducting
H = Heat Recovery
R = Remote Control Option
690 = 690cfm @0.4 W.G
4 = Four Ports
5 = Five ports
R = Recirculation
Table of content
INSTALLATION
Location ...........................................................................4
Port Configuration .....................................................................5
Installing Drain Line ....................................................................5
Installing Duct Connections...............................................................6
AIRFLOW BALANCING ........................................................................7
Bypass Module (BPM)
Installing the BPM .....................................................................8
INSTALLATION EXAMPLES
Fully Dedicated Systems.................................................................9
Partially Dedicated Systems (direct connections) ...............................................9
Partially Dedicated Systems (indirect connections) .............................................10
Simplified Installation ..................................................................10
MODES OF OPERATION .......................................................................11
Speed Setting .......................................................................12
LOW VOLTAGE CONTROL SYSTEMS ..............................................................13
MAINTENANCE .............................................................................14
ELECTRICAL CONNECTIONS
SHR 6904 / SHR8004 / SHR11004 / SHR14104 .............................................15
SHR6905R / SHR11005R ..............................................................16
INSTALLATION VERIFICATION TEST
SHR 6904 / SHR8004 / SHR11004 / SHR14104 .............................................18
SHR6905R / SHR11005R ..............................................................19
PARTS LISTS
SHR6904 ..........................................................................41
SHR6905R.........................................................................42
SHR8004 ..........................................................................43
SHR11004 .........................................................................44
SHR11005R........................................................................45
SHR14104R........................................................................46

4
Installation
Location
The HRV must be located in a heated space where it will be possible to conveniently service the unit. Typically the HRV would be located in the
mechanical room, above a drop ceiling or an area close to the outside wall where the weatherhoods will be mounted. Attic installations are not normally
recommended due to extreme temperatures, and difficulty in performing required service & maintenance. If an attic is selected, special care should be
taken in ensuring the unit will perform as intended. Unit may need to be protected with insulated shelter, built on site.
Connecting appliances to the HRV It is not recommended, including:
• clothes dryer
• kitchen exhaust hoods
• combustion venting
• central vacuum system
These appliances may cause lint, dust or grease to collect in the HRV , damaging the unit.
Connecting any of these type of appliances to the HRV will invalidate your warranty
A
B
C
DE
F
G
Model A B C D E F G
Kg lbs Kg lbs in. mm. Kg lbs Kg lbs Kg lbs in. mm.
SHR 6904/6905R 23.8 22.5 22.5 49.6 15.4 390 85 187 20 44 18.8 41.3 17.6 448
SHR 8004 20 44 17 37.5 15.9 404 71.5 158 19 41.9 16.5 36.4 11 282
SHR 11004/11005R 30.4 67 27 60 21.4 544 109 241 27.7 61 24.3 53.5 18 455
SHR 14104 29.2 64.4 24.5 54 19 483 116 255 30 66.2 34.7 76.5 10 254

5
Installing Drain Line
Through normal operation and including defrost mode, the HRV may produce some condensation. This water should flow into a nearby drain, or be taken
away by a condensate pump. The HRV and all condensate lines must be installed in a space where the temperature is maintained above the freezing
point. A “P” trap should be made in the drain line. This will prevent odors from being drawn back up into the unit.
Install the drain hose, making a “P” trap
Port configuration
The unit has access doors on the front and back. Also, the main control panel may be moved from front to back allowing for ducting layout.
SHR 6904, SHR 6905R, SHR 11004, SHR 11005R
COLD SIDE
COLD SIDE
WARM SIDE
WARM SIDE
SHR 8004, SHR 14104
WARM SIDE
WARM SIDE COLD SIDE
COLD SIDE
Factory Setting. Unit may be easily reversed
in eld.
Factory Setting. Unit may be easily reversed
in eld.

6
Installing ducts going to / from outside
Installing the ducting to the weatherhoods
Outside weatherhoods
The weatherhoods must have built-in "bird" screens with 1/4 inch (6.35 mm) minimum mesh to prevent birds and rodents from entering into the
ductwork. Do not use smaller mesh as it will be very susceptible to plugging up. The preferred location of the weatherhoods is:
• No less than 10 ft. (3 m) apart from each other.
• At least 18 inches (457.2 mm) above snow line or ground level.
• Supply hood must be kept away from sources of contaminants, such as automobile exhaust fumes, gas meters, garbage cans, containers,
cooling towers, tar roofs, etc.
• Avoid prevailing winds, whenever reasonably possible.
The outside perimeter of the weatherhood must be sealed to prevent leakage into the building.
The design and size of the weatherhoods or louvers chosen by the installer must allow for adequate free area. Water and snow penetration of the system
is minimized when the airflow does not exceed 1000 FPM (5.08 m/s) free area velocity.
Ducting from the weatherhoods–To and From the hrv
Galvanized sheet metal ducting with sufficient cross section with an integral single piece of insulated wrap with vapor barrier should be used to connect
the HRV to the weatherhoods. The R-value of the insulation should be adequate for condensation control. Insulated flex duct may be used in moderation,
if sized and installed properly. (Consult local codes)
All ducts should be sealed using a good bead of high quality caulking (preferably acoustical sealant) and a high quality aluminum foil tape, or other
approved duct sealant.

7
Exhaust air ducting
The stale air exhaust system is used to draw air from the points in the building where the worst air quality problems occur. ( See installation
examples in the manual.)
Installing ducts to / from inside
Direct connection to furnace/ air handler return duct
• Should you wish to hard duct the supply air directly into the cold air return of the HVAC systems, remember to check the airflow balance of the HRV
with the HVAC systems fan both “on”and “off” to determine that it does not imbalance the HRV more than 10%. Make sure you respect the minimum
distance from the supply air in of the HRV and the HVAC systems.
• It may be necessary to install a separate fresh air supply ductwork system if the heating is other than forced air.
When installing an HRV, the designer and installer should be aware of local codes that may require smoke detectors and/or firestats in the HVAC
or HRV ductwork.
Because an HRV is designed to bring fresh air into the building, structures may require supply voltage interrupt when smoke or flame sensors are
triggered, or when a central fire alarm system is activated.
To maximize airflow in the ductwork system, all ducts should be kept short and have as few bends or elbows as possible. Forty-five degree are
preferred to 90elbows. Use “Y” tees instead of 90elbows whenever possible.
All duct joints must be fastened with screws or duct sealant and wrapped with a quality duct tape to prevent leakage. Aluminum foil duct tape is
recommended.
Supply air ducting
In buildings without a forced air HVAC systems, fresh air should be supplied to all habitable areas. It should be supplied from high wall or ceiling
locations. Grilles that diffuse the air comfortably such as grille {MGE (metal) or CG (plastic)}grilles with "coanda effect" are recommended.
Optional inline duct heaters may be used to add heat if required.
AThe duct’s airflow velocity
is generally measured
with a magnehelic gauge
and a pitot tube.
• To avoid airflow turbulence
and incorrect readings, the
airflow velocity should be
measured on steel ducting
a minimum of 3 duct
cross-sections from the
unit or elbow and before
any transition.
• The balancing procedure consists of measuring the exhaust air leaving the system and the supply air entering the system and ensuring that these
two are equal. A deviation of 10% or less is acceptable.
Airflow balancing
A*
Pitot tube and gauge
A professional air balancer should be contacted to commission the system properly. A skilled HVAC Tech may complete the balance
of air providing they possess the proper equipment. Call Fantech Technical support for assistance.

8
Installing BYPASS Module (BPM) - SHR6905R/SHR11005R
Kit content
• 1x BPM assembly
• 1x bracket "A"
• 2x bracket "B"
• 10x Screws
• 1x black extension wire*
• 1x red extentson wire*
* Only used when electrical box is
reversed
Bracket "A"
Bracket "B"
Figure 1
Bracket "B" Installed
Figure 2
Bracket "A Installed
Figure 3
BPM Tilted
Figure 4
BPM Fastening
Figure 5
Bracket "B" tightened
1. Loosely fasten both
brackets “B” to cabinet
using screws in the pilot
holes (Fig. 1). Don’t drive
the screw all the way;
leave about ¼” of thread
for the step 4.
2. Using the same screw
already on the unit,
assemble bracket “A” on
the cabinet (Fig. 2).
3. Install BPM by tilting it
(Fig. 3) so that the hole
on the mounting bracket
“A” lines up with the
pilot hole on top of the
BPM. Secure it with the
fastener and release
the BPM. The tilting
will enable the hole to
line up properly and will
compress the gasket
once released.
4. Assemble the remaining fasteners to secure the BPM
(Fig. 4). Continue to tighten the fasteners holding the
bracket “B” to cabinet in order to compress the gasket
between the BPM and the cabinet (Fig. 5).
Figure 6
Insert damper motor wires
through bushing
Figure 7
HCE Controller, showing "N.O."
terminal location and "C" terminal
location
5. Next route the damper motor wires through the plastic bushing (Fig.6) of
the electrical box and run the wires to the HCE controller on the terminal
marked “N.O.” in the eld marked “DAMPER” and on the terminal marked “C”
in the eld marked “24VAC”. (Fig. 7)
9
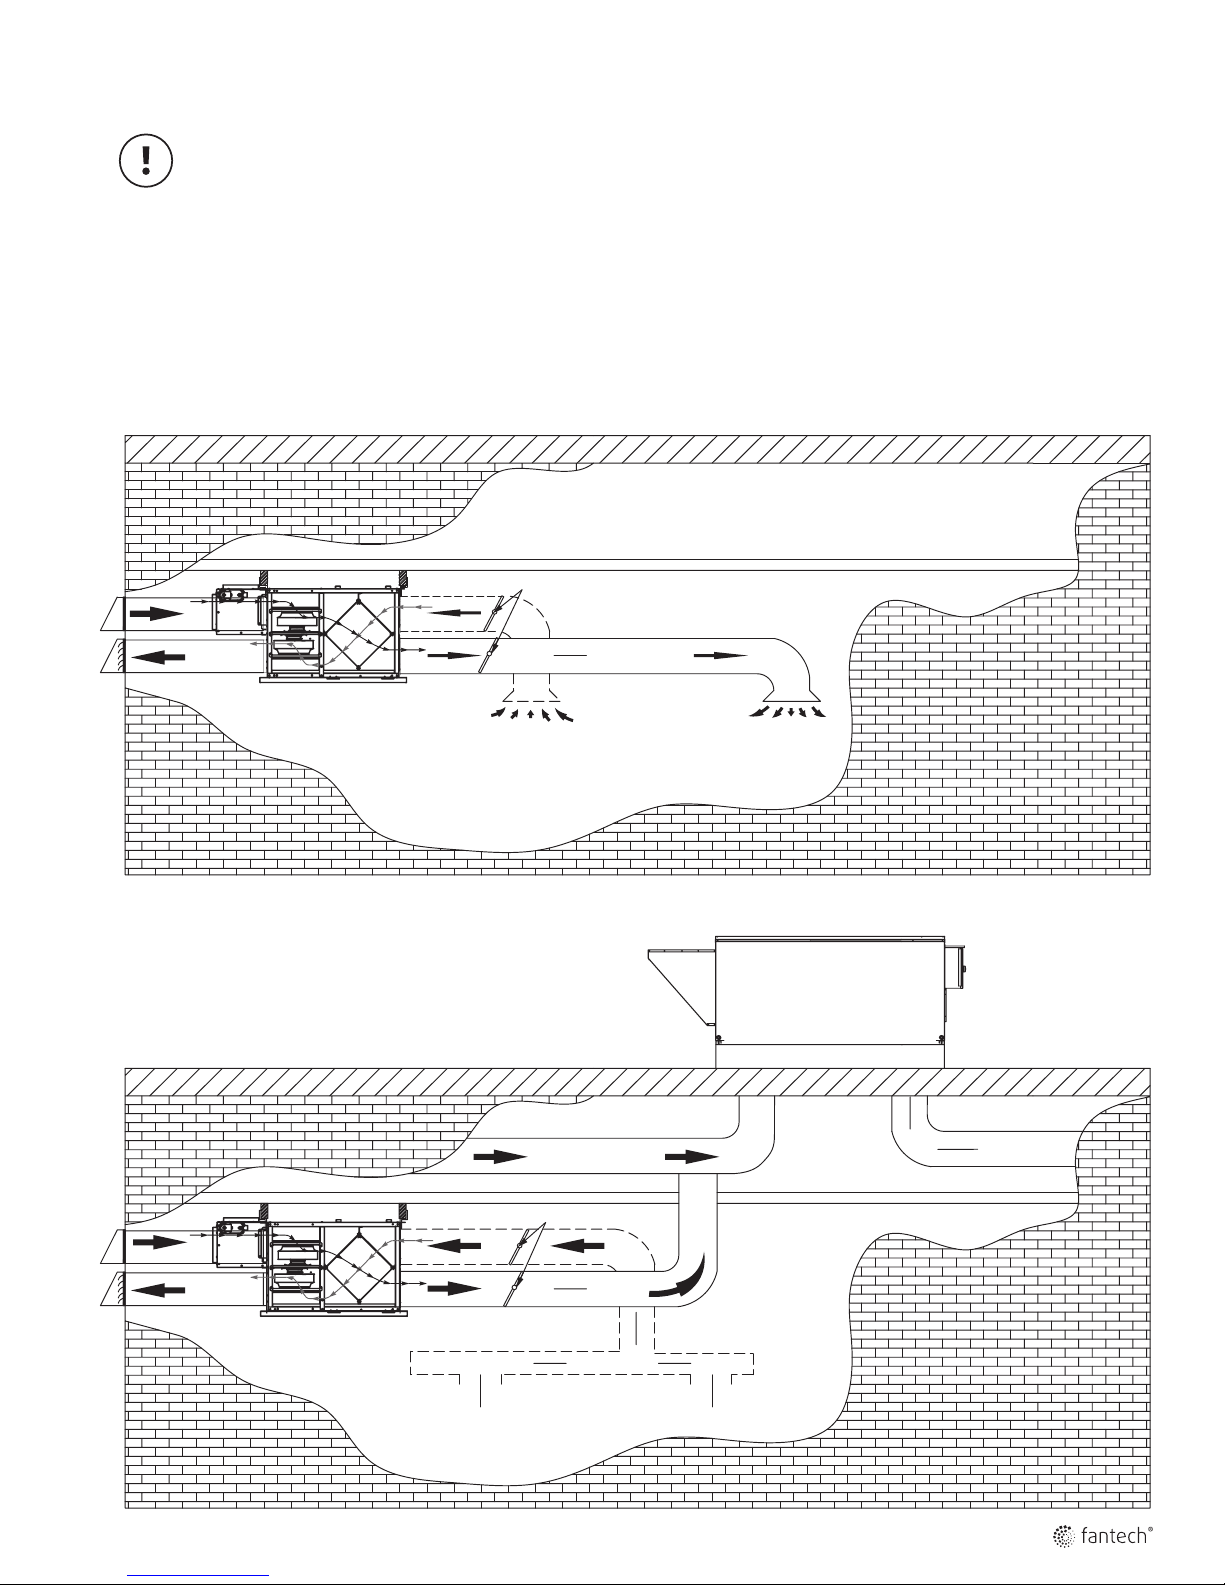
Installation examples
* Drawings are illustrations only and actual port locations and airflow directions may vary, consult unit spec sheets.
It is the responsibility of the installer to ensure all ductwork is sized and installed as designed to ensure the system will perform as intended.
The amount of air (CFM) that an HRV will deliver is directly related to the total external static pressure (E.S.P.) of the system. Static pressure
is a measure of resistance imposed on the blower by length of duct work/number of fittings used in duct work, duct heater etc.
Fully Dedicated System
• Stale air drawn from areas of contamination
• Fresh air supplied to main areas
• HRV airflow should be balanced
• External heating or cooling coil may be needed if air is not able to mix comfortably.
SUPPLY IN
EXHAUST OUT
HRV UNIT
SUPPLY DUCT
RETURN AIR DUCT
EXHAUST AIR TO HRV UNIT
AIR HANDLER UNIT
SUPPLY IN
BALANCING DAMPERS
SUPPLY IN
EXHAUST OUT
HRV UNIT
SUPPLY IN
BALANCING DAMPERS
Partially Dedicated System (Direct Connection)
• Stale air drawn from areas of contamination
• Fresh air supplied to return of air handler
• Air Handler blower may need to operate when call for ventilation
• HRV airflow should be balanced

10
Installation examples (Cont'd)
* Drawings are illustrations only and actual port locations and airflow directions may vary, consult unit spec sheets.
It is the responsibility of the installer to ensure all ductwork is sized and installed as designed to ensure the system will perform as intended.
The amount of air (CFM) that an HRV will deliver is directly related to the total external static pressure (E.S.P.) of the system. Static pressure
is a measure of resistance imposed on the blower by length of duct work/number of fittings used in duct work, duct heater etc.
SUPPLY IN
EXHAUST OUT
HRV UNIT
RETURN AIR DUCT
AIR HANDLER UNIT
SUPPLY IN
BALANCING DAMPERS
SUPPLY IN
EXHAUST OUT
HRV UNIT
SUPPLY DUCT
EXHAUST AIR TO HRV UNIT
12" BREATHER SPACE
CEILING RETURN AIR PLENUM
AIR HANDLER UNIT
SUPPLY IN
BALANCING DAMPERS
Simplified Installation
• Stale air drawn from return of air handler
• Fresh air supplied to return of air handler, further down
stream of HRV exhaust
• Air Handler blower must operate when HRV is providing
ventilation
• HRV airflow should be balanced
Partially Dedicated System (Indirect Connections)
• Stale air drawn from areas of contamination
• Fresh air supplied into ceiling return air plenum or grille
• HRV airflow should be balanced
Ce manuel convient aux modèles suivants
5
Table des matières
Langues :
Autres manuels Fantech Ventilation