Fancom AURA 70 Manuel utilisateur

g

N.B.: The original, authentic version of this manual is the English version produced by Fancom B.V. or one of its
daughter companies (referred to further as Fancom). Any modifications introduced to this manual by third parties
have neither been checked nor approved by Fancom. Modifications are taken by Fancom to include translations
into languages other than English and the insertion and/or deletion of text and/or illustrations to/from the original
contents. Fancom cannot be held liable for any damages, injury, guarantee claims and other claims relating to this
type of modification, in as far as these modifications result in a content that differs from the original English
version of this manual produced by Fancom. For the latest information about product installation and operation,
please contact the customer service dept. and/or the technical service dept. of the Fancom concerned. In spite of
the care taken when compiling this manual, if you should discover any errors, please inform Fancom B.V. in
writing. Fancom B.V., PO Box 7131, 5980 AC Panningen (the Netherlands).
Copyright © 2017 Fancom B.V.
Panningen (the Netherlands)
All rights reserved. Nothing from this manual may be copied, distributed or translated into other languages, partly
or wholly, without express prior written permission from Fancom. Fancom reserves the right to modify this manual
without notice. Fancom can give no guarantee, neither implicit nor explicit, for this manual. All risks are for the
user.
This manual has been compiled with the utmost care. If, however, you should discover an error, please inform
Fancom B.V.
Art.Nr. 5911993
GB170112

Aura 70
Table of contents
i
1. General introduction .................................................................................................................................. 1
1.1 Documentation with the control computer....................................................................................... 1
1.2 How to use this manual .................................................................................................................. 1
1.3 Fancom Sales & Service Center..................................................................................................... 1
1.4 Safety instructions and warnings.................................................................................................... 2
2. Aura 70 ........................................................................................................................................................ 3
2.1 Basic principles of the Aura 70....................................................................................................... 3
2.2 Schematic view for positioning the components............................................................................. 4
2.3 Example time schedule................................................................................................................... 4
3. Using the Aura 70....................................................................................................................................... 6
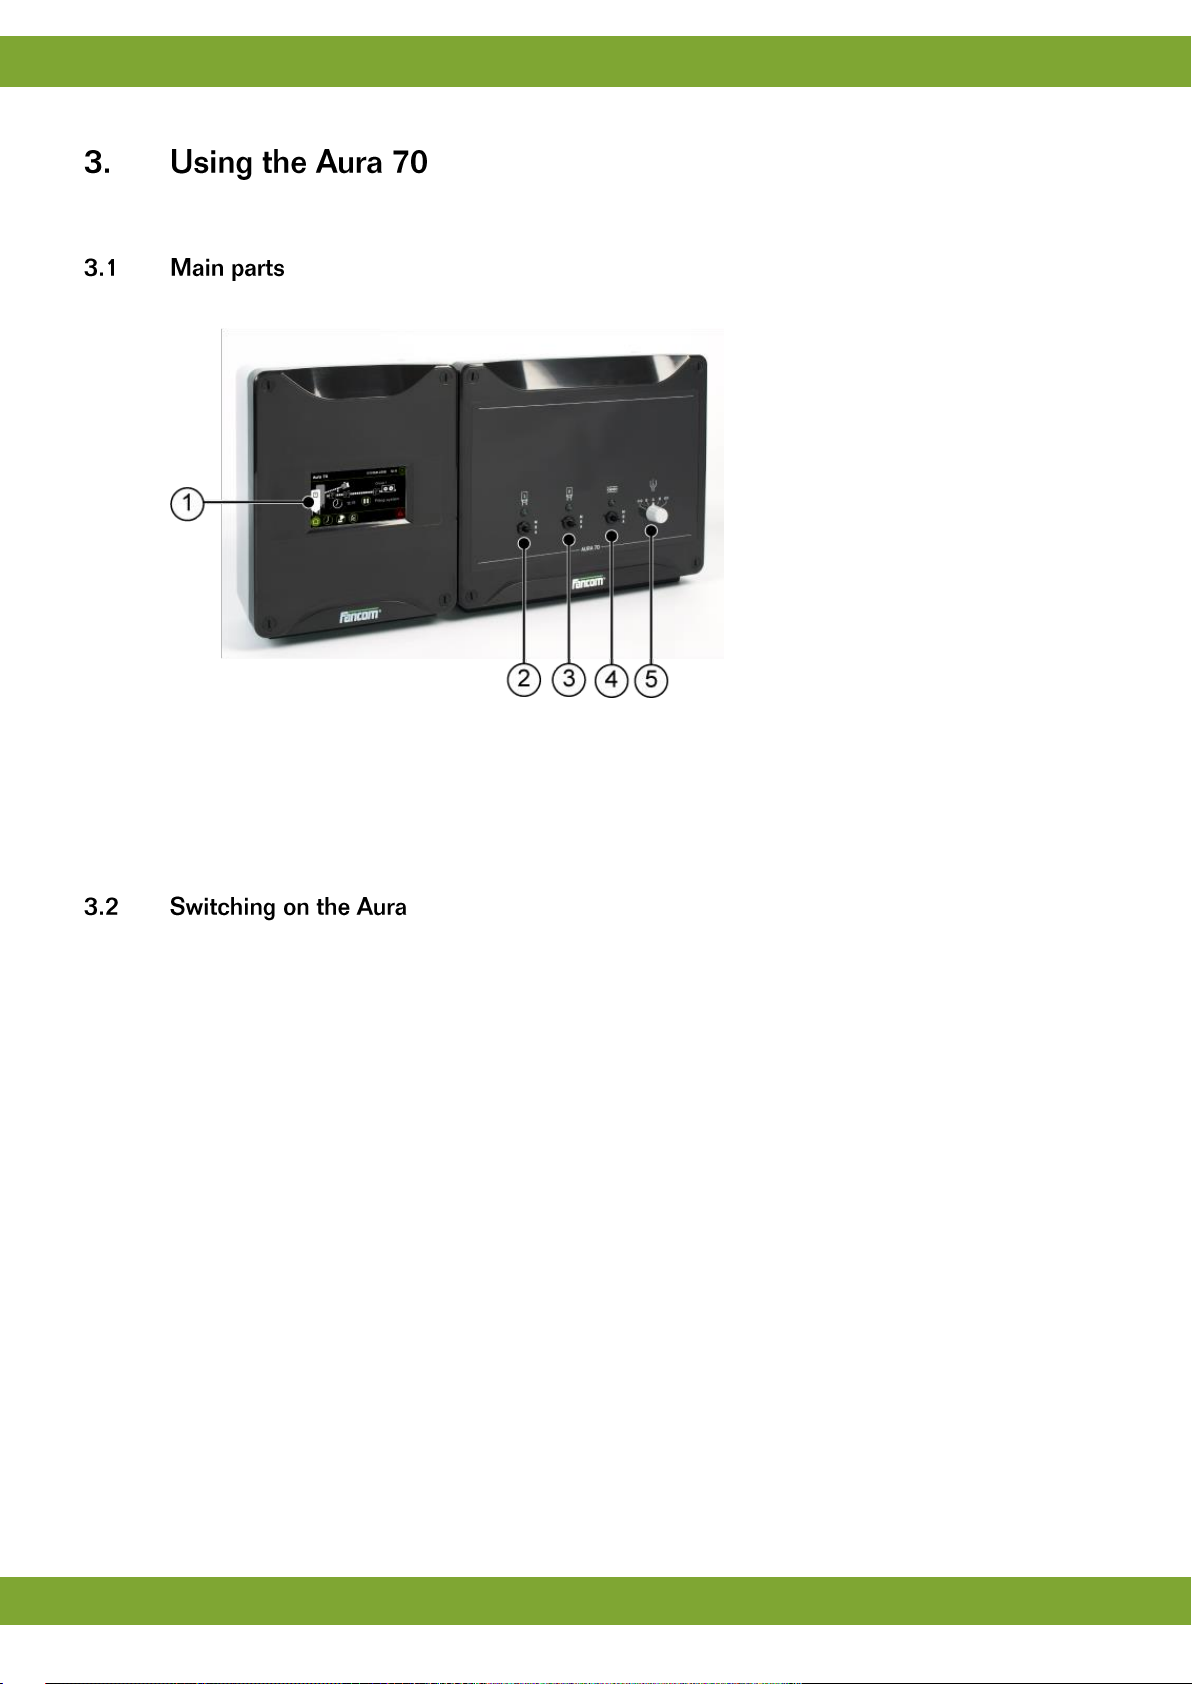
3.1 Main parts....................................................................................................................................... 6
3.2 Switching on the Aura..................................................................................................................... 6
3.3 Working with the Aura .................................................................................................................... 7
4. User settings............................................................................................................................................... 8
4.1 Overview......................................................................................................................................... 8
4.2 Feeding times................................................................................................................................. 8
4.3 Circuit times.................................................................................................................................... 9
4.4 Registration .................................................................................................................................... 9
5. Alarm ......................................................................................................................................................... 10
5.1 Alarm overview............................................................................................................................. 10
5.2 Alarm settings............................................................................................................................... 13
5.3 Alarm history................................................................................................................................. 13
6. Installing the Aura 70 ............................................................................................................................... 14
6.1 Determine location........................................................................................................................ 14
6.2 Mount the Aura 70........................................................................................................................ 14
6.3 Connect the Aura 70..................................................................................................................... 15
6.4 Connect the Aura 70 to FNet........................................................................................................ 16
7. Installer settings....................................................................................................................................... 17
7.1 CFG.............................................................................................................................................. 17
7.2 SYS .............................................................................................................................................. 18
7.3 INS ............................................................................................................................................... 19
8. Technical specifications Aura 70 + Switchbox ...................................................................................... 21
8.1 Interior control computer............................................................................................................... 22
8.2 Interior switch box......................................................................................................................... 22
8.3 Aura board.................................................................................................................................... 23
8.4 FCA Powerboard.......................................................................................................................... 23
8.5 Dosator motor / power supply....................................................................................................... 24
8.6 Silo switch / chain switch.............................................................................................................. 25
9. Appendix: EG-declaration of compliance............................................................................................... 26

Aura 70
General introduction
1
This manual has been created with the utmost care. If, however, you should discover an error, please inform
Fancom B.V.
This manual supplies information about connecting and configuring the control computer and information about
working with the control computer after installation. Always keep the manual close to the control computer.
The following symbols are used in this manual:
Tips and suggestions.
Note providing recommendations and additional information.
Warning indicating damage to the product if you do not follow procedures carefully.
Warning indicating danger to humans or animals.
Electrical shock hazard. Danger to humans and animals.
Example of a practical application of the described functionality.
Calculation example.
Describes the key combinations for arriving at a particular screen.
Decimals
The control computer and this manual use a decimal point in values. For example: a weight is shown as 1.5 kg
(not as 1,5 kg).
For any questions and support, please contact the local Fancom Sales & Service Center.

Aura 70
General introduction
2
Before installing and commissioning the Aura 70, read the safety instructions, provisions and conditions carefully.
This paragraph contains a number of general safety instructions. The installation of the device and remedying of
any malfunctions should be performed by a certified electrical installer according to the applicable norms. The
guarantee does not apply if this product is installed in any other way than is indicated by Fancom and if the
product's motor has been opened and changes have been made to the product.
Disconnect power before installation or before carrying out any maintenance to the control computer.
You must be able to switch off the device using a bipolar main switch.
Take precautions against electrostatic discharge (ESD) when working on the control computer. Ensure
the workplace is clean and dry.
Use the wiring/cables indicated on the connection diagrams and follow all. Only apply power after the
wiring has been connected correctly. Incorrect connections can cause permanent damage. Before a
new fuse is placed, the cause of the defect should be remedied by an authorized installer. Only replace
a defective fuse by a fuse of the same type (see connection diagram).
Inspect the control computer regularly for any damage. Report any damage to your installer
immediately. A damaged control computer is dangerous! Do not use running water (high pressure
cleaners) to clean your control computer. The control computer is water resistant, but not waterproof!
Do not switch off the computer when houses are unoccupied; otherwise there is the risk of
condensation in the computer.
The installation, of which this product is a part, must be equipped with a reliable, independent alarm
system, for example, a minimum/maximum thermostat. We advise you to test the alarm system every
day for proper functioning.
Connect each Fancom device according to the applicable legislation/regulations of the local energy
provider.
Check that the mains voltage and frequency, for which this computer is suitable, correspond to the
mains voltage and frequency on site.
Low-voltage and high-voltage wires may not be placed parallel to each other but may cross each other.
When using metal ducts, Fancom advises grounding the ducts at the ends and at as many other places
as possible.
Connect the computers to one group, from the main distributor.
Keep signal and power cables as short as possible.

Aura 70
Aura 70
3
The Aura 70 is a feed computer especially made for Fancom's EasyFeed feeding system. EasyFeed is a simple
dry feed system based on volume dosing at house level. All the animals are given the same type of feed, no feed
weighing takes place. The EasyFeed system is very flexible and offers the following possibilities:
1. Individual feeding of i.e. sows using dispensers.
2. Feeding of groups of rearers or fatteners using liquid and dry feed troughs is possible.
The Aura 70 has a built-in time clock. The feed system is started externally or automatically at preset times. The
Aura 70 enables to choose whether you will start:
Opening the dispensers: when the filling process starts, the dispensers will open and the feed will fall into
the troughs.
Filling the dispensers: when the filling process starts, the dispensers will be filled first.
The basic components of the feeding system usually include a silo auger and a feed chain drive unit. The
System full sensor on the end of the circuit registers if the system is full and stops filling it. A delay time for the
System full sensor can be set to ensure a successful start of the next feeding cycle, there will be still some feed
before the sensor. The silo augers remains off during this delay time to prevent the system from becoming
overfilled (till the silo switch sensor is free). The Return feed sensor turns on/off the feed intake from the silo
auger. If the Silo switch sensor detects no feed it will turn over to the second silo.
Figure 1: Schematic overview of an Aura 70 system

Aura 70
Aura 70
4
Figure 2: Schematic view for positioning the components
When the option ‘Filling the dispensers’ is chosen, the circuit will be filled first (circuit filling). This method is
usually used with dry or liquid feed troughs but there are also situations using a combination with dispensers. The
chain will start first to dose the feed into the dispensers. After a settable wait time the silo auger starts to filling
the circuit until the feed return sensor detects feed. During the settable wait time sections can be inspected and
dispensers can be adjusted per animal. After the wait time the dispensers will open and the feed will fall into the
troughs (Dispenser run time).
Figure 3: Example of a time schedule by ‘Filling the dispensers’

Aura 70
Aura 70
5
When the option ‘Start with dosator’ is chosen, the dispensers will open and the feed will fall into the troughs
(Dispenser run time). During the settable wait time sections can be inspected and dispensers can be adjusted
per animal. After the wait time the system starts the circuit filling process. The chain will start first to dose the feed
into the dispensers. After a settable wait time the silo auger starts to filling the circuit until the feed return sensor
detects feed.
Figure 4: Example of a time schedule by ‘Start with dosator’

Aura 70
Using the Aura 70
6
This chapter describes the main parts and the operation of the Aura 70.
The Aura 70 can be operated on the touch screen.
1. Touch screen
2. Silo 1 control switch
3. Silo 2 control switch
4. Circuit control switch (automatically switch off in case of a chain break)
5. Dosator control switch
The computer is automatically activated as soon as you switch on the power. The start-up progress is shown on
the screen.

Aura 70
Using the Aura 70
7
The Aura 70 screens are divided in three sections:
1. Title bar: Displays the date and time and provides access to the installation and user menu.
2. Working area: Displays the data user or installation settings of the control computer.
3. Menu selection and alarm bar: Provides buttons to navigate through available menus and an alarm
indicator to navigate to more details.
Only data important to you will appear on your control computer. This has been set in the installation
menus. This chapter explains all the management screens, which may include screens that are
irrelevant in your situation. Skip any sections not of importance to you.
The screen displays the status of a circuit. The circuit parts (sensors and chain) can be active or
inactive. Active parts are displayed green, inactive parts are grey.
The working area provides one action button: .
Table des matières
Autres manuels Fancom Ordinateur de bureau


