Ezee Glow Celestial 36 Manuel utilisateur

Ezee Glow Celestial 36,50,60,72 Electric Fire Range
MZEFTCEL36 MZEFTCEL50 MZEFTCEL60 MZEFTCEL72
OWNERS MANUAL
AC 220-240V, 50Hz 1400-1600W
WARNING
Please read the entire owner’s manual, including all safety information,
before plugging in or using this product. Failure to do so could result in fire,
electric shock, or serious personal injury.
CAUTION
Keep the owner’s manual for future reference. If you sell or give this product
away, make sure this manual accompanies this product.

2
IMPORTANT SAFETY INFORMATION!
WARNING
When using electrical appliances basic precautions should always be followed to reduce the
risk of fire, electric shock and injury to persons, including the following:
⚫Read all instructions before using this heater.
⚫This heater is hot when in use. To avoid burning, do not touch hot surface. If provided, use
handles when moving this heater. Keep combustible materials, such as furniture, pillows,
bedding, paper, clothes, and curtains at least 1 m from the front of the heater and keep them
away from the sides and rear. In order to avoid overheating, do not cover the heater.
⚫Extreme caution is necessary when any heater is used near children or the infirm and
whenever the heater is left operating and unattended.
⚫Always unplug heater when not in use.
⚫Do not operate any heater with a damaged cord/ plug, after the heater malfunctions or has
been damaged in any manner. Return heater to authorized service facility for examination,
electrical/ mechanical adjustment, and repair.
⚫Indoor use only, do not use outdoors.
⚫This heater is not intended for use in bathrooms, laundry areas or similar indoor locations.
Never locate heater where it may fall into a bathtub or other water container.
⚫Do not run cord under carpeting. Do not cover cord with throw rugs, runners, or similar
coverings. Arrange cord away from traffic areas, where it will not be tripped over.
⚫To disconnect heater, turn controls to off, then remove plug from outlet.
⚫Do not insert objects to enter any ventilation or exhaust openings, as this may cause an electric
shock, fire, or damage to the heater.
⚫To prevent a possible fire, do not block air intakes or exhaust in any manner. Do not use on soft
surfaces like a bed, where openings may become blocked.
⚫The heater has hot, arcing parts inside. Do not use it in areas where flammable liquids are
used/ stored.
⚫Use this heater only as described in the manual. Any other use not recommended by the
manufacturer may cause fire, electric shock or injury to persons.
⚫DANGER - HIGH Temperatures may be generated under certain abnormal conditions. Do not
partially or fully cover/ obstruct the front of this heater.
⚫This appliance is not intended for use by persons (including children) with reduced physical/
sensory capabilities or by those with a lack of experience/ knowledge, unless they are provided
with supervision and instruction concerning use of the appliance by a person responsible for
their safety.
⚫CAUTION: In order to avoid a hazard due to inadvertent resetting of the thermal cut-out, this
appliance must not be supplied through an external switching device, such as a timer, or
connected to a circuit that is regularly switched on/ off by the utility.

3

4
Preparation
This product includes a GLASS panel. Use extreme caution when handling. Failure to
do so could result in personal injury or property damage.
Remove all parts and hardware from the carton and place them on a clean, soft, dry surface. Check
the parts list to make sure you have all the parts you need. Please recycle all packaging material at
your local recycling center.
You will need the following tools (not included): Phillips screwdriver.
Parts and Hardware
A –Fireplace
B –Wood Screws
C –Drywall anchors
D- Remote Control
E-Artificial logs
F- Decorative Crystals
G- Charred wood pieces
H –Fuel-bed tray
I- ‘L shape’metal bracket
J- Instruction Manual

5
Specification and Dimension
PRODUCT DIMENSIONS
Model Number
A
B
C
D
E
F
G
MZEFTCEL36
36.6"
93cm
19.1"
48.4cm
7.9"
20cm
35.5"
90.2cm
18.3"
46.56cm
10.1"
25.61cm
36.4"
92.57cm
MZEFTCEL50
50"
127cm
19.1"
48.4cm
7.9"
20cm
48.9"
124.2cm
18.3"
46.56cm
10.1"
25.61cm
49.8"
126.57cm
MZEFTCEL60
60"
152.4cm
19.1"
48.4cm
7.9"
20cm
58.9"
149.6cm
18.3"
46.56cm
10.1"
25.61cm
59.8"
151.97cm
MZEFTCEL72
72"
182.8cm
19.1"
48.4cm
7.9"
20cm
70.9"
180cm
18.3"
46.56cm
10.1"
25.61cm
71.8"
182.37cm
Installation Overview
Your appliance facilitates three different installation configurations: three-sided, two-sided, and
single-sided.

6
Three-sided installation
•
Glass exposed on front, left, AND right sides.
•
Appliance is fully recessed into the wall with
both sides open.
•
See pages 9 and 10 for more info.
Two-sided installation
•
Glass exposed on front AND left OR right sides.
•
Appliance is fully recessed into the wall with
one side open.
•
See pages 9 and 10 for more info.
Single-sided installation
•
Glass exposed on front ONLY.
•
Appliance is fully recessed into the wall.
•
See pages 9 and 10 for more info.

7
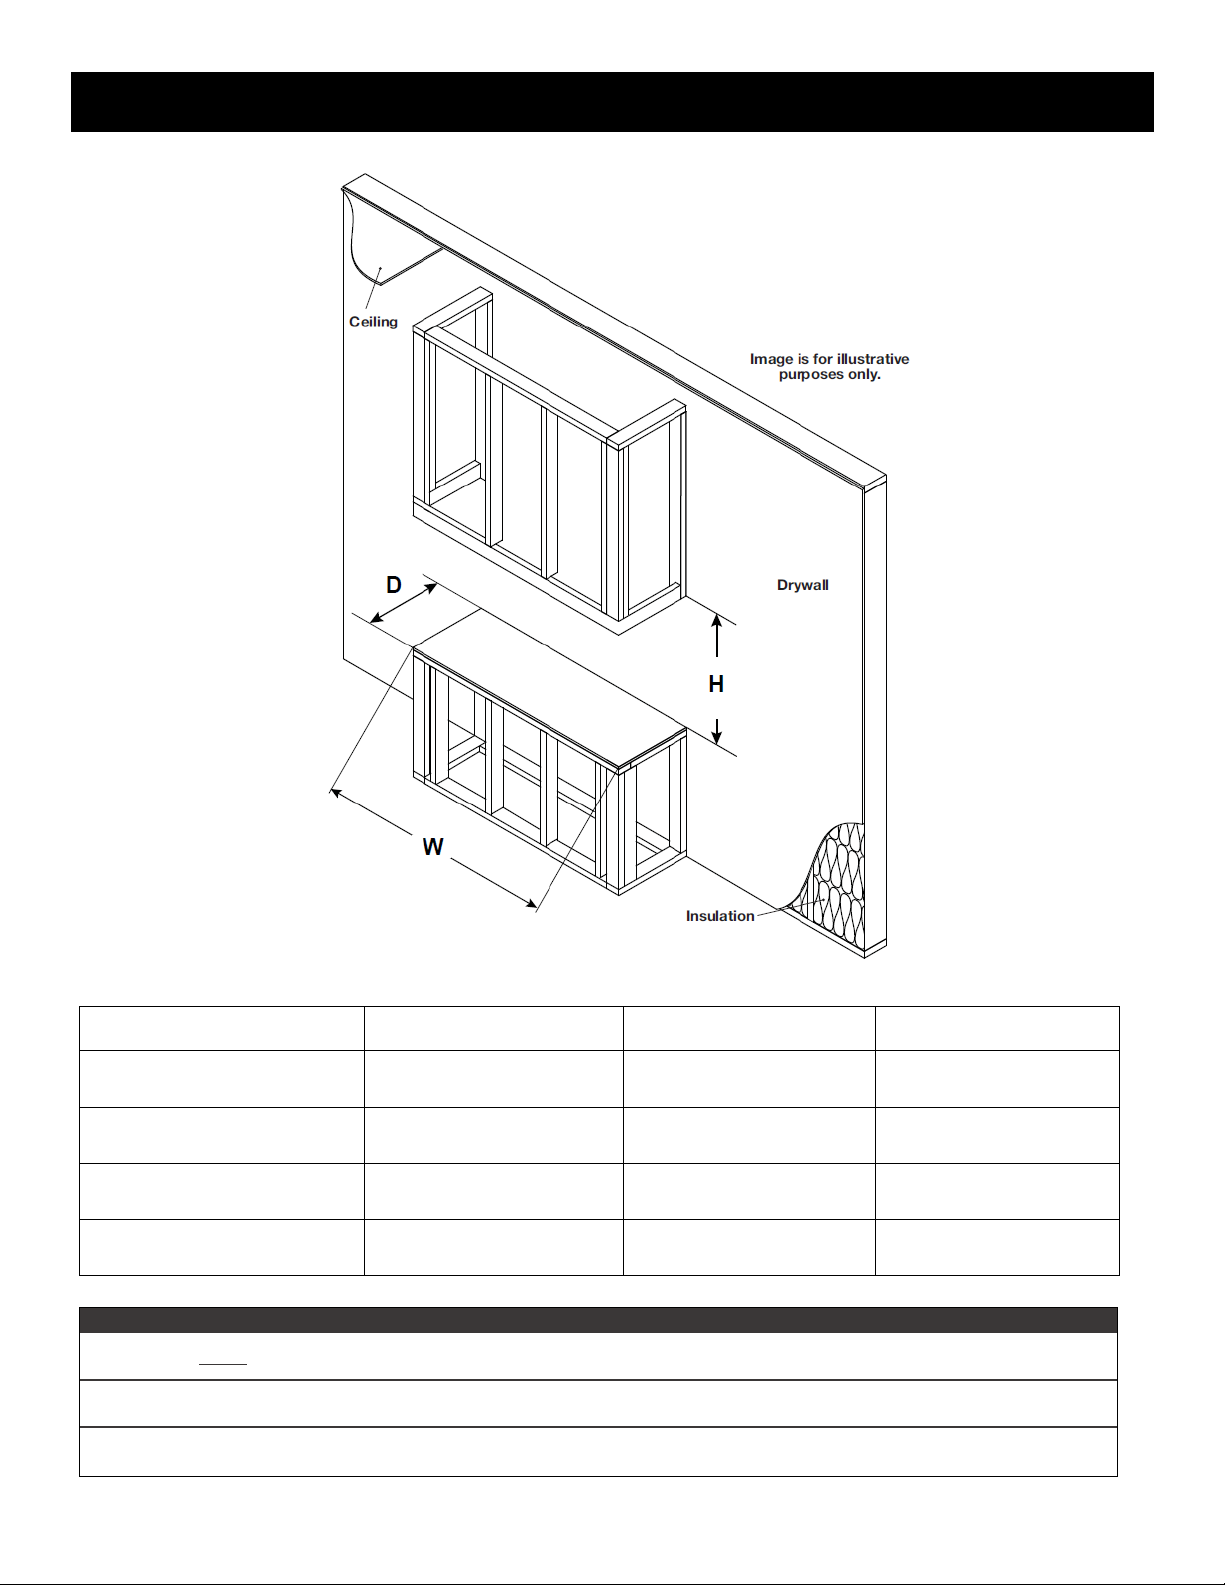
Installation / Minimum Clearance
Your appliance is a recessed and/or mantel installed appliance. Select a suitable location that is
not susceptible to moisture build-up. It must be located enough distance away from curtains, furniture
and high traffic areas. See below for more info.
NOTE: Follow all local and national electrical codes.
MINIMUM CLEARANCE TO COMBUSTIBLES
Measurements are taken from the glass front.
Bottom 0" Top 11.8" (300mm) to mantel
Sides 0" Top 11. 8" (300mm) to ceiling
Back 0" Front 36”(1000mm) to vent
MINIMUM MANTEL CLEARANCES
WARNING
WHEN USING PAINT OR LACQUER TO FINISH THE MANTEL, THE PAINT OR LACQUER MUST BE
HEAT RESISTANT TO PREVENT DISCOLOURATION.
8
Installation / Rough Framing
Model Number
W
D
H
MZEFTCEL36
36.6"
9.3cm
8.07"
20.5cm
19.25"
48.9cm
MZEFTCEL50
50"
127cm
8.07"
20.5cm
19.25"
48.9cm
MZEFTCEL60
60"
152.4cm
8.07"
20.5cm
19.25"
48.9cm
MZEFTCEL72
72"
182.8cm
8.07"
20.5cm
19.25"
48.9cm
Note:
Appliance is NOT load-bearing. Carefully consider weight of finishing materials when constructing rough framing.
Ensure installation complies with all local building codes and requirements.
All viewing options (single-sided, two-sided [left or right], and three-sided) use the same framing dimensions.
9
Three-sided, two-sided, and single-sided viewing
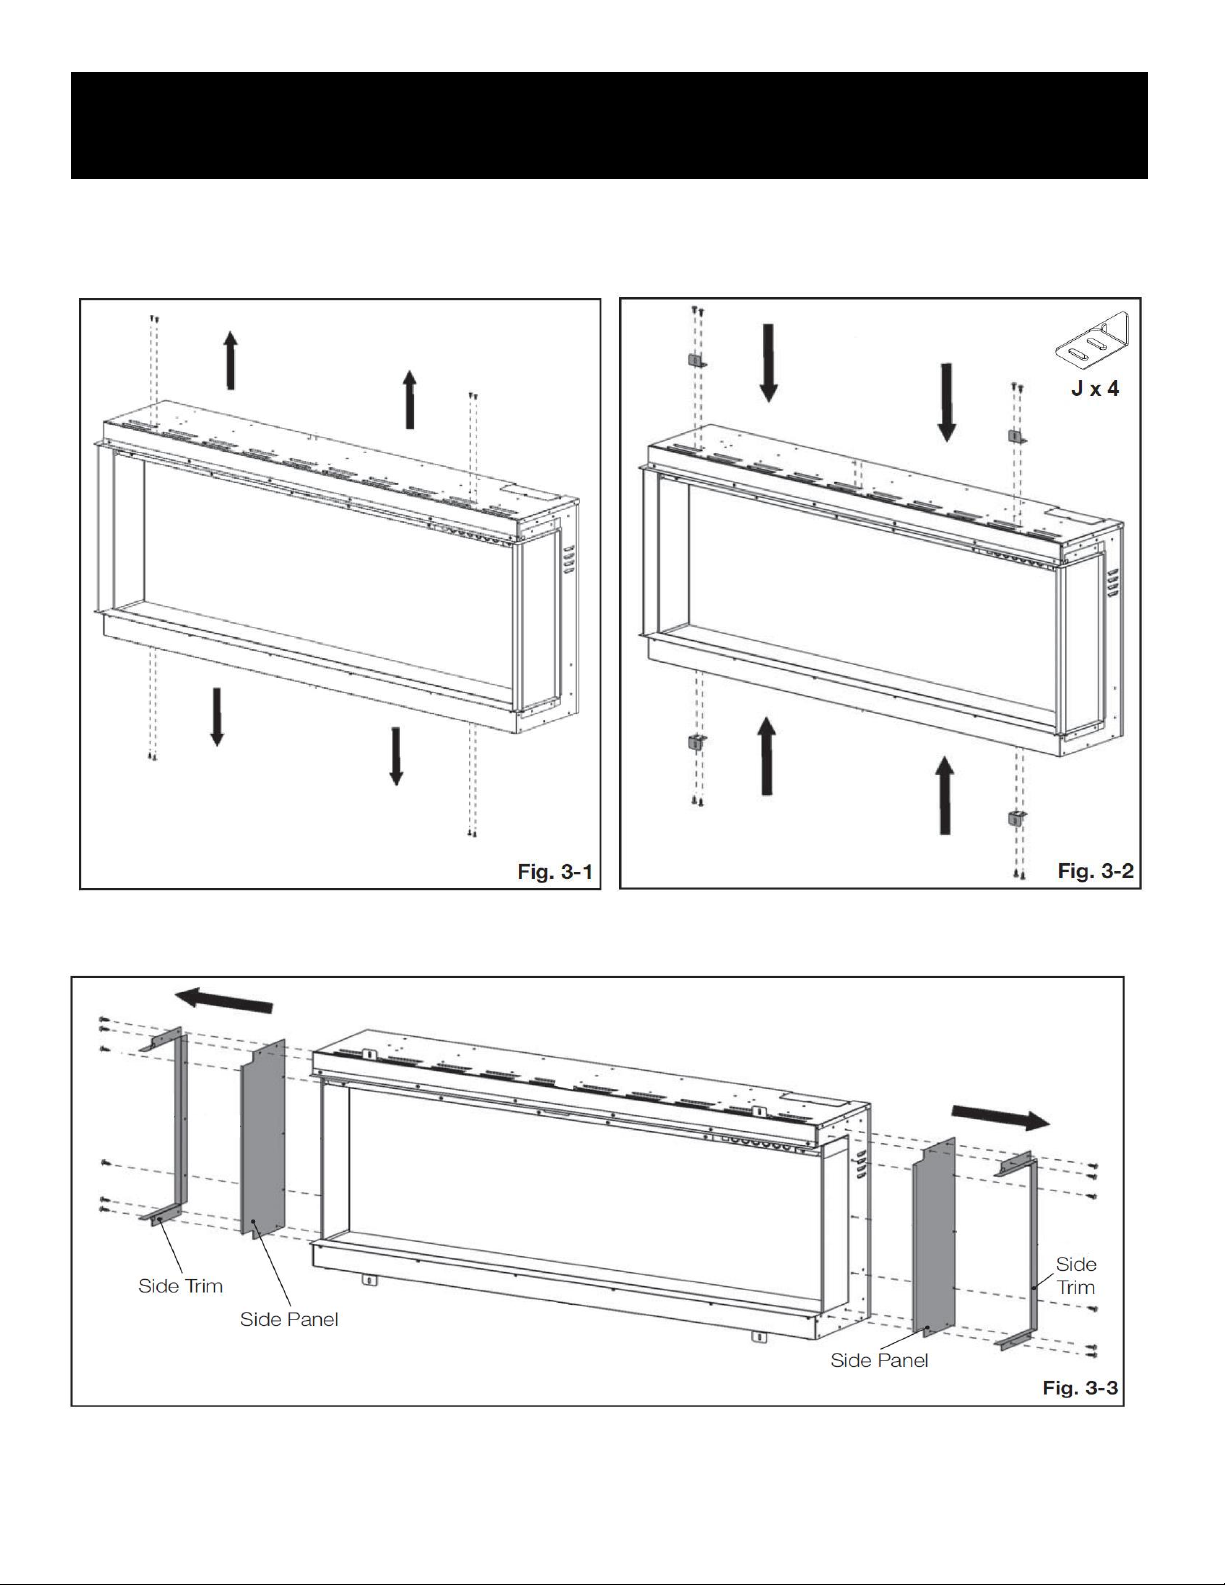
Pre-installation
1.Remove the 8 screws from the top and bottom of the appliance (Fig. 3-1).
2.Install the 4 metal brackets (supplied) using the 8 screws previously removed (Fig. 3-2).
3. Remove the side trims and side panels from both sides of the appliance by removing the 12 screws
(Fig.3-3). Set the side trims, side panels, and screws aside.

10
Three-sided Viewing Installation
1.Re-secure both side trims using the 12 screws previously removed (Fig.3-4).
Two-sided Viewing Installation
1.For desired open side, re-secure the side trim using the 6 screws previously removed (Fig. 3-5).
2.For desired closed side, re-secure the side panel using the 4 screws previously removed (Fig. 3-5).
Note:
When installed with both sides open, the appliance will have a front view, as well as left and right-side views.
Note:
When installed fully recessed into the wall with one side open, the appliance will have a front view and left-
or right-sided view, depending on your desired open side.
Autres manuels pour Celestial 36
1
Ce manuel convient aux modèles suivants
8
Table des matières
Autres manuels Ezee Glow Cheminée intérieure


