Dualsky Hornet 460 Manuel utilisateur

Instruction Manual · 使用说明
Hornet460
EN CN
Hornet 460 ARF
Vol.2 · 21001-2

- 2 -
Thank you Thank you for selecting the Hornet 460 from Dualsky! This kit is designed to be fun to fly and uses top
quality parts for durability and performance. This instruction manual you are reading was designed to be
easy to follow, yet thorough in its explanations. Dualsky wants you to enjoy the performance and experience
of using our products. If you have come across any problems or require further assistance, contact us or
one of our international distributors and we will do our very best to help you.You can also contact us on the
internet at www.dualsky.com
· This is a high performance R/C kit, and it requires regular maintenance for best performance. If you don't do regular maintenance the
performance will suffer. Dualsky has all the necessary parts and accessories available to keep your aircraft performing at its best.
The caution or attention symbols will warn you about steps that can be very dangerous.
Please read and understand the instructions carefully before proceeding.
!Caution
警告
Failure to follow these instructions
can damage your kit, and cause
serious bodily injury or death. !Attention
注意
Failure to follow these instructions
can cause injury to yourself or
others. You might also cause
property damage or damage your kit.
!Caution
警告
Before Flying
·Please read manual with parent or guardian (responsible adult).
·Turn ON transmitter first, and then turn ON the receiver. This will prevent the aircraft from losing control.
Before Operating
·Make sure that all screws and nuts are properly tightened.
·Always use fully charged batteries in your transmitter and receiver to avoid losing control of the model.
·Make sure no one else is using the same radio frequency that you are using.
·Please confirm the range of the radio operation.
During Flying
·Please do not fly in a public area, this could cause serious accidents, personal injuries and/or property damage.
·Please do not fly near pedestrians or small children.
·Please do not fly in small and confined areas.
After Flying
·Turn OFF receiver first, then turn OFF transmitter. This will prevent the aircraft from losing control.
Battery Safety
·Please be careful when handling the battery. It could be hot after running. As part of a regular maintenance
routine, be sure to check all wiring including battery wire and terminals.

- 3 -
感谢您 感谢您选择双天的Hornet 460!这款套件力求让您体验到飞行的乐趣,在设计时我们选用顶级材料与配件以保证
最佳的可靠性和飞行表现。您正在阅读的这份使用说明力求通过简单易懂的描述让您对本产品有一个全面细致的了解。
我们希望您能够喜欢我们的产品。如果您在使用过程中遇到问题,或者需要一些帮助来完成某一步骤,请您致电我们
公司,我们会竭诚为您服务。您也可以通过我们公司的网站(www.dualsky.com)来联系我们。
·这是一款高性能的遥控模型套件,它需要一定的常规维护来使其保持在最佳状态。如果您不进行常规维护,那么产品的性能将会受到影响。双天
公司提供完备的产品配件及附属装备来保证您的飞行器始终工作在最佳状态下。
警告及注意事项符号将会提醒您哪些安装或使用步骤会变得十分危险。
请在操作前仔细阅读并完全理解这些说明。
!Caution
警告
未能按照说明操作将会损坏您的套件,
并会造成严重的身体伤害甚至死亡。 !Attention
注意
未能按照说明操作将会伤害到您或他人。
您也有可能会造成财产损失或损坏到您
的套件。
!
Caution
警告
在飞行前
· 请与父母或监护人(能够负责任的成年人)一起阅读本“使用说明”。
· 先打开遥控器的开关,再打开接收机的开关。这可以防止飞行器失控。
在操作前
· 确保所有螺丝和螺帽都已经正确锁紧。
· 总是在遥控器和接收机中使用全新的或完全充电的电池以防止模型失控。
· 确保没有人和您使用相同的遥控频率。
· 请确认遥控距离在遥控器的可操作范围之内。
在飞行中
· 请不要在公共场合飞行,这可能会引起严重的意外事故、人身伤害及财产损失。
· 请不要在行人或儿童附近飞行。
· 请不要在狭小受限的环境中飞行。
在飞行后
· 先关闭接收机的开关,再关闭遥控器的开关。这可以防止飞行器失控。
电池安全
· 请小心使用电池。它在飞行之后会变得很热。如果电池组的接线受到磨损,有可能会短路,
进而引发火灾。作为日常维护工作的一部分,请确保检查电池接线和插头。

- 4 -
Table of Contents
* Visit our website at Dualsky.com to view our updated instruction manual.
Section Contents Page
Thank you
1
2
Equipment Needed
2
3
4
5
6
Packing List
Assembly Instruction
7
8
Configuration
Test Flight
Exploded View
Parts List
Optional Parts List
5
6
8
16
18
20
21
22
目录
* 请访问我们的网站 www.dualsky.com 以获取最新说明书
章节 内容 页码
感谢您
1
2
所需设备
2
3
4
5
6
包装清单
安装指南
7
8
设定与调试
试飞
产品爆炸图
配件清单
选装配件清单
5
6
8
16
18
20
21
22

- 5 -
1Equipment Needed
所需设备
Electronics 电子设备
The Hornet 460 requires the following items to complete: at minimum a 4-channel radio system (we recommend a 6-channel or higher
radio system), Lithium Polymer (LiPo) battery pack (recommend Dualsky 1700-5000mAh 11.1V) and battery charger.
您需要准备一套4通道(或以上的)遥控设备、锂电池组和电池充电器。
Battery Charger
电池充电器
!Caution
警告 If you do not use a charger designed to charge Nickel Metal Hydride / LiPo batteries, the batteries will be damaged.
如果您使用的电池充电器不是专为镍氢和锂电池所设计的,那电池将会被损坏。
Tools
Tools needed for assembly. Sold Separately.
组装所需的工具。需要单独购买。
工具
Allen Wrench
内六角螺丝刀 1.5
mm
M6 Wrench
M6扳手
M3 Wrench
M3扳手
Lipo Battery Pack (11.1V)
锂电池组(11.1V)
*Dualsky 1700-5000mAh Recommended
Transmitter
发射机
Receiver
接收机
Thread Lock
螺丝胶十字螺丝刀(2号)
#2 Philips Head Screwdriver

- 6 -
2Packing List
包装清单
Box A Bottom Case, Canopy and Parts 底壳、头罩和零部件
21007
H460-Upper Deck
H460 二楼板 Assembled Lower Case w/Battery Mount
er
C
安装完成的底壳(带电池安装架) Canopy
头罩
FC430飞控
21021
FC430 Flight Control Unit
21021-1
Double
Sided
Tape
双面胶
21010
H460-Wire Set Battery Patch Battery Fastener
电池魔术贴片
电池紧固带
H460接线套件
FC430接线套件
21022
FC430-Wire Set
Jumper
跳线
2 x
- 7 -
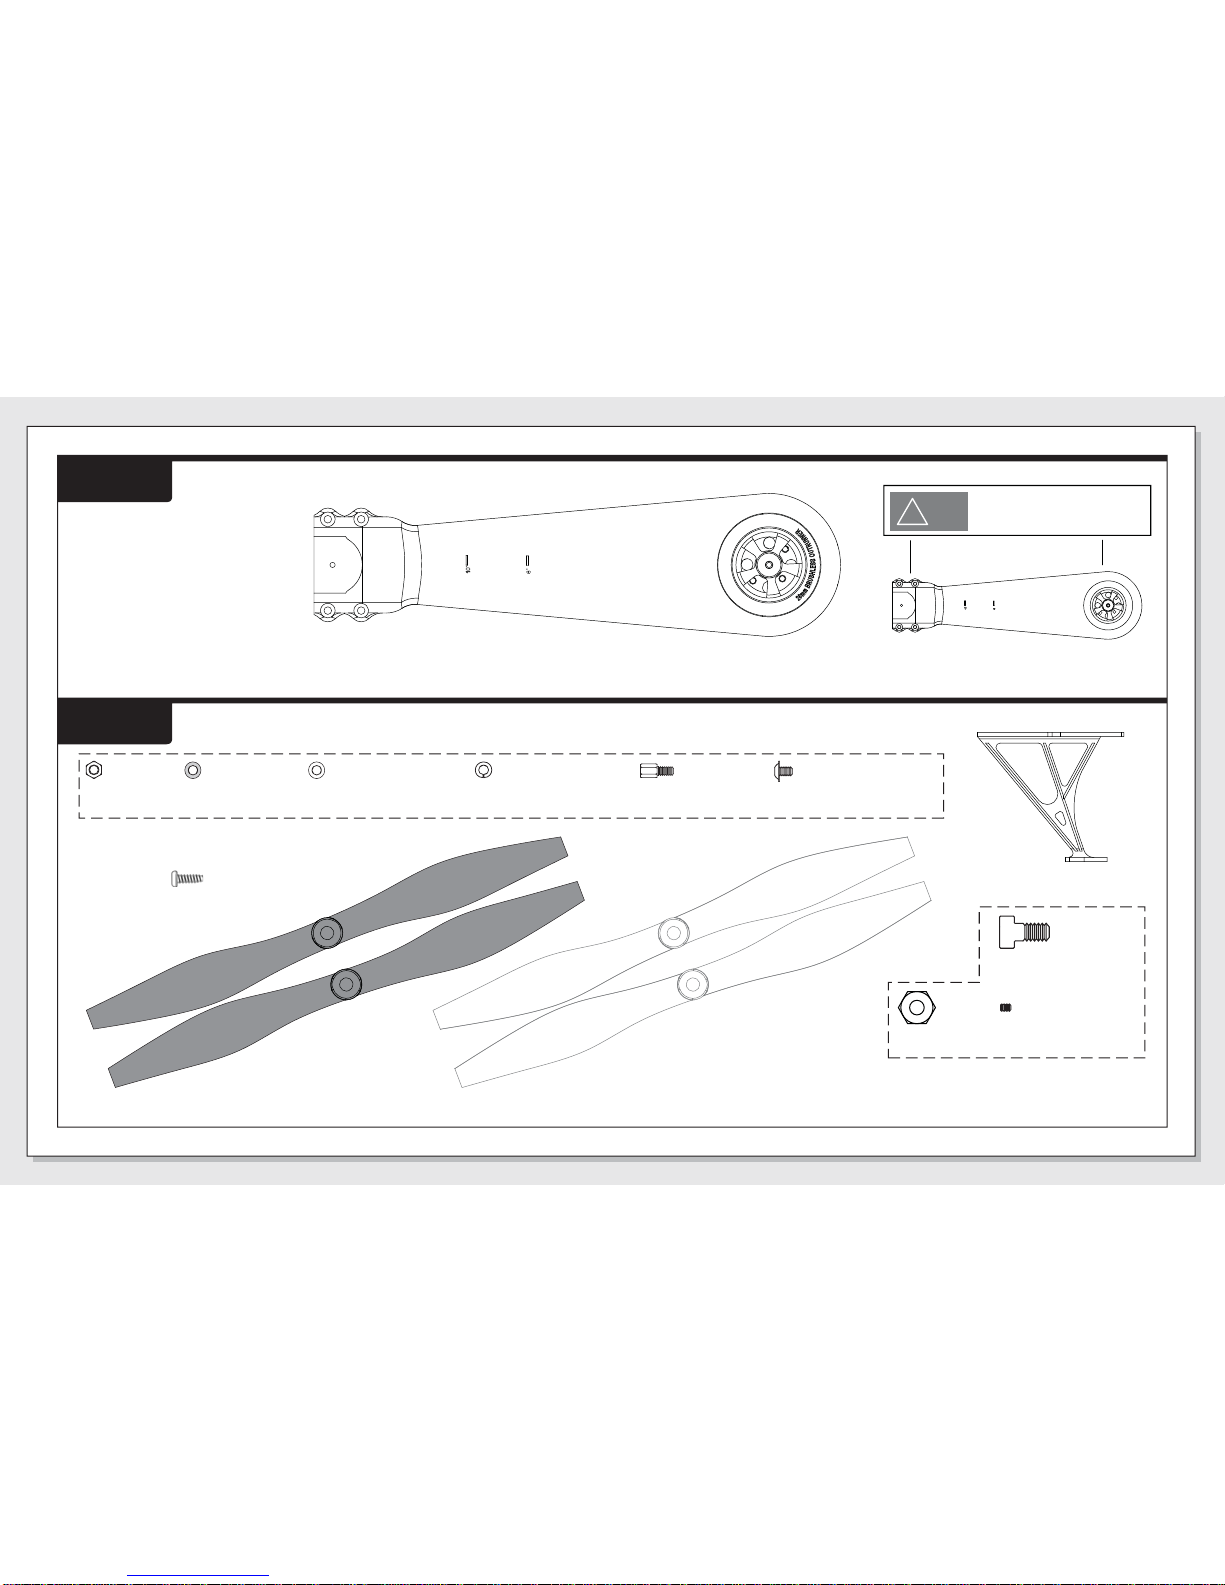
Box C Landing Gear, Propeller and Parts 起落架、螺旋桨与零部件
Box B Arm Set 机臂组件
41016
PM32S - Propeller Mount Set
21017
H460-Propeller (9" black, 1 pair) 21018
H460-Propeller (9" white, 1 pair)
H460螺旋桨(9" 黑色,一对) H460螺旋桨(9" 白色,一对)
4 x
21005
H-Landing Gear
起落架
Assembled Arm Set
安装完成的机臂组件
2 x #1,#2
安装前请撕去保护膜
Please peel off the protective
film before assembly
!Attention
注意
Box D also has two assembled Arm Sets inside (#3, #4) D盒中也有两支安装完成的机臂组件(#3,#4)
Each pair of propellers includes one Normal and one Reverse propeller
每对桨都包括一支正桨和一支反桨
Nut M3 x 2pcs
M3螺母 x 2颗 Washer M3 x 2pcs
M3垫片 x 2片 Plastic Washer M3 x 2pcs
M3塑料垫片 x 2片 Spring Washer M3 x 2pcs
M3弹簧垫片 x 2片 M3x12 Post x 2pcs
M3x12螺丝立柱 x 2个 M3x5 Washer Screw x 2pcs
M3x5带垫片螺丝 x 2颗
Accessories of #21009 H460-Canopy
#21009 H460头罩的安装附件
Nut M6 x 4pcs
M6螺母 x 4颗 Set Screw x 4pcs
顶丝 x 4颗
Propeller Mount x 4pcs
桨座 x 4个
PM32S 桨座组件
21014
H-Screw 3x10
3x10自攻螺丝
32 x

- 8 -
3Assembly Instruction
安装指南
1Install Landing Gear 安装起落架
Repeat
Steps
重复
步骤
Repeat this step
to install Landing
Gear to Arm Sets
in Box B and D
重复此步骤,将起落
架安装到B盒和D盒中
的机臂上
21014
21014
请留意机臂此处的编号,在下一步中请留意
机臂此处的编号,在下一步中需要与底壳插
口的编号一一对应,依次安装。
Please note the number
marker here, you will need
to match this number with
the slot number on the Lower Case in
the next assembly step.
!Attention
注意

- 9 -
2Install Arm Set to Bottom Case 将机臂安装到底壳上
Repeat
Steps
重复
步骤
Repeat this step
to install Arm Sets
to four directions
of the Lower Case
重复此步骤,将机臂
安装到底壳的四个方
向上
1
23
4
底壳插口编号
Bottom Case Slot Number
口
Notice the direction 注意方向
·
将机臂编号与底壳插口编号一一对应
·
将机臂插入底板上的金手指插座
·
用#21014螺丝(3x10)将机臂固定在底壳上
· Match the Arm Set Number with the Bottom
Case Slot Number
· Plug the Arm Set into the Slot on the Lower Case
· Use the #21014 Screw (3x10) to fix the Arm Set
21014 21014

- 10 -
3Connect Cables 连接线缆
Port
APort
BPort
C
端口 端口 端口
Port
D
端口
Plug
A
插头
Plug
C
插头 Jumper
B
跳线 Jumper
D
跳线
ESC 1 ESC 2 ESC 3
(Orange) (Red) (Brown)
· Connect cables and jumpers according
to the Letter
· Jumper B is the switch for the LEDs on
Arm 1 and 4
· Jumper D is the switch for the LEDs on
Arm 2 and 3
·
按照字母表示连接对应的线缆和跳线帽
·
跳线帽B是机臂1和4上的LED的控制开关
·
跳线帽D是机臂2和3上的LED的控制开关
(White)
(Red)
(Black)
Autres manuels pour Hornet 460
1
Table des matières
Autres manuels Dualsky Quadricoptère


