Dragon Touch Classic 10 Manuel utilisateur

USER MANUAL
Wi-Fi Cloud Photo Frame Classic 10


CONTENTS
Contents of Box
Frame Features
Getting Started
Ourphoto App
Bind Your Frame
Upload Photos and Videos
Delete Photos and Videos
Main Menu
Contact Us
1
1
3
4
6
9
13
13
16
English
01
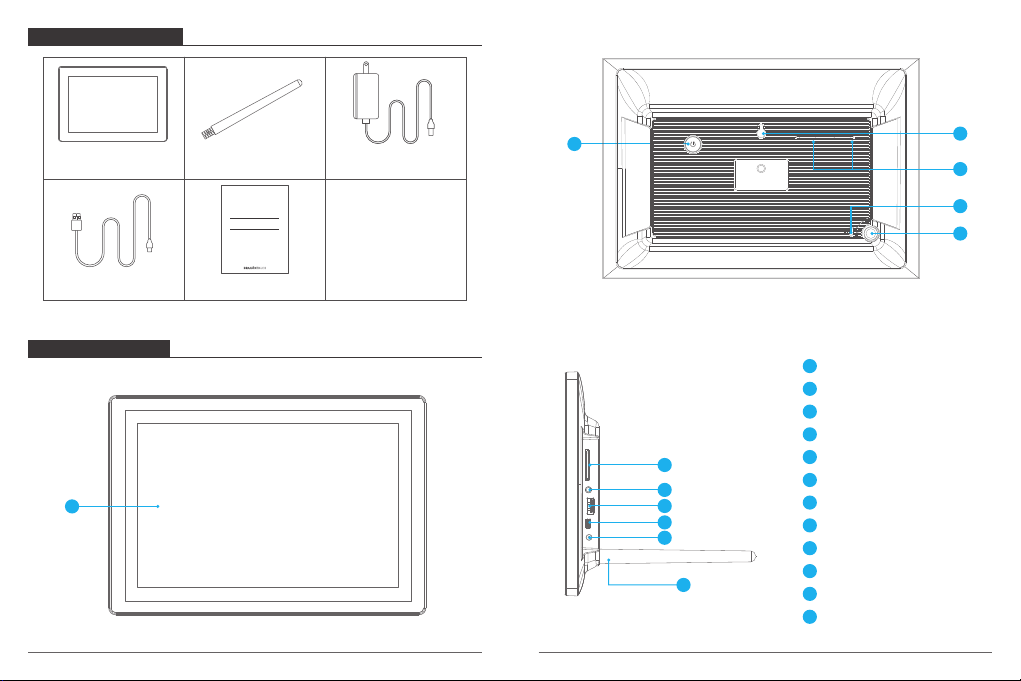
CONTENTS OF BOX
FRAME FEATURES
Dragon Touch Wi-Fi Cloud
Photo Frame Classic 10 Stand Power Adapter with
Power Cable
USB Data Cable Quick Start Guide
7
8
9
10
11
1
2
3
4
5
6
7
8
10.1“ IPS Touch Screen
Power Button
Wall Mount Hole
Security Lock Slot
Speakers
Stand Port
SD Card Slot
3.5mm Headphone Jack
USB-A Port
9
Mini USB Port
10
DC Power Port
11
12
Quick Start Guide
Wi-Fi Cloud Photo Frame Classic 10
2
12 Stand
1
02 03
6
3
5
4
GETTING STARTED
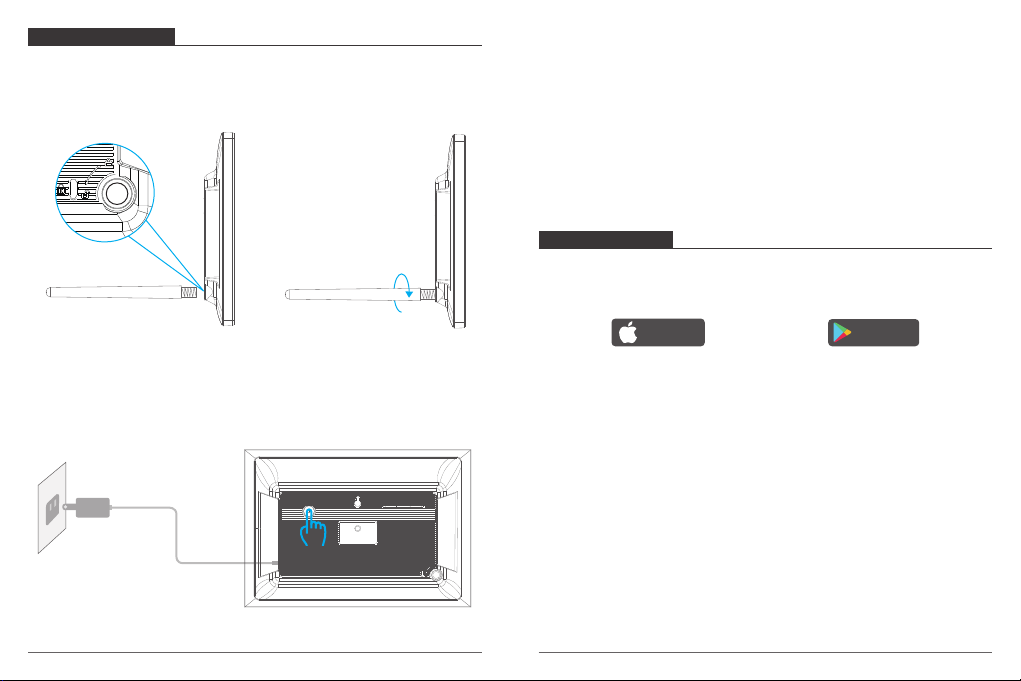
1. Install the stand
Screw in the frame stand on the back. You can place the frame either in landscape or
portrait (we recommend you place it in landscape during the first setup). You can also
mount the frame on the wall with the Wall Mount Hole on the back.
2. Power on
Connect the Power Cable to your frame and plug the Power Adapter into the wall socket,
the frame will enter the system in seconds.
3. Initial settings
There are several initial settings (Wi-Fi, Device info, Sleep Mode, etc.) when you enter the
system for the first time.
4. Connect to Wi-Fi
Select the Wi-Fi network you would like to connect and enter the password if required.
If your Wi-Fi network is not on the list, move your frame closer to your router, wait for
seconds and check it again.
Note: Classic 10 supports 2.4GHz Wi-Fi only.
OURPHOTO APP
1. Download the OurPhoto App
Please download and install the OurPhoto App in your smartphone or tablet by searching
OurPhoto in the App Store or Google Play.
2. Log in your account in the App
① Open OurPhoto App, select Sign Up and fill in all the required information (if you
already have an account, please log in directly).
② Click the right arrow icon to verify the email address you provide. A verify code is to be
sent to your email address.
③ Collect and fill in the verify code, then click Submit to complete the account registration.
Download on the
App Store
GET IT ON
Google Play
04 05
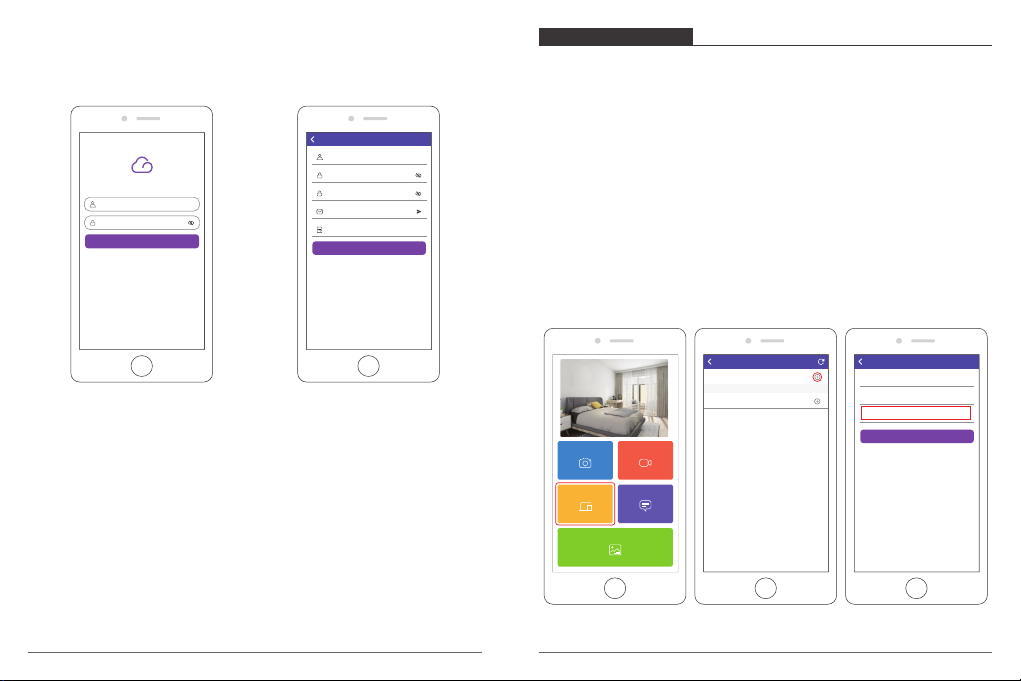
OUR PHOTO
Username
Password
LOGIN
Forgot Password? Sign Up
Username
Password
Verify password
Email
Veruft Code
Submit
Log In Sign Up
3. Invite friends to download and log in the App
If your friends would like to share their photos and videos to your frame via App, we
recommend your friends download and install the OurPhoto App in their smartphones or
tablets, and log in their accounts in the App (refer to step 2).
BIND YOUR FRAME
1. Bind your frame with App
① Please confirm you have signed in OurPhoto App.
② Select Devices.
③ Click the “+” next to My Devices.
④ Enter the Frame ID.
Note: Frame ID is a 6-digit series number which can be found in your frame, Settings →
Device Info.
⑤ Create a Device Name for your frame.
Note: We recommend you to name your frame after the Frame ID for easy
identification, for example, Frame ID is 123456, please name your frame Frame123456.
⑥ Create a unique email account for your frame.
Note: We recommend you to create the account with the Frame ID for easy
identification, for example, Frame ID is 123456, please create such an email account
⑦ Then click Bind.
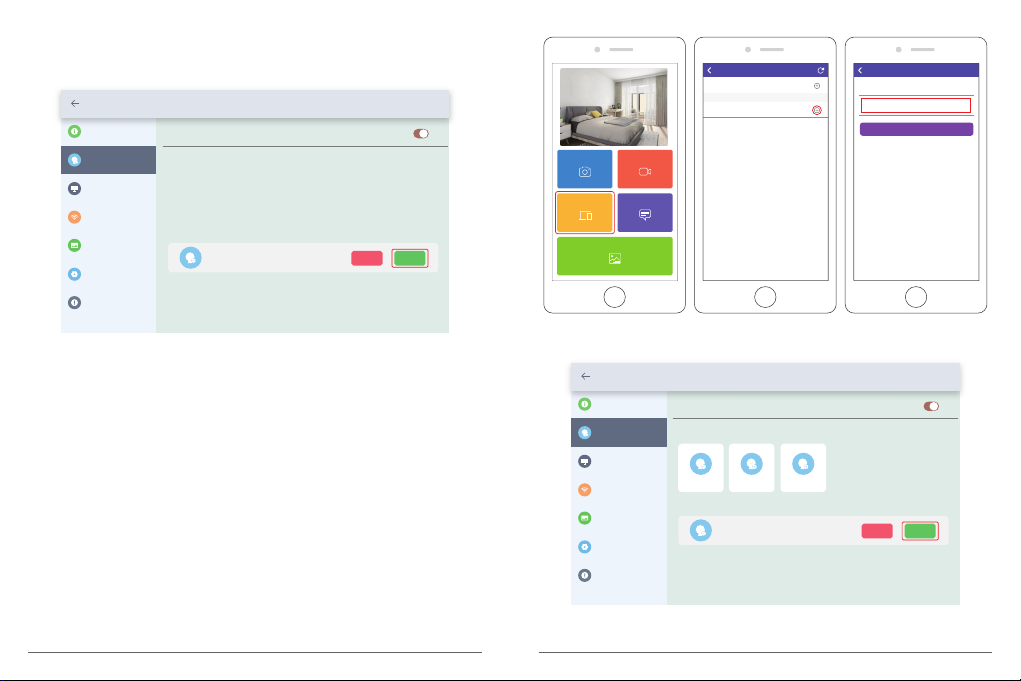
Devices Messages
Video
Photo
Media
My Devices
Bound Devices
Back Devices
Device name frame123456
Device Email frame123456@ourphoto.cn
Frame ID 123456
Bind
Devices Devices Bind
06 07
⑧ Confirm the binding request on your frame, Settings → User Management → Pending
User Requests, click Accept.
⑨ Now this account is bound to your frame, and it will be the main account of your frame.
Settings
Device Info Accept new users
Users
User Management
PC Control
Wi-Fi
Album Settings
System Settings
About
Pending User Requests
User 1 Refuse Accept
2. Invite friends to bind your frame with App
① Make sure your friends have downloaded the OurPhoto App and logged in their
accounts in the App.
② On their way, operate in the App with their accounts, select Devices → Bound Devices,
then click “+”.
③ Enter the Frame ID.
Note: Frame ID is a 6-digit series number which can be found in your frame, Settings→
Device Info. Please inform this Frame ID to your friends.
④ Create a Device Name for the frame.
Note: We recommend your friends to name the frame after the Frame ID for easy
identification, for example, Frame ID is 123456, please name the frame Frame123456.
⑤ Then click Bind.
⑥ On your way, you confirm the binding request on your frame, Settings →
User Management → Pending User Requests, click Accept.
⑦ You can find the bound users in User Management interface.
Devices Messages
Video
Photo
Media
My Devices
Bound Devices
Back Devices
Device name frame123456
Frame ID 123456
Bind
Devices Devices Bind
Settings
Device Info Accept new users
Users
User Management
PC Control
Wi-Fi
Album Settings
System Settings
About
User 1
Pending User Requests
User 2 User 3
User 4 Refuse Accept
08 09
Note: The above screen shot is for reference, please update to the latest firmware version.
Note: The above screen shot is for reference, please update to the latest firmware version.

UPLOAD PHOTOS AND VIDEOS
1. Upload photos and videos via App
① Open OurPhoto App and log in your account. Make sure you have bound your
account to your frame before.
② Click Media to upload your photos or videos in your smartphone or tablet. Select the
photos or videos you would like to upload, and choose the frame you would like to
send to. Click the right arrow icon to confirm.
③ Click Photo or Video to take new photos or videos,
and choose the frame you would like to send to.
Click the right arrow icon to confirm.
④ Your photos or videos will be received in seconds,
you can check the photo or video library on the
frame.
Note:
• Video clip is limited to 30 seconds or 100MB.
• The App support sending Full Image to the frame.
Please check your App version is 1.1.94 (iOS)/
1.0.4 (Android) or above.
3. Bind your frame with Email
You and your friends can also bind your email accounts to the frame, so that you can
share photos to the frame via email.
① Send an email with the subject “bd + Frame ID” to the email account of your frame (the
one you created when you bound your frame). For example, Frame ID is 123456, thus
send an email with the subject “bd123456” to the email account of your frame.
② Wait for seconds, you will receive a confirm email from OurPhoto team, and your email
account is successfully bound to the frame. You can also find the bound email accounts
in User Management interface.
Devices Messages
Video
Photo
Media
2. Upload photos via Email
Send an email with photos attached to the email address of the frame. Your photos will be
received in seconds, you can check the photo or video library on the frame.
Note: Videos cannot be uploaded via email.
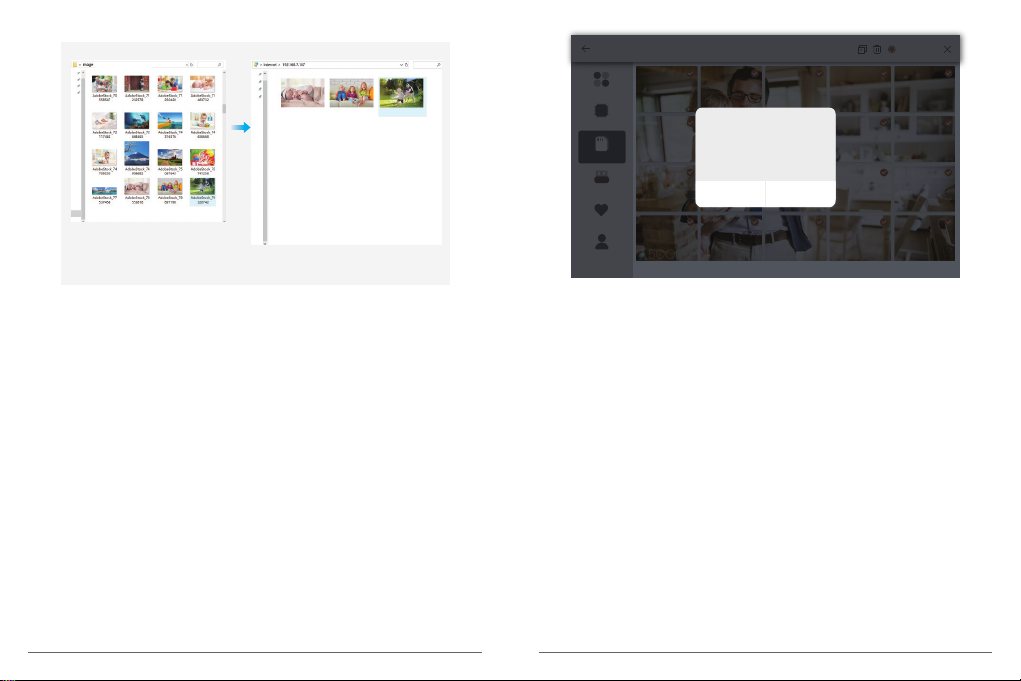
3. Upload photos and videos via computer
① Make sure your frame and computer are in the same Wi-Fi network.
② On your frame, enter the PC Control interface, Settings → PC Control. Click Start
button, you will find an FTP address in the screen.
③ On your computer, open File Explorer. In the File Explorer, enter the FTP address in the
address bar.
④ Then you can drag and drop the photos and videos in the computer that you would
like to transfer to the folder showed up.
⑤ Click Stop on the frame to end PC connecting and uploading.
⑥ Your photos or videos will be received in seconds, you can check the photo or video
library on the frame.
Settings
WLAN Name: “Wifi 001”
Enter the following address into your FTP client:
ftp://XXX.XXX.X.XXX:XXXX
II Start
10 11
Note: The above screen shot is for reference, please update to the latest firmware version.
4. Upload photos and videos via USB drive
① Insert USB drive into the frame, and wait for seconds, the frame will let you know when
the USB drive is successfully connected.
② Enter Photo or Video library, click USB and you will see all the photos or videos stored
in the USB drive.
③ Click More icon at the right upper corner, and select the photos or videos you would
like to import to the internal memory of the frame.
④ Click Share icon at the top then choose OK to import the photos or videos.
⑤ Your photos or videos will be received in seconds, you can check the photo or video
library on the frame.
Note:
• If you have too many files stored in the USB drive, it will take more time to read.
• The system will protect and lock the USB drive if there is no action after the USB drive
has been inserted for a while. To activate it, you need to take it out and insert again.
• Please remove all your external devices when you reset the photo frame.
5. Upload photos and videos via SD card
① Insert SD card into the frame, and wait for seconds, the frame will let you know when
the SD card is successfully connected.
② Enter Photo or Video library, click SD card and you will see all the photos or videos
stored in the SD card.
③ Click More icon at the right upper corner, and select the photos or videos you would
like to import to the internal memory of the frame.
④ Click Share icon at the top then choose OK to import the photos or videos.
⑤ Your photos or videos will be received in seconds, you can check the photo or video
library on the frame.
Note:
• Max support 32GB SD card.
• If you have too many files stored in the SD card, it will take more time to read.
• The system will protect and lock the SD card, if there is no action after the SD card has
been inserted for a while. To activate it, you need to take it out and insert again.
• Please remove all your external devices when you reset the photo frame.
12 13
All files
Internal Storage
photo
SD Card
USB
Favorites
User 1
Import
Import files to memory
Cancel OK
Selected 215
Note: The above screen shot is for reference, please update to the latest firmware version.

DELETE PHOTOS AND VIDEOS
1. Delete files in Photo or Video library
① Enter Photo or Video library and choose Internal Storage, you will see all the photos
or videos stored in the internal memory.
② Click More icon at the right upper corner, and select the photos or videos you would
like to delete from your frame.
③ Click Delete icon at the top then choose OK to delete the photos or videos.
2. Delete files on slideshow
①During the photos or videos are displayed on the screen, click the photos or videos
you would like to delete.
②Click Delete icon on the menu below, then choose OK to delete the photos or videos.
3. Delete files in Album Settings
Delete all the photos from internal storage.
MAIN MENU
Device Info
You can find the Frame ID and App download information.
User Management
Turn on/off the Accept New Users button to receive or reject new user requests.
You can see and manage the bound users under the Users. Click the account you want to
manage, and a submenu will allow you to view the account’s photos, remark name, delete
user and delete user & photos.
Accept or refuse the New User Requests under the Pending User Requests.
PC Control
Wi-Fi connection status is shown on the screen. To activate the PC Control function and
upload files from computer, make sure your frame and your computer are in the same
Wi-Fi network.
Click Start and enter the FTP address on your computer to upload files (please refer the
Upload Photos and Video instruction before), and click Stop to end.
Wi-Fi
You can choose the Wi-Fi network you would like to connect on the list.
Album Settings
1. Full Screen
Turn on the button to make the photo displayed in full screen.
2. Slideshow
You can set Slideshow time to make the frame automatically displays photos after a period
time of inactivity.
3. Slideshow Mode
You can choose either Sequential or Random mode to display photos.
4. Slideshow Interval
You can set Slideshow Interval to adjust the duration of each photo displays.
5. Slideshow Transition Effect
You can choose the effect of slideshow transition.
6. Delete Photos
Delete all the photos from internal storage.
7. Restore default settings
It will remove all your user info, settings and files on your frame.
14 15
Autres manuels pour Classic 10
2
Table des matières
Autres manuels Dragon Touch Cadre photo numérique

Dragon Touch
Dragon Touch Modern 10 Manuel utilisateur

Dragon Touch
Dragon Touch Classic 15 Manuel utilisateur

Dragon Touch
Dragon Touch Classic 8 Manuel utilisateur

Dragon Touch
Dragon Touch Modern 10 Manuel utilisateur

Dragon Touch
Dragon Touch Classic 10 Manuel utilisateur

Dragon Touch
Dragon Touch Classic 10 Manuel utilisateur

Dragon Touch
Dragon Touch MODERN 16 Manuel utilisateur

Dragon Touch
Dragon Touch Classic 8 Manuel utilisateur

Dragon Touch
Dragon Touch Classic 15 Manuel utilisateur


