DPR GEMINI Manuel utilisateur

USER MANUAL
GEMINI
this product is certified:


IMPORTANT: Please keep the original packaging in
case you need to return the material. If we receive the
system in non-original packaging, the warranty will be
void.
IMPORTANT: The latest version of the Gemini software
is available on our websites
or ,section “Download”.


Overview
GEMINI - Digital Cutting Software
Unpacking the contents of the GEMINI
How to istall the Cutting Manager software
How to update the Cutting Manager software
Assembly of your GEMINI
Setting up the GEMINI Feeder
Cable connections and aligning the feeder
Pinch Roller Position - Paper Size/Format Adjustment
Cutting options - Blade Positions
Cutting Manager software
Advanced options
Creating Your Files
Graphics le design
Layers for printing
Layers for cutting
Marks positioning and specics
File properties for cutting
Graphic le Compatibility
Basic operations
Startup
File opening
Set working view
Set working mode
Sheet and pinch rollers alignment
Adjust plotter’s knife
Changing blade positions
Cutting parameters
Cut test
Copy mode
Press Start to launch the cutting series
How to replace cutting mat
How to replace the knife
How to restore plotter settings
TroubleShooting
GEMINI USER GUIDE - TABLE OF CONTENTS
........................................................................1
.........................................................................2
.................................................................2
..............................................................4
..............................................................................................5
..........................................................6
...............................................7
.................................................................................8
............................................................................................10
.........................................................................................................11
.......................................................................................................16
......................................................................................................17
...............................................................................................18
................................................................................................18
..................................................................................19
.............................................................................................20
....................................................................................20
................................................................................................................21
........................................................................................................21
................................................................................................21
..............................................................................................21
......................................................................21
...........................................................................................23
...................................................................................24
.............................................................................................25
...............................................................................................................26
.........................................................................................................27
..............................................................27
..........................................................................................27
...............................................................................................28
....................................................................................29
............................................................................................................32

GEMINI - DIGITAL CUTTING SOFTWARE
1
There are also additional functions enabling the management of die cutting sheet material, using
cross cut (Cut through) and dashed cut features, so that greeting cards, POS and packaging board
material may be also cut.
The gemini solution consists of both hardware and software.
Hardware
The hardware is consist of:
-The automatic sheet feeding system
-The cutting plotter
-The paper exit tray
Software
The Gemini Cutting Manager is our own proprietary software that will allow you to cut lines and
paths of a pdf vector graphics.
The cutting manager works on windows OS from Vista. We do not guarantee its functionality on
windows XP.

HOW TO INSTALL THE CUTTING MANAGER SOFTWARE
UNPACKING THE CONTENTS OF THE GEMINI
2
Before installing the cutting manager software please make sure the cutting plotter is o,
disconnected from a power supply, and that the gemini hub’s usb cable is not plugged to
your pc.
The Cutting manager software for the GEMINI can be downloaded from the following websites:
www.dpr-srl.it / www.dpr-llc.com
Execute the installation’s program SetupGeminiCM and follow the next steps
Your GEMINI is packed in 2 boxes.
The second box contains:
- The GEMINI Exit tray (II)
- The GEMINI Feeder (III)
- And the power adaptor, plus USB cables, manual and drivers. (IV)
The GEMINI Exit tray sits under the GEMINI cutting engine, be sure to position the vertical tabs
under the recesses on the front of the cutting engine.
The GEMINI Auto-Feeder clips on to the front of the GEMINI cutting engine and lines up next to
paper size guides along the front left edge.
USB hub integrated under the feeder to your computer.
Also in addition a USB cable to connect the GEMINI cutting Engine to the integrated USB Hub
under the feeder.
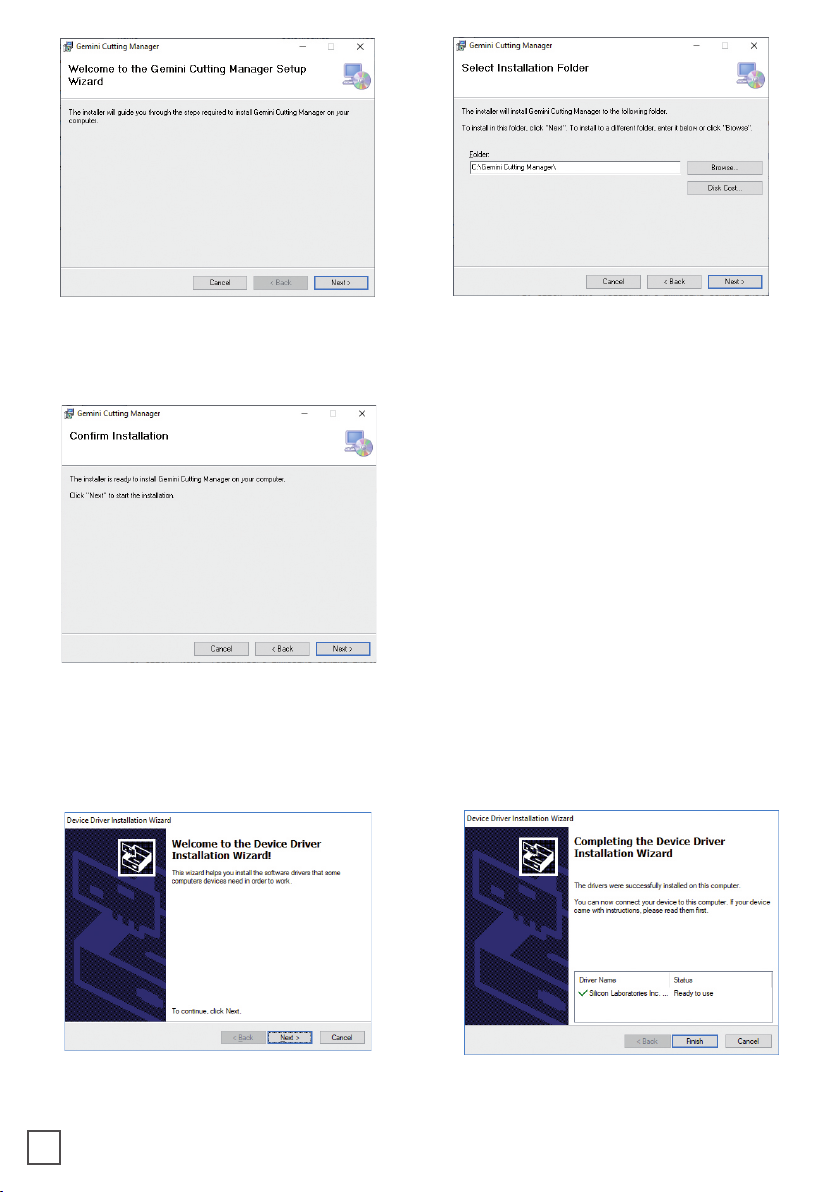
3. Click NEXT 4. Allow the permission for the installation
if it is asked
5. Click YES 6. Click FINISH
1. Click NEXT 2. Click NEXT
3

To update your cutting manager you just have to unistall the old version of the software from
the control panel or its installer, and then install the new version.
HOW TO UPDATE CUTTING MANAGER SOFTWARE
9. Click NEXT
11. Wait until the sign “Update for the
Graphtec CE6000/CE6000Plus driver was
completed” shows up. Click “OK” to end
the installation. It may ask you to restart
the computer
7. Click OK 8. Click NEXT
10. Select the correct graphtec model
name. Do not confuse graphtec CE6000
with graphtec ce6000plus. Click “Next”
After the installation you will have the software’s shortcut on your desktop, and a folder that contains
the report of all the cuts in C:\Gemini Cutting Manager\Report.
4

ASSEMBLY OF YOUR GEMINI
STEP 1
Install the “S” support onto the tray.
STEP 4
Insert the feeder feet into the holes on
plotter plate.
Pay attention!
A
5
B
C
A
STEP 2
Fix the tray to the plate of plotter.
B A
+
Plotter plate
Tray
C
A
C
A
A
STEP 3
Insert the plotter feet into the holes on
plate.
Autres manuels pour GEMINI
1
Table des matières
Autres manuels DPR Finisseur


