Dnake A416 Manuel utilisateur

Model: 280SD-C12
280SD-R2
280SD-R5
Quick Start Quide
Door Station
The picture is only a schematic diagram. The actual product shall prevail.
USER MANUAL
A416

Please follow the user manual for correct installation and
testing. If there is any doubt please call our tech-supporting
and customer center.
Our company applies ourselves to reformation and
innovation of our products. No extra notice for any change.
The illustration shown here is only for reference. If there is
any difference, please take the actual product as the
standard.
The product and batteries must be handled separately from
household waste. When the product reaches the end of
service life and needs to be discarded, please contact the
local administrative department and put it in the designated
collection points in order to avoid the damage to the
environment and human health caused by any disposal. We
encourage recycling and reusing the material resources.
REMARK

CATALOG
Product Features .....................................................1
Technical Parameters .............................................1
Package Contents...................................................2
Pictures.....................................................................2
Operations ...............................................................3
Web Settings..........................................................21
System Configuration ..........................................25
System Diagram ...................................................26
Installation .............................................................28
Troubleshooting ...................................................30
Safety Instructions ................................................31

PRODUCT FEATURES
1. Building intercom application:
Talkback: Support video call, monitoring, unlocking, and checking of
call records.
Security: Support 8 alarm zones with three states, zone and scene
setup.
Smart: Support smart home extension by RS485 communication.
2. Operating system: Android.
TECHNICAL PARAMETERS
Voltage: DC 12V
POE
Rated power: 10W
Standby power consumption: 3W
Display screen: 7-inch IPS LCD
Touch screen: Capacitive touch screen
Resolution: 1024x600
Working Temperature: -10℃ to +55℃
Storage Temperature: -10℃ to +60℃
Working Humidity: 10% to 90% (non-condensing)
1

Package Contents
MODEL: A416
Please make sure the package contains the following items:
PACKAGE CONTENTS
2
PICTURES
:
Quick Start Guide
Screw
Indoor Monitor Bracket
Speaker
7'' capacitive
touch screen
Camera
Microphone

3
OPERATIONS
Main menu: Call, Monitor, Camera, Phonebook, Message, DND, QR Code,
Security, Security, Concierge, Lift Control, SOS, Settings.
Click “Call” icon on the main interface, the system will enter the following
interface:
1.Call

1.1 Call Logs
Click “Call Logs” icon, the system will enter the following interface:
refers to call-out record; refers to call-in record; refers to missed
call record. It can save up to 60 records.
Select one record and click icon to call; click icon to delete it.
If there is any snapshot image, click icon to view it.
1.2 Dial
Click “Dial” icon, the system will enter the following interface:
1.2.1 Call Resident
Input 1-3 digits building No.+ “Building” + 2-digit Unit No. + “Riser” +4-digit
room No., then click icon to call.
The system will enter into the following interface:
4

When the call is answered, the system will enter into call state:
1. If there is a camera, the caller’s image will be displayed on the screen;
2. When the call is answered, the video will be uploaded into the indoor
monitor.
5
click icon to end the call.
You can make audio and video recording during communication (TF card
should be inserted into indoor monitor ). Click icon to take a snapshot;
click icon to save the video and image for current communication.
The system’s default call duration is 120s.
1.2.2 Call Master Station
Click “ ” icon to call master station, the system will call master station
No.1-No.5 successively. If the master station cannot be searched or call
failed, the system will automatically call next master station. When the
master station answers, it will ring and stop calling next one.
Click icon to end the communication.
When calling, the indoor monitor will ring; if there is no answer within 25
seconds, the call will be ended.
1.2.2 Door station call
Clicking “ ” icon to call management center(namely master station),
the system will call management center No.1-No.5 successively. If the
management center cannot be searched or call failed, the system will
automatically call next management center. When the management center
answers, it will ring and stop calling next one.
Click icon to end the communication.

1.3 Phonebook
Click “Phonebook” icon, the system will enter the following interface:
6
1.2.3 Receive Call from Door Station
When the door station, wall station or secondary door station calls, the
indoor monitor will ring; when door station calls indoor monitor, the image
from door station will be displayed on the indoor monitor; if there is no
answer within 25 seconds, the call will be ended.
click icon to end the call; click icon to unlock the door.
Remark: Click icon to switch between answering interface and
monitoring interface of IP camera. After numeric keypad shows, press
number key "2" to "9" to select the IP camera and press "1" to return to
previous page.
You can make audio and video recording during communication (TF card
should be inserted into indoor monitor ). Click icon to take a snapshot of
the visitor; click icon to save the video and image for current
communication.
The system’s default call duration is 120s.
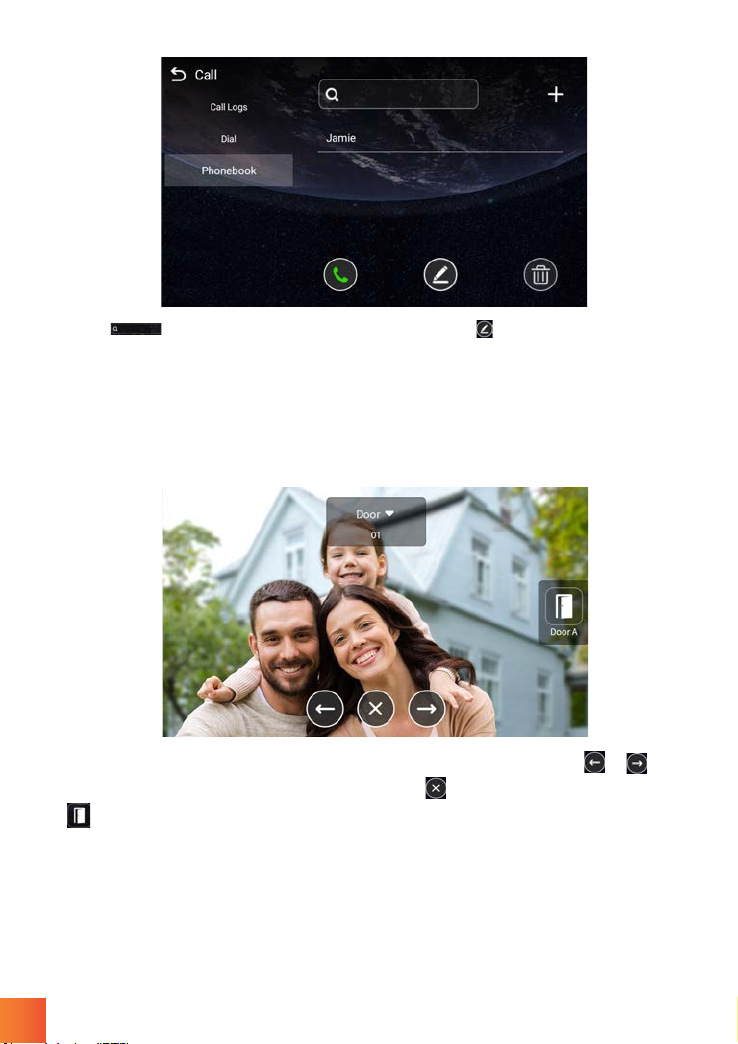
Click “ ” icon to search for the contact. Click “ ” icon to edit and save
the contact
Click “Monitor” icon on the main interface, the system will enter the
following interface:
2.Monitor
Click “Door01” icon to switch the type of door station, then click or icon
to select the area you want to monitor. Click icon to end monitoring. Click
icon to unlock the door.
Remark: The system’s default monitoring time is 25s.
7
Autres manuels pour A416
1
Table des matières
Autres manuels Dnake Moniteur


