Dish TV T1000n-VM Manuel utilisateur
T1000n-VM USER MANUAL

Safety Instructions
IMPORTANT!
01. Read these Instructions.
02. Follow all Instructions.
03. Keep these Instructions.
04. Do not use this receiver near water.
05. Clean only with a dry cloth.
06. Do not block any of the ventalation openings, install in accordance with instructions.
07. Do not install near any heat sources such as radiators, heat registers, stoves, or any
other appliances (including amplifiers) that produce heat.
08. Protect the power cord from being walked on or pinched, particularly the plug and the
point where they exit from the receiver.
09. Unplug this receiver during lightning storms or when unused for long periods of time.
10. Refer all servicing to qualified personnel. Servicing is required when the receiver has
been damaged in anyway, such as...
-when the power supply or plug is damaged.
-liquid has been spilled into the unit.
-objects have fallen into the unit.
-the unit has been exposed to rain or moisture.
-unit does not operate normally.
-unit has been dropped.
11. Attention should be drawn to the environmental aspects of battery disposal.
12. Do not attempt to disassemble the receiver.
13. Do not put any foreign objects inside this receiver. Touching internal components of
this receiver is dangerous and may cause serious damge to the receiver.
14. If this receiver has been exposed to moisture, do not operate.
15. Ensure receiver is used in a moderate climate, avoid high temperature or humidity.
WARNING:
To reduce risk of fire or electric shock, do not expose unit to rain or moisture.
The batteries shall not be exposed to excessive heat such as sunlight or fire.
This product is capable of receiving and decoding Dolby Audio™.
Manufactured under license from Dolby Laboratories. Dolby, Dolby Audio,
and the double-D symbol are trademarks of Dolby Laboratories.
®
®
This product has an HDMI™ Connection to allow use of an HDMI Cable.
HDMI, the HDMI Logo and High-Definition Multimedia Interface are
trademarks or registered trademarks of HDMI Licensing LLC.
T1000n-VM USER MANUAL
03
WELCOME:
The T1000n-VM is a Terrestrial Receiver, it requires a UHF Aerial to operate correctly. It does not use a Satellite Dish.
For help, please refer to the Technical Support Contact Details under the Menu - System Info or Page 19 in this User Manual.
Thank you for choosing the Dish TV T1000n-Vm Digital Terrestrial Receiver. You will be able to
receive all the Freeview High Definition and Standard Definition digital TV channels, along with the
Radio channels.
This Manual covers the installation of the receiver and the necessary steps to make use of its various
features. This will explain each feature in detail, which will allow you to get the most out of the receiver.
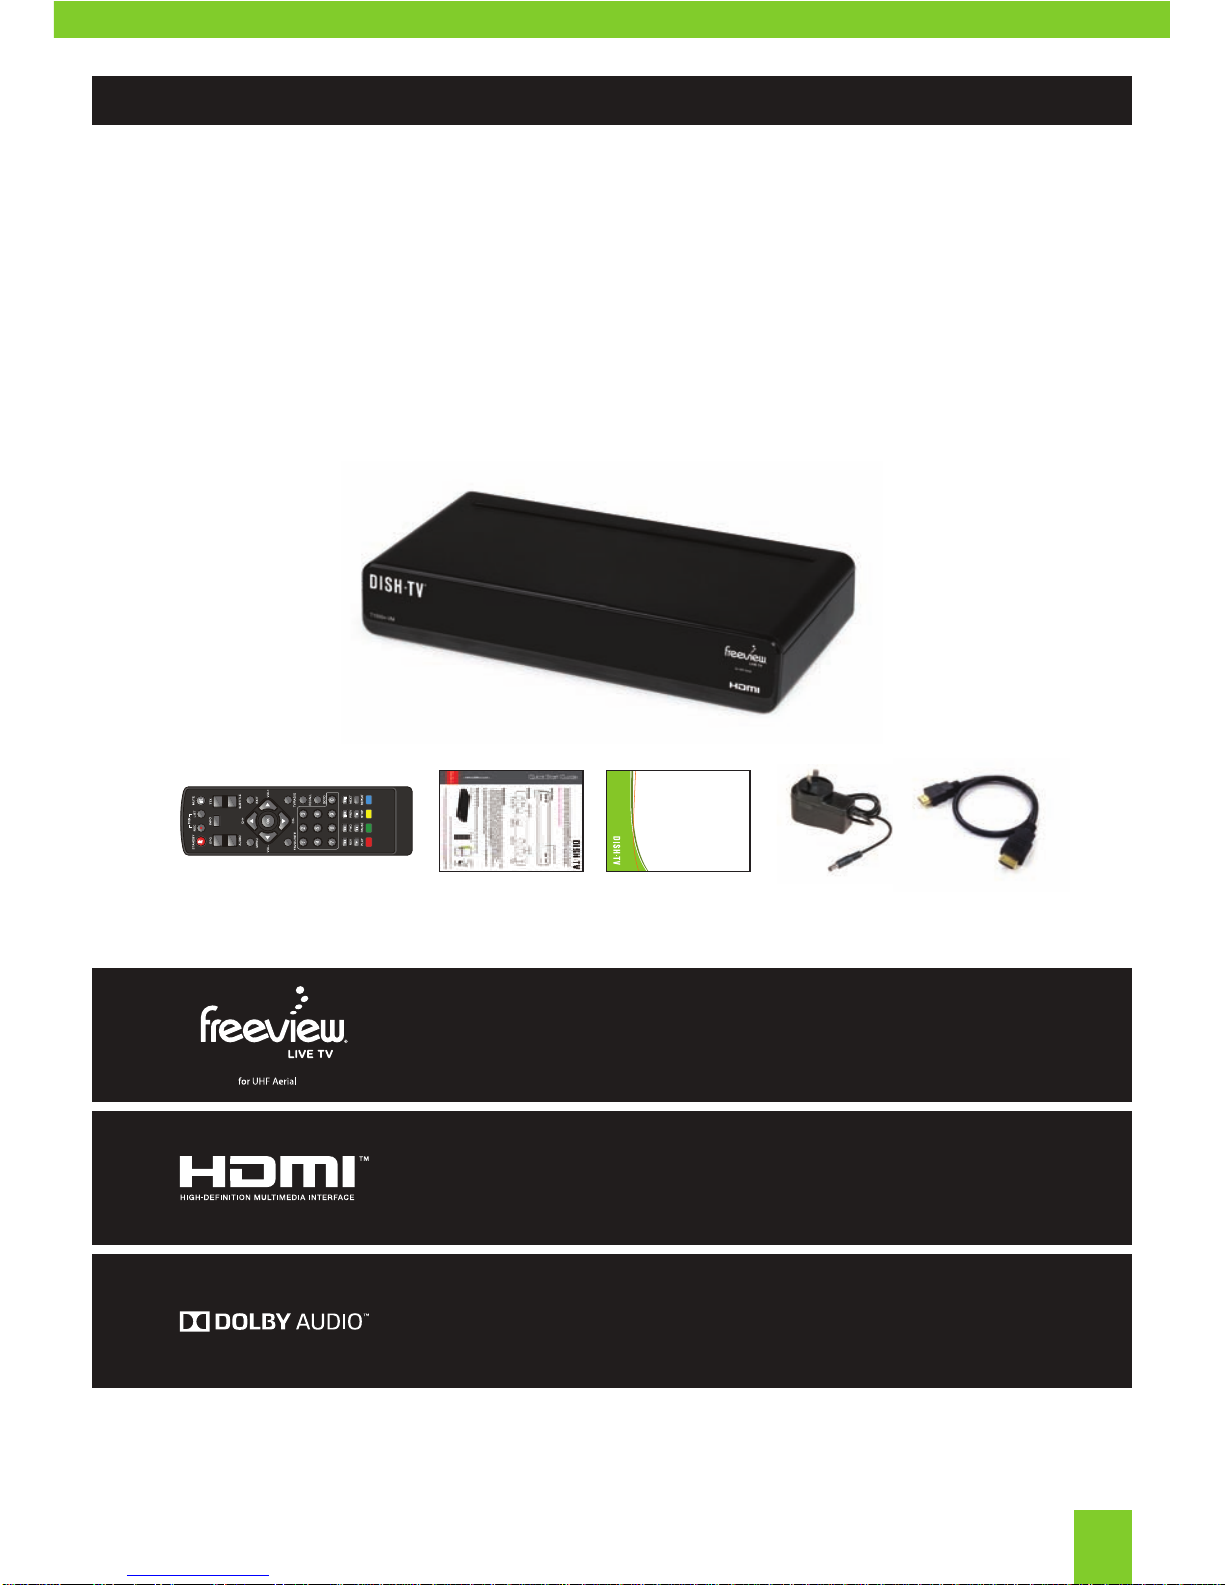
What’s in the Box?
Please check to see whether you have all the following in this box, you should have:
Some items missing? Please contact the retailer or store you purchased this from.
Your NEW T1000n-VM
Remote Control (2x Batteries) Power Supply
User Manual HD Cable
Install Sheet
This Digital Terrestrial Receiver gives you access to over 20 Freeview™
Digital TV and Radio Channels, without subscription or contract.
For more information about Freeview, visit www.freeviewnz.tv

Warranty....................................................................................................
Troubleshooting........................................................................................
Support Information.................................................................................
Connecting Up.........................................................................................
Getting Started........................................................................................
Freeview MHEG EPG.................................................................................
About your Set Top Box..........................................................................
Welcome...............................................................................................
What’s in the Box?................................................................................
Product Overview....................................................................................
Front and Back View.............................................................................
Remote Control.....................................................................................
Main Menu................................................................................................
Channel Organiser ...............................................................................
User Preference....................................................................................
System Settings....................................................................................
Manual Timer.........................................................................................
Admin....................................................................................................
EPG (Weekly EPG)...................................................................................
System Info..............................................................................................
User Options..............................................................................................
FAQ.............................................................................................................
07
08
17
03
03
03
05
05
06
09
10
11
12
13
14
15
15
16
18
04
CONTENTS:
19
20
21
05
2
13 4 5 67
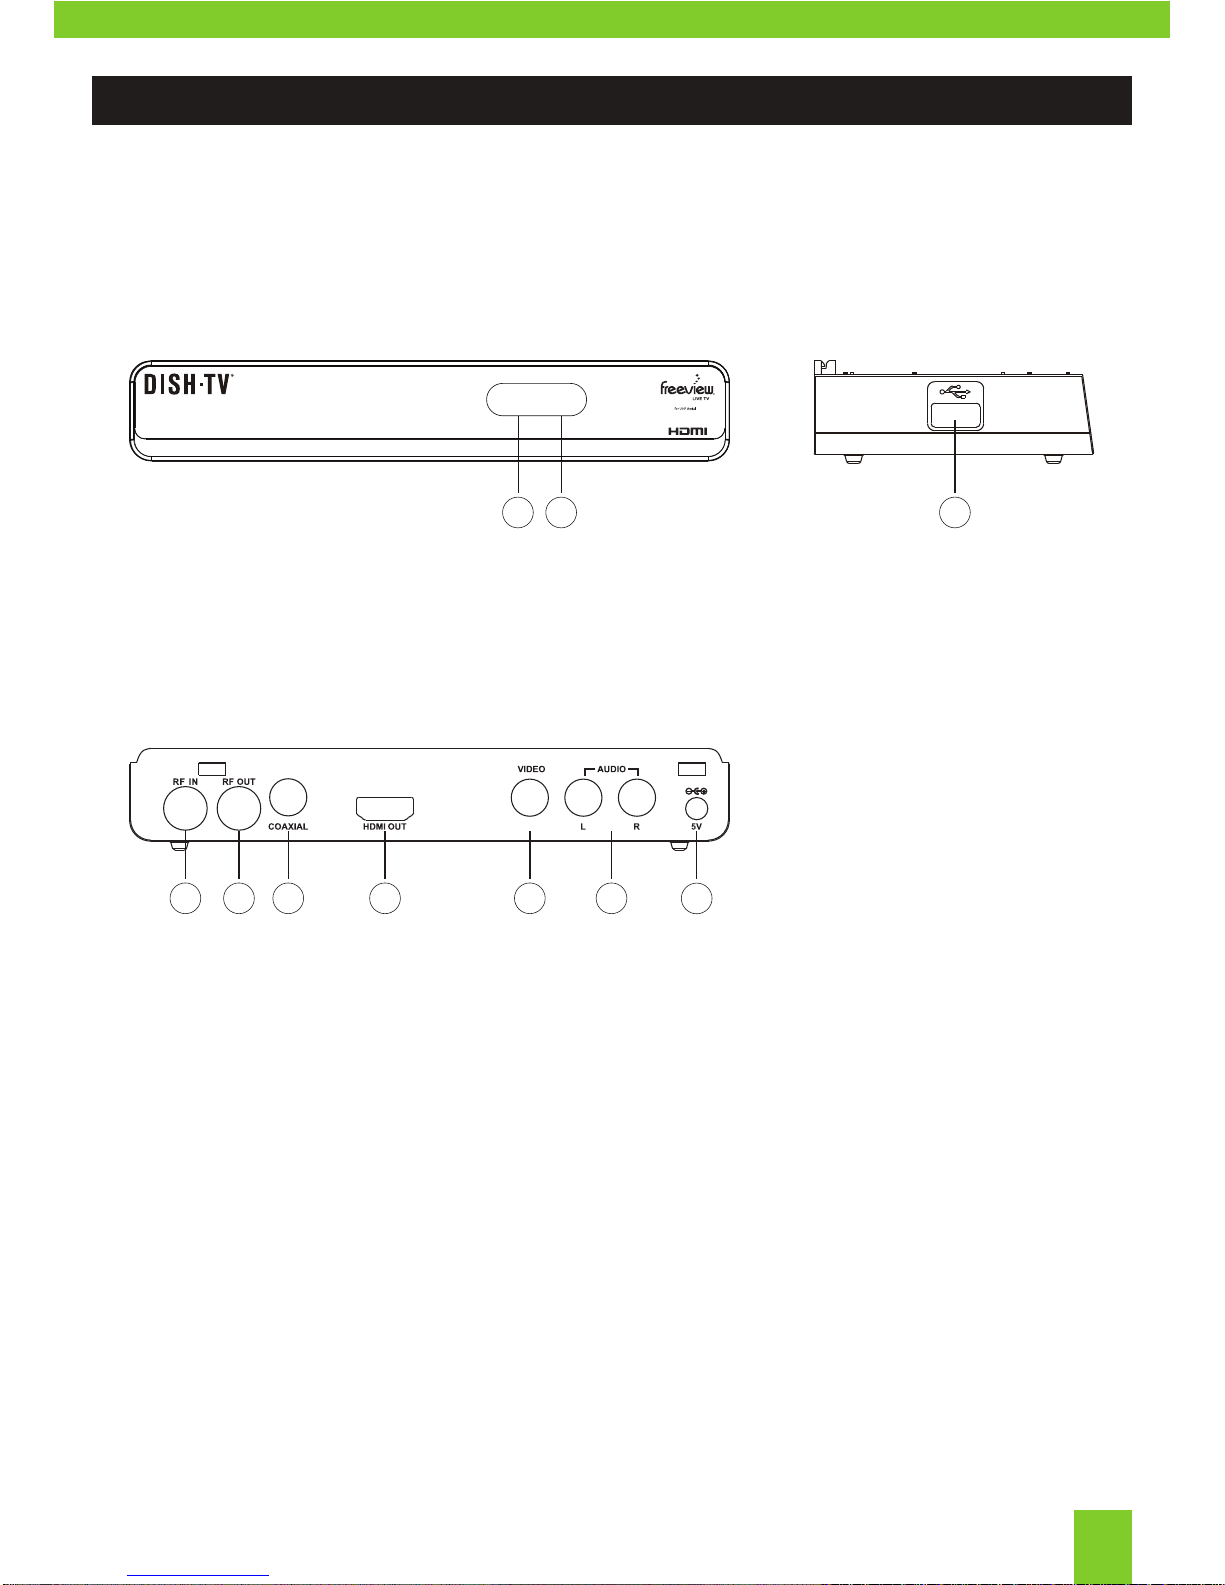
PRODUCT OVERVIEW:
Front & Back View
Product Overview
Rear Panel
01. RF IN: UHF Aerial Cable Input.
02. RF OUT: Output to another device.
03. COAXIAL: Digital Audio Output.
04. HDMI OUT: High Definition Output for HDTV.
05. VIDEO: RCA Video Output.
06. AUDIO L/R: RCA Audio L/R Output
07. DC IN (5V): Connect Power Supply (5V Only).
Front Panel & Side Panel
01. LED INDICATOR: GREEN - Powered ON. RED - Stand-by.
02. IR SENSOR: Used to receive the signal from the Remote Control.
03. USB (2.0) PORT: Connect external USB Devices (Software Update Only).
23
1
T1000n-VM
NOTE, image is for reference only and the final product may differ slightly in color and design.
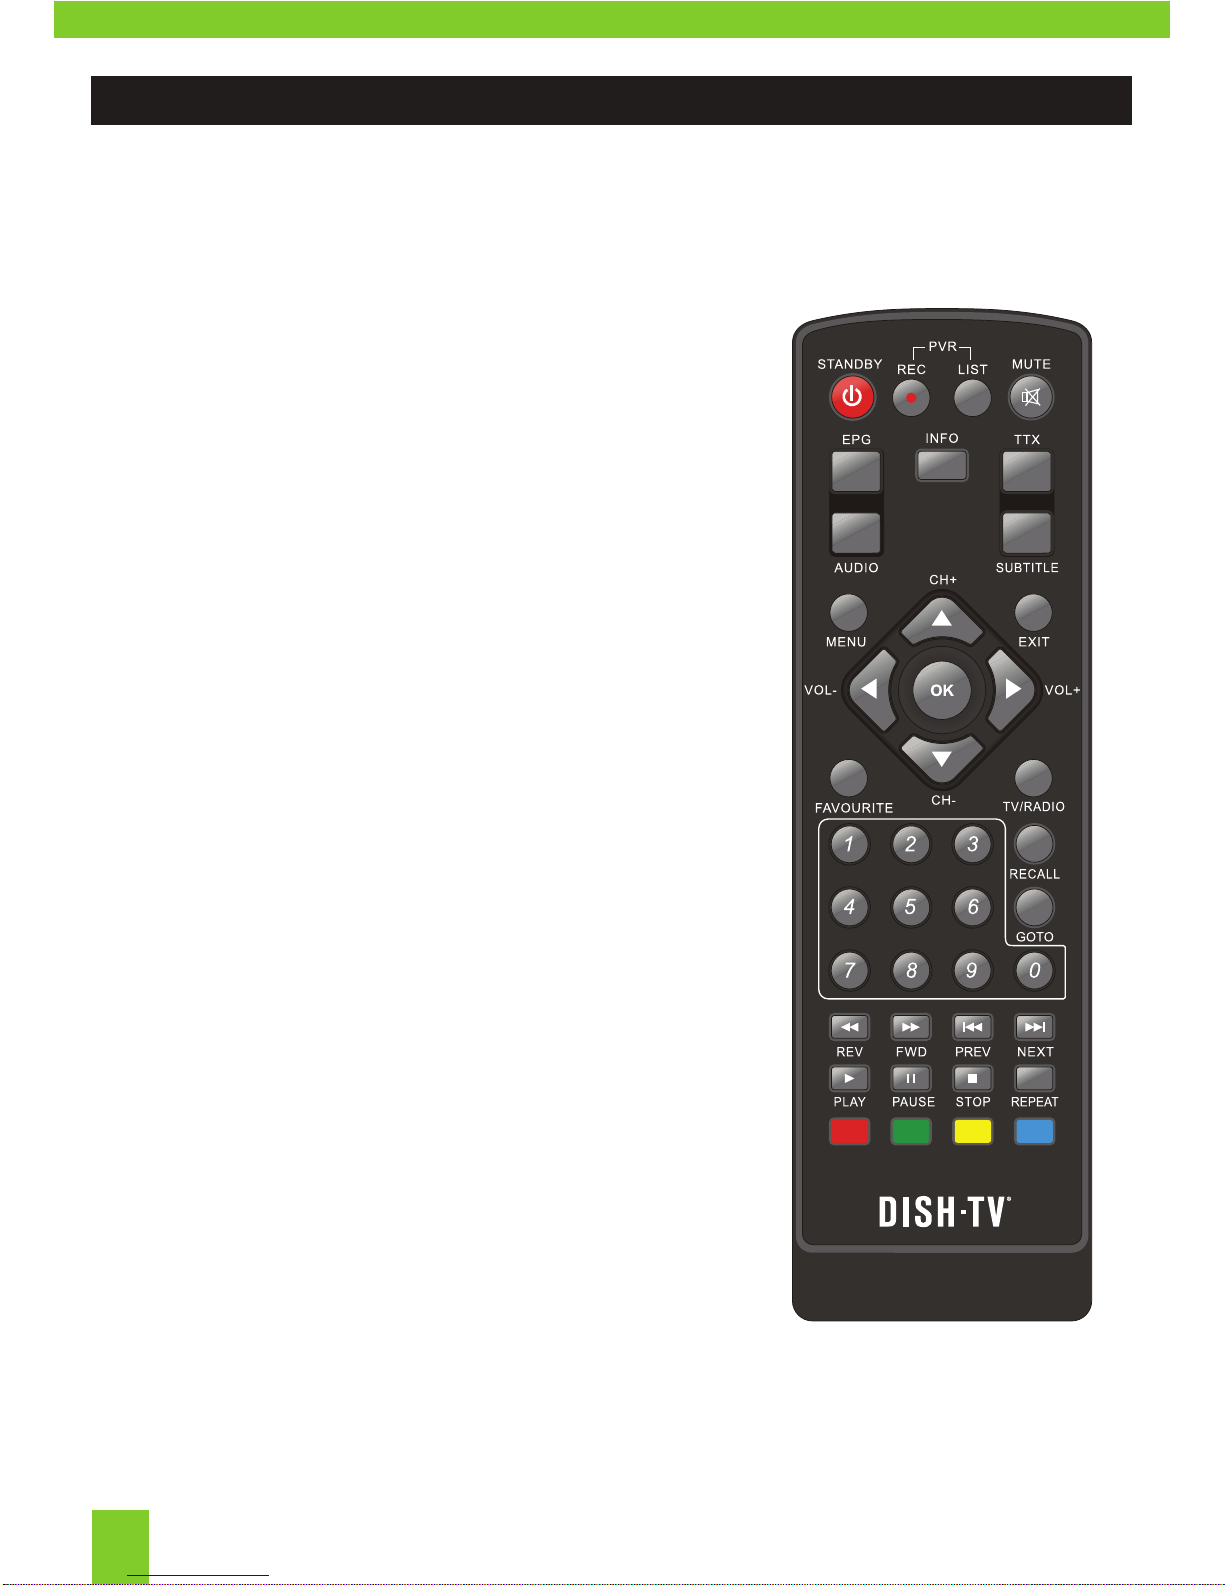
Remote Control
Product Overview
06
PRODUCT OVERVIEW:
POWER: Standby ON/OFF.
REC: No functionality with the T1000n-VM.
LIST: No functionality with the T1000n-VM.
MUTE: Toggle sound ON/OFF.
EPG: Call up the Freeview EPG (Electronic
Program Guide).
INFO: Show information on selected channel
or event.
TTX: No functionality with the T1000n-VM.
AUDIO: Change Audio, when available.
SUB: Turn Subtitles ON/OFF, when available.
MENU: Bring up main menu, becomes back
in select sub-menus.
EXIT: Exits on screen displays and menus.
NAVIGATION: Move through menus to select.
OK: Confirm current selection.
VOL UP/DOWN: Adjust volume up and down.
CH UP/DOWN: Navigate through Channels.
FAV: No functionality with the T1000n-VM.
TV/RADIO: Switch between TV/Radio modes.
NUMERIC KEYS: Enter Numbers. Enter PIN.
Select Channels.
RECALL: Bring up Recall List.
GOTO: No functionality with the T1000n-VM.
REWIND: No functionality with the T1000n-VM.
FF: No functionality with the T1000n-VM.
PREV: No functionality with the T1000n-VM.
NEXT: No functionality with the T1000n-VM.
PLAY: No functionality with the T1000n-VM.
PAUSE: No functionality with the T1000n-VM.
STOP: No functionality with the T1000n-VM.
REPEAT: Bring up User Options.
COLOUR KEYS: Interactive use, functionality
differs with each menu.
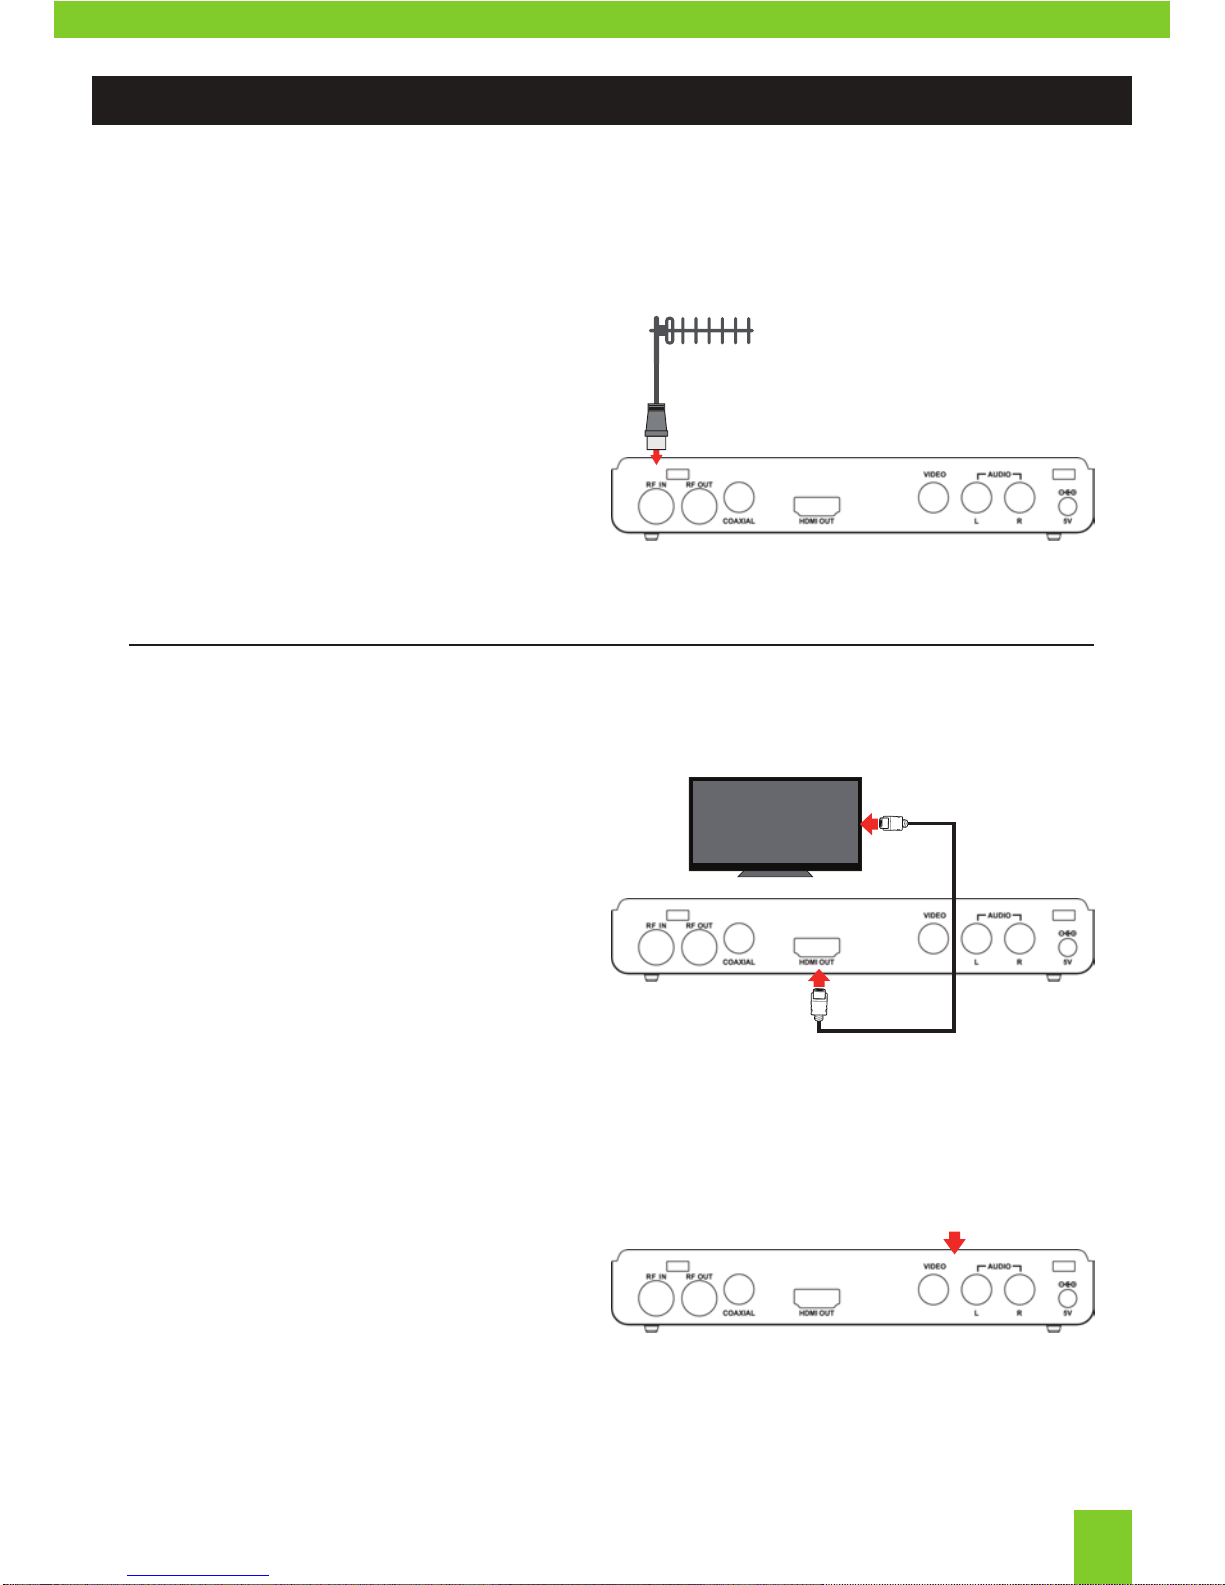
Connecting to your UHF Aerial
Connect the cable from your UHF Aerial*
to the RF IN socket on the back of your
receiver.
Connecting to your TV
Connecting using a HDMI Cable
Connect one end of the HDMI cable
into the HDMI socket on the back of the
receiver, then connect the other end to the
HDMI input sockets on your HD Ready TV.
*It’s best to check that your UHF Aerial is aligned correctly and
that the UHF Aerial can withstand any strong weather.
Connecting using an AV Cable
If your TV doesn’t have HD compatibility,
you can connect the receiver using the
an AV Cable, using the Red, White and
Yellow sockets on both your TV and
receiver.
Note, if you are using an AV connection then it is not possible
to view programs in High Definition (HD).
HD Ready TV
Connect AV Cable into the
Red, White and Yellow
connections.
HDMI Cable
CONNECTING UP:
07
Connecting Up
Install batteries in the Remote Control
Open the battery cover of the Remote and put 2x AAA size batteries so the ‘+’ and ‘-’ marks
on the batteries match the ‘+’ and ‘-’ marks inside the Remote. Replace the battery cover.
Plug in and switch on
Plug the AC Adapter into the wall socket and switch on. Switch your TV on and ensure you
are on the correct video input (i.e. HDMI1 or AV). The Receiver will take some time to boot
up as part of the initial installation.
2
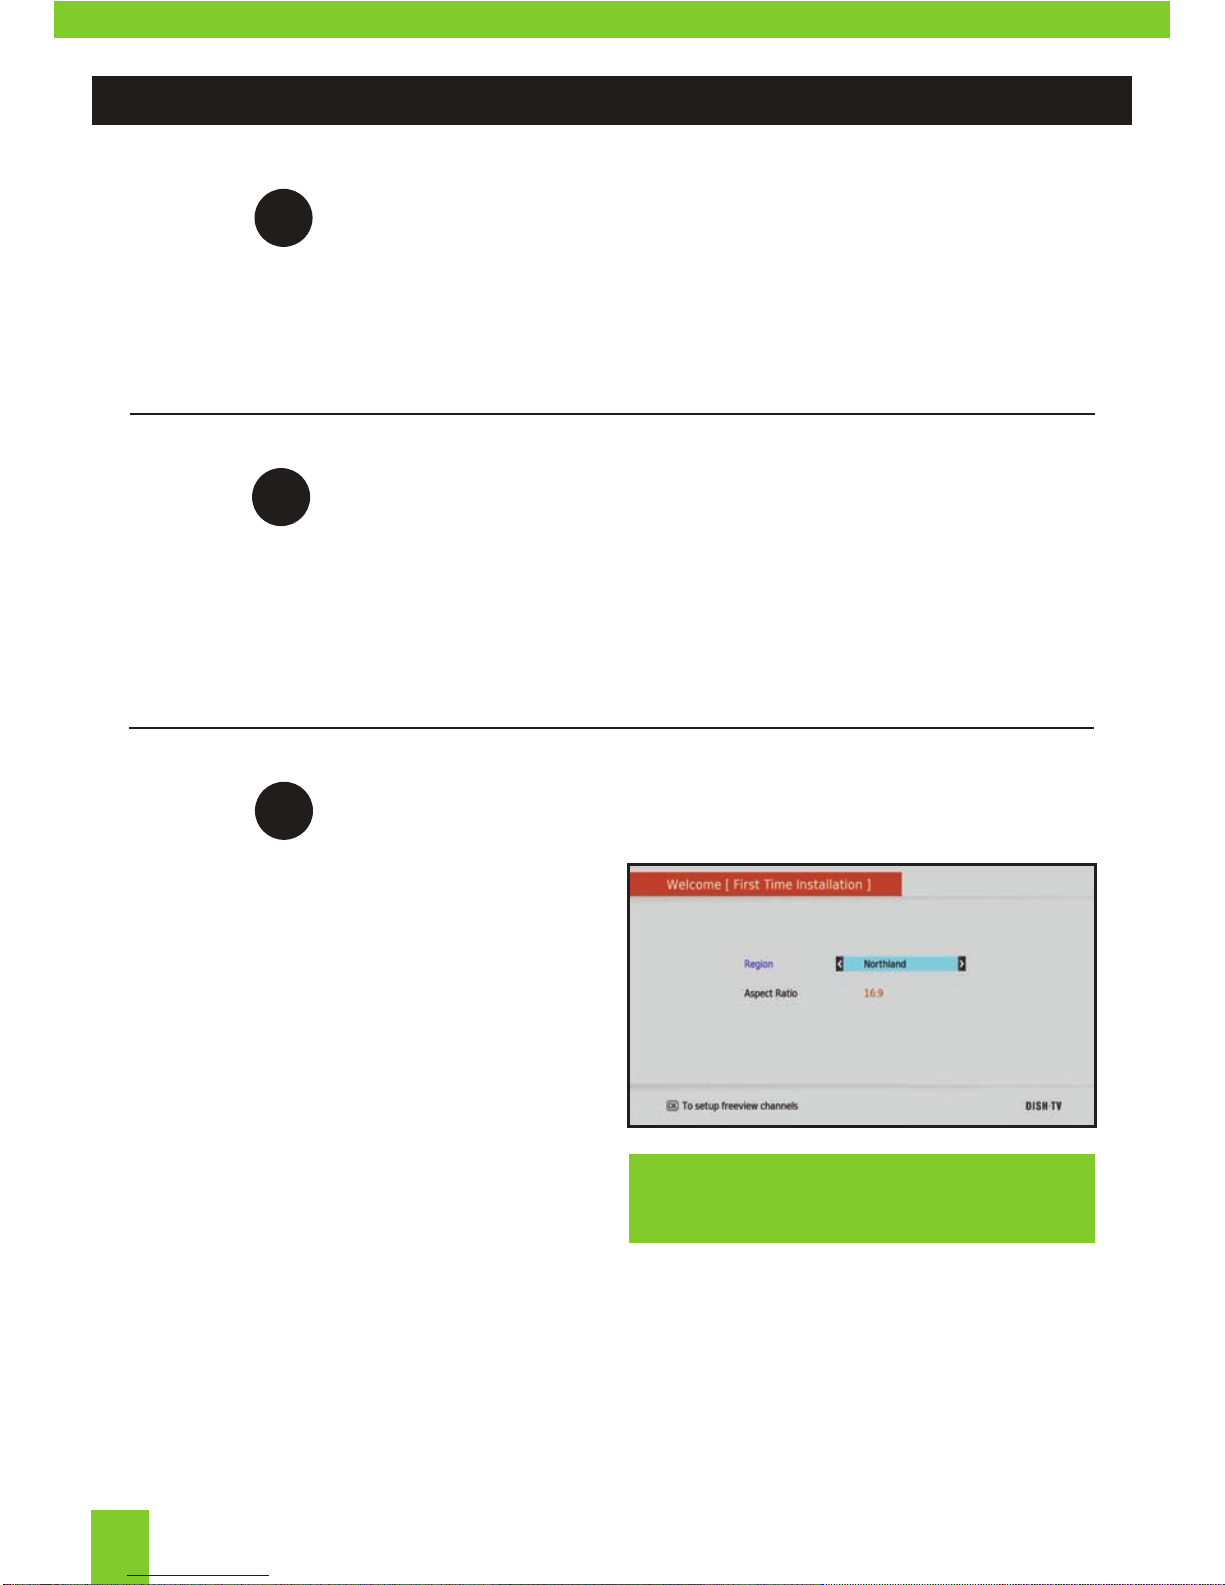
Welcome Screen
The Welcome Screen should appear on your
TV* when the receiver is first turned on.
Before pressing OK to continue the initial
setup, ensure you have your Region and
the Aspect Ratio correct.
Once you press OK, the receiver will start
the Auto-Scan to tune in all current available
Freeview Channels.
DO NOT push any buttons until the scan
has completed.
Step
1
Step
3
Step
*If the welcome screen does not appear, go to
the Menu, select Admin then Factory Reset.
The default Password is 0000.
GETTING STARTED:
08

Installation
Access all tuning related functions.
Channel Organiser
Manage all Channels.
Settings
Change general user settings, from Video
settings to preferred Language options.
Manual Timer
Manually set Wake Up Times.
All receiver’s settings and tuning options are accessed from the Main Menu. You may require
to access this menu if you wish to alter the Settings, Preferences or if you experience an
issue with the receiver and need to reset it. You can bring up the Main Menu by pressing
the MENU button on the Remote Control.
The Main Menu features several options:
EPG
View the Weekly EPG.
Admin
View Factory Reset and Software Updating
options.
System Info
Provides relevant information in regards to
the receivers software and support.
You can toggle between the options by using the
UP/DOWN and LEFT/RIGHT buttons.
MAIN MENU:
09
Main Menu
Main Menu
10
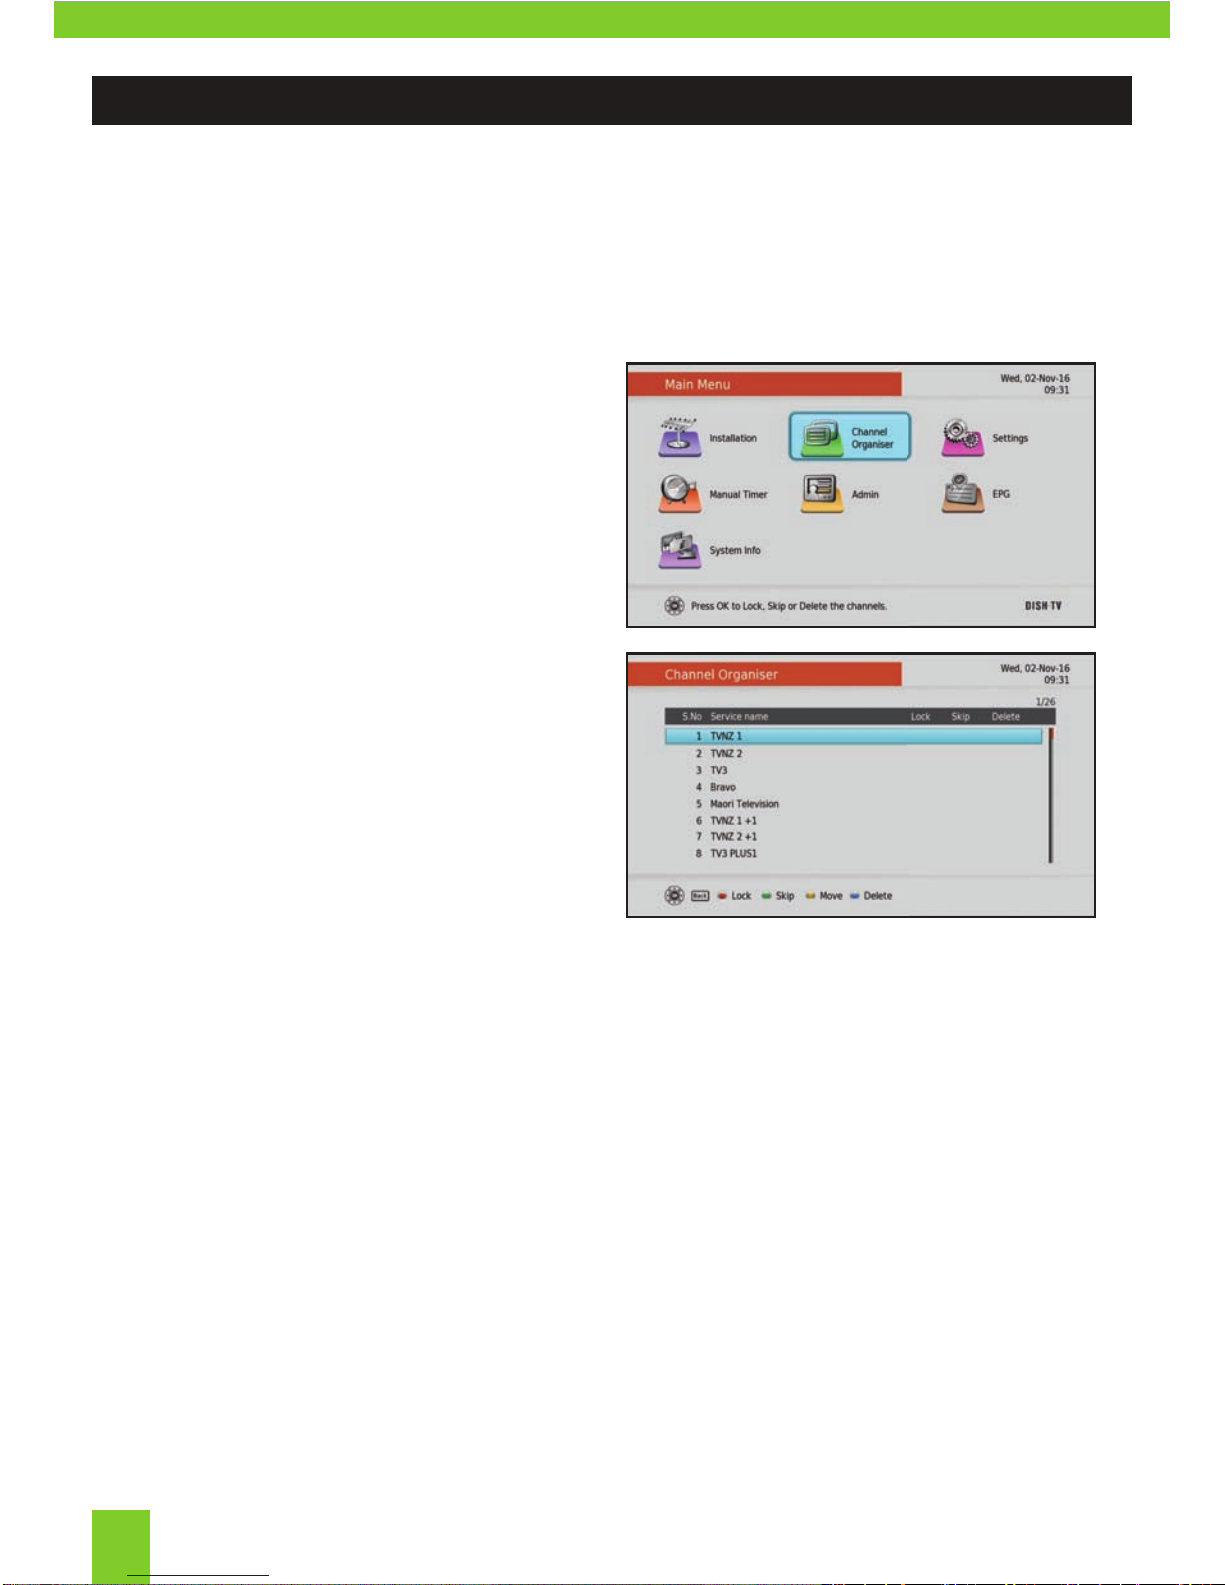
Channel Organiser
Main Menu - Organiser
Lock, Skip or Delete a Channel.
1. Press MENU on your remote.
2. Select Channel Organiser from the Main
Menu. Press OK.
3. Select a channel you wish to set using
the ▲▼ keys on the remote.
4. On your remote press the corresponding
colour:
RED: Lock Channel
Will lock the channel. To view the locked
channel, you will need to enter your PIN.
GREEN: Skip Channel
Will skip the channel when pressing the
CH+ and CH- key to browse channels.
YELLOW: Move Channel
Will move the channel to another position.
LCN will need to be turned OFF to allow
the change.
BLUE: Delete Channel
Will delet the channel from the list.
Press OK to confirm the operation.
NOTE, we never recommend turning LCN off as it can lead to
issues involving and not limited to recording, channel updates
and electronic program guide information.
MAIN MENU:
Table des matières
Autres manuels Dish TV Récepteur

Dish TV
Dish TV DishTV S7070r Manuel utilisateur

Dish TV
Dish TV DishTV S7070r Manuel utilisateur

Dish TV
Dish TV FreeviewHD T1000 Manuel d'utilisation et d'entretien

Dish TV
Dish TV SNT7070 Manuel utilisateur

Dish TV
Dish TV FreeviewHD T1000 Manuel utilisateur

Dish TV
Dish TV S9020DVD Manuel utilisateur

Dish TV
Dish TV S7070 Manuel utilisateur

Dish TV
Dish TV S7000 Manuel utilisateur

Dish TV
Dish TV S9000 Manuel utilisateur


