Directed Pixbee lullabi Manuel utilisateur
USER MANUAL
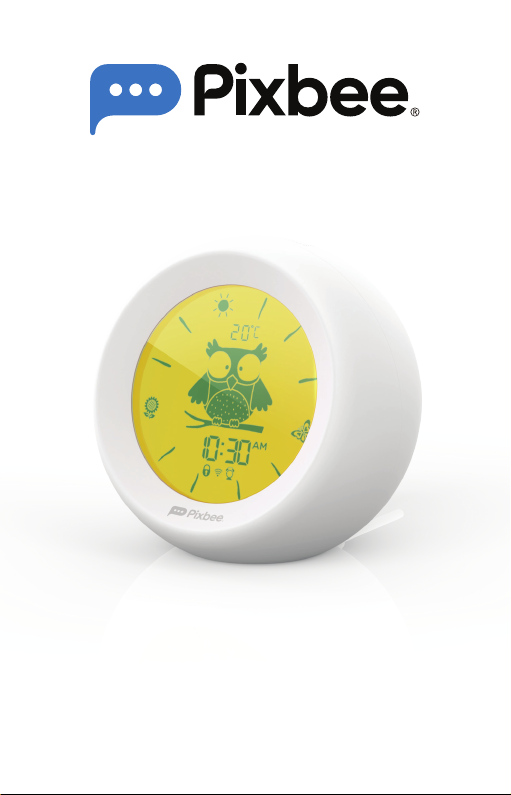
lullabi
Smart Sleep Trainer
with Night Light and White Noise
PXB-100L


3

4
CONTENTS
1.0 IMPORTANT SAFETY PRECAUTIONS................ 6
2.0 PRODUCT OVERVIEW ....................................... 7
3.0 OPERATING INSTRUCTIONS............................. 8
3.1 LCD screen............................................8
3.2 Snooze button.......................................8
3.3 Mode button (1) ....................................8
3.4 Mode button (2) ....................................9
3.5 Speaker .................................................9
3.6 USB Type-C port (power supply) ...........9
4.0 CHILD LOCK FUNCTION.................................. 10
5.0 TIME SETTING ................................................... 11
6.0 ALARM CLOCK SETTING..................................12
7.0 PIXBEE SMART LIFE APP ..................................13
8.0 LIGHTING ADJUSTMENTS................................15
9.0 THEME SELECTION ...........................................17
10.0 ALARM CLOCK SELECTION .............................19
11.0 APPLICATION SETTINGS..................................21
12.0 VOICE COMMANDS......................................... 23

5
13.0 TROUBLESHOOTING .......................................24
14.0 SPECIFICATIONS ............................................. 24
15.0 IN THE BOX....................................................... 25
16.0 WARRANTY TERMS AND CONDITIONS ......... 25

6
1.0 IMPORTANT SAFETY PRECAUTIONS
Please read these instructions carefully before
installing and using the product. Please retain
these instructions for future reference.
1. Use only the supplied USB Type-C cable and
AC power adaptor.
2. The LED light cannot be replaced. Please
do not dismantle or modify the device by
yourself as it will void the warranty.
3. Do not place or operate the product near
extreme heat sources, damp surroundings or
corrosive materials.
4. Do not operate the product with a damaged
power cord, after a malfunction has occurred
or if the product is damaged in any manner.
5. This product is not waterproof or designed
for rugged use.
6. Use only a dry cloth to clean and remove
dust.
7. Please follow local regulations when
disposing of or recycling this product and its
components.
8. If this product is not in use for prolonged
periods, please disconnect the power supply
and store it in a clean and dry place.
7
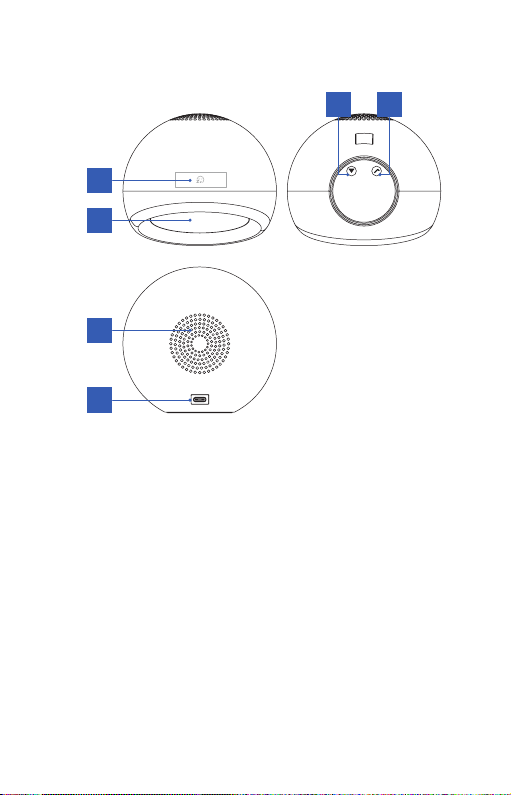
2.0 PRODUCT OVERVIEW
5
6
3 4
1
2
1. LCD screen
2. Snooze button
3. Mode button (1) for temperature, time, alarm
clock and child lock
4. Mode button (2) for time, time format, alarm
clock, child lock and Wi-Fi network pairing
5. Speaker
6. Type-C USB port

8
3.0 OPERATING INSTRUCTIONS
3.1 LCD SCREEN
• The screen will display various working
parameters such as temperature, time, child
lock, Wi-Fi, alarm clock, time format and
other information.
• Wake-Up mode: The time range is from 06:00
to 17:59. The sun, butterfly and sunflower
icons will flash 3 times every 5 minutes
(except for snooze mode).
• Sleep mode: The time range is from 18:00
to 05.59. All the 12 icons will flash 3 times in
sequence every 30 minutes.
3.2 SNOOZE BUTTON
• When the alarm sounds, short press the
Snooze button
Z
Z
to stop the alarm. Long
press for 3 seconds to adjust the brightness
from 1% to 100%.
• When entering snooze mode, the alarm
will sound every 10 minutes. The 12 icons
will continue to flash during snooze mode.
When the alarm sounds, you can continue to
operate other functions or turn off the alarm.
3.3 MODE BUTTON (1)
Used in combination with Mode button (2)
Temperature, time, alarm clock and child lock
• Short press the button to switch between
Celsius and Fahrenheit.

9
• Long press for 3 seconds to choose
time setting, alarm clock and selection
confirmation. Short press to exit setting.
• Temperature variation is ±3º. This is normal.
3.4 MODE BUTTON (2)
Used in combination with Mode button (1)
Time, time format, alarm clock, child lock and
Wi-Fi network pairing
• Short press the button to switch between
12-hr and 24-hr format.
• Long press for 3 seconds to enter into Wi-Fi
network pairing mode. When entering time
or alarm clock setting, short press to switch
options or adjust parameters.
• The default time format is 12-hr and AM and
PM will be displayed. AM and PM will not be
displayed for the 24-hr format.
• This device will enter into Wi-Fi network
pairing mode once it is powered on.
3.5 SPEAKER
• All sounds will be emitted from the speaker.
3.6 USB TYPE-C PORT (POWER SUPPLY)
• This product uses a USB Type-C power input
with an output voltage of DC5V/1A.
• It is recommended to use the original power
adaptor to avoid any hazards.

10
4.0 CHILD LOCK FUNCTION
The child lock prevents children from tampering
with the device settings.
• Press the and at the same time and
hold for 3 seconds to access the child lock
function.
• To exit the function, press the two buttons at
the same time and hold for 3 seconds.
• When child lock is activated, the child lock
icon will appear on the LCD display.
• Child lock function is also available in the
Pixbee Smart Life app.
Ce manuel convient aux modèles suivants
1
Table des matières


