Digitus DN-70181 Manuel utilisateur

300MBPS
WIRELESS-N REPEATER
Quick Installation Guide
DN-70181

Introduction:
DN-70181 is a WiFi Repeater with a combined wired/wireless network connection
designed specifically for small business, office, and home office networking
requirements. It allows a wireless network to be expanded using multiple access points
without the need for a wired backbone to link them. It also works well with other 11b/g
and 11n protocol wireless products.
NOTE: Please press and hold the reset bottom for 10 seconds to reset the Wi-Fi
Repeater.
Package Contents
Before you starting to use this WiFi repeater, please check if there’s anything missing
in the package, and contact your dealer of purchase to claim for missing items:
1 x Wireless-N Repeater
1 x RJ-45 Networking Cable
1 x Quick installation Guide
Getting Started
Setting up a Wireless Infrastructure Network
For a Typical Wireless setup at Home (as shown below), please do the following:
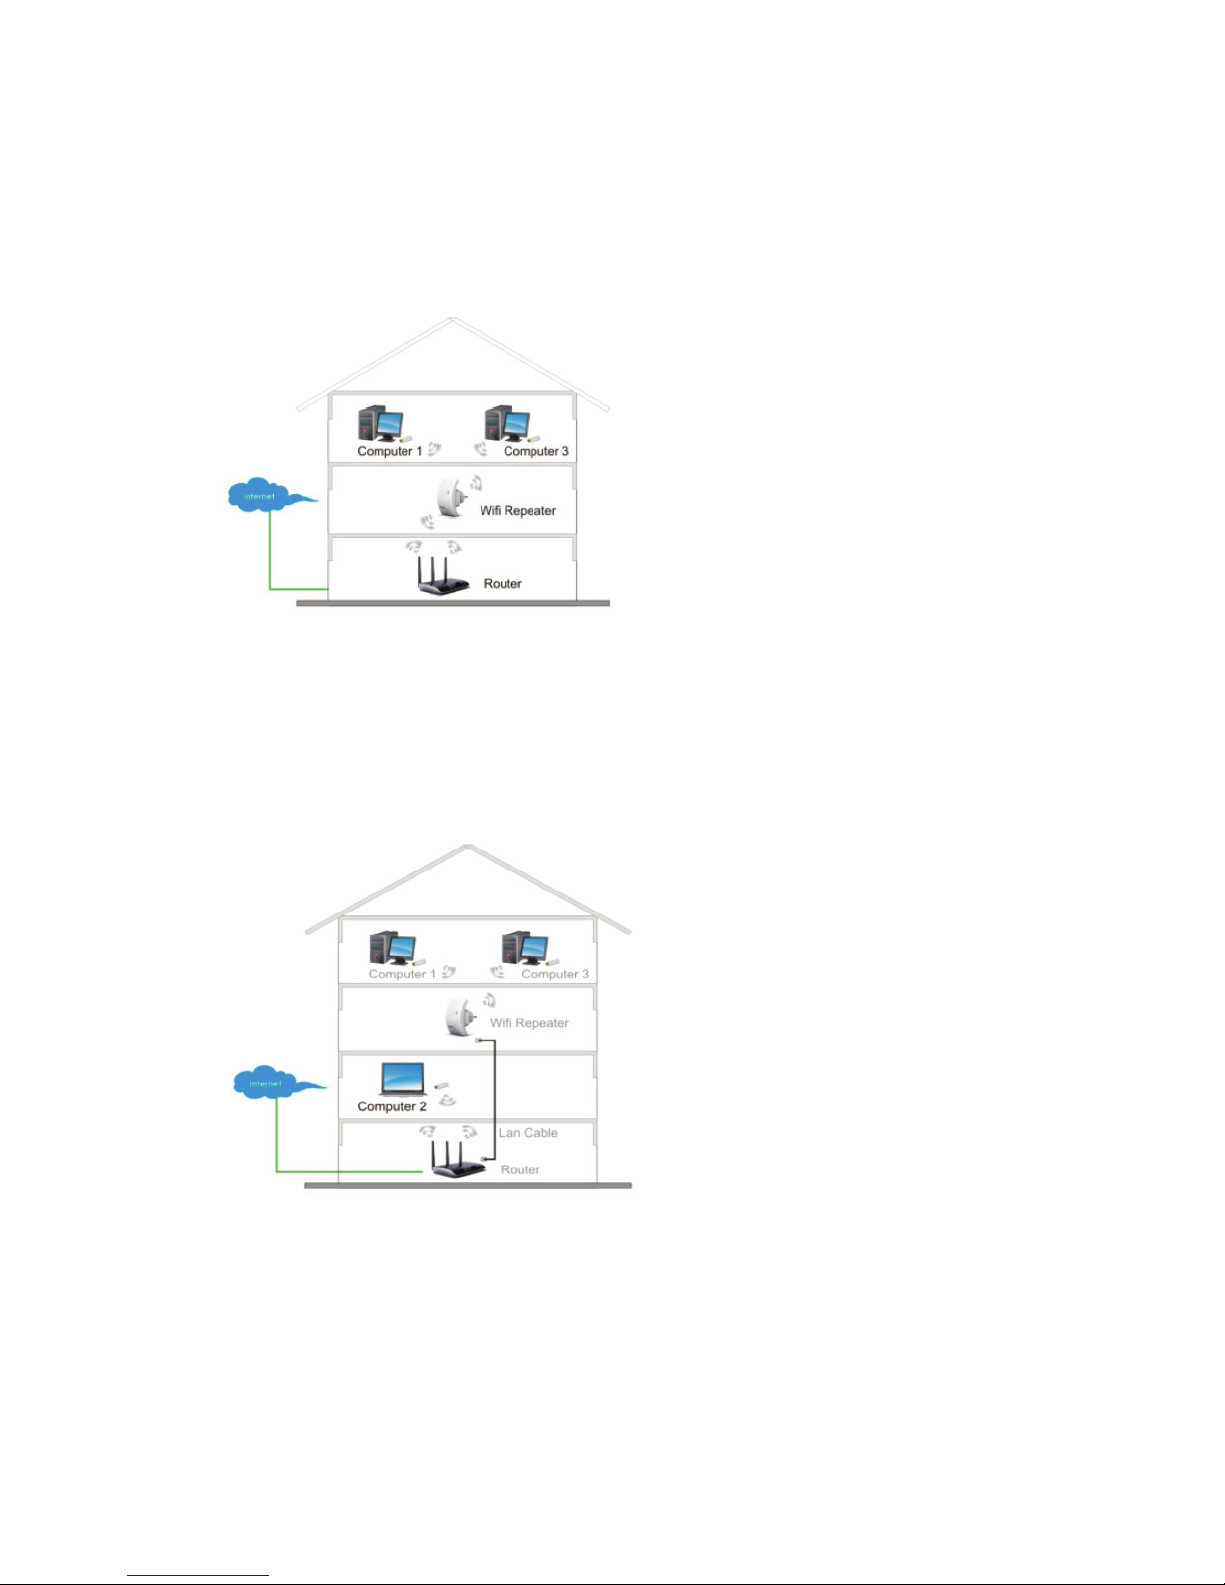
Wireless Repeater Mode
You will need WiFi AP/Router Internet access
Wireless AP Mode
You will need a broadband Router for Internet access
Connect the WiFi-Repeater to your Router/Switch withRJ-45 Cable

How to configure the Wi-Fi Repeater
You can configure the Wi-Fi Repeater after connecting it with your computer/laptop
with enclosed RJ45 cable or wirelessly.
A. Configure the Wi-Fi Repeater wirelessly
A1. Plug the Wi-Fi Repeater to a wall socket.
A2. Click on the network icon ( or ) on the right bottom of your desktop.
You will find the signal from the Digitus 300N Repeater.
Click on ‘Connect’ and wait for a few seconds.
A3. Open web browser and type http://192.168.10.1 in the browser's address box.
This number is the default IP address for this device.
Note: Please check whether the WiFi-Repeater accord with factory default settings
once you can’t download http://192.168.10.1. If you are still not sure what reasons,
you can reset the WiFi-Repeater, just need to press the reset button for 10 seconds,
then try again.
Digitus 300N Repeater

A4. The login screen below will appear.
Enter the “User Name” and “Password” then click “OK” to login.
The default User name is “admin” and Password is “admin”.
A5. After logging in and click “Setup Wizard”, you will see the web page below:
Select “Wireless Repeater Mode (Station)” then click on ‘Next’ to continue.

A6. Select your Wireless SSID to continue.
A7. When you see the site below, please do not change any setting
but only insert the key of your network.
Click on ‘Save and Reboot’ button, The Repeater will restart.
Wait for a few seconds your Wi-Fi Repeater is ready for use.
* The Wireless SSID and KEY of Wi-Fi Repeater is the same as your AP/router.

B. Configure the Wi-Fi Repeater with RJ45 Cable
1. Plug the Wi-Fi Repeater to a wall socket. Connect your computer / laptop
with the Wi-Fi Repeater with enclosed RJ45 Cable.
2. Follow process A3 to A7 to configure your Wi-Fi Repeater.
C. Configure the Wi-Fi Repeater with WPS Button
1. Plug the Wi-Fi Repeater into a wall socket.
2. Make sure WiFi-Repeater to be "Wireless Repeater Mode (Station)" Mode.
Step 1: Press the WPS button of the AP/Router directly for 3 seconds.
(Please check your AP/Router Manual with WPS configuration)
Step 2: Press the WPS button of the WiFi Repeater for 7 - 10 seconds.
Step 3: Wait a few seconds your Wi-Fi Repeater is ready for use.
* The Wireless SSID and KEY of Wi-Fi Repeater is the same as your AP/router.

D. Configure the Wireless AP Mode
1. Plug the Wi-Fi Repeater into a wall socket.
2. Follow process A3 to A4.
3. Select “Standard Wireless AP Mode” then click on ‘Next’ to continue.
4. The following message will be displayed on your web browser:
SSID: Main Service Set Identifier. It’s the "name" of your wireless network.
Channel Number: Auto (recommend)
Encryption: Setup the wireless security and encryption to prevent
from unauthorized access and monitoring.
Click on ‘Save and Reboot’ button, The Repeater will restart.
Wait a few seconds your Wi-Fi Repeater is ready for use.

How to connect your computer/laptop with the Wi-Fi Repeater
Adding a Wireless computer to the Wi-Fi Repeater
1. Log on to the computer.
2. Open Connect to a Network by right-clicking the network icon (or)
in the notification area.
3. Choose the wireless network from the list that appears, and then click Connect.
4. Type the network security key or passphrase if you are asked to do so,
and then click OK. You'll see a confirmation message when you are connected to the
network.
5. To confirm that you added the computer, do the following:
Open Network by clicking the Start button, and then clicking Control Panel.
In the search box, type network, and then, under Network and Sharing Center,
click View network computers and devices. You should see icons for the
computer you added and for the other computers and devices that are part of the
network.
Note: If you don't see icons in the Network folder, then network discovery
and file sharing might be turned off.
Adding a Wireless computers to the WiFi-Repeater with WPS Button
1. Log on to the computer.
2. Press the WPS button of the WiFi Repeater directly for 2 – 3 seconds.
3. Press the WPS button of the Wireless Adapter directly for 2 - 3 seconds.
Digitus router

Click Finish to complete the WPS configuration.
(Please check your Wireless adapter Manual with WPS configuration)
4. You should see icons for the computer you added and for the other
computers and devices that are part of the network.
Adding a wired (Ethernet) computer to the WiFi-Repeater
1. Plug the Wi-Fi Repeater to a wall socket. Connect your computer / laptop
with the Wi-Fi Repeater with enclosed RJ45 Cable.
2. To confirm that you added the computer, do the following:
Open Network by clicking the Start button, and then clicking Control Panel.
In the search box, type network, and then, under Network and Sharing Center, click
View network computers and devices. You should see icons for the
computer you added and for the other computers and devices that are part of the
network.
For more information:
http://windows.microsoft.com/en-US/windows7/Add-a-device-or-computer-to-a-network
http://windows.microsoft.com/en-US/windows7/Setting-up-a-wireless-network
http://windows.microsoft.com/en-US/windows-vista/Setting-up-a-wireless-network
How to configure your computer/laptop with
the Network IP Address
1. Log on to the computer.
2. Click the “Start” button (it should be located at
the lower-left corner of your screen), then click
“Control Panel”. Click “View Network Status and
Tasks”, and then click “Manage Network
Connections”. Right-click “Local Area Network”,
then select “Properties”. When the “Local Area
Connection Properties” window appears, select
“Internet Protocol Version 4 (TCP/IPv4)” and
then click “Properties”.
Table des matières
Autres manuels Digitus Répétiteur


