Defender wireless IP2KCB1 Manuel utilisateur

For the full product manual and support videos visit www.DEFENDER-USA.COM/SUPPORT
QUICK START GUIDE
2K (4MP) Wireless IP Camera
IP2KCB1
For the full product manual and support videos visit www.DEFENDER-USA.COM/SUPPORT
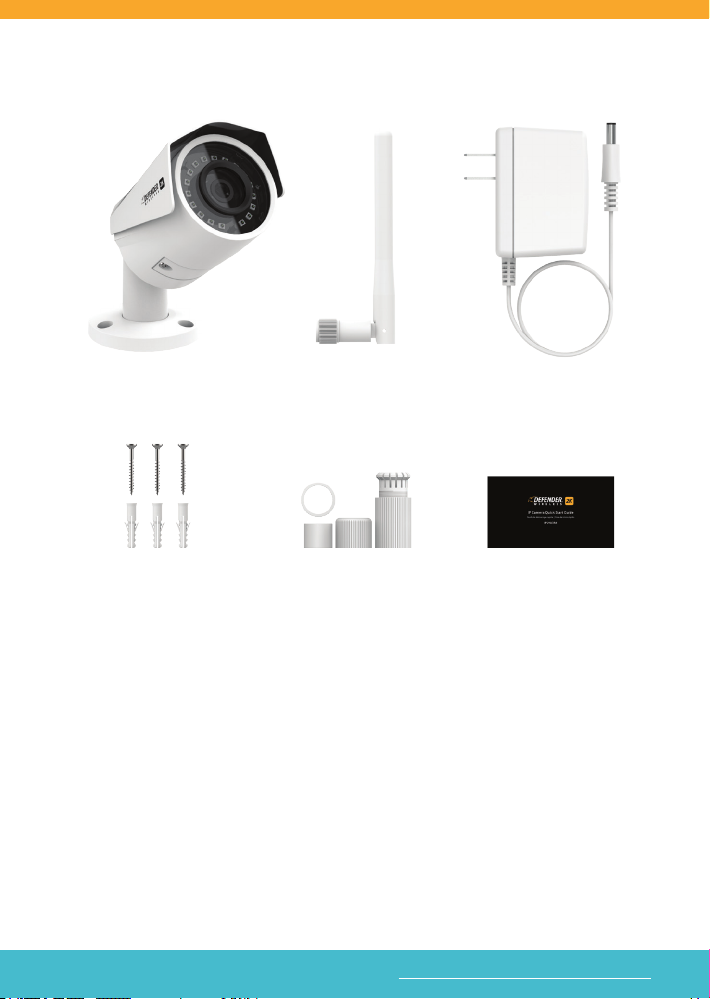
WHAT’S INCLUDED
WHAT YOU’LL NEED FOR SET UP & INSTALLATION
• Drill
• Phillips (#2) Screwdriver
• Ladder (if required)
• Cable Protectors (optional)
• Ethernet Cable (for rst time setup only depending on your Network setup)
NOTE: The IP 2K Camera will only work on 2.4 GHz frequency and is not
compatible with 5 GHz networks.
Wireless Wi-Fi 2K IP Camera with
pre-installed 16GB Micro SD Card
Camera Mounting
Hardware
Wireless Wi-Fi
Camera Antenna
Waterproof
Connectors
Camera Power
Supply (10ft)
Quick Start Guide

For the full product manual and support videos visit www.DEFENDER-USA.COM/SUPPORT For the full product manual and support videos visit www.DEFENDER-USA.COM/SUPPORT
GETTING STARTED
1. Connect the antenna to the camera.
2. Power on the camera by connecting the camera cable to the adapter
IMPORTANT: Depending on your Network setup, you may need to connect
the camera to your modem/router using an Ethernet cable (not included)
the rst time you add the camera to the app. Once you establish a connec-
tion you can remove the cable and continue using your Wi-Fi connection to
view the camera.
3. Connect the camera to your modem/router using an Ethernet cable for
rst time setup (not included)
*Optional: Router
Camera Reset
Button
SD Card
Input
1
2
3
NOTE: To access the Reset Button and SD Card (installed), remove the cover
on the back of the camera.
1
2
3

For the full product manual and support videos visit www.DEFENDER-USA.COM/SUPPORT
MOBILE APP SET UP
1. Download the SmartSignal mobile app from your app store. Open the
app on your device.
2. Follow the on-screen instructions to create your account. Setup
requires access to text or email to receive the Verication Code.
IMPORTANT: Depending on your mobile device your on-screen keyboard
may remain on the screen – minimize your keyboard to continue.
1
2

For the full product manual and support videos visit www.DEFENDER-USA.COM/SUPPORT For the full product manual and support videos visit www.DEFENDER-USA.COM/SUPPORT
CAMERA SET UP (ADD DEVICE)
1. Ensure your mobile device is connected to your Wi-Fi network (2.4 GHz)–
the camera and mobile device must be connected to the same network
for setup.
2. Once your account is activated, the Add Device screen will open.
Tap the + icon to add the camera.
3. Scan the QR Code on your camera and select Single Camera Setup.
If your Network allows, the camera will connect over Wi-Fi directly.
Follow the on-screen instruction to complete the camera setup.
NOTE: If the camera does not connect, follow the Setup Using Ethernet
Cable steps.
1
2
3

For the full product manual and support videos visit www.DEFENDER-USA.COM/SUPPORT
SETUP USING ETHERNET CABLE
1. Connect the camera to your modem/router using an Ethernet Cable
(not included) for rst time setup only.
2. Complete steps 1 & 2 from the Camera Set up (Add Device) section.
Tap Device connected to network link to continue - NOTE: DO NOT
tap Next.
1
2
3. Create an Admin Password for your Device (Camera) and Tap OK
to continue.
3

For the full product manual and support videos visit www.DEFENDER-USA.COM/SUPPORT For the full product manual and support videos visit www.DEFENDER-USA.COM/SUPPORT
4. Tap to select your Wi-Fi Network from the list. NOTE: the IP 2K Camera
will only work on 2.4 GHz frequency.
5. Enter your Wi-Fi Password and tap the Save icon (top of the screen)
to continue.
6. For both setup options once the camera is connected you will see the
Add successfully screen. Tap Start Preview to open the app.
NOTE: If you used a hard wire connection to get started, once the
camera has been connected to the app, you can disconnect the
Ethernet cable and use your Wi-Fi connection.
4
5
6

For the full product manual and support videos visit www.DEFENDER-USA.COM/SUPPORT
USING THE APP (MAIN SCREEN)
1 2
3 4 5
1. Camera Information
2. Motion Detection ON (yellow)/OFF
3. Device Selection
4. Alerts Received
5. Account Information & Settings
1
2
3
4
5
Install your camera in the desired
location. For more setup instruction,
access our full manuals and support
videos on the product page.

GUIDE DE DÉMARRAGE RAPIDE
Caméra IP sans l 2K (4MP) - IP2KCB1
GUÍA DE INICIO RÁPIDO
Cámara IP inalámbrica de 2K (4MP) - IP2KCB1

Pour le manuel complet du produit et les vidéos de support, visitez www.DEFENDER-USA.COM/SUPPORT
CE QUI EST INCLU / QUÉ ESTÁ INCLUIDO
CE DONT VOUS AVEZ BESOIN POUR
L’INSTALLATION ET L’INSTALLATION
• Percer
• Tournevis cruciforme (n ° 2)
• Échelle (si nécessaire)
• Protecteurs de câbles (optionnel)
• Câble Ethernet (pour la première instal-
lation uniquement en fonction de votre
conguration réseau)
REMARQUE: La caméra IP 2K ne fonctionnera
que sur une fréquence de 2,4 GHz et n’est pas
compatible avec les réseaux de 5 GHz.
LO QUE NECESITARÁ PARA LA
INSTALACIÓN Y LA INSTALACIÓN
• Perforar
• Destornillador Phillips (# 2)
• Escalera (si es necesario)
• Protectores de cable (opcionales)
• Cable Ethernet (solo para la conguración
por primera vez, dependiendo de su
conguración de red)
NOTA: La cámara IP 2K solo funcionará en una
frecuencia de 2,4 GHz y no es compatible con
redes de 5 GHz.
Caméra IP Wi-Fi 2K sans l avec carte Micro
SD 16 Go préinstallée
Cámara inalámbrica Wi-Fi 2K IP con tarjeta
Micro SD de 16 GB preinstalada
Le matériel de montage
Accesorios de montaje
Antenne Caméra
Antena de camara
Connecteurs Etanches
Conectores a prueba de agua
Alimentation de la caméra (10ft)
Fuente de alimentación de la cámara
(10 pies)
Guide de démarrage rapide
Guía de inicio rápido
Autres manuels pour IP2KCB1
1
Table des matières


