DC MONT DC-MPPT-MPK2-40A Manuel utilisateur

MPPT CONTROLLER USER MANUAL
PLEASE READ THIS MANUAL CAREFULLY BEFORE OPERATION AND MAINTENANCE,
FOLLOW ALL PROVIDED WARNING & CAUTION, AND KEEP IT FOR FUTURE REFERENCE.
SKU: DC-MPPT-MPK2-40A / DC-MPPT-MPK2-60A / DC-MPPT-MPK2-100A
MONT
V1.0

SAFETY INSTRUCTIONS
General Safety Information
Read all of the instructions and cautions in the manual before beginning the installation.
There are no serviceable parts for this controller. Do NOT disassemble or attempt to repair the
controller.
Do NOT allow water to enter the controller.
Make sure all connections going into and from the controller are tight.
Charge Controller Safety
NEVER connect the solar panel to the controller without a battery.
Do NOT use the solar controller to charge non-rechargeable batteries. Doing so may result in harm
to the user and/or damage the solar module, battery and controller.
MONT
BATTERY SAFETY
Use only sealed lead-acid, flooded or lithium batteries which must be deep cycle.
Explosive battery gases may be present while charging. Be certain there is enough ventilation to
release the gases.
Be careful when working with large lead acid batteries. Wear eye protection and have fresh water
available in case there is contact with the battery acid.
Carefully read battery manuals before operation.
Do NOT let the positive (+) and negative (-) terminals of the battery touch each other.
Recycle battery when it is replaced.
Equalization is carried out only for flooded lead acid batteries. Do NOT equalize VRLA type AGM /
gel / lithium cell batteries UNLESS permitted by battery manufacturer.
Battery must be connected first, then the solar panel, finally the load.
Otherwise it may cause a dangerous occurrence where the controller would
experience a high open circuit voltage at the terminals.
Once equalization is active in the battery charging, it will not exit this stage
unless there is adequate charging current from the solar panel. There should
be NO load on the battery when in equalization charging stage.
WARNING!
CONTENTS
1 x MPPT Solar Controller
1 x Bluetooth Module
1 x Remote Temperature Sensor
1 x User Manual
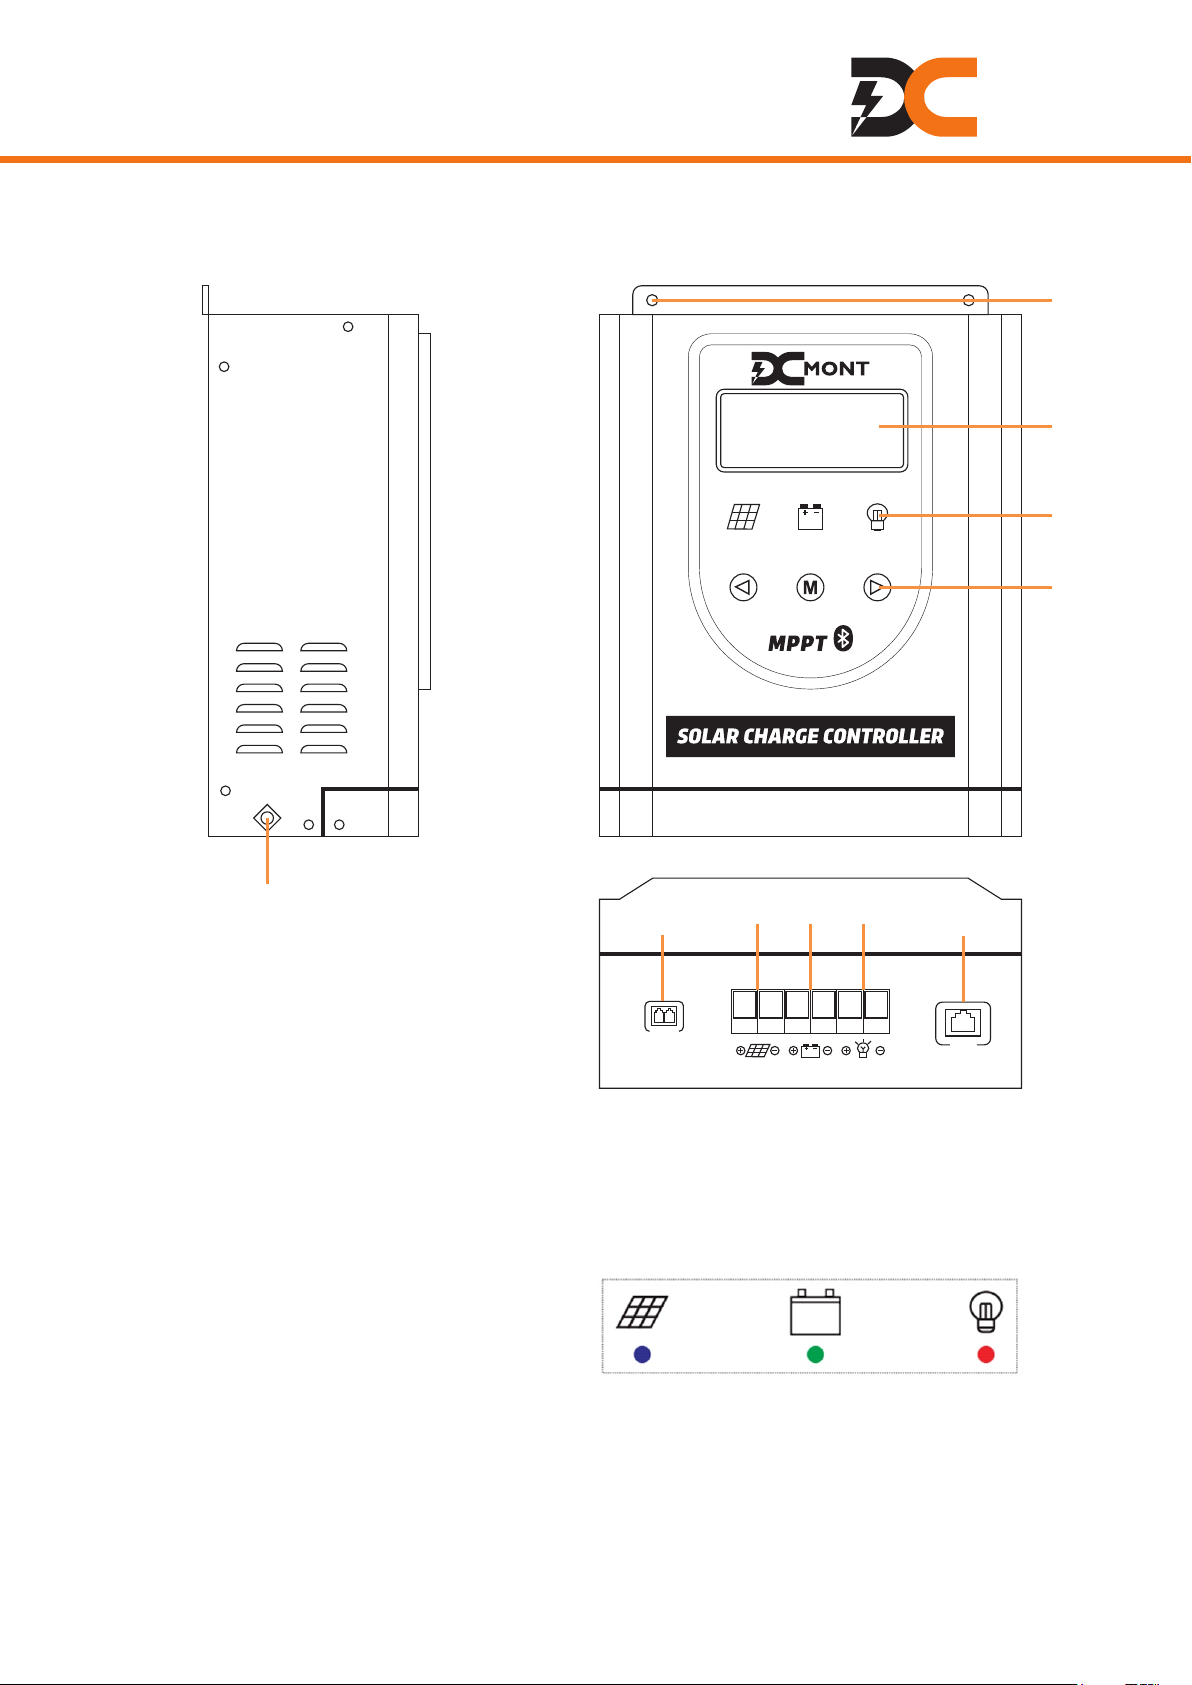
IDENTIFICATION OF PARTS
LCD Screen Indicators Buttons Remote Temperature Sensor Port
Solar Panel Terminals Battery Terminals Load Terminals
Communication Port Grounding Terminal Mounting Holes
MONT
RS485
Temp Senser
①
②
③
④⑤⑥⑦⑧
⑨
⑩
LED INDICATORS
Blue indicator (left):
on -> bulk charge, flashing -> equalization, absorption or floating charge, off -> stop charging.
Green indicator (middle):
on -> battery is normal, flashing quickly -> battery is over-voltage, flashing slowly -> battery low
voltage, off -> battery voltage is too low or not connected.
Red indicator (right):
on -> load is on, flashing -> overload, off -> load is off.
SOLAR PANEL BATTERY DC LOAD

MONT
INSTALLATION
Choose a mounting location on a vertical surface which should be protected from direct sunlight,
high temperatures, and water. Make sure there is good ventilation.
Verify that there is sufficient room to run wires, as well as clearance above and below the controller
for ventilation. The clearance should be at least 6 inches (150mm).
Secure the controller on the mounting location.
Switch off the air switch or fuse of the battery, solar panel and load.
Connect the battery to the battery terminals on the controller.
Connect the solar panel to the solar panel terminals on the controller.
Connect the load to the load terminals on the controller.
Switch on the fuse of the battery first, then the air switch of the solar panel, finally the fuse of the load.
12V Battery
Remote
Temperature
Sensor BLUE TOOTH
Fuse
Air-switch
Fuse

MONT
REMOTE TEMPERATURE SENSOR
This sensor measures the temperature at the battery and uses this data for very accurate
temperature compensation.
Simply connect the cable of the sensor and adhere the sensor on top or the side of the battery to
record ambient temperature around the battery.
BLUETOOTH MODULE
With the Bluetooth module, you can monitor your system and change parameters directly from your
cell phone.
DOWNLOADINGAPP
Search and download “SController2.1” in App Store on your iPhone.
For the Android version, you can scan the QR code to download and install the App.

MONT
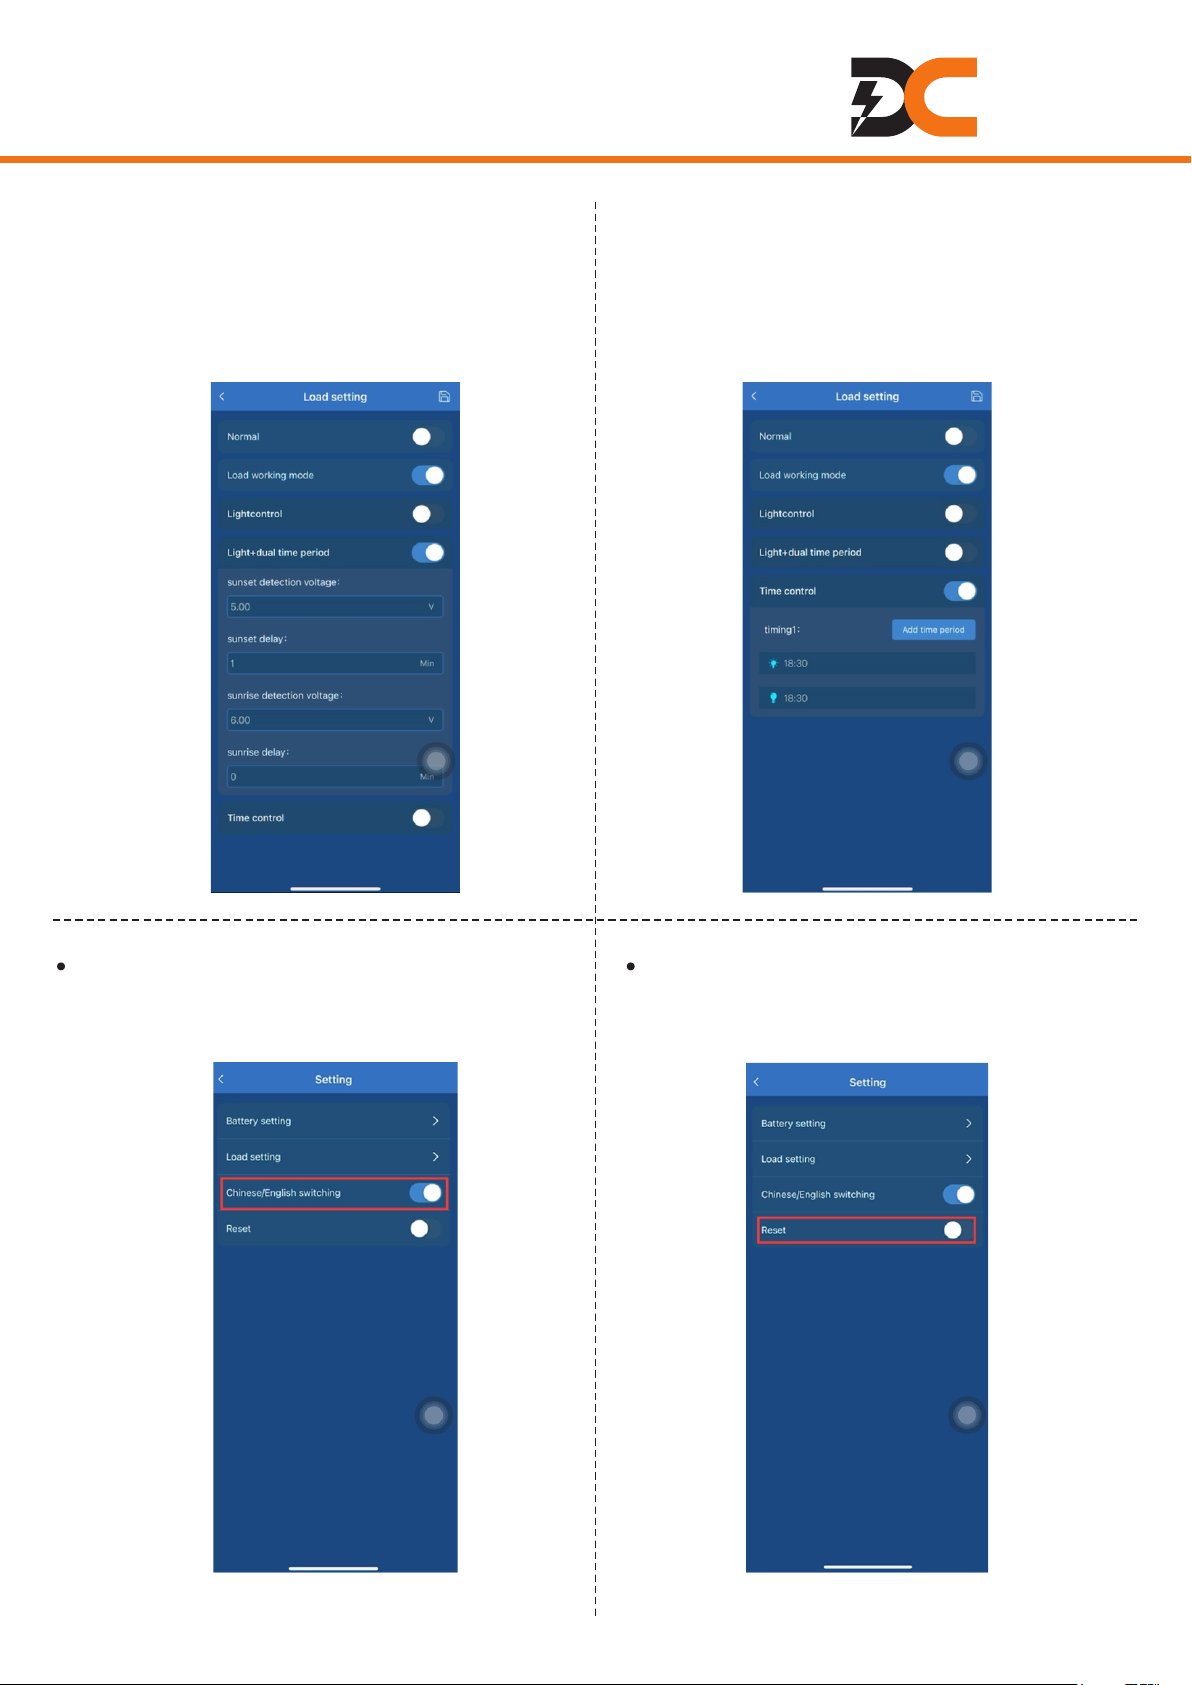
Click on the right top of the interface for battery setting, load setting, Chinese / English switching
and reset.
OPERATION
Plug the Bluetooth module into
the RS485 port of the charger.
Enter the App interface and click
“Bluetooth”.
Choose and click “BT18”, you can see real-time status of
solar panel, battery, load, power generation and electricity
consumption.

MONT
Load working mode
By switching on “Load working mode”, you can
choose other working modes for the load, i.e.
(1) light control mode, (2) dual time period
control mode or (3) time period control mode.
(1) Light control
As the interface shows, the load will turn on
when the voltage of the solar panel decreases
to 5V at sunset and turn off when the voltage
reaches 6V at sunrise.
1. Battery Setting
In this interface, you can choose battery type,
system voltage, and set up battery parameters
(absorption voltage, absorption duration, over
voltage disconnection voltage, etc.).
2. Load Setting
In this interface, you can choose normal
working mode or other working modes.
Normal
By switching on “Normal”, the load will work for
24H per day.
MONT
3. Chinese / English Switching
By switching on/off this switch, you can set
the system language to English / Chinese.
4. Reset
By switching on “Reset”, you can reset the
controller to factory settings.
(2) Dual time period control
As the interface shows, the load will be on for
1 minute after sunset (solar panel voltage
decreases to 5V) and be on for 0 minute before
sunrise (solar panel voltage reaches 6V). The
load working time duration can be set up.
(3) Time period control
In this interface, you can set up load working
time period.

MONT
Main Display
On the main display, you can check charging & discharging current, battery voltage, system voltage,
battery type, etc. Press to the time interface displaying time and date. Press to the capacity
interface displaying charging & discharging capacity.
Interface will remain if the machine works well. It will switch automatically to the fault interface (check
ERROR CODE CHART in this manual for information) after 15s if something is out of work. Press
/ to exit the fault interface.
LCD Display Interface
Load On/Off Setting: On the main display, press to switch on/off the load.
M
OPERATING THE CONTROLLER
LCD Display Interface Overview
12345 6 7
8
9
10
11
1. Solar panel
2. Working status
3. System voltage level
4. Charging
5. Battery capacity
6. Discharging
7. Battery type
8. Load working mode&status
9. Unit
10. Day/night
11. Characters

MONT
Sound Setting: To set sound, long press on the time interface to turn on/off sound.
Total Capacity Count: Maximum total charging / discharging capacity is 65KAH. Once over 65KAH,
the count starts again from 0 Ah. On the main display, press to enter the capacity interface. Then
long press over 5s to restart charging capacity count. Long press over 5s to restart
discharging capacity count.
Restore Factory Settings: On the capacity interface, long press to restore factory settings.
M
Time and Date Setting: On the main display, press to enter the time interface. Then long press
for over 5s to enter the setting interface. From left to right, it is date, month, hour, minute, year
and day of week. Short press or to modify, and long press for over 5s to save. Short
press to switch. Month: 1~9 stands for January~September; O stands for October; N stands for
November; D stands for December.
MM
M
Panel Voltage Display: On the main display, long press for over 5s to check PV voltage.
5
5
5
5
5
date month hour minute date of week year date of week
Ce manuel convient aux modèles suivants
2
Table des matières


