DB POWER SBB-55210 Manuel utilisateur

Bluetooth Soundbar
User Manual
MODEL: SBB-55210
2018.03.
01
16:52:53
+08'00'

What’s in the box ..........................................................................................................2
Product diagram ...........................................................................................................3
1DLNSDÊBNMSQNKÊJDXÊCDȭM@SHNMÊ
Battery installation for remote control.............................................................5
Placement and mounting .......................................................................................6
General operation ........................................................................................................7
Bluetooth pairing and connection.......................................................................8
Optical digital audio in operation..........................................................................8
Line in and Aux in opertation ..............................................................................10
Troubleshooting...........................................................................................................11
&DQMDQ@KÊRODBHȭB@SHNMR
FCC statement and Safety instructions.........................................................13
TABLE OF CONTENTS

WHAT’S IN THE BOX
Soundbar Remote Control with CR2025 Battery
User Manual Power Adapter
Aux In cable
Digital Optical Cable
Line In Cable
2
Bluetooth Soundbar
User Manual
MODEL: SBB-55210

PRODUCT DIAGRAM:
Front View
Rear View
Top View
2. Mode Indicator
1. Remote sensor
3. Speaker 3. Speaker
8. STANDBY/
SOURCE button
9. Play/Pause button
10. Volume down button
11. Volume up button
3
3
5. Aux in 7. DC in jack
6. Line in
Ê.OSHB@KÊHMÊ
LINE IN

REMOTE CONTROL KEY DEFINATION
Power
Volume +
/QDRRÊSNÊSTQMÊNMNȬÊ
the device
Press to increase volume
Previous Next
Press to return to
previous track Press to skip to the
next track
News Mode
Press to adjust news
DȬDBS
Music Mode
Press to adjust music
DȬDBS
Treble Mode
Press to enter treble
adjustment mode
Press and hold 5
seconds to restore
default settings
Pause/Play
Press to play or pause
Mute
Press to mute/unmute
Volume -
Press to decrease volume
Source
Press repeatedly to switch
Bluetooth/Optical/Line in
Aux mode
Movie Mode
/QDRRÊSNÊ@CITRSÊLNUHDÊDȬDBS
Bass Mode
Press to enter treble
adjustment mode
Press and hold 5 seconds
to restore default settings

BATTERY INSTALLATION FOR REMOTE CONTROL
5
Battery installation:
1. Press and slide out the battery door as shown in Fig.1.
2. Replace the battery with a new CR2025(3V) button cell with the polarity marking
upward as shown in Fig.2.
Ê(MRDQSÊSGDÊA@SSDQXÊCNNQÊA@BJÊ@F@HMÊ@MCÊL@JDÊHSÊȭQLÊ@RÊRGNVMÊHMÊ%HF
3VGCR2025
CR2025
3VGCR2025
Fig.1 Fig.2 Fig.3
CR2025
BATTERY PRECAUTIONS
Follow these precautions when using a battery in this device:
Ê4RDÊNMKXÊSGDÊRHYDÊ@MCÊSXODÊNEÊA@SSDQXÊRODBHȭDC
2. Be sure to follow the correct polarity when installing the battery as indicated in
the battery compartment, a reserved battery may cause damage to the device.
Ê#NÊMNSÊLHWÊCHȬDQDMSÊSXODRÊNEÊA@SSDQXÊSNFDSGDQÊÊDFÊ KJ@KHMDÊ@MCÊ"@QANMYHMBÊ
or old battery with fresh ones.
Ê(EÊSGDÊA@SSDQXÊHMÊSGDÊCDUHBDÊ@QDÊBNMRTLDCÊNQÊSGDÊCDUHBDÊHRÊMNSÊSNÊADÊTRDCÊENQÊ@ÊKNMFÊ
period of time, remove the battery to prevent damage or injury from possible
leakage.
5. Do not try to recharge the battery as it is not intended to be recharged; it can
overheat and rupture. ( Follow the battery manufacturer’s instructions.)
Ê3GDÊA@SSDQXÊRG@KKÊMNSÊADÊDWONRDCÊSNÊDWBDRRHUDÊGD@SÊRTBGÊ@RÊRTMRGHMDÊNQÊȭQD
7. Clean the battery contacts and also those of the device prior to battery
installation.
8. The remote control is supplied with a coin/button cell
battery. If the coin button cell battery is swallowed, it
can cause severe internal burns in just 2 hours and can
lead to death. Keep new and used battery away from
children. If the stop using the product and keep it
CR2025

PLACEMENT AND MOUNTING
MOUNTING TO THE WALL
6
1. Placing the device on table - Ventilation
When placing the Sound Bar on an entertainment center, bookshelf, or Bany type of
enclosed space, be sure to allow at least 2-3 inches of space around the Sound Bar
for ventilation. If the Sound Bar is enclosed in a tight space, without ventilation,
heat generated from the Sound Bar could produce a potential heat hazard.
2.1 Mounting to wooden wall
away from children.If you think battery might have been swallowed or placed any
part of the body, seek immediate medical attention.
CAUTION
λÊÊDanger of explosion if the battery is incor rectly replaced.
λÊReplace only with the same or equivalent type.
Remote control operation range
λÊWhen there is an obstacle between the remote and the transmitter, the unit may
not operate.
λÊ6GDMÊCHQDBSÊRTMKHFGSÊ@MÊHMB@MCDRBDMSÊK@LOÊȮTNQDRBDMSÊK@LOÊNQÊ@MXÊNSGDQÊRSQNMFÊ
light shines on the REMOTE SENSOR of the unit, the operation of the remote may be
unstable.
19.3 inches
(screws not included)
2-3inches
2-3inches

GENERAL OPERATION
7
A. Mark the position of the mounting screws on the wall using a pencil.
B. Drill the screws directly into the marks that you have made on the wall and leave
approx. 0.3 inches length to hook the sound bar.
"Ê/TSÊSGDÊRNTMCÊA@QÊNMSNÊSGDÊLNTMSHMFÊRBQDVRÊ,@JDÊRTQDÊSGDXÊ@QDÊȭQLÊ@MCÊRS@AKD
NOTE: The indicators also function as a volume indicator. When the volume + / -
A. Mark the position of the mounting screws on the wall using a pencil.
B. Drill 2 holes on wall with a powerful electric drill.
"Ê(MRDQSÊSGDÊȭWHMFÊOKTFÊ@MCÊG@LLDQÊHMSNÊSGDÊGNKDR
#Ê2DBTQDÊSGDÊRBQDVRÊHMSNÊSGDÊȭWHMFÊOKTFÊ@MCÊKD@UDÊ@OOQNWÊÊHMBGDRÊKDMFSGÊSNÊGNNJ
the sound bar.
$Ê/TSÊSGDÊRNTMCÊA@QÊNMSNÊSGDÊLNTMSHMFÊRBQDVRÊ,@JDÊRTQDÊSGDXÊ@QDÊȭQLÊ@MCÊRS@AKD
1. Connect the Adapter to the unit and wall outlet. The red indicator will light.
2. Press and hold the STANDBY/SOURCE button on the unit or press the button
on remote control to power on the unit.
3. Press the STANDBY/SOURCE button on the unit or press the SOURCE on remote
control repeatedly to switch to desired mode. The color of the mode indicator will
turn to:
2.2 Mounting to brick wall
RBQDVRÊ@MCÊOK@RSHBÊȭWHMFÊOKTFÊ@QDÊMNSÊHMBKTCDC
19.3 inches
Bluetooth Indicator Flashing Blue Not paired to any Bluetooth device
Optical Mode
Line in Mode
Aux in Mode
Paired
Solid Blue
Solid Indigo
Solid Green
Solid Violet
Optical Indicator
Line in Indicator
Aux in Indicator

OPTICAL DIGITAL AUDIO IN
BLUETOOTH PAIRING AND CONNECTION
8
ATSSNMÊHRÊOQDRRDCÊSGDÊ+$#ÊHMCHB@SNQRÊVHKKÊȮ@RGÊTOÊNQÊFNÊNȬÊNMDÊAXÊNMDÊSNÊRGNVÊ
the increased or decreased volume,it will turn to solid light when the maximum or
minimum volume is pressed.
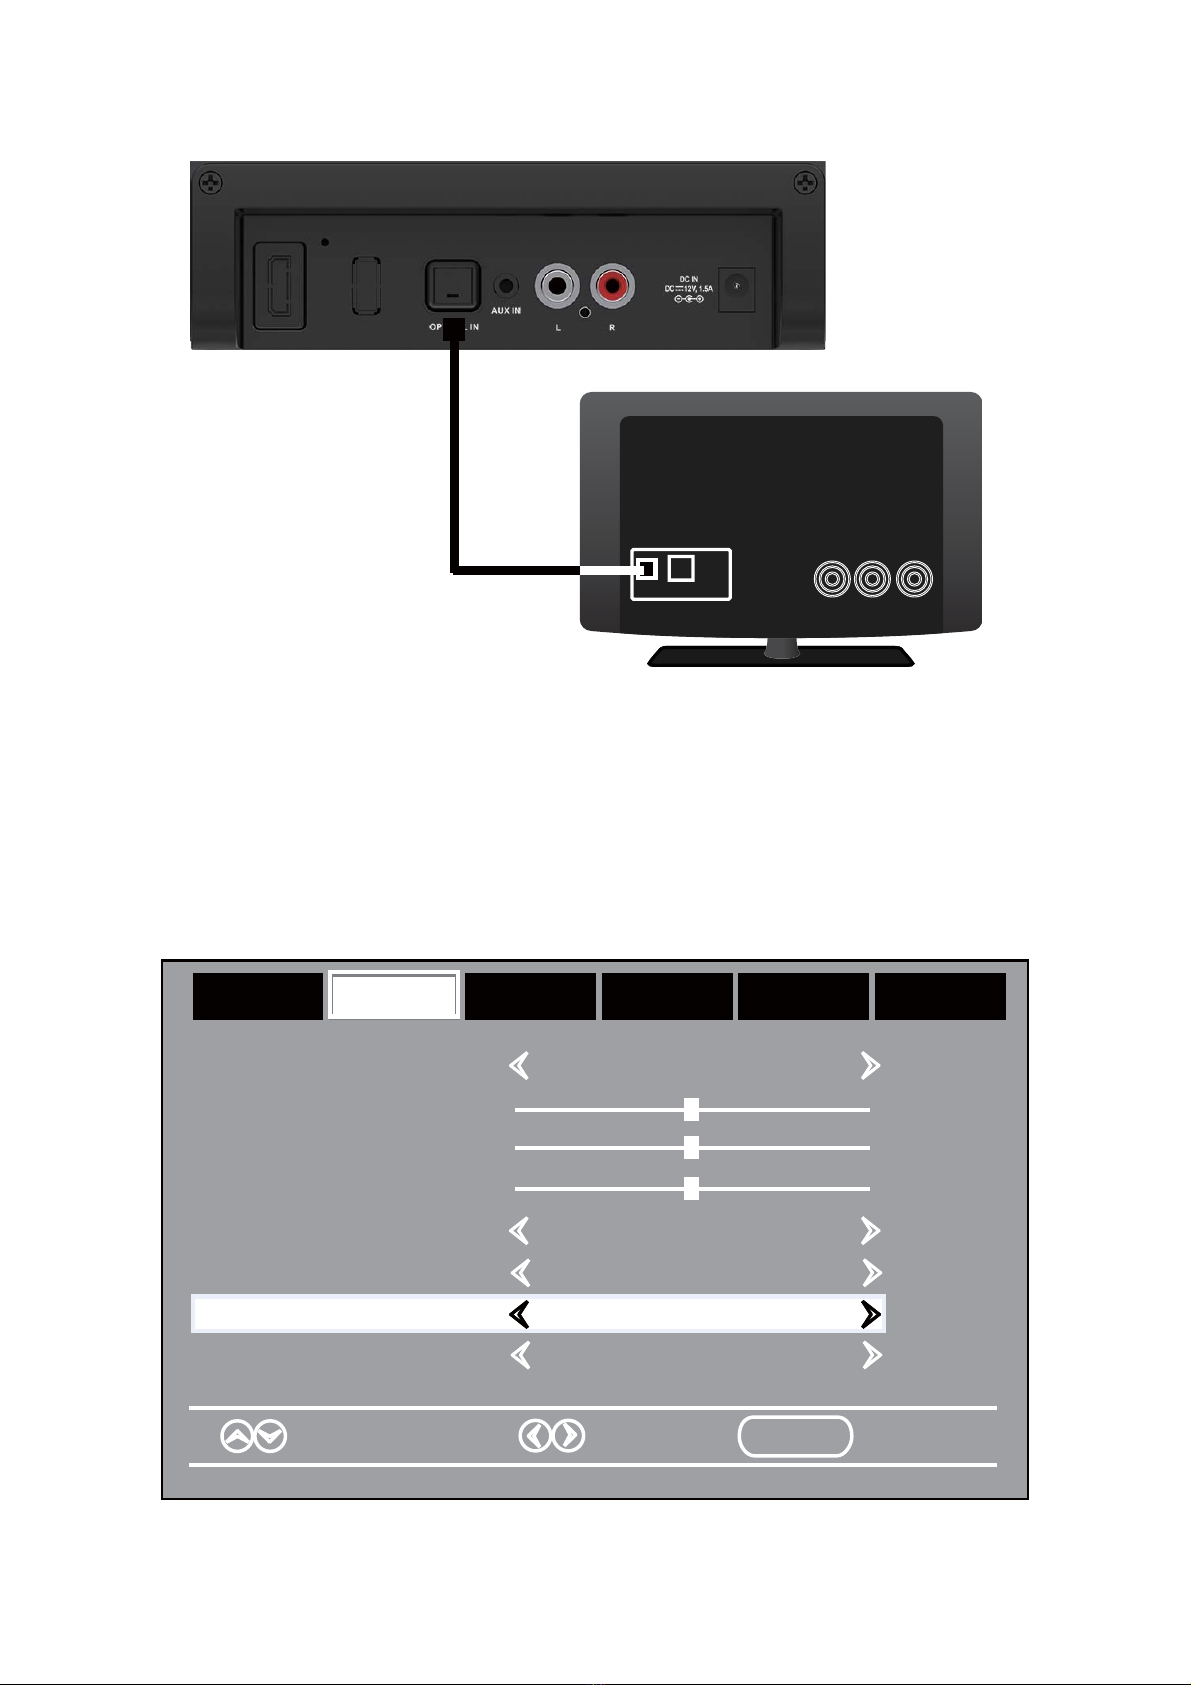
1. Connect the Optical out jack from the external audio player (such as TV, DVD
player etc.) to the OPTICAL IN jack on the rear of the unit with the optical
connection cable as illustated below:(For PCM format only)
1. Power on the unit as previously explained.
2. Press the STANDBY/SOURCE button on the unit or press the SOURCE button on
remote control repeatedly until the indicator turns to Blue and blinks.
3. Power on the external Bluetooth enable device and enter Bluetooth mode and try
searching the unit.
Ê6GDMÊ2!!Ê@OOD@QRÊRDKDBSÊHSÊ@MCÊL@JDÊBNMMDBSHNM
Ê ȱDQÊRTBBDRRETKÊO@HQDCÊSGDÊ!KTDÊHMCHB@SNQÊVHKKÊRS@XÊKHS
6. During playback:
~ Press the or button on remote control to skip tracks.
~ Press the button on remote control to pause, press it again to resume.
NOTE: The unit will be automatically connected with the last paired Bluetooth device
if their Bluetooth function are activated and they are in working range.
Ê1DLNSDÊBNMSQNKÊRDSTO
~ Press the Vol+ or Vol- buttons to adjust volume.
]Ê/QDRRÊSGDÊ,43$ÊATSSNMÊNMÊQDLNSDÊBNMSQNKÊSNÊSTQMÊNMÊNQÊSTQMÊNȬÊSGDÊRNTMC
]Ê/QDRRÊSGDÊ-$62ÊNMÊQDLNSDÊBNMSQNKÊSNÊRDSÊSGDÊMDVRÊRNTMCÊDȬDBS
]Ê/QDRRÊSGDÊ,.5($ÊNMÊQDLNSDÊBNMSQNKÊSNÊRDSÊSGDÊLNUHDÊRNTMCÊDȬDBS
]Ê/QDRRÊSGDÊ,42("ÊNMÊQDLNSDÊBNMSQNKÊSNÊRDSÊSGDÊLTRHBÊRNTMCÊDȬDBS
~ Press the BASS button on remote control repeatedly to set bass level.
~ Press the TREBLE button on remote control repeatedly to set treble level.
NOTE: Both BASS and TREBLE button have seven levels of adjustment with 0 as the
default. A single press sequentially gives +1, +2, +3, -3, -2, -1 and back to 0.
Ê6GDMÊȭMHRGÊKHRSDMHMFÊOQDRRÊ@MCÊGNKCÊSGDÊ23 -#!82.41"$ÊATSSNMÊNMÊTMHS
NQÊOQDRRÊSGDÊÊÊÊÊÊÊÊÊATSSNMÊNMÊQDLNSDÊBNMSQNKÊSNÊONVDQÊNȬÊSGDÊTMHSÊ@MCÊOTSÊHSÊHMSN
standby mode.
9
2. Power on the unit as previously explained.
3. Press the STANDBY/SOURCE button on the unit or press the SOURCE button
on remote control repeatedly until the indicator turns to Indigo.
Ê/NVDQÊNMÊSGDÊBNMMDBSDCÊDWSDQM@KÊOK@XDQÊ@MCÊRS@QSÊOK@XA@BJÊSGDÊLTRHBÊ@RÊTRT@K
Turn on the digital audio output and set it to PCM (Plus Code Modulation) type
RHLHK@QÊSNÊSGDÊENKKNVRÊȭFTQD
Optical Connection Cable
Rear View
TV or DVD player etc.
Bass
Treble
Balance
Select Move MENU Exit
Sound Mode Standard
Surround Off
AVL Off
Audio Language English
Picture Time Setup Lock Off
AudioAudio
Digital Output PCMDigital Output PCM
LINE IN
OPTICAL OUT
Table des matières
Autres manuels DB POWER Système de haut-parleurs


Manuels Système de haut-parleurs populaires d'autres marques


Sondpex
Sondpex Active Speaker System and Digital Music... Manuel utilisateur

JVC
JVC NX-PN7 Manuel utilisateur

Marshall Amplification
Marshall Amplification AR-DM61-BT Manuel utilisateur

Yamaha
Yamaha NX-A01 - Speaker Sys Manuel utilisateur

SE Audiotechnik
SE Audiotechnik I-LINE Manuel utilisateur

Gemini
Gemini WRX-843 Series Manuel utilisateur