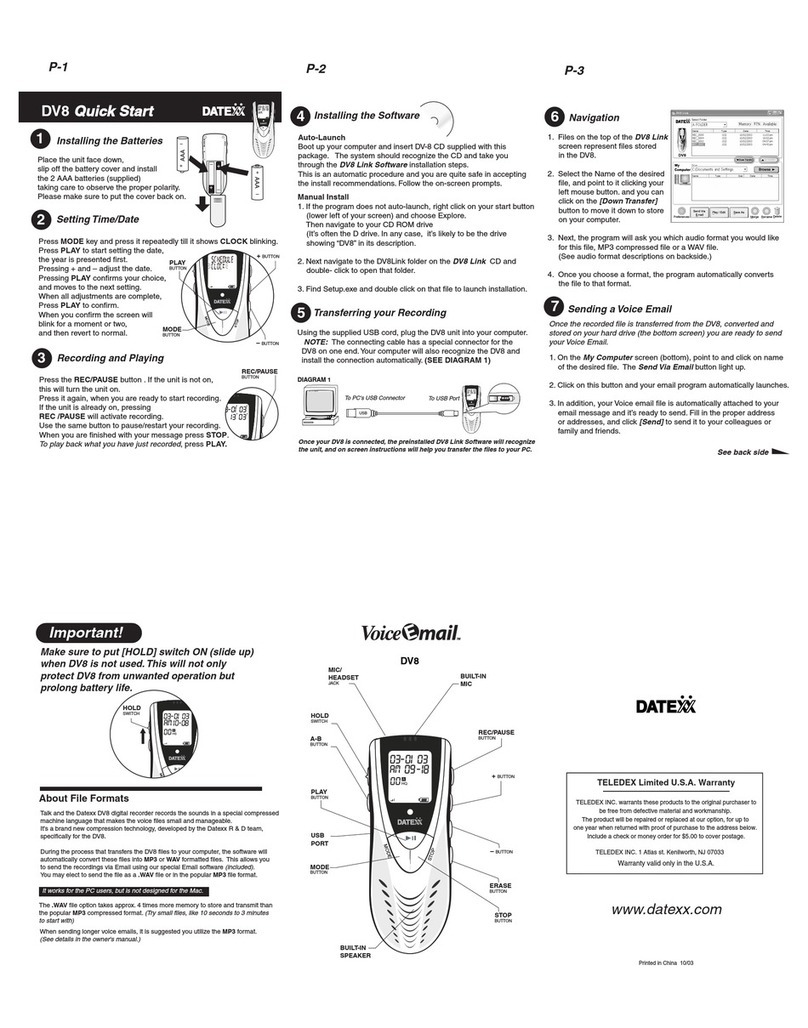
Datexx DV8 Manuel utilisateur

File name: DV8OwnersManual10_23.doc Page: 0 / 48
Printed date: 2003/10/23 Paper size: 128 mm x 182 mm
Teledex Inc.
DV8 Owner’s Manual

DV8 Owner’s Manual 1
File name: DV8OwnersManual10_23.doc Page: 1 / 48
Printed date: 2003/10/23 Paper size: 128 mm x 182 mm
Table Of Contents
1. WELCOME! 4
2. QUICKSTART 4
2.1. PACKAGE CONTENTS 4
2.2. IDENTIFICATION OF PARTS 5
2.3. INITIAL SET UP 6
2.3.1. INSTALLING THE BATTERIES 6
2.3.2. SETTING TIME/DATE 6
2.3.3. INSTALLING THE DV8 LINK SOFTWARE 7
2.3.3.1. AUTO-LAUNCH 8
2.3.3.2. MANUAL INSTALL 8
3. STARTING WITH THE BASICS 10
3.1. SAY IT! 10
3.2. TRANSFER IT ! 11
3.3. SEND IT VIA EMAIL! 12
3.4. A WORD ABOUT FILE FORMATS 13
4. DV8 LINK SOFTWARE 14
4.1. TRANSFERING FILES TO YOUR PC. 14
4.2. PLAYING AND EDITING FILES ON YOUR PC. 15
4.3. SENDING FILES VIA EMAIL 17
5. BASIC AND ADVANCED FEATURES IN DETAIL 18
5.1. GETTING AROUND 18
5.1.1. DISPLAY 18
5.1.2. MODE MENU STRUCTURE 18
5.1.3. HOLD FUNCTION 19
5.2. RECORDING FUNCTIONS 20
5.2.1. SETTING RECORDING MODE QUALITY 20

2 DV8 Owner’s Manual
File name: DV8OwnersManual10_23.doc Page: 2 / 48
Printed date: 2003/10/23 Paper size: 128 mm x 182 mm
5.2.2. SETTING VOICE OPERATION
RECORDING (VOR) 21
5.2.3. SETTING VOICE OPERATING MICROPHONE
SENSITIVITY (VOS) 22
5.2.4. RECORDING THROUGH AN EXTERNAL
MICROPHONE 23
5.2.5. PERFORMING A RECORDING 23
5.2.5.1. SELECTING RECORDING FOLDER 23
5.2.5.2. STARTING A RECORDING 24
5.2.5.3. PAUSING THE RECORDING 24
5.2.5.4. STOP RECORDING 25
5.2.5.5. CHECKING THE RECORDING DATE 25
5.2.5.6. CHECKING AVAILABLE RECORDING TIME 26
5.3. PLAYING A RECORDED MESSAGE 26
5.3.1. BEGINNING PLAYBACK 26
5.3.2. PAUSING PLAYBACK 27
5.3.3. ADJUSTING VOLUME 27
5.3.4. REPEATING PLAYBACK 28
5.3.5. CONTINUOUS PLAYBACK 28
5.3.6. SKIPPING A FILE DURING PLAYBACK 29
5.3.7. FAST PLAYBACK 29
5.3.8. SCAN PLAYBACK 29
5.3.9. A-B REPEAT FUNCTION 30
5.3.10. LEARNING FUNCTION 30
5.4. ERASING FUNCTIONS 31
5.4.1. ERASING ONE FILE 31
5.4.2. ERASING ALL FILES IN A FOLDER 32
5.4.3. FORMATTING THE RECORDER 32
5.5. SCHEDULING FUNCTIONS 33
5.5.1. SCHEDULING FUNCTION MENU MAP 34

DV8 Owner’s Manual 3
File name: DV8OwnersManual10_23.doc Page: 3 / 48
Printed date: 2003/10/23 Paper size: 128 mm x 182 mm
5.5.2. MENU MEANINGS 35
5.5.3. SCHEDULED RECORDING (PRE-REC) 36
5.5.3.1. AT THE PRESET TIME 37
5.5.3.2. TO CANCEL THE SCHEDULED ACTIVITY 38
5.5.4. SCHEDULE FILE PLAYBACK (BF-PLAY) 38
5.5.4.1. AT THE PRESET TIME 39
5.5.4.2. TO CANCEL THE ACTIVITY 40
5.5.5. SCHEDULE ALARM (B-ONLY) 40
5.5.5.1. AT THE PRESET TIME 41
5.5.5.2. TO CANCEL THE ACTIVITY 41
5.6. SPORT TIMER FUNCTION 41
5.6.1. STOPWATCH – MEASURING ELAPSED TIME 42
5.6.1.1. TO SAVE AND STOP THE STOPWATCH 42
5.6.2. COUNT DOWN 43
5.6.2.1. TO START COUNT-DOWN TIME 43
5.6.2.2. TO START ACTUAL COUNT-DOWN 44
5.6.3. COUNT-DOWN FROM THE LATEST HOUR 44
5.6.4. USING THE BUILT-IN COUNTER 44
6. TROUBLESHOOTING 45
7. SPECIFICATIONS 46
8. CARE AND MAINTENANCE 47
9. PRODUCT REGISTRATION 47
10. NEED ASSISTANCE? 47

4 DV8 Owner’s Manual
File name: DV8OwnersManual10_23.doc Page: 4 / 48
Printed date: 2003/10/23 Paper size: 128 mm x 182 mm
1. Welcome!
Welcome to the World of Teledex Palm-Sized Digital Recorder and
Voice Email Systems. We are pleased that you have chosen the
DV8 VoiceEmail for your digital recordings and we congratulate you
for joining the Email Revolution!
2. QuickStart
Before you start using your DV8 check the items in your package
with the list below.
2.1. Package Contents
Voice recorder Batteries CD-ROM
USB cable Owners manual & Quick Start Guide
Earphone / Microphone Line (option)
Telephone recording adapter (option)

DV8 Owner’s Manual 5
File name: DV8OwnersManual10_23.doc Page: 5 / 48
Printed date: 2003/10/23 Paper size: 128 mm x 182 mm
2.2. Identification of Parts
EAR/MIC JACK
SPEAKER
BUILT-IN MICROPHONE
DISPLAY
PLAY
STOP
MODE
BATTERY COVER
STRAP ATTACHMENT
REC/PAUSE
REWIND/
USB PORT
ERASE
HOLD
A-B REPEAT
RECORDING INDICATOR
FORWARD/+

6 DV8 Owner’s Manual
File name: DV8OwnersManual10_23.doc Page: 6 / 48
Printed date: 2003/10/23 Paper size: 128 mm x 182 mm
2.3. Initial Set Up
2.3.1. Installing the Batteries
Place the unit face down, slip off the battery
cover and install the 2 AAA batteries
(supplied) taking care to observe the proper
polarity.
Close the batter
y
cover completely, or the
unit is unable to operate.
The battery indicator on the display shows the battery level as
follows:
Battery indicator
Battery level Full Low Exhausted
If the Exhausted indicator or BATTERY LOW message appears on
the display, you need to replace the batteries as soon as possible.
If abnormal conditions occur and further operations become
impossible, please re-install the batteries to release the problem.
2.3.2. Setting Time/Date
Press MODE key 3 times till it shows CLOCK blinking. Press PLAY
to start setting the date, the year is presented first. Pressing and
adjust the date. Pressing PLAY confirms your choice, and moves
to the next setting. (Look for the designations just below the
keys on the side of the unit.) When all adjustments are complete,

DV8 Owner’s Manual 7
File name: DV8OwnersManual10_23.doc Page: 7 / 48
Printed date: 2003/10/23 Paper size: 128 mm x 182 mm
Press PLAY to confirm. When you confirm the screen will blink for a
moment or two, and then revert to normal.
2.3.3. Installing the DV8 Link Software
System Requirements
OS
(Operation System)
Microsoft Windows 98 / 98 SE / Me /
2000 / XP
CPU Intel Pentium MMX or better based
compatible PC
RAM 32MB or more
Hard Disk 3.5MB(for DV8 Link software) or more
Sound board Microsoft Windows compatible
Display 800 x 600 pixels, 256 colors
CD ROM 2X or better
Interface port 1 USB port
Audio Output Speaker, Earphone
Your DV8 comes with software that allows you to easily transfer,
review, edit & send your voice recordings. The installation of this
software is very straightforward and it is encouraged that you accept
all of the default values to all prompts.

8 DV8 Owner’s Manual
File name: DV8OwnersManual10_23.doc Page: 8 / 48
Printed date: 2003/10/23 Paper size: 128 mm x 182 mm
NOTE Close all running programs, because when
installation is complete, you will be asked to restart your
computer.
2.3.3.1. Auto-Launch
Boot up your computer and insert DV8 CD supplied with this
package. The system should recognize the CD and take you
through the DV8 Link software installation steps. All you have to do
is to follow the on-screen prompts.
When installation is complete, you will be asked to restart your
computer.
2.3.3.2. Manual Install
1. If the program does not auto-launch, right click on your START
button (lower left of your screen) and choose Explore. Then,
navigate to your CD ROM drive (It’s often the D drive. In any
case, it’s likely to be the drive showing “DV8” in its description.

DV8 Owner’s Manual 9
File name: DV8OwnersManual10_23.doc Page: 9 / 48
Printed date: 2003/10/23 Paper size: 128 mm x 182 mm
2. Next navigate to the DV8Link folder on the DV8 Link Software
CD and double-click to open that folder.
3. Find Setup.exe and double click on that file to launch installation.
4. Follow the on-screen installation prompts.
5. When installation is complete, you will be asked to restart your
computer.
Autres manuels pour DV8
2
Table des matières
Autres manuels Datexx Enregistreur vocal