Data Conversion Systems DCS VIVAlDI Manuel utilisateur

© Data Conversion Systems Ltd. 2012 - 2015 Price UK £10.00
All rights reserved. No part of this publication may be reproduced, stored in or introduced into a retrieval system,
or transmitted in any form, or by any means (electronic, mechanical, photocopying, recording or otherwise)
without the prior written permission of dCS1. Any person who does any unauthorised act in relation to this
publication may be liable to criminal prosecution and civil claims for damages.
Information contained in this manual is subject to change without notice, and whilst it is checked for accuracy, no
liabilities can be accepted for errors.
1dCS is Data Conversion Systems Ltd. Company registered in England No. 2072115.
dCS Vivaldi Upsampler
Digital to Digital Converter
User Manual
Software Release 1.2x
December 2015

dCS Vivaldi Upsampler User Manual Software Issue 1.2x
December 2015
Vivaldi Upsampler Manual v1_2x Page 2 English version

dCS Vivaldi Upsampler User Manual Software Issue 1.2x
December 2015
Vivaldi Upsampler Manual v1_2x Page 3 English version
Contents
Using the dCS Vivaldi Upsampler for the first time .............................................................................5
What’s in the box? 5
Positioning the unit 5
Safety Notice 6
Made for iPod®and iPhone®7
Step-by-Step Guide ................................................................................................................................8
Preliminaries 8
STEP 1 – Connecting a PCM input 9
Connecting to a Single AES or SPDIF source 9
Connecting to an SDIF-2 PCM Source 9
STEP 2 – Connecting an Output 10
Dual AES 10
Single wire PCM 11
STEP 3 - Setting the Sync Mode 12
Using a Master Clock 12
Using the Vivaldi Clock’s enhanced clocking system 12
A full Vivaldi system 13
STEP 4 – Using the USB1 interface with a computer 14
Compatibility 14
Setting the USB Audio Class 14
Loading the Windows driver for USB Class 2 14
Basic setup with a PC 15
A word about Music Playing Software 16
Selecting the Vivaldi Upsampler as your Audio Output device 16
STEP 5 – Using the USB2 input 17
Playing music files from a USB Flash Drive 17
Playing music from an iPod/iPhone 17
STEP 6 – UPnP Network Connection 18
Compatibility 18
Basic set-up 18
Playing music 19
Playlist 19
STEP 7 – Setting the Sync Mode for Computer Audio sources 20
Using the DAC in Universal Master Mode 20
Using the DAC and Upsampler with a Master Clock 21
Advanced options 22
Customising the input configuration 22
Front Panel............................................................................................................................................23
Remote Control Receiver 23
Display 23
Power Button 24
Menu Button 24
Filter Button 24
Input Button 25
Output Button 25
Rear Panel .............................................................................................................................................26
Digital Outputs 26
Digital Inputs 26
Word Clock Input / Output 27
Network Interface 27
USB Interfaces 27
Test interface 28
Mains inlet 28
Label 28

dCS Vivaldi Upsampler User Manual Software Issue 1.2x
December 2015
Vivaldi Upsampler Manual v1_2x Page 4 English version
The Menu...............................................................................................................................................29
Using the Menu 30
INFORMATION Menu 31
Unit Status 31
Version 31
Contact 31
Update 31
Network Update 31
UPSAMPLER SETTINGS Menu 32
Sync Mode 32
Dual AES 32
Clone Mode 33
USB Class 33
DSD Pass-Through 33
DXD Mode 33
RS232 Mode 33
CONFIGURATION Menu 34
Settings Lock 34
Save Configuration 34
Restore Configuration 34
Reset Input Names 34
Factory Reset 34
DISPLAY SETTINGS Menu 35
Brightness 35
Display On/Off 35
GENERATOR Menu 35
Channel Check 35
Phase Check 35
Burn In 35
Specification .........................................................................................................................................36
Maintenance and Support....................................................................................................................38
Service and Maintenance 38
Replacing a Blown Mains Fuse 38
Cleaning the case 38
Limited Warranty 39
If you need more help 40
Software History 41
Index ......................................................................................................................................................42

dCS Vivaldi Upsampler User Manual Software Issue 1.2x
December 2015
Vivaldi Upsampler Manual v1_2x Page 5 English version
USING THE dCS Vivaldi Upsampler FOR THE FIRST TIME
Congratulations on purchasing your dCS Vivaldi Upsampler.
Before using your unit, please read this section and the Step by Step Guide. This will enable you to
set the unit up quickly and safely with your hi-fi system.
From time to time, dCS will release updated software on CD-R that you can install yourself using the
Update feature. Please check our web-site occasionally to see if new Vivaldi software is available, or
consult your dealer.
What’s in the box?
Check that the box contains the following items:
•dCS Vivaldi Upsampler
•Manual and Menu / Setup Guide
•Power cable
•2 AES cables
•USB-A to USB-B cable
•Ethernet cable
•BNC cable
•Spare fuses
Notify your dealer as soon as possible if anything is missing or damaged. We suggest that you retain
the original packaging for possible future use. If this is not possible, replacement packaging can be
ordered from dCS or our distributors. Details can be found on our web site at www.dcsltd.co.uk.
A dCS Premium remote control is supplied with the Vivaldi DAC, it is available as an optional extra.
Positioning the unit
For best sound quality, the units in the Vivaldi range are designed to be mounted on separate shelves
of a rack, although they may be stacked directly on top of each other if this is absolutely necessary.
Place each unit on a firm, vibration free base, allowing convenient connection to the other parts of
your system. To prevent overheating, we recommend that you leave some free space around the unit
to allow for ventilation.
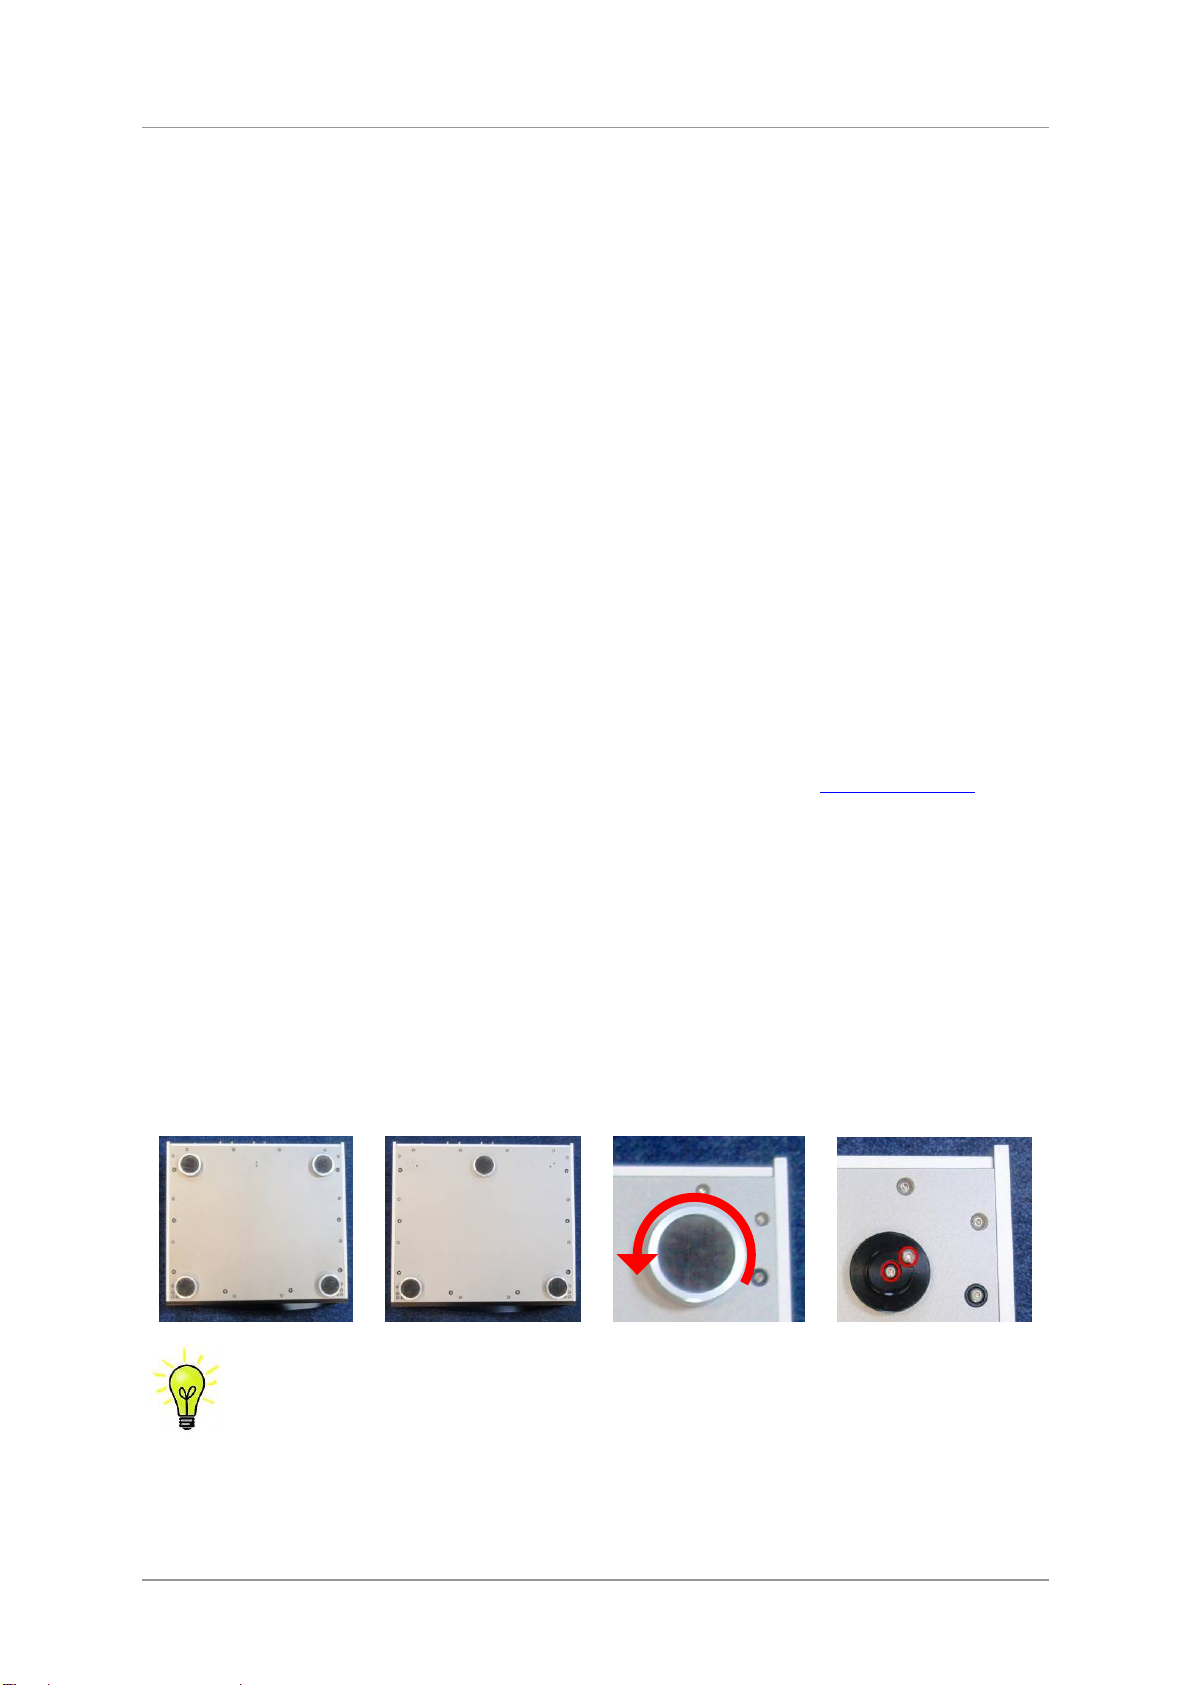
The unit is supplied with 4 feet fitted. If you prefer a 3-feet layout, unscrew the two back feet, remove
the two black cores using a 2.5mm A/F Allen key, fit one of the cores in the middle position and
replace the foot. Take care not to cross-thread the foot!
With all feet screwed fully home, the unit will sit level on a flat surface. If you need to do
any levelling, you can unscrew any of the feet up to 3 complete turns, to give up to 3mm
(1/8”) of height adjustment.

dCS Vivaldi Upsampler User Manual Software Issue 1.2x
December 2015
Vivaldi Upsampler Manual v1_2x Page 6 English version
Safety Notice
Your dCS Vivaldi Upsampler contains no user serviceable parts. DO NOT attempt to
open the case as there are potentially dangerous voltages present inside. In the event of
the unit developing a fault, please contact your dealer in the first instance.
If you decide to remove safety covers for any reason, disconnect the power cable first.
To maintain protection from electric shock, the unit MUST be connected to mains earth
(ground) via the power cable. Also, unearthed systems do not give the best sonic
performance.
Protect the product from dripping or splashing liquids. Liquid-filled objects such as vases
must not be placed on the product.
This product is lead-free and complies with the RoHS directive.
Before connecting the power cable to the unit for the first time, please check that it has been set to the
correct operating voltage for your mains supply. The unit’s voltage setting is shown on the serial
number label. If this does not match your local supply voltage, DO NOT attempt to use the unit.
Contact your dealer to have the unit reset. Using the unit with the wrong mains setting for your local
supply may result in serious damage to the unit and will invalidate the warranty. Do not attempt to
reset the voltage yourself.
We do not recommend the use of mains regenerators. However, if you do wish to use a mains
regenerator with variable voltage and frequency, we recommend that you set the voltage to match
your local voltage and the frequency to either 50Hz or 60Hz ONLY.
!
Damage caused to your Vivaldi Upsampler by misuse of a mains regenerator or by a
malfunctioning mains regenerator is not covered by the warranty.
Disposal at end-of-life - the symbol indicates that this product should not be treated as
normal household waste. It should be recycled, so please take it to an approved
collection facility.

dCS Vivaldi Upsampler User Manual Software Issue 1.2x
December 2015
Vivaldi Upsampler Manual v1_2x Page 7 English version
Made for iPod®and iPhone®
The Vivaldi Upsampler is compatible with the iPod and iPhone models illustrated below.
Made for:
“Made for iPod” and “Made for iPhone” mean that an electronic
accessory has been designed to connect specifically to iPod or
iPhone respectively and has been certified by the developer to meet
Apple performance standards. Apple is not responsible for the
operation of this device or its compliance with safety and regulatory
standards.
iPad®, iPhone, iPod and iPod touch®are trademarks of Apple Inc.,
registered in the U.S. and other countries.

dCS Vivaldi Upsampler User Manual Software Issue 1.2x
December 2015
Vivaldi Upsampler Manual v1_2x Page 8 English version
STEP-BY-STEP GUIDE
This section guides you through setting up the unit for use in various ways.
Preliminaries
The Menu Guide sheet details the menu structure.
For digital interfaces, use with cables designed for digital audio:
•for AES/EBU interfaces use 110Ωscreened, twisted pair cables fitted with one male XLR
connector and one female XLR connector.
•for SDIF, Word Clock or SPDIF BNC interfaces, use 75Ωcoax cables fitted with BNC plugs.
!
SDIF and Word Clock interfaces require a simple DC-coupled connection. The interfaces
may malfunction or not work at all if capacitor coupled cables or cables with built-in
networks are used.
•for SPDIF RCA interfaces, use 75Ωcoax cables fitted with RCA Phono plugs.
•for TOSLINK optical interfaces, use Toslink fibre-optic cables.
•for the Network interface, use the Ethernet cable provided with the unit.
•for the USB1 interface, use a standard screened USB cable fitted with one type ‘A’ connector and
one type ‘B’ connector. The internal screen must be connected at both ends.
•to connect the USB2 interface to an iPod, iPad or iPhone, use an Apple adapter cable.
•Connect the power cable to the power inlet on the Upsampler rear panel, and plug the other end
into a convenient power outlet. Set the rocker switch on the rear panel to the I position (on).
!
Please do not use an excessively heavy or inflexible power cable as this may damage
the power inlet connector.
The cables supplied with the unit are “commercial grade”, because most owners will
have their own “audiophile grade” cables or will prefer to make their own cable choices.
•Press the Power button – the unit will display Vivaldi Upsampler. Wait about 30 seconds while the
Upsampler configures itself.
•If the unit is likely to be set in an unfamiliar state, you can run the Factory Reset routine by pressing
the buttons in this sequence: Menu, ►, ►, Menu, ◄, ◄, Menu.
•Wait a few seconds while the unit resets itself.
We will start with a basic setup using a standard PCM source.

dCS Vivaldi Upsampler User Manual Software Issue 1.2x
December 2015
Vivaldi Upsampler Manual v1_2x Page 9 English version
STEP 1 – Connecting a PCM input
Switch on the source equipment. If appropriate, load a disk / tape and set the machine in PLAY mode
to ensure it is generating a digital audio data stream.
Choose one or more of the following sections:
Connecting to a Single AES or SPDIF source
Most digital audio source equipment (such as CD transports, DVD players) is fitted with a single wire
digital output, usually on an RCA phono connector.
•Connect your source equipment to the matching input on the Upsampler’s rear panel using a
suitable cable.
•Press the Input button repeatedly until your chosen input is displayed. This will be either AES,
SPDIF1 (RCA), SPDIF2 (RCA), SPDIF3 (BNC) or Toslink.
The Upsampler will lock to the source and display 16/44.1 > 96 for example, if the source is a CD
player.
Connecting to an SDIF-2 PCM Source
!
SDIF (Sony Digital InterFace) is not the same as SPDIF (Sony/Philips Digital InterFace)
and the two are not compatible.
Please ensure that you connect to the correct BNC socket.
•Connect the CH1 output on your source equipment to the CH1 input on the Upsampler’s rear panel
and the CH2 output to the CH2 input, using two BNC cables. Connect the word clock output on
your source equipment to the Word Clock In1 or In2 connector on the Upsampler’s rear panel.
Ensure the cables are not swapped.
•Press the Upsampler’s Input button repeatedly until SDIF appears on the display.
Set the Settings > Sync Mode menu page to Word Clock 1 or Word Clock 2 as
appropriate.
The Upsampler will lock to the source and display 16/44.1 > 96 for example, if the source is a CD
player.

dCS Vivaldi Upsampler User Manual Software Issue 1.2x
December 2015
Vivaldi Upsampler Manual v1_2x Page 10 English version
STEP 2 – Connecting an Output
Choose which output interface you want to use and connect it up as described below. The
Upsampler’s main output is Dual AES. You can connect as many outputs as you wish.
Dual AES
Connect the AES1 Out and AES2 Outputs to matching inputs on your DAC. Use the Output button
on the front panel to set the output sample rate to 88.2, 96, 176.4, 192, 352.8 or 384kS/s or DSD.
Open the menu, scroll to the Settings > Dual AES page and make sure it is set to On.
(The button sequence is Menu, ►, Menu, ►.) If it is not, press the Menu button once.
Use the DAC’s Input button to select the Dual AES input. You may need to open the DAC’s menu
and set it to accept Dual AES.
!
All dCS DACs are capable of Dual AES operation, older models may be limited to a
maximum of 192kS/s. Some other manufacturer’s DACs may have 2 single AES inputs
that are not Dual AES capable. Please check the DAC manual to be sure.
Figure 1 – Connecting the Dual AES output
Analogue
outputs
to Amplifier
Table des matières
Autres manuels Data Conversion Systems Convertisseur de média