Czur StarryHub Manuel d'instructions

Thank you for choosing StarryHub, the all-in-one business
conferencing system.
Since this is a new product style in video conferencing indus-
try, we recommend you to go over this instruction before
activating the StarryHub. So you can understand how Starry-
Hub works and enjoy the video meeting experience.
StarryHub Quick User Guide

FCC STATEMENT
1. This device complies with Part 15 of the FCC Rules. Operation is sub-
ject to the following two conditions:
(1) This device may not cause harmful interference.
(2) This device must accept any interference received, including interfer-
ence that may cause undesired operation.
2. Changes or modifications not expressly approved by the party
responsible for compliance could void the user's authority to operate
the equipment.
NOTE: This equipment has been tested and found to comply with the
limits for a Class B digital device, pursuant to Part 15 of the FCC Rules.
These limits are designed to provide reasonable protection against
harmful interference in a residential installation.
This equipment generates uses and can radiate radio frequency energy
and, if not installed and used in accordance with the instructions, may
cause harmful interference to radio communications. However, there is
no guarantee that interference will not occur in a particular installation.
If this equipment does cause harmful interference to radio or television
reception, which can be determined by turning the equipment off and
on, the user is encouraged to try to correct the interference by one or
more of the following measures:
· Reorient or relocate the receiving antenna.
· Increase the separation between the equipment and receiver.
· Connect the equipment into an outlet on a circuit different from that
to which the receiver is connected.
· Consult the dealer or an experienced radio/TV technician for help.
FCC Radiation Exposure Statement
This equipment complies with FCC radiation exposure limits set forth
for an uncontrolled environment. This equipment should be installed
and operated with minimum distance 20cm between the radiator &
your body.
The symbol indicates DC voltage.
RECYCLING: This product bears the selective sorting symbol for
Waste electrical and electronic equipment ( WEEE ). This means that this
product must be handled pursuant to European directive 2012/19/EU in
order to be recycled or dismantled to minimize its impact on the envi-
ronment.

StarryHub Main Unit
Rear
Front
1
Projector Lens Auto-focus Camera
USB3.0
USB3.0 USB2.0 DC IN
LAN HDMI
HDMI
USB2.0 DC IN
LAN
Camera LED IndicatorCamera
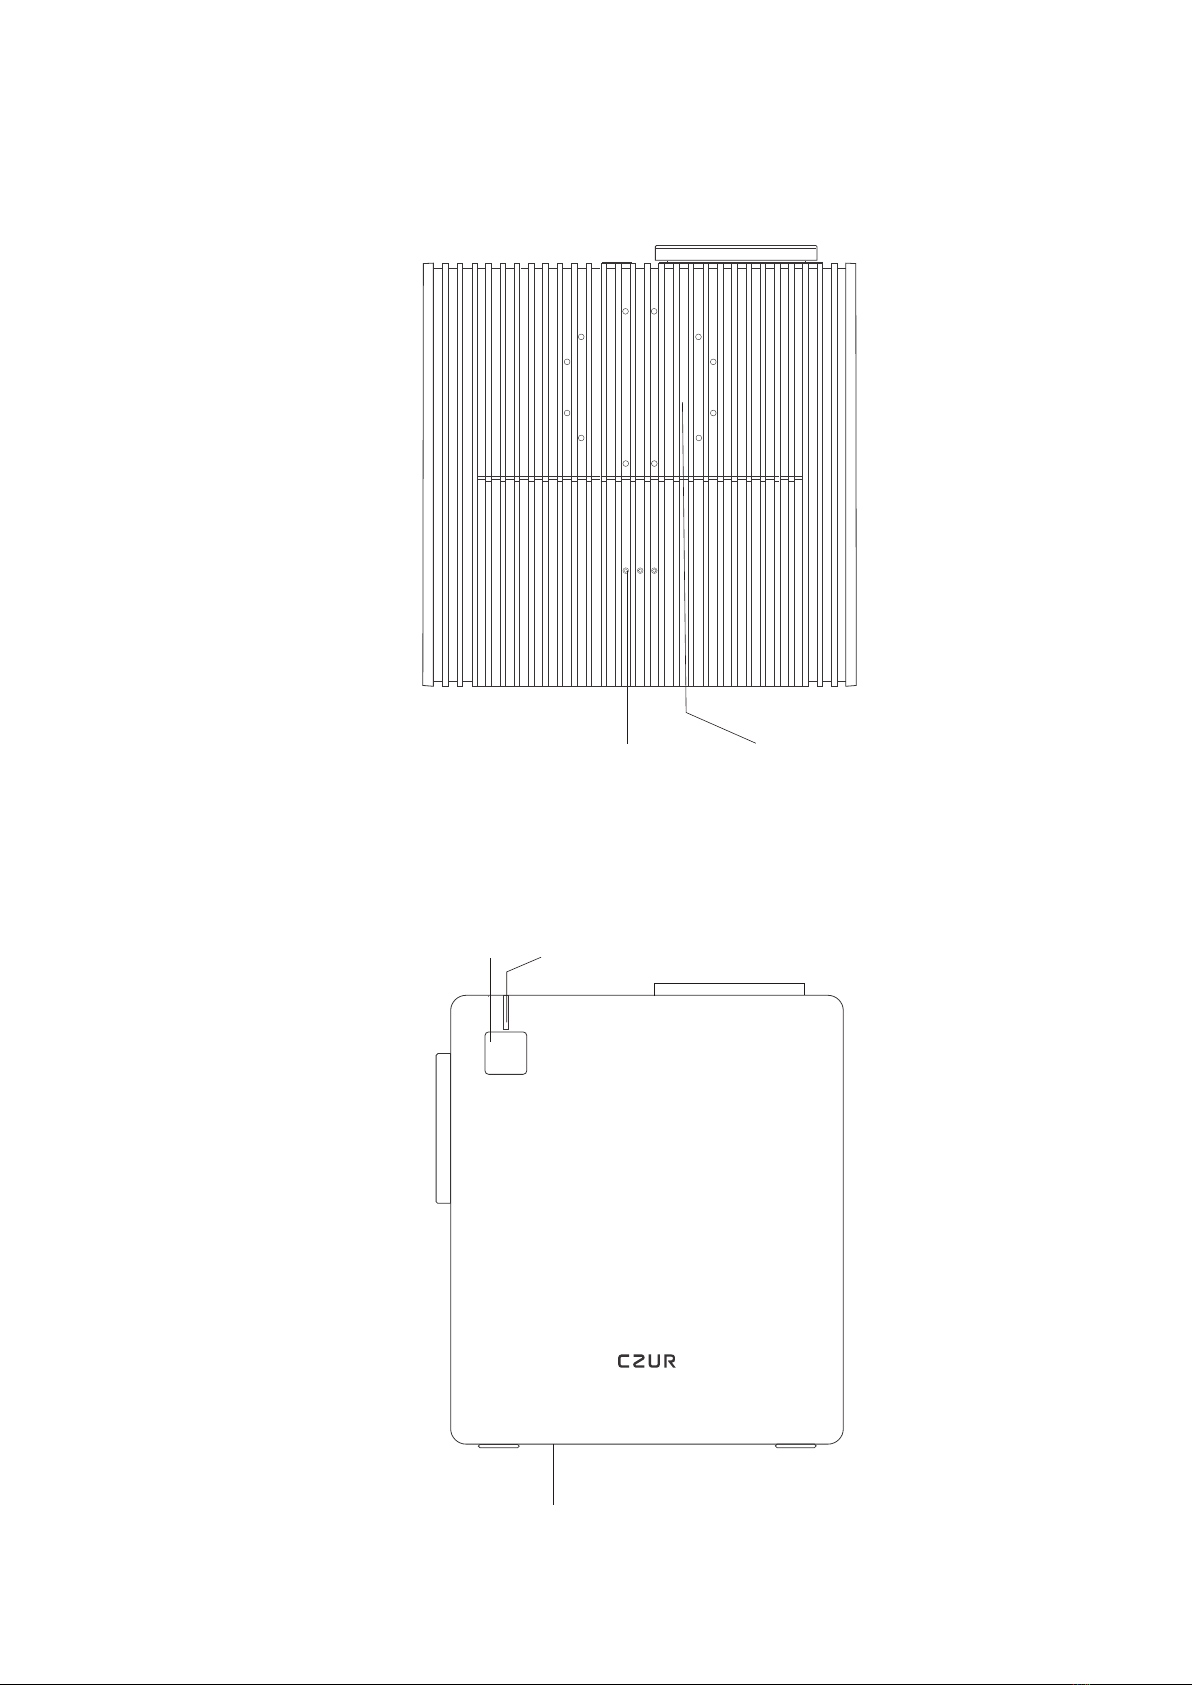
Upper Side
Right
Elevation Bracket, 4°/8° Two-level Adjustment
Power Power LED Indicator
Charging Dock Mic. Array

Power On/Off
2
· Power on
Connect the power source, the power indicator will turn
red.
Then press the power button (for 1 second) until the indi-
cator blinks in blue color.
When the power indicator turns blue (not blinking) and the
screen lights up, StarryHub is ready for use.
* How to activate StarryHub
After installing the StarryHub unit, power on, you can
follow the steps shown on the projection screen to either
register a new StarryHub account or log-in with an existing
account.
This 6-digit StarryHub account number is also used as the
ID of the meetings it launches.
You can also invite this account number to join video meet-
ings launched by other StarryHub accounts.

· Standby
When powered on, press the power button or put the
TouchBoard back to the charging dock to enter Standby
Mode.
Note: If initial setting of the StarryHub is not finished yet,
StarryHub will not enter Standby mode by pressing power
button or putting back TouchBoard to the charging dock.
· Wake up
In Standby Mode, press the power button or pick up the
TouchBoard from the charging position to wake up Starry-
Hub.
If the TouchBoard is not in charging position when in
Standby Mode, move or pick up the TouchBoard will also
wake up the StarryHub.
* It's recommended to keep StarryHub in Standby Mode in
order to receive video meeting invitations.
Only shut down and remove power source if you are not
going to use StarryHub in a long time.
· Power off
When StarryHub is powered on, long-press the power
button for 3 seconds. There will be a pop-up window on
the screen so you can either shut down or reboot with
TouchBoard or WriteBoard (StarryHub accessories).
Or you can long-press the power button for 10 seconds to
shut down directly.
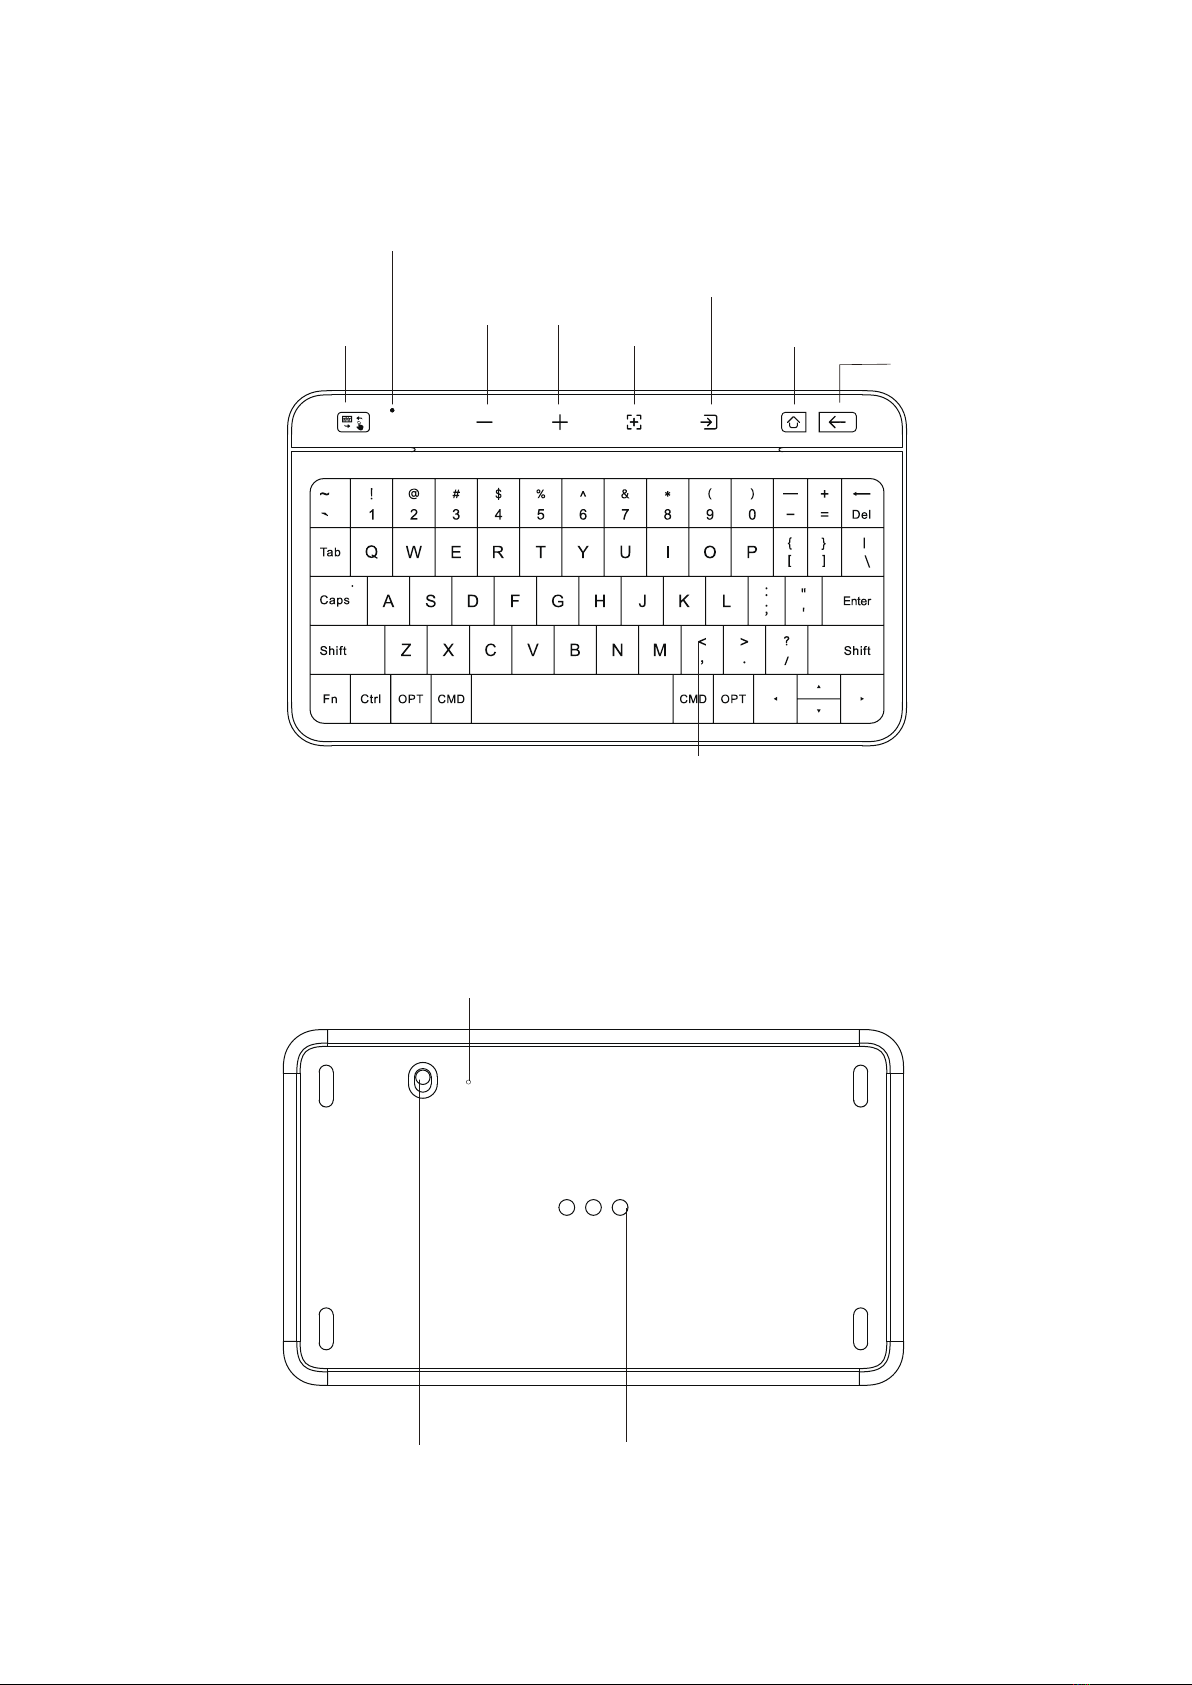
TouchBoard
Front
Back
Charging pinTouchBoard Power on/off
Buzzer
Touch Panel
/ Keyboard V- V+ Signal Source
Back
LED Indicator
Focus Home
on
Off
Touch Panel / Key Board

How to Use the TouchBoard
3
·Pair the TouchBoard with the StarryHub
* TouchBoard and the StarryHub are paired by factory default.
If you need pair them again, please do as follow steps:
Main unit power on TouchBoard power on
❶
❷
Power on StarryHub and the TouchBoard.
on
Off
TouchBoard acts as a wireless controller to the StarryHub.
You can operate StarryHub with the TouchBoard easily.
Before using the TouchBoard, please turn the power button
(on the back of the TouchBoard) to ON status.
Put the TouchBoard back to charging dock (on the top of
StarryHub) after each use.
Long press on the upper left corner for 3 seconds
until the LED indicator blinks in blue color.
on
Off

Tap on Touch/Board to switch input method (touch
panel or keyboard).
· Touch Panel / Keyboard
Tap on V- V+ to adjust volume of the StarryHub.
· Volume adjustment
Paired!
❸Put the TouchBoard back to the charging dock, wait for
10 seconds until the icons on the first row of the Touch-
Board light up. Pairing is completed.

Tap on to focus the projector lens automatically. Long
press to use manual focus.
· Auto-focus
· Switch signal source
Tap on to switch between Starry OS main system,
HDMl, and wireless screen projection signal sources.
· Home
Tap on and back to home page, long press for APP
selector.
Autres manuels pour StarryHub
1
Table des matières
Manuels Système de conférence populaires d'autres marques

Kramer
Kramer VIA GO Manuel utilisateur

AVT
AVT MAGIC AC1 Go Manuel utilisateur

ProSoft Technology
ProSoft Technology AN-X4-AB-DHRIO Manuel utilisateur

Sony
Sony PCS-I150 Manuel utilisateur

Middle Atlantic Products
Middle Atlantic Products VTC Series Manuel utilisateur

Prentke Romich Company
Prentke Romich Company Vanguard Plus Mode d’emploi


