CUE irCUE Manuel utilisateur

CUE, a.s., K Nouzovu 6, 14300 Praha 4, Czech Republic
fax: +420 241 432 446
www.cuesystem.com
mail: info@cuesystem.com
phone: +420 241 091 240
User Manual
irCUE
Version 02

User Manual irCUE
UM035_02, 02.04.2009
Copyright © CUE, a.s., Praha, Czech Republic 1990 - 2009.
All rights reserved. Specifications are subject to change without prior notice.

User Manual irCUE
www.cuesystem.com
Page 3 of 20
Table of Contents
1. Introduction ...............................................................................................................................4
1.1. Overview ...........................................................................................................................4
1.2. Models...............................................................................................................................4
1.3. Features ............................................................................................................................4
1.4. Programming.....................................................................................................................4
2. Using..........................................................................................................................................5
3. Charging ....................................................................................................................................6
4. The Front Panel .........................................................................................................................7
5. Button Labels ............................................................................................................................8
6. Addressing ................................................................................................................................9
7. irCUE Receiver 485..................................................................................................................11
7.1. Mounting .........................................................................................................................11
7.2. Connecting ......................................................................................................................12
7.3. Addressing ......................................................................................................................13
8. Troubleshooting ......................................................................................................................15
9. Specifications and Mechanical Drawings...............................................................................16
9.1. irCUE ..............................................................................................................................16
9.2. irCUE Receiver 485.........................................................................................................17
10. Software and Firmware License .............................................................................................18

User Manual irCUE
www.cuesystem.com
Page 4 of 20
1. Introduction
1.1. Overview....................................................................
The irCUE wireless hand-held remote control panel is a compact infrared transmitter with a distinctive
black plastic / wood and stainless steel enclosure. Supplied in three versions of wood – mahogany,
white birch and oak and two versions of plastic, the irCUE is designed to blend even with the most
critical environments. Providing 33 dedicated buttons, the irCUE remote control is prepared to fit
perfectly in your hand. It is the ideal solution for the control of audio, video and lightning in
boardrooms, conference rooms and homes.
The irCUE Receiver 485 links IR wireless control panels to the CUEwire (RS-485). It is an infrared
receiving unit designed for ceiling mounting (similar to halogen lamps mounting). Using multiple IR
receivers within the unit, the irCUE Receiver 485 provides signal receiving in a horizontal level from all
directions.
1.2. Models........................................................................
Model Product code Description
irCUE CS0324 Wireless IR remote hand-held control panel, 33 buttons
irCUE Receiver 485 CS0169 IR receiver with connection to CUEwire
1.3. Features.....................................................................
32 freely programmable buttons
All programmable buttons can have two different functions changed by the Fn button
Dedicated buttons for the most frequent functions
One-way infra-red communication
Plastic upper part of the front panel for customized engraved labels for 11 buttons
Touch sensor for automatic switching of backlight
Stainless-steel and wooden or plastic case
Quick recharging by the supplied docking station
Max. transmitting range 10 m / 30 ft
Charging indication
1.4. Programming .............................................................
All panels are programmed using Cue Director XPL programming tool.

User Manual irCUE
www.cuesystem.com
Page 5 of 20
2. Using
The irCUE is connected to the rest of control system via IR communication. As IR receiver you can
use IR receiver built-in controllers (ipCUE-alpha, beta, delta, epsilon) or external unit irCUE Receiver
485 or receivers built-in keypadCUE-8-L, keypadCUE-8-E.
The example of irCUE, ipCUE controller and irCUE Receiver 485 configuration is described in the
picture below.
CUEwire
irCUE
irCUE Receiver 485
ipCUE-xxx
Notice: to enable the IR receiver on ipCUE controller, make the following two steps:
Enable IR receiver in AdminWeb of controller. In the menu Configuration – IR receiver
select “IR receiver controlled by XPL application” item.
Place the command IrReceiverEnable to the Autoexec sequence of the controller program

User Manual irCUE
www.cuesystem.com
Page 6 of 20
3. Charging
The irCUE wireless remote control panel is powered from internal LiOn accumulator
2000 mAh.
To charge the accumulators, use the delivered charging docking station with power supply adapter.
Connect the output jack from power supply adapter to the connector placed on the bottom side of the
docking station (see picture) and plug the adapter into power (110 – 230 V / 50-60 Hz). The charging
time for a fully charged accumulator is about 4 hours. Longer charging time is not dangerous because
the protection against overcharging is built in.
It is recommended to connect the irCUE to the docking station at the end of every day. Place irCUE to
the docking station also in case there is a lower range of the transmission or when the
backlight brightness is reduced.
Charging is indicated by the LED charging indicator placed on the front panel (see picture on the next
page).
RED light – accumulator is charging
GREEN LIGHT – accumulator is fully charged
If irCUE is not placed in the docking station and the charging indicator flashes RED every few
seconds, it means that the accumulator is going to be discharged. In such case, place irCUE to the
docking station.

User Manual irCUE
www.cuesystem.com
Page 7 of 20
4. The Front Panel
The front panels are equipped with
32 programmable buttons
Plastic upper part of the front panel for customized engraved labels for 11 buttons
Fn button and Fn Indicator
Charging indicator
The Programmable buttons send IR codes to irCUE Receiver.
The Fn button changes first and second function of all programmable buttons.
The Fn Indicator lights when the second functions of programmable buttons are selected.
The Charging indicator indicates the charging and battery status.
Engravable part
for button labels
Fn button
Charging indicator
Programmable buttons
Fn indicator
Programmable buttons

User Manual irCUE
www.cuesystem.com
Page 8 of 20
5. Button Labels
irCUE uses the separate plastic upper part of the front panel for customized engraved labels for 11
buttons.
Steps
1. Have the labels engraved on the rear surface of the plastic upper part of the front panel.
Labels must be engraved specularly.Recommended fontsare Nimbus, Trebuchet, Verdana or
Arial, size 6 points, bold.
Label 1Label 2Label 3
Label 4Label 5Label 6
Label 7Label 8Label 9
Label 10 Label 11
Matt front surface Glossy rear surface
Transparent organic glass Engravable layer
2. Clean and degrease the rear glossy part of engraved front panel by denatured alcohol.
VolumeChannel
Fn 0Enter
7 8 9
4 5 6
1 2 3
Release liner
3. Remove the release liner from top part of irCUE.
4. Place the engraved front panel to the upper part of irCUE, Make sure, that the buttons can be
pressed easily and then press the panel to stick together with the irCUE. Be as precise as
possible, because it very difficult to remove the panel once it has been glued.
User Manual irCUE
www.cuesystem.com
Page 9 of 20
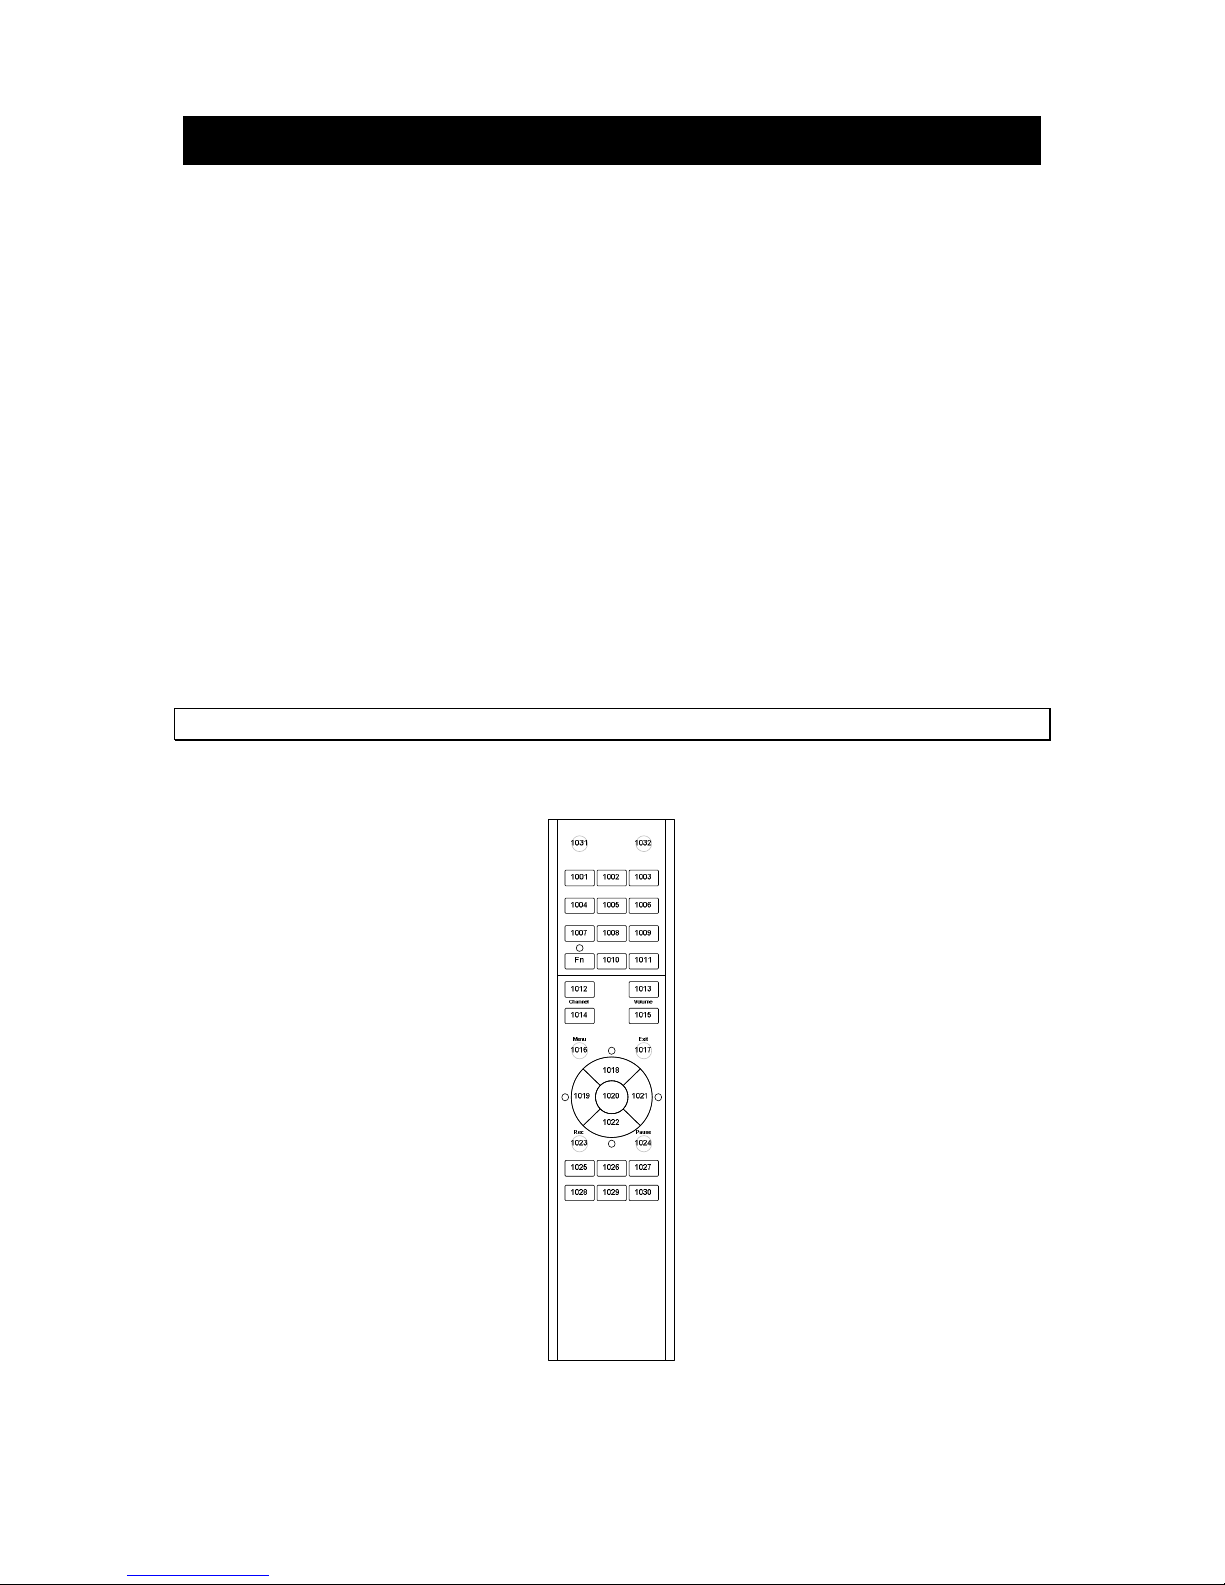
6. Addressing
The BUTTON_ID transmitted by the panel is the LINK number used in the programming for button
identification. The value depends on the button position, on Fn button and on a panel ADDRESS too.
Default panel ADDRESS is 0. BUTTON_ID is calculated according a formula.
If Fn is not activated: BUTTON_ID= (64 * ADDRESS) + Button Code
If Fn is activated: BUTTON_ID= (64 * ADDRESS) + Button Code + 32
The Fn button changes the first and second function of each button. If Fn is not active, LED above Fn
button is switched off and there is no modification of BUTTON_ID (the button has its first function). If
Fn is active, the LED above Fn button is on and all buttons have their second functions (BUTTON_ID
is shifted by 32).
Every press of the button changes Fn activity. If Fn is active, after 1 minute it is switched off
automatically.
For example, button PLAY has the Button Code 1026. Panel ADDRESS is set to 0. If Fn is not
activated, the pressing of the PLAY button will generate BUTTON_ID: 1026. If Fn is activated, the
pressing of the PLAY button will generate BUTTON_ID: 1058.
For addressing with irCUE Receiver 485 see chapter irCUE Receiver 485 / Addressing.
The button codes are numbers from 1001 to 1032 and they are shown in the following picture.

User Manual irCUE
www.cuesystem.com
Page 10 of 20
The ADDRESS of the panel can be set in the range 0 to 47. Default panel ADDRESS is 0, addresses
1 to 47 can be set up by the following procedure:
1. Undo four screws on the rear panel of irCUE and remove the rear cover plate.
2. Press the address button on the PCB. The backlight of irCUE is switched on now and Fn
LED is flashing.
3. Type a 2-digit address using the number buttons on the front side of irCUE (for example
for ADDRESS 0 press buttons 0 and 1) and then press ENTER.
4. If the address has been set correctly, all LEDs are switched off now.
5. If the address has not been set correctly, the color LED around navigation cross will start
flashing. In this case address has not been modified. Start again from point 2.
6. Mount back the rear cover plate of irCUE.
In the table below there are BUTTON_ID ranges for all addresses.
ADDRESS BUTTON_ID range
01001 1064
11065 1128
21129 1192
31193 1256
41257 1320
51321 1384
61385 1448
--- --- ---
46 3945 4008
47 4009 4072
Ce manuel convient aux modèles suivants
1
Table des matières
Autres manuels CUE Contrôleurs


