Core ANT100TCR Manuel utilisateur

100-Mile Range Outdoor/Attic Amplied TV Antenna
ANT100TCR
User Manual

2
Safety Precautions
Before using this antenna, please read these instructions carefully. Store this
manual in a safe place for future reference.
Read the entire instruction manual before you start installation and assembly.
If you have any questions regarding any of the instructions or warnings,
please contact Customer Service.
• Inspect your installation site carefully for power lines. Ensure that there is
no possibility for your antenna or ladder to come into contact with power
lines.
• Make sure that the distance between power lines and your antenna and
its mounting structure is at least two times the total height of your antenna
and its mounting structure. There must be enough distance between the
antenna and power lines, in the event that the antenna falls during or after
assembly.
• Ground the antenna and its mounting structure in compliance with the NEC
electrical code, as well as all state and local electrical codes.
• Do not use a metal ladder.
• Do not install the antenna on a windy day. If the antenna begins to fall, do
not attempt to catch it. Let it fall to the ground.
• Never touch anything or anyone in contact with a power line. In case of
emergency, call 911.
• If you are unsure of how to safely install the antenna, please contact a
professional in your area.
3
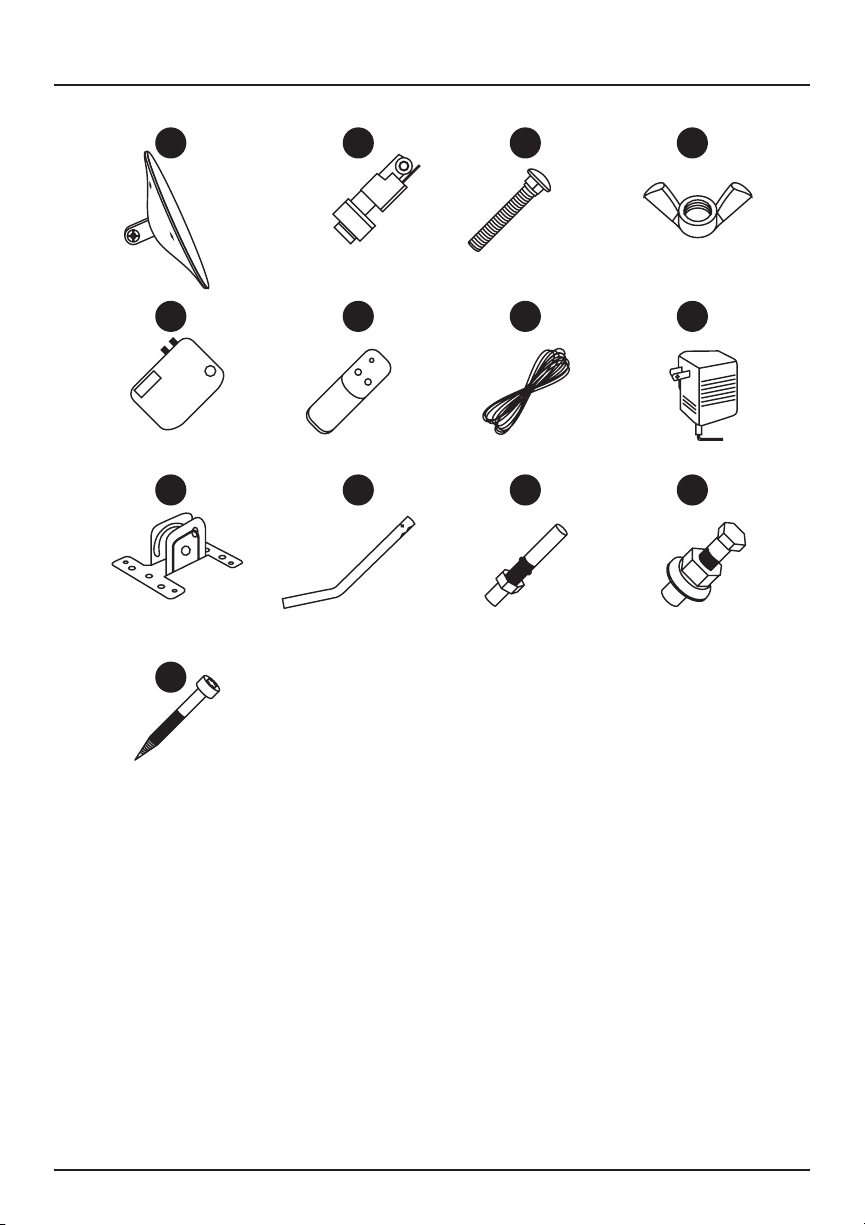
1. Main Unit
2. Motor
3. Carriage Bolt ( 3/16” x 1 5/8”)
4. Wing Nut ( 3/16”)
5. Power Supply
6. Remote Control
7. Coaxial Cable (25’)
8. Power Adapter
9. Bracket
10. J Pole
11. Expansion Screws x 4
12. Bolts & Nuts x 2
13. Self-tapping Screws x 2
I. Included Parts and Hardware
1 2 3 4
5 6 7 8
910 11 12
13

4
360˚ Motorized Wireless Remote
• Insert 2 AAA batteries (not included) into the
remote before use.
• Press the red directional buttons to rotate
the antenna to reach the desired station.
II. Power Supply
III. System Connection
Infrared
Receiver LED Indicators
Red Light
TV1
Digital Converter Box
(sold separately - for analog TVs only)
Coaxial Cable
Antenna
TV2
Power on
Green Light Antenna is rotating
Yellow Light
Something is wrong with
the power supply. Check
cable connection.
Rotation
Switch
ANT TV1 TV2 AC Power
Input
LED
Indicators
Power
On/O

5
Make sure the distance between your location and TV transmitter tower is
within 100 miles, and set up your antenna as high as possible in the direction
of the TV tower for better reception. You can search for available channels in
your area by visiting dtv.gov/maps or www.tvfool.com.
IV. Key Considerations for Your Installation Site
• Be sure that installation is in accordance with all local, city and state
electrical and building codes.
• Understand where broadcast towers are located in your area.
Visit www.antennapoint.com or www.antennaweb.org and enter your zip
code to identify the channels you can expect to receive.
80 miles 100 miles
Outdoor
antenna series
Indoor
antenna series
Weaker signal
reception area
Weaker signal
reception area
Strong
receivingarea
Indoor & Outdoor
antenna series

6
Step 1: Connect the Main Antenna and Motor
Step 2: Attach Your Antenna to the J-Pole
Step 3: Connect Your Antenna
Align the motor with the main unit and secure
them in place with the carriage bolt 3and
wing nut 4.
Place your antenna & motor assembly onto the
J-pole 10 , and tighten the column until your
antenna is secure.
Tip: Keep a 20-inch clearance around your
antenna so it can rotate properly.
Using the included coaxial cable 7, connect your antenna to the antenna
input on the power supply box 5. Connect the box to a power source (i.e.
an electrical outlet) using the included wall adapter.
If your TV has a digital tuner, simply connect the power supply box output
cable directly to your TV’s cable input port.
If your TV does not have a digital tuner, connect the power supply box
output cable to your digital converter box, and then connect your converter
box output cable to your TV.
Connect the coaxial signal line from the motor
to the main unit and tighten the fastener.

7
To perform a TV channel scan:
• Set the tuner mode to “Antenna” or “Air” on your TV’s setup menu.
• Set your TV to scan for channels. This may be listed as auto-program,
auto-scan, channel search or channel scan.
Move and rotate your antenna, and note which locations receive the most
channels and best channel reception. Use the included remote to rotate
your antenna to the desired position
Note: Running a channel scan is not the same as pressing Channel UP/
DOWN on your remote.
• Refer to your TV’s user manual for further details.
Note: You must re-scan for channels anytime you move or reposition your
antenna.
Step 4: Scan for Channels

8
Make sure to test your antenna in multiple locations to nd the best
reception. Placing your antenna higher up or in a position that is angled
toward the broadcast tower may result in better reception. Once you nd the
location that receives the most channels and best channel reception, you
can mount the pole and antenna.
Caution: Your mounting site must be clear of power lines. Do not attempt to
mount your antenna near electric power lines.
Note: If your walls are made of wood, do not use expansion screws. Use
self-tapping screws instead.
Place the bracket base on your wall and mark
the corresponding points for the expansion
screws and holes, based on the location.
Secure the expansion or self-tapping screws
into the bracket base holes.
1
2
Step 5: Mount Your Antenna
Connect the pole to the base of the main unit
assembly. Use the bolts and nuts to secure the
pole to the mounted bracket.
3

9
This antenna can support two TVs at the same time. Simply connect an
additional coaxial cable between the power supply box output connector
and your second TV.
Antenna Specifications:
• 25’ coaxial cable
• Easy install and setup
• Remote control included
• Built-in noise circuit
• Built-in high-gain booster
• 360˚ motorized rotation
• UHF: 470-606MHz I 23±2dB
• Impedance: 750Ω I F-connector
• Noise gure: 2.5dB
• Max output level: 105d BIV
• Main voltage: AC-120 / 60Hz
• Operating temperature: 14°F - 122°F
• Weather resistant
Pole Specifications:
• Great for mounting indoor and outdoor antennas, satellite dishes and
more.
• Outer diameter: 1”
• Pole length: 16.5”
• Material: iron
• Mounting hardware included
Specifications

10
I am not getting any channels, or channels are missing.
Keep your antenna away from sources of interference, including air
conditioners, hair dryers and microwave ovens. Rotate your antenna and
re-run a channel scan on your TV. Refer to your TV’s user manual for more
information.
Picture or sound freezes while I am watching a channel. Picture quality
is weak.
This is often caused by a weak or intermittent signal. Try moving or rotating
your antenna to a dierent location or angle.
When do I need to run a channel scan?
Run a channel scan after setting up or adjusting your antenna.
Visit www.antennaweb.org/address to calculate the strength of each station.
You may then run a channel scan on an as-needed basis.
How do I know where the signal is strongest?
Test your antenna in dierent locations or at dierent angles, making sure to
run a channel scan every time you move your antenna.
Sometimes moving a few feet can make a dierence. The fewer obstructions
between the antenna and the tower, and the higher the antenna is mounted,
the better the chance of receiving a strong signal.
Some HDTVs have a signal strength indicator that shows how strong your
signal is. Refer to your TV’s user manual for more information.
Where should I mount my antenna?
The antenna is designed for outdoor and attic use. We recommend mounting
your antenna at least 30 feet above the ground to access more channels.
Troubleshooting
Table des matières


