Cord mi-fi four Manuel utilisateur

mi- four
owners’ manual

Introduction
Thank you for purchasing a CORD mi-fi four, powered speaker system. The mi-fi four is
just one product in our range embracing our philosophy of “extraordinary audio visual
gear”.
This product has been designed and engineered to give you many years of trouble free
listening enjoyment. Please ensure you carefully read this manual to gain the maximum
benefit from your purchase.
We suggest you keep your original proof of purchase receipt, this manual and the
original packaging for future reference, in case you need to move your product,
or in the unlikely event that you need to return the product for service.
Product updates, technical info, warranty and service centre details are available on
our web site at www.cord-av.com.
1
The lightning flash with the arrowhead symbol inside an equilateral
triangle is intended to alert you to the presence of a non-insulated
"dangerous voltage" inside the product that may be of sufficient
magnitude to constitute the risk of electric shock.
The exclamation point inside an equilateral triangle is intended
to alert you to the presence of important operating, maintenance
or servicing instructions detailed in this manual.

• Introduction 1
• Importantsafetymessages 3
• What’sinthebox 4
• Preparingforuse 5
• iPodadaptors 6
• Setup 7
• Basicoperation 9
• Troubleshooting 11
• Specifications 12
• Warranty 13
2
Contents
“Made for iPod” means that an electronic accessory has been designed to connect specifically to iPod and has
been certified by the developer to meet Apple performance standards.
Apple is not responsible for the operation of this device or its compliance with safety and regulatory standards.
®iPodisatrademarkofAppleInc.,registeredintheU.S.andothercountries.

Important safety messages
• BeforeyoupoweronyournewCORDproduct,toensuresafeandefcient
operation,pleasetakethetimetoreadthesemessages.
• Keeptheseinstructionsinasafeplaceforfuturereference.
• Payattentiontoallwarningsastheseareimportanttoensureyoursafetyand
theoptimumoperationofthisproduct.
• Alwaysusethisproductinaccordancewiththeinstructions.
• Whenthevolumeishigh,theproductcanproducesoundlevelssufcientto
damageyourhearingorthehearingofothers.Operateatsafe,sensiblelevels.
• Donotusethisproductnearwaterorindirectsunlight.
• Donotplaceobjectslledwithwateronornearthisproduct.
• Donotexposethisproducttorainormoistureofanykind.
• Donotusenearanycooking,heating,coolingorventilationappliances.
• Donotblockanyoftheventilationopeningsontheproduct.
• Usethisproductonlyonastableandlevelsurface.
• UsethecorrectinsertforyouriPodtoavoiddamagetotheiPodorconnector.
• Unplugthisproductduringlightningstormsorwhentheproductwillbe
unusedforlongperiodsoftime.
• Onlyusethepowersupplycord,orequivalent,suppliedwiththisproduct.
Pleaseconsultaqualiedelectricianiftheplugdoesnottyourpoweroutlet.
• Toensureyoursafety,protectthepowersupplycordfrombeingwalkedon,cut,
pinched,twistedorotherwisecompromised.
• Nouserserviceablepartsareusedinthisproduct.Referallservicingto
qualiedservicepersonnel.
• Iftheproducthasbeendamagedinanyway-forexample;ifthepowersupply
cordorplugisdamaged,liquidhasbeenspilledorobjectshavefalleninsidethe
product,theproducthasbeenexposedtorainormoisture,doesnotoperate
normallyorithasbeendropped-refertheproducttoyournearestservicecentre.
3

4
What’s in the box
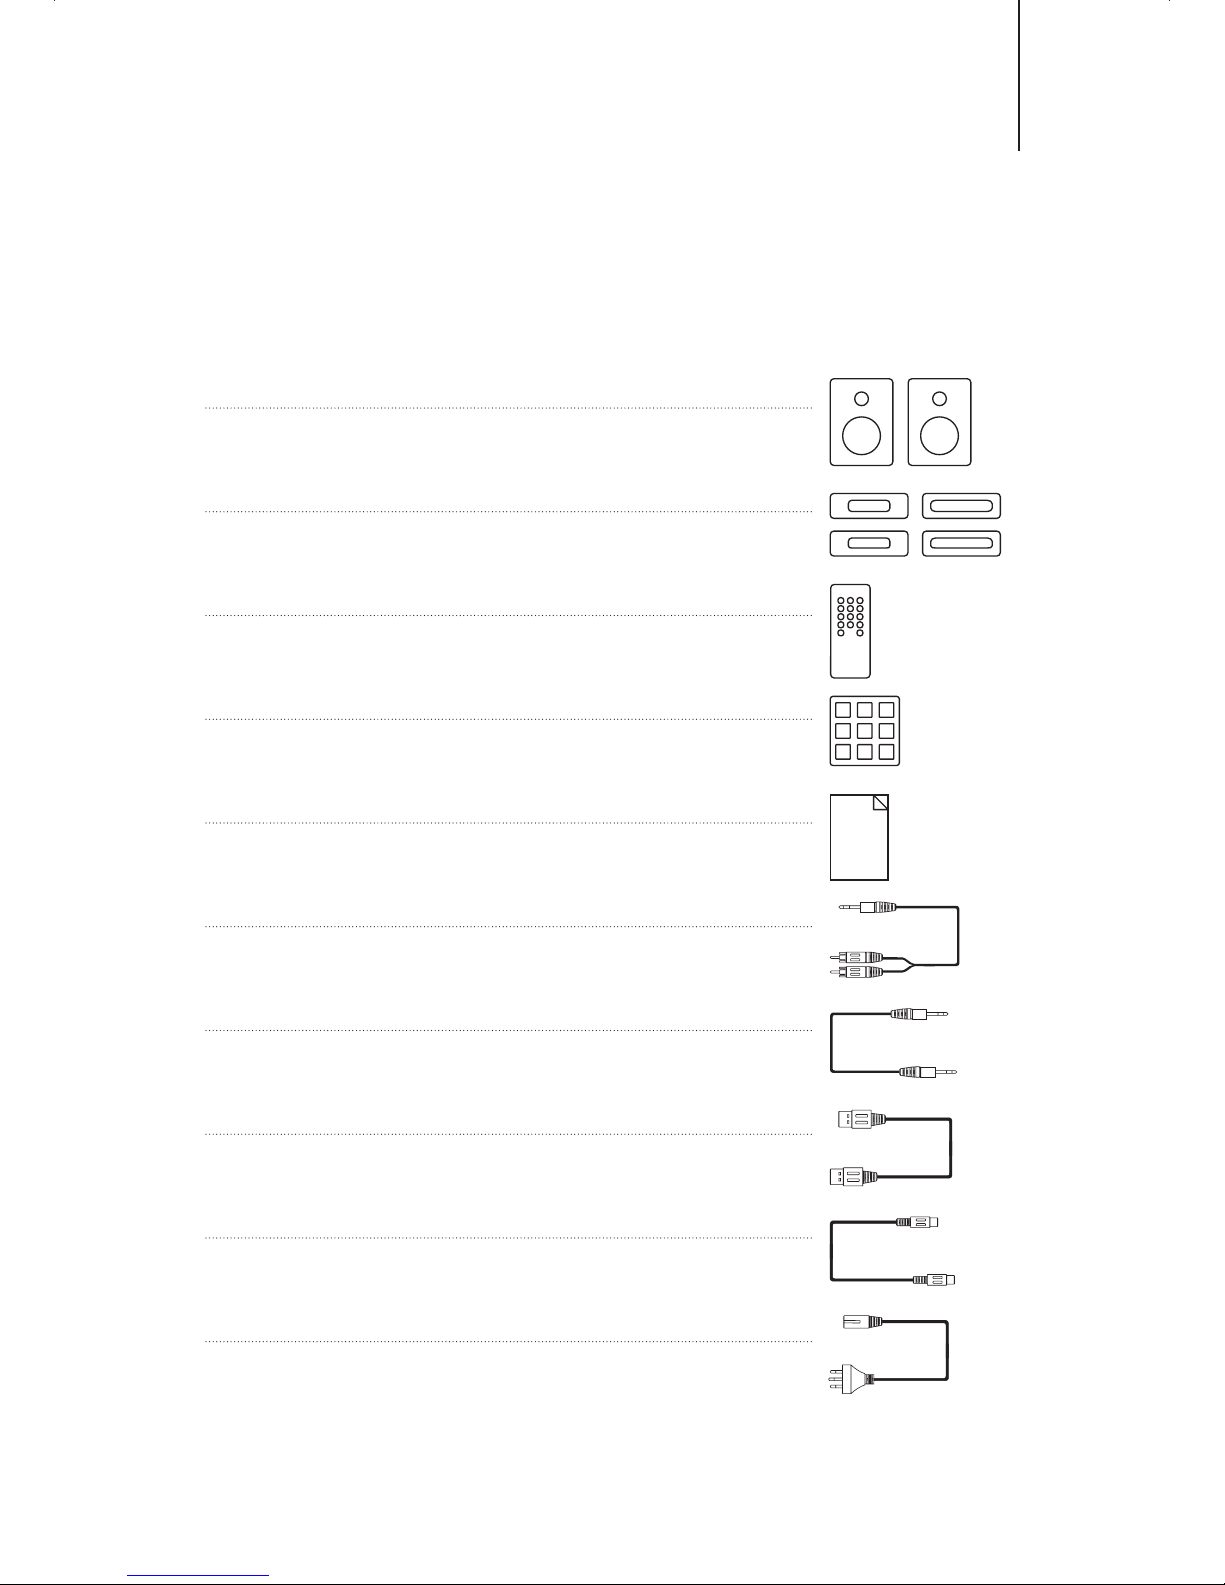
• OnepairofCORDmi-fifourspeakers
• iPoduniversaldockadaptors
• Oneremotecontrol
• Foampadfeetforspeakers
• Oneownersmanual
• One3.5mmstereominijacktoRCAaudiocable
• One2m,3.5mmto3.5mmaudiosignalcable
• One1.2mUSBtoUSBcable
• One1.5mS-Videocable
• OneACpowersupplycord

5
Preparingforuse
• ToensureyouenjoymaximumbenetfromyourCORDproduct,please
takeafewmomentstoprepareyourproductforuse.
• Pleaseturnthespeakersupsidedownonasoft,drysurfaceandapplythefoam
protectivefeettothefourcornersofthespeakers.
• Insertthebatteriesintotheremotecontrol.
• Carefullyselectthepositionofthespeakerssothatconnectingcablescaneasily
reachtheotherdevices.Ifnecessaryyoumayneedtopurchasecablesof
additionallength.
• Thissystemiscapableofproducinghighsoundpressureoutputwhichmay
causevibrationiftheareaofplacementisnotsturdyandsolid.Toavoid
possiblemovementandsubsequentdamagetoyourCORDproductpleaseuse
thisproductonlyonasolidsurface.
• PriortoconnectinganycablespleaseensurethattheACPowerisdisconnected.
• Beforeswitchingonthisproduct,pleaseensurethevolumelevelissetlowto
avoidinstantaneous,loudplayback.
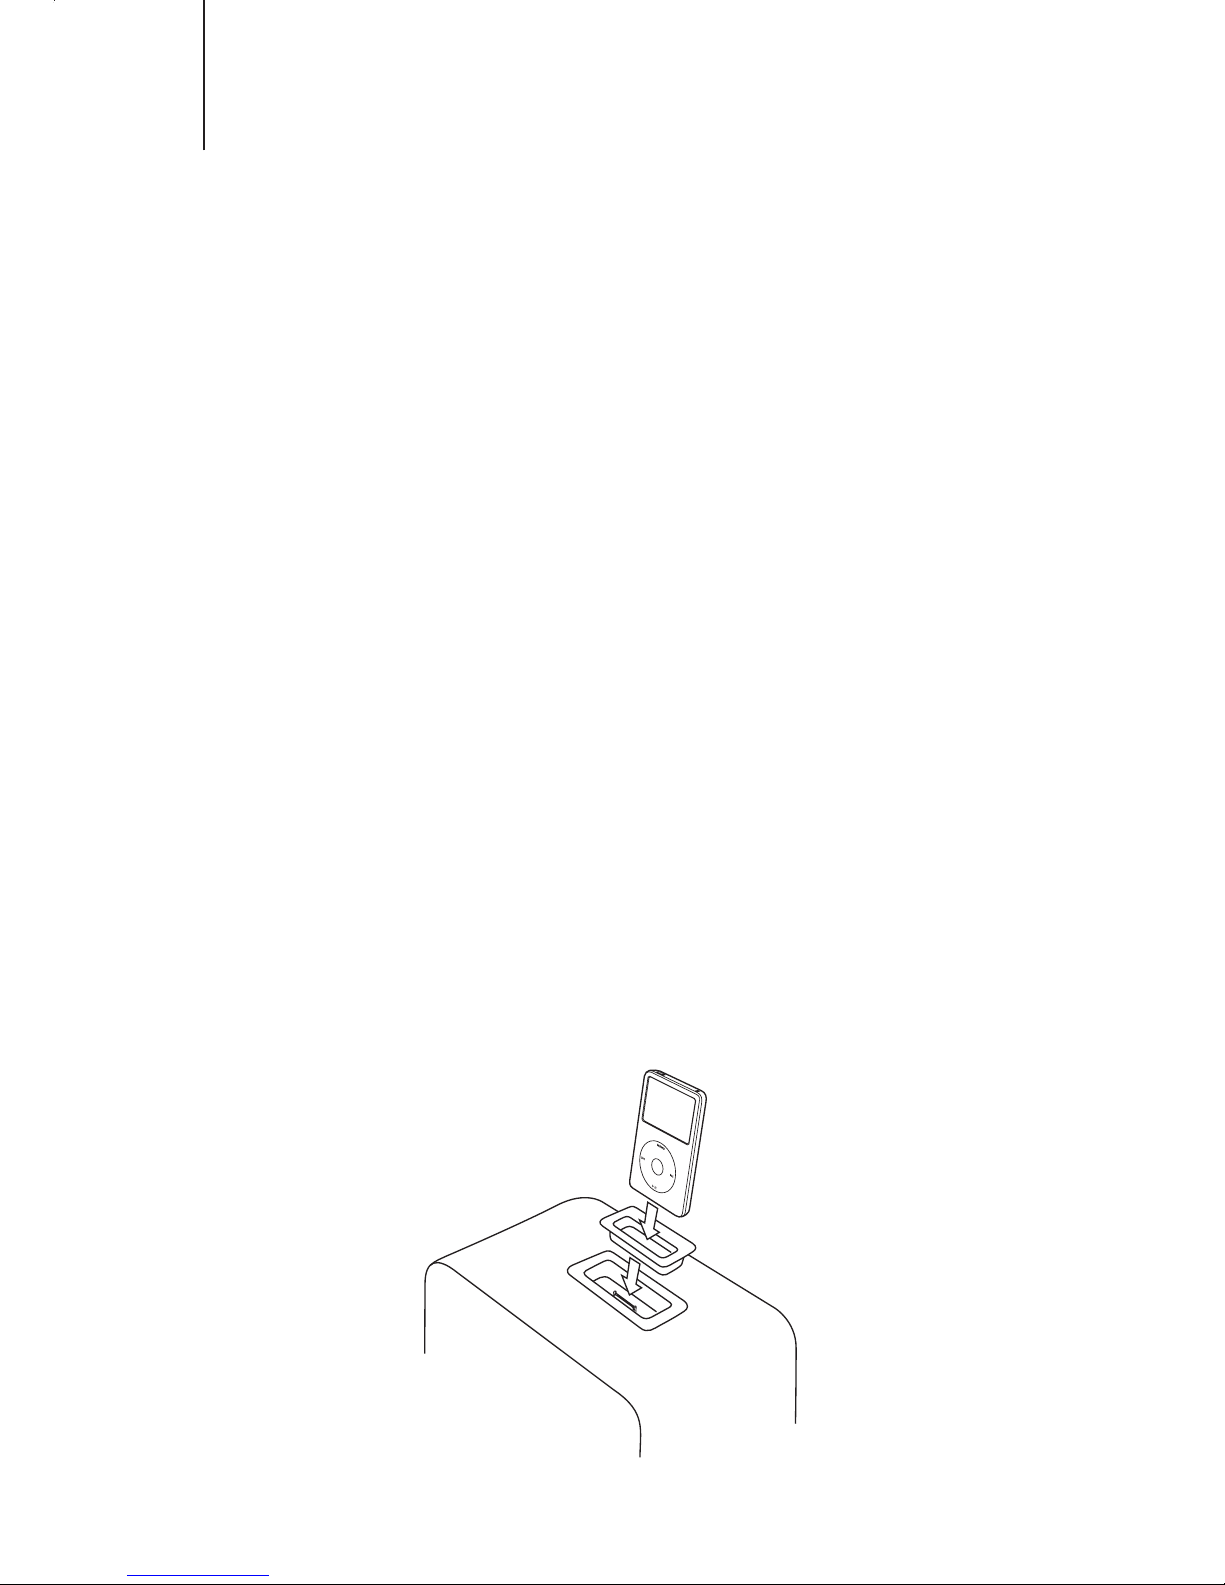
• InsertthecorrectadaptorforyouriPodintothedocktoensureasafeandsecure
connection(seediagrambelow).
• IfyouriPoddoesnothaveacompatibledockadaptor,youcanplaybackaudioby
connectingyouriPodtotheAUXInconnector.

6
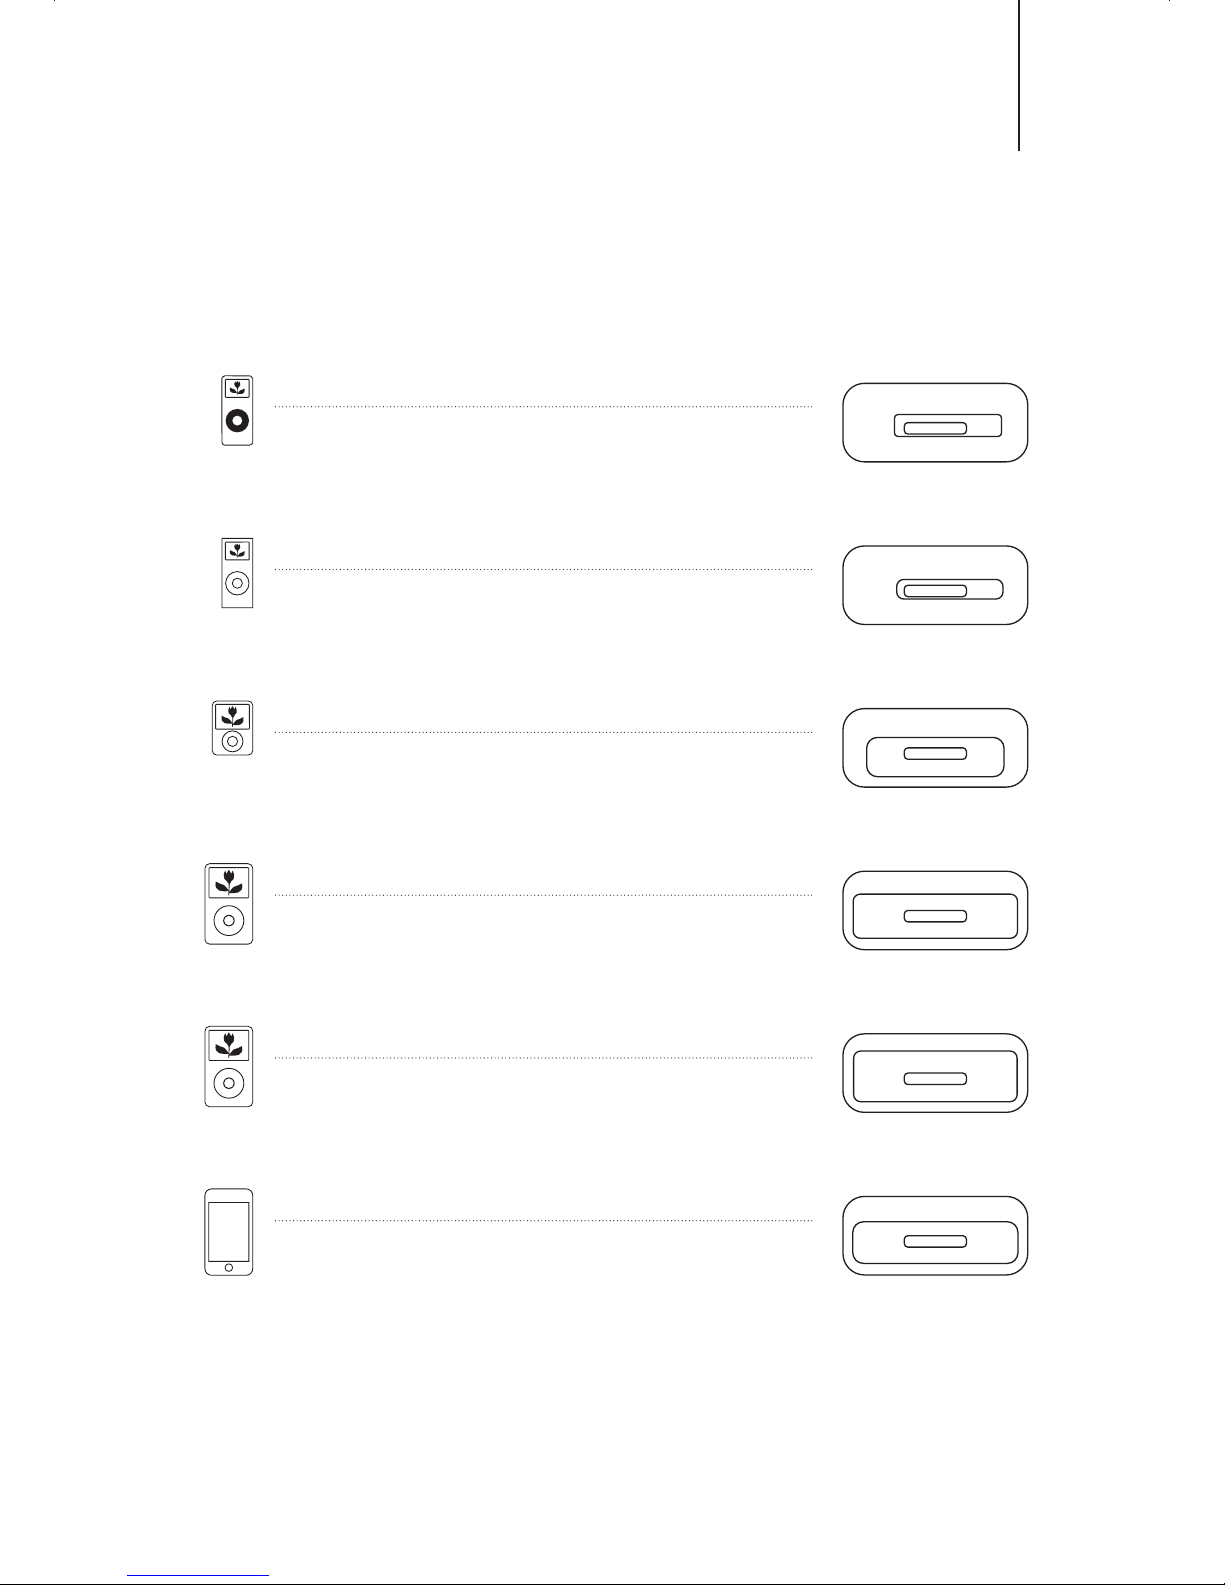
iPodnano-1stgeneration
iPodnano-2ndgeneration
iPodnano-3rdgeneration
iPodvideo30GB&classic80GB
iPodvideo60GB,80GB&classic160GB
iPod touch
iPod adaptors
Adaptors for other iPod models may be available, please check our web site for details.

7
Setup
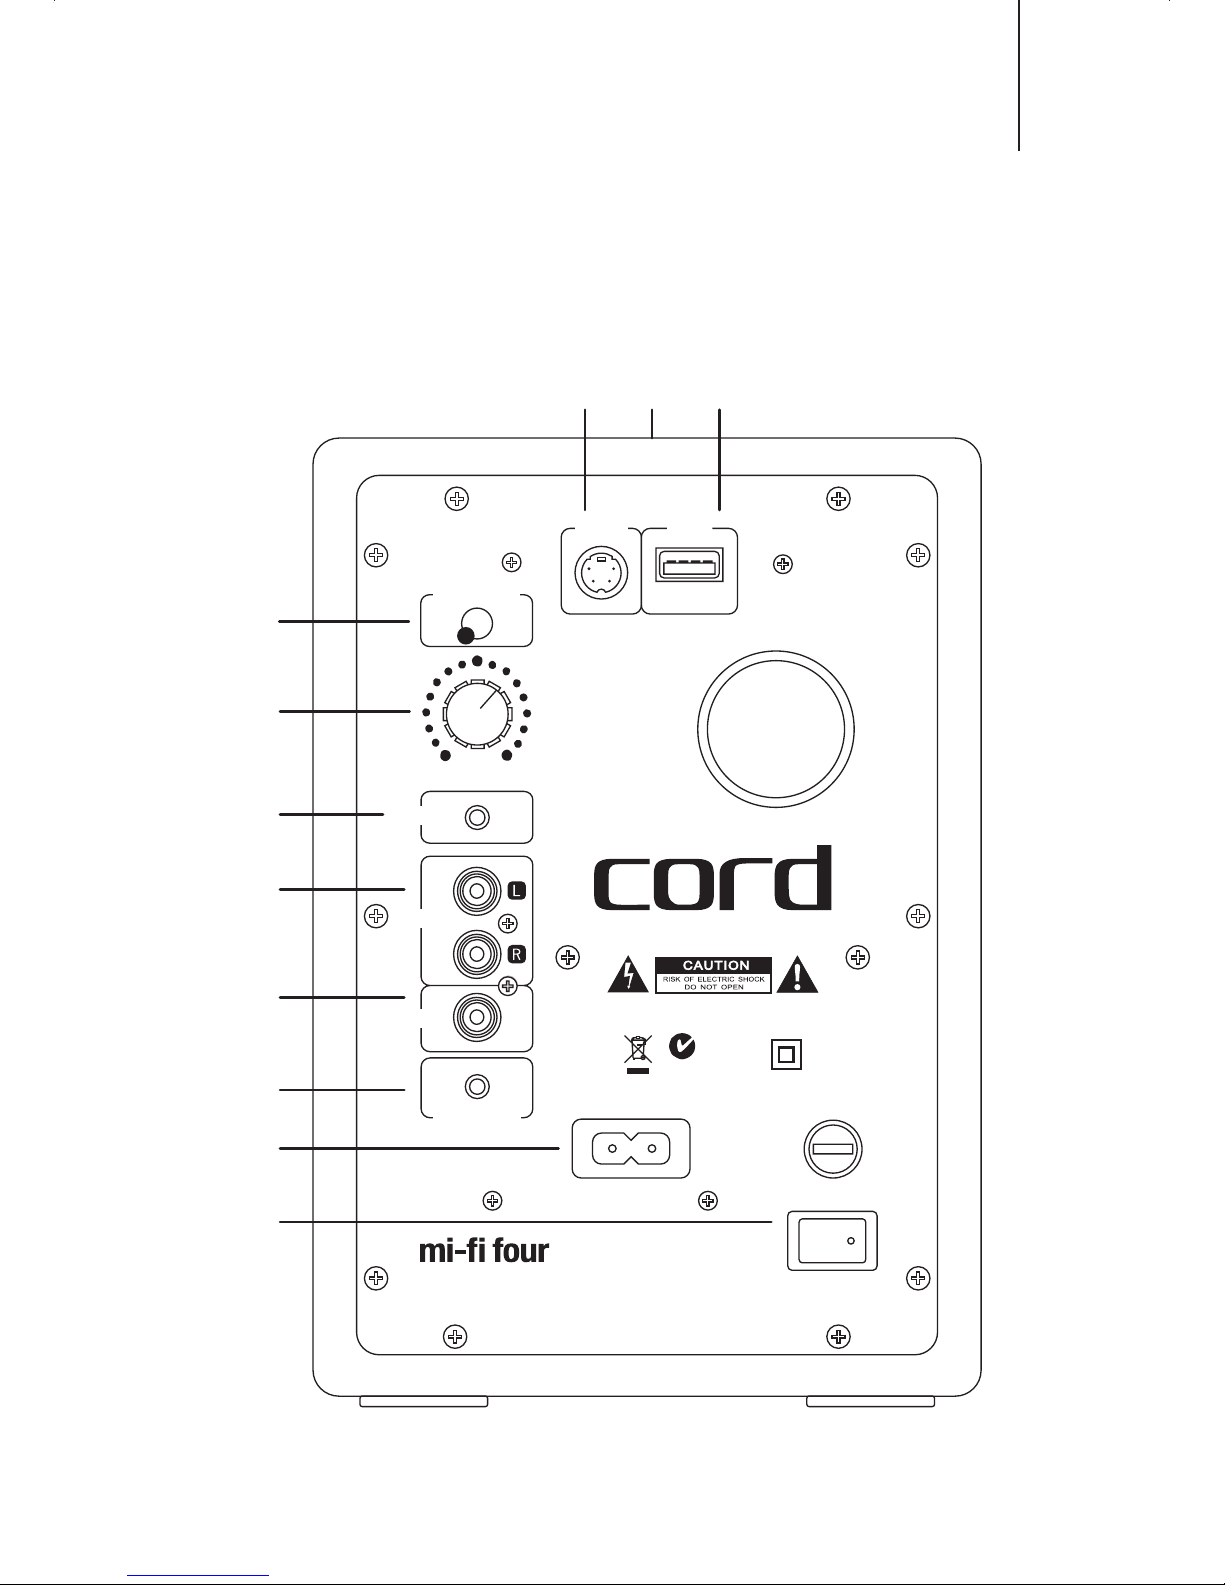
• To charge and playback media from your iPod, insert your iPod into the dock on
the top of the main speaker B. Please use the matching dock adaptor to
ensure the safe and secure connection of your iPod.
• TosyncyouriPodwithyourcomputer,connecttheUSBcablefromtheUSBport
CtotheUSBportonyourcomputer.ACPowermustbeOfftoenableSync.
• ToplaybackvideoortoviewphotosfromyouriPod,connecttheS-Videocable
totheS-VideoportAandtotheS-Videoinputonyourtvormonitor.OnyouriPod
selectTV-Out-thenselectOn.
• Toplaybackaudiofromanyaudiosource*connectthe3.5mmconnectortothe
AUX In port Fand to the audio source output.
• To playback audio from any audio source* connect the RCA connector to the RCA In
port Gand to the audio source output.
• Toconnecttheoptionalsubwoofer,connecttheSUBOutHto the signal input
on your subwoofer using an RCA cable.
• ConnecttheSpeakerOutIontheleft(mainspeaker)usingthe3.5mmto3.5mm
cabletotheSpeakerInontherightspeaker.
• Connect the AC Power cord to the AC power socket J.
* Audio sources can include any audio source with a RCA line level output such as;
CD,DVD&Blu-rayplayers,mediaplayers,computers,TVs,recordplayers,
radios, internet radios, etc.
SwitchofftheACPowerbeforeconnectingordisconnectingany
accessory cables to ensure correct operation.
Important! Always switch off the AC Power when connecting or
disconnectingtheUSBcabletoorfromyourcomputer.

8
Volume
Serial Number:
S-Video USB
Input Select
AUX In
RCA In
SUB Out
Speaker Out
AC Input 240V 50Hz Fuse: T500mAL 250V
POWER
OFFON
SWITCH OFF AC POWER BEFORE CONNECTING
OR DISCONNECTING ACCESSORY CABLES
WARNING - SHOCK HAZARD - DO NOT OPEN
DO NOT EXPOSE TO MOISTURE
N18041
MADE IN CHINA

9
Basicoperation
Main Unit (Illustration Previous Page)
• ToturnONorOFF,movethePowerswitchtotheONorOFFposition.
• Toselectthesourceforplayback,presstheInputSelectbutton. Pressing the Input
Selectbuttonchangestheinputinthefollowingsequence:iPod-AUXIn-RCAIn.
• Toincreasethevolume,turntheVolumecontrolclockwise. To decrease the
volumeturntheVolumecontrolcounterclockwise.
• To charge your iPod insert the iPod into the dock Band move the Power switch
to the ON position. In this mode power is supplied by the speaker's power supply.
• To charge your iPod or sync your iPod from your computer, ensure the Power
switchisOFFandconnecttheUSBcabletoyourcomputer.Donotturnthe
Power switch ON - in sync mode, power is supplied by the computer.
Remote Control
AiPod Menu Up and Menu Down
BiPod Menu
CiPod Enter
SelectsiPod ShuffleOn-ShuffleTracks-ShuffleAlbums-ShuffleOff
VolumeUp
FPressforPreviousTrack-PressandholdforScanBack
GVolumeDown
HReset system tone control to flat (Normal)
IBassBoost(+)andBassCut(-)
JTrebleBoost(+)andTrebleCut(-)
iPod Mute
iPod BacklightOn
SelectsiPod Repeat On - Repeat Track - Repeat All Tracks - Repeat Off
Play / Pause
PressforNextTrack-PressandholdforScanForward
SelectiPodsource
SelecttheRCAInsource
SelecttheAUXInsource
Table des matières
Manuels Système de haut-parleurs populaires d'autres marques

Sondpex
Sondpex Active Speaker System and Digital Music... Manuel utilisateur

JVC
JVC NX-PN7 Manuel utilisateur

Marshall Amplification
Marshall Amplification AR-DM61-BT Manuel utilisateur

Yamaha
Yamaha NX-A01 - Speaker Sys Manuel utilisateur

SE Audiotechnik
SE Audiotechnik I-LINE Manuel utilisateur

Gemini
Gemini WRX-843 Series Manuel utilisateur