
Copeland E3 Manuel utilisateur

E3 Supervisory Control
(Contrôle du superviseur E3)
Quick Setup Guide
(Guide d’installation rapide)


iii
Technical Specifications.........................................................................................6
Wiring.............................................................................................................................7
Ethernet Connections..............................................................................................7
E3 RS485 Wiring Guide Example ........................................................................8
Direct Connect Instructions - Connect your Laptop to E3’s Ethernet
Port ETH1:.....................................................................................................................9
Logging Into the E3 Controller.......................................................................... 10
How to Change the IP Address ......................................................................... 11
Setup Wizard ...........................................................................................................12
Contents
Table des matières
English
Français
Spécifications techniques................................................................................... 14
Câblage......................................................................................................................15
Connexions Ethernet.............................................................................................15
Exemple de guide de câblage E3 RS485 ......................................................16
Instructions de connexion directe - Connectez votre ordinateur portable
au port Ethernet ETH1 de l’E3 :..........................................................................17
Connexion au contrôleur E3...............................................................................18
Comment changer l’adresse IP......................................................................... 19
Assistant de configuration .................................................................................20


5
The E3 is a system that combines energy
management with the ability to monitor various
facility systems and provide alerts when there
are issues that need attention. This system
provides HVAC control, Refrigeration System
Monitoring and Control, as well as Lighting
Control. In addition, the E3 can monitor and
report energy consumption and take action to
reduce the energy demand during peak periods.
This can have a direct impact on utility bills by
reducing total energy costs. E3 ensures that the
HVAC and lighting systems are on and off at the
appropriate times. This ability to monitor store
conditions can potentially minimize energy
consumption.
Technical Specifications
*Operating Temperature -40°F to 113°F (-40°C to 45°C)
*Tested to UL60730-1 standard
Operating Humidity
Storage Humidity
5% - 95% RH non-condensing at 90°F
5% - 100% RH
24 VAC 24 VAC ±20%, 50/60 Hz, Class 2
Dimensions 12” L x 12.5” W x 3.75 H”
4 RS485 ports
COM 1 = RS485-COM2A and RS485-COM2B
COM 2 = RS485-COM6<ISOLATED>
COM 3 = <ISOLATED>RS485
COM 4 = RS485-COM4A and RS485-COM4B
2 Ethernet ports ETH 0, ETH 1
2 USB ports J2, J3
External Pollution Rating All Models: Pollution Degree 3
Rated Impulse Voltage 2500/4000V
Lithium Battery Marking
Caution: The cell used in this device may present a fire or
chemical burn hazard if mistreated. Do not disassemble, heat
above 212°F (100°C), or incinerate.
E3 Supervisory Control
Quick Setup Guide

6
PIB Board Layout
Ethernet Connections
• ETH 0 is used to connect to corporate LAN.
• ETH 1 is designed to be used for directly
connecting to PIB, and laptop or PC and
network devices.
The default IP for ETH 1 is 192.168.1.250.
ETH Ports
Wiring
1. Connect the RS485 Communication wire to the terminal block headers as shown. The Cables are
numbered 1 through 4.
2. Connect the 2-pin 7.5mm power connector and Ground wire as shown in PIB Board Layout illustration.
3. Connect the other end of the power cable to one of the 50VA P/N 640-0040 transformers.
4. Plug the 50VA P/N 640-0040 Transformers into a 120VAC outlet.
5. Turn the power switch ON (up position). The unit should boot up to the home screen.
6. You can log into the unit the first time by using the below username and password if needed.
• Username = user
• Password = pass
7. Once logged in you will be prompted to change your password.

7
E3 RS485 Wiring Guide Example
• For E3 Serial IO Net connections, connect the white wire to the positive terminal and the black wire to
the negative terminal.
• For 8RO and MultiFlex RS485 IO Net connections, connect the white wire to the positive terminal and
the black wire to the negative terminal.
• Connect the shield wire to earth/chassis at the end of the IO Net (network) segment. Connect the shield
wire to the center terminal (0V) of the IO Net connector on the E3.
• For daisy-chain configurations, terminate devices at the beginning and the end of the network segment.
All other devices in the network segment are not terminated (termination jumpers in the not-terminated
position).
E3, MultiFlex, and 8RO Wiring Layout
E3 and XR75 Wiring
DEVICE
MAX
NUMBER ON
NETWORK
MAX CABLE
RUN LENGTH
9600 BAUD
MAX CABLE
RUN LENGTH
19.2k BAUD
MultiFlex +
8RO
32 Max
Devices 4000 ft 4000 ft
NOTES:
1. Transformers for 8RO and MultiFlex 16AI must be center-tapped,
24VAC, 15VA minimum per board.
2. Transformer for MultiFlex ESR must be center-tapped 24VAC,
50VA P/N 640-0040 minimum per board.
3. All other MultiFlex board can be non center-tapped or
center-taped 24VAC, 15VA minimum per board.
4. For MODBUS device wiring, set jumpers above COM connection
to MOD (top 2 pins) and connect devices as indicated by the
device manual or quick start guide.
DEVICE
MAX
NUMBER ON
NETWORK
MAX CABLE
RUN LENGTH
9600 BAUD
MAX CABLE
RUN LENGTH
19.2k BAUD
XR75
(120V) 50 2500 ft 1250 ft
NOTES:
1. Ground shields at ends of communication run.
2. Terminate MODBUS Network at furthest device.
3. Set Com mode using jumpers for the E3 Com port used.
4. Consult factory for congurations with mixed models.
5. Ectrical loading only. Software limitations may apply.
6. RS485 COM polarity is reversed between the
E3 and XR75CX.

8
Direct Connect Instructions - Connect your Laptop to E3’s Ethernet
Port ETH1:
All configuration can be accomplished through the E3’s built-in display or through a laptop, PC, or tablet.
On your PC:
1. Under Control Panel - Network and Sharing Center, select Change adapter settings.
2. Select the Local Area Connection port being used.
3. Select Properties.
4. Highlight the section Internet Protocol
Version 4 (TCP/IPv4) and click Properties:
5. Click Use the following IP address: and
enter the IP address 192.168.1.251 and
the Subnet mask 255.255.255.0 of the PC
being used on the Local Area Network or
direct connection and click OK.
Change Adapter Settings
Highlight Internet Protocol Version 4 (TCP/IPv4)
IP Address and Subnet Mask
9
Logging Into the E3 Controller
1. Launch a preferred Web browser: Google Chrome 105.0.5195 and later, Firefox 105.0 and later, MAC
Safari 14.1.2 and later, iOS Safari 14.7 and later, Microsoft Edge 84.0.522 and later, and Chrome/
WebView 105.0.5195 and later are the supported browsers.
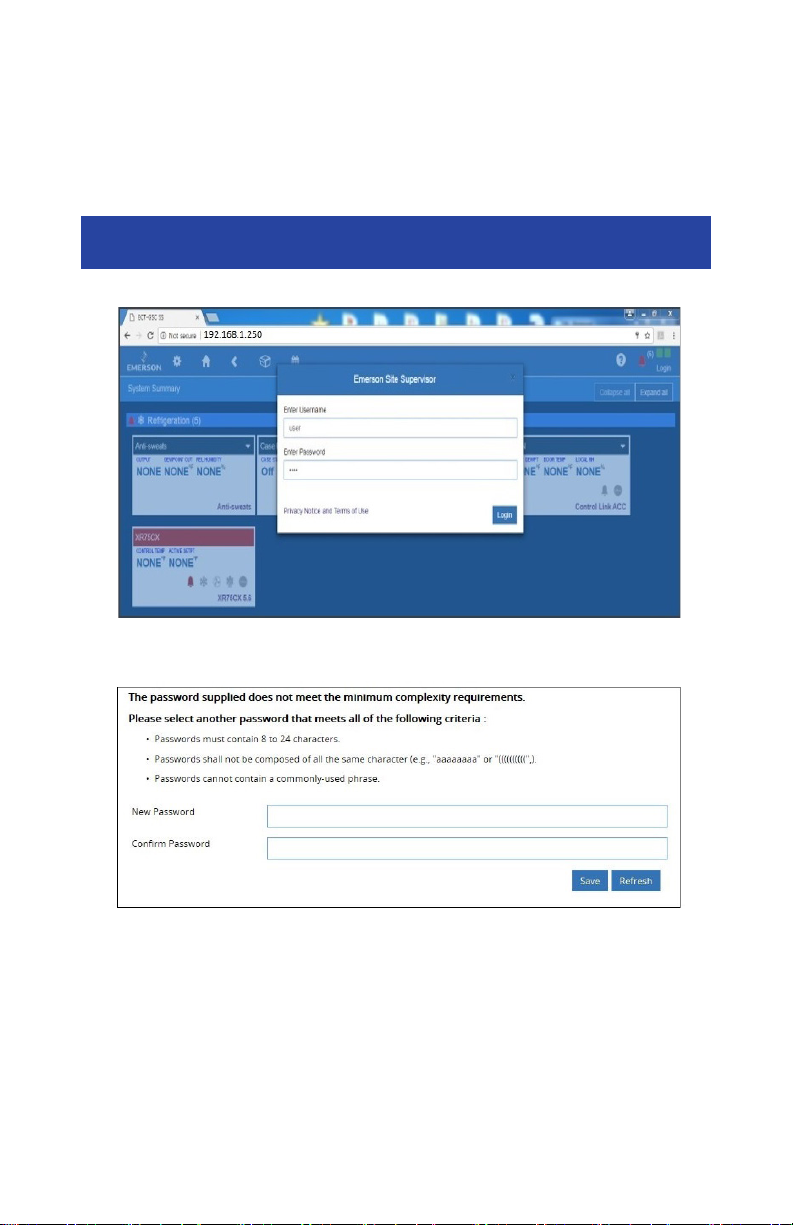
2. Enter the IP Address of the device.
3. Enter your Username/Password (default user/pass) and click Login. Then update your password to
the minimum complexity requirements and click Save.
Update Password
Login Screen at Controller Startup
Note that when directly connecting your laptop or PC to ETH1, enter the default IP into the
browser address bar: ETH1 Default IP Address is 192.168.1.250.

10
How to Change the IP Address
Method 1: Direct Connect
1. Select the Main Menu icon > Configure System > General System Properties > Network
Settings:
2. On the INTERNET (TCP/IP) section on the screen, enter the IP Address in the ETH 0 IP Address field.
Method 2: USB Port
1. Create a “network.txt” with your desired settings (Enter IP Address in the ETH 0 IP Address Field):
2. Save to the root folder of a thumb drive. Insert the thumb drive into the USB port of E3.
3. Power cycle the E3. The new IP Address will be saved.
Network.txt Notepad
Enter IP Address in the ETH 0 IP Address Field
Note that you can set up the Peer Group, Unit Number, Network Mask, and Default Gateway on
this screen.
Table des matières
Langues :
Autres manuels Copeland Contrôleurs


