ConnectLAB DOTS.bike Manuel utilisateur

User Manual

Chapter 1: Getting to know your device
What’s in the box
Specication
Device overview
The Tracker
The LED on the Tracker
The LED on the Power-Light
The Power-Light rear light
Siren
Chapter 2: Setting up your device
Set a code for the Combination Lock
Tracker charging
Removing and charging the Power-Light
Inserting the Tracker and Power-Light
Install your DOTS.bike
Chapter 3: Setting up your DOTS.bike App
Setting Up
Create a new account
Login
Forgot Password
Pairing
Chapter 4: Recharging your DOTS.bike
Chapter 5: Using DOTS.bike App on your smartphone
5.1 Tab Bar
5.2 Home Section
5.2.1 Automatic pairing with the smartphone
5.2.2 Last Update
Missing Internet Connection
5.2.3 Beeper
5.2.4 Light
Auto Activation ON
Auto Activation OFF
Brake Light
Light Pattern
5.2.5 Location
5.2.6 Cycling Statistics
5.2.7 Impact Detection
5.2.8 Device warning
Device o
Service Inactive
5.2.9 Event warning
Sommario
2

Impact detection
Fallen bike
Motion Detection
5.2.10 Battery
5.2.11 Power-Light Warning
Power- Light out of battery
Power- Light removed
5.3 Location Section
Find my Bike
5.4 Settings Section
Device info
Change your DOTS.bike picture
Change your DOTS.bike name
Bike Info
Notications
Safe Zone
Impact Detection
Setting up the Impact Detection
Setting up the emergency timer
Adding a contact to the Impact Detection list
Removing a contact from the Impact Detection list
Light Settings
Changing the Light pattern
Combination Lock Code Memo
Setting the code
Motion Detection
My Prole
Changing Password
Help
5.5 Notications
3

Chapter 1: Getting to know your device
DOTS.bike is securely attached to the bike seat post, and features an
intelligent tail and brake light for safety when riding. DOTS.bike recognises
you via Bluetooth, ensuring a safe ride with geolocation, impact detection
and send SMS alerts to emergency contacts.
DOTS.bike combines several unique features:
• easy to use by simply securing it to the seat post
• Bluetooth recognition
• geolocation
• intelligent tail and brake light for safety
• fallen bike detection
• impact detection and send alerts
Specications
DOTS.bike
106.6mm x 74.4mm x 44.1mm
240g
GSM/GPRS
900/1800MHz
BT 4.1
MTK MT2503D
4MB ROM + 4MB RAM
93 dB
450 mAh
2000 mAh
56 lm, 17 cd
125°
Product name
Dimension
Weight
Connection
2G
Bluetooth
Chipset
Memory
Acoustic alarm
Tracker Battery
Power-Light Battery
Brake and Rear Light
Light Beam Angle
4
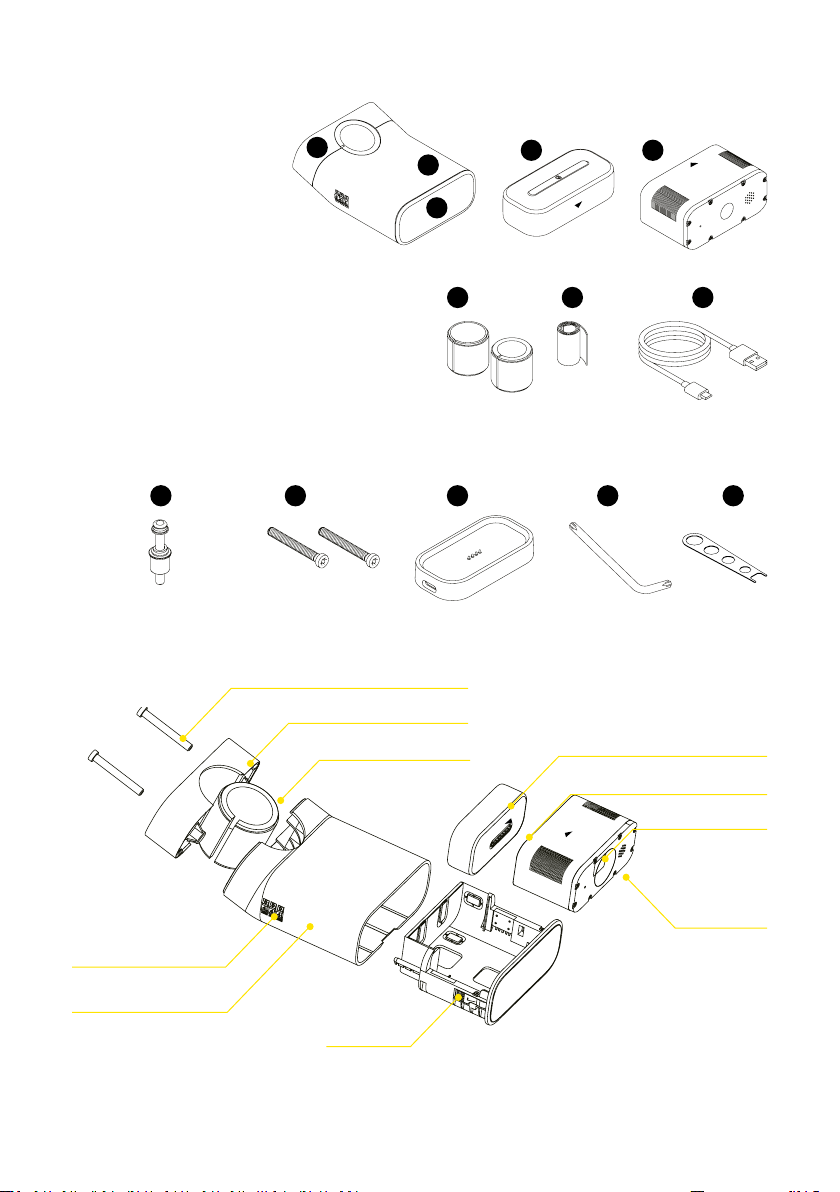
12 13
1
2
3
4 5
6 7 8
9 10 11
Tamper-proof Screw
Bike Stop
Rubber adaptor
Power-Light
Tracker
Charging port
Combination lock
Housing
Drawer
LED
What’s in the box
1. Bike Stop
2. Housing
3. Drawer
4. Tracker
5. Power-Light (inside drawer)
6. Rubber Adaptors (x2)
7. Rubber Band
8. USB type-C Cable
9. Tamper-proof Bolt
10. Tamper-proof Screws (x2)
11. Dock Charger
12. Allen Key
13. Combination Lock Tool
5
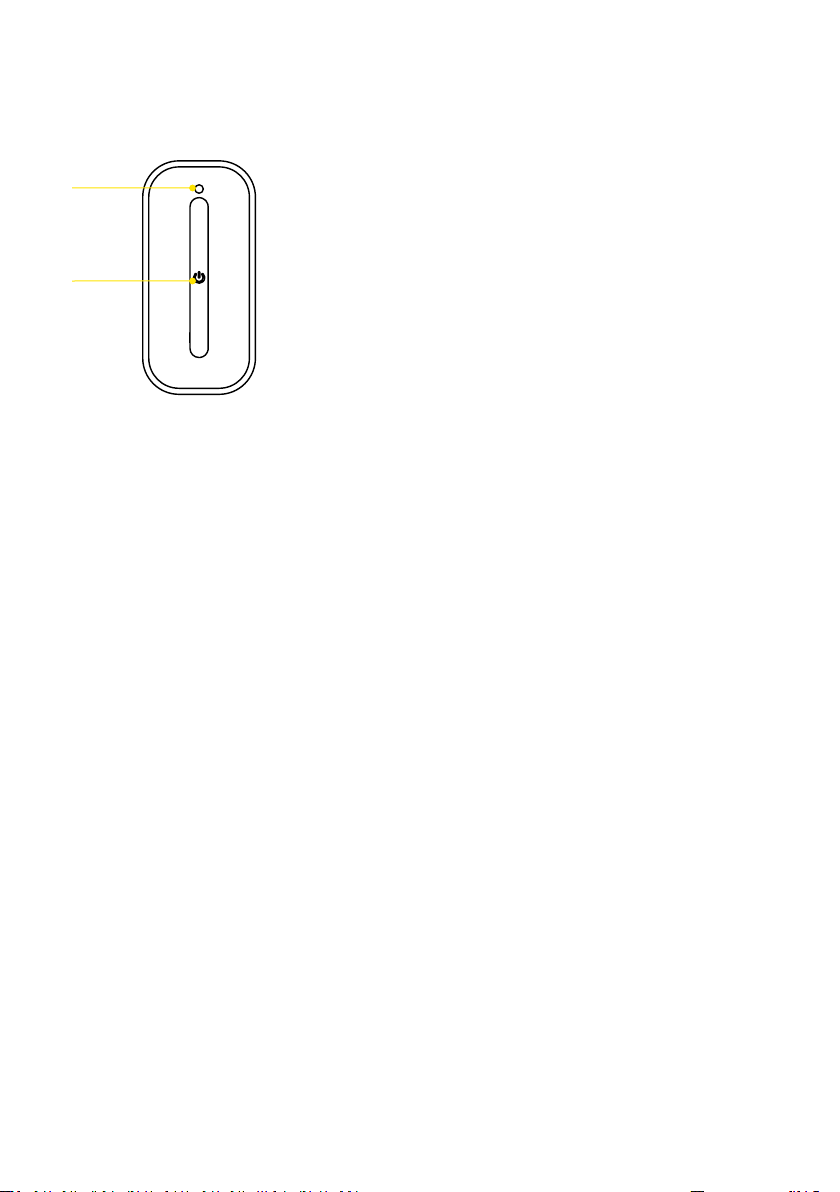
Device Overview
The Tracker
• Power On
Press the power key on the Tracker for 3 seconds to power on. The LED
will display ashing blue for 7 seconds, then solid blue for 3 seconds
• PowerO
Press the power key on the Tracker for 3 seconds to power o.
The LED will display solid red for 10 seconds
• Wake up
Press the power key on the Tracker for 1 second
• Reset
Press the power key on the Tracker for 15 seconds
The LED on the Tracker
• LEDo
In Normal working mode / Sleep
• Solid blue
Flashing blue for 7 seconds then solid blue for 3 seconds when your
DOTS.bike powers on
Solid blue for 2 seconds when your DOTS.bike wakes up
• Flash blue
Tracker is charging
• Solid green
Tracker Battery is fully charged
• Solid red
Solid red for 10 seconds when your DOTS.bike powers o
• Flash red
Battery level below 20%
• Solid yellow
No 2G signal
Led
Power Key
6
• Flash yellow
No GPS
• Flash green
Connection set-up and data transfer
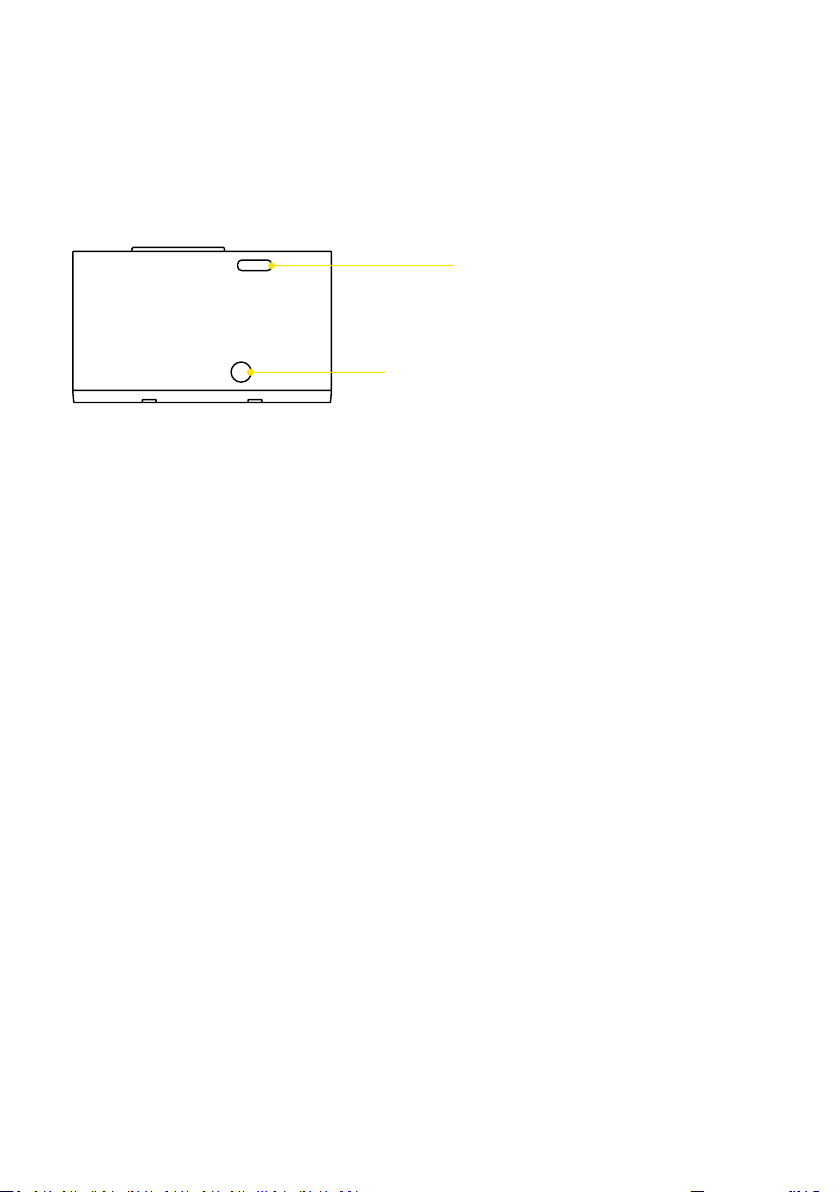
The Power-Light
The LED on the Power-Light
• Solid green
The battery is fully charged
• Solid red
The device is charging
The brake and rear light of Power-Light
• Flash red
Flashes 0.5 seconds when your DOTS.bike pairs/reconnects/
disconnects with your Smartphone
• Solid red
Your bike is decelerating
Beeper
Beeps for 0.5 seconds when your DOTS.bike pairs/reconnects/
disconnects with your Smartphone.
DOTS.bike beeper will be automatically activated when Fallen Bike and
Impact Detection event occurs.
Led
USB type-C port
7
Chapter 2: Setting up your device
Before starting to use your new DOTS.bike make sure to recharge the
Power-Light and the Tracker for at least 3 hours.
For subsequent uses it will be sucient to recharge only the Power-Light
and insert it correctly inside the Drawer [see “Recharging your DOTS.bike”
pag 16].
For the safety of your bike and DOTS.bike, we recommend that you add the
Anti-theft saddle bolt & nut and set a new password for the Combination
Lock. (0-0-0 is the default combination).
Note: do not forget the code you set, as you need it to unlock the tool and
change the code. Use the App to store your code whenever you set a new
code [see “Combination Lock Code Memo” pag 30].
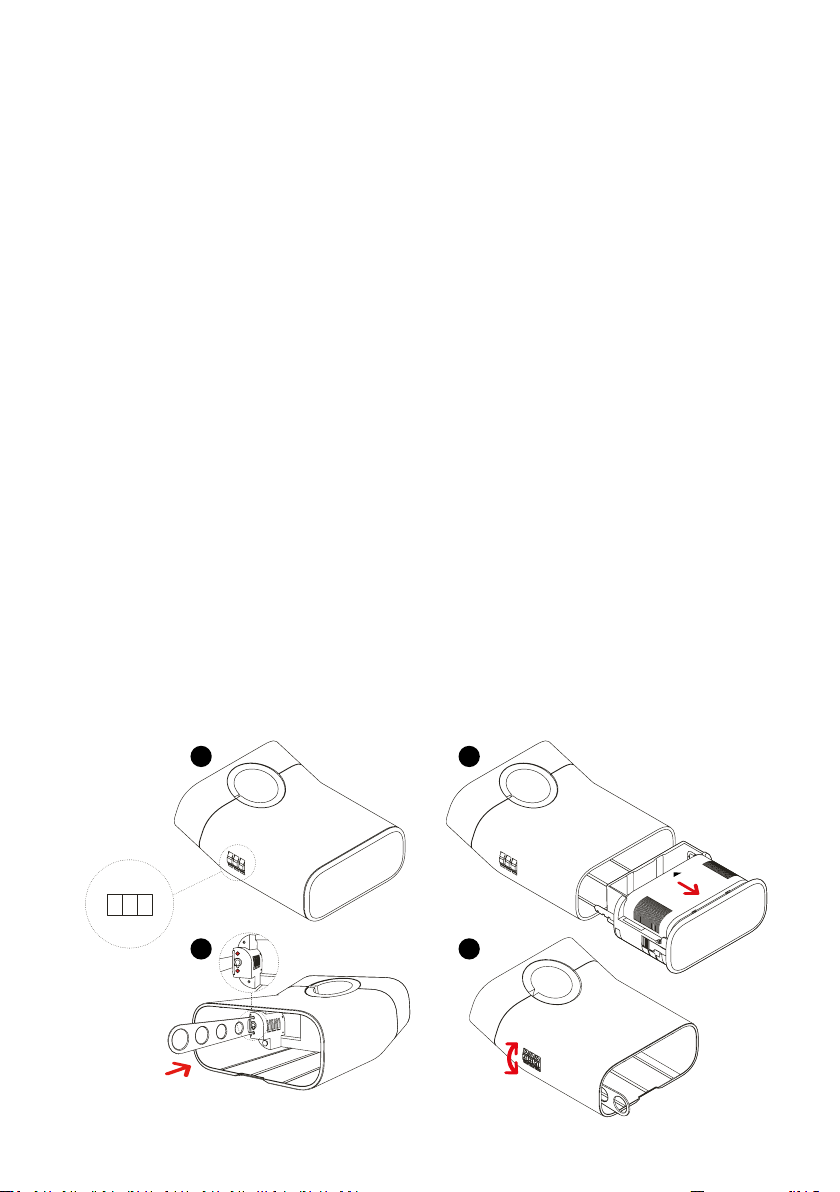
Setting a code for the Combination Lock
1. Make sure the code is set to default combination (0-0-0)
2. Extract the Drawer from the DOTS.bike by sliding it with your ngers
3. Use the Combination Lock Tool provided to press and hold the two
holes on the lock inside the housing near the Combination Lock and
turn the dial
4. Set a new code. Release the Combination Lock Tool. You have now set
the new code.
3
2
4
1
8
0
00
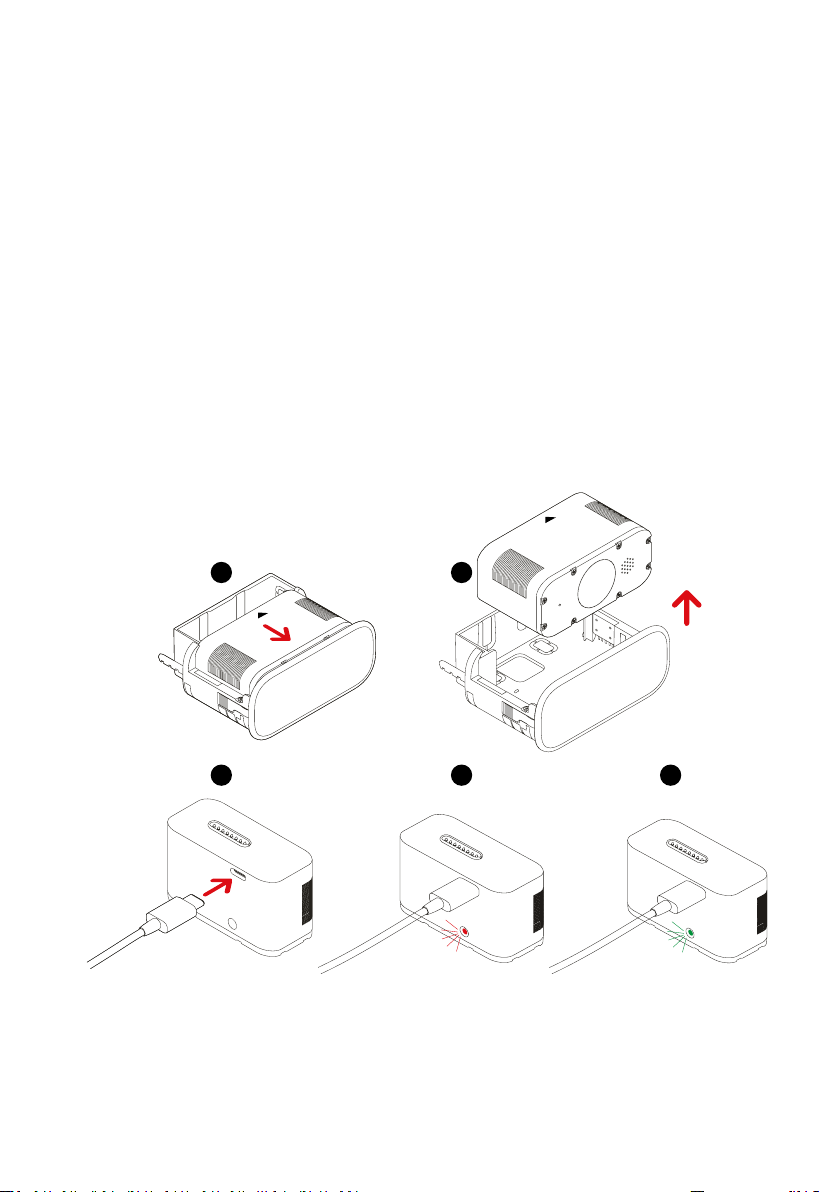
Removing and charging the Power-Light
1. Shift the Power-Light towards the reector to unlock it
2. Lift the Power-Light up to remove it
3. Connect the USB type-C cable to the Power-Light. Connect the USB
type-C cable via USB to either a computer or USB power adapter to
begin charging
4. You will know it is charging when the red LED on the Power-Light
turns on. Full charge will require 3 hours
5. The Power-Light is fully charged when the LED colour changes to
green.
1 2
3 4 5
9
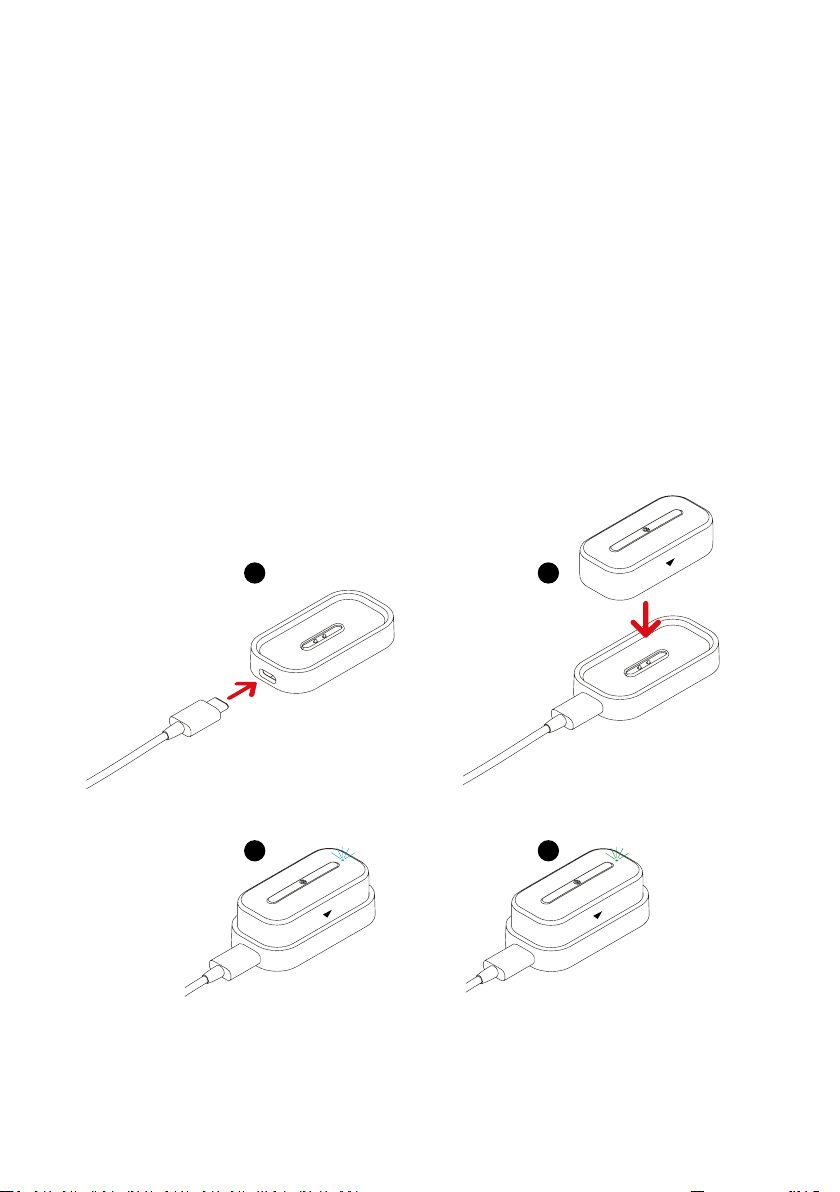
Charging the Tracker
1. Connect the USB type-C cable to the Dock Charger
2. Place the tracker on the Dock Charger. Magnets will guide the
insertion to the right position
3. Connect the USB type-C cable via USB to either a computer or USB
power adapter to begin charging. Keep the charging pins clean for
optimal performance. You will know it is charging when the blue LED
on the Tracker lights up. Full charge will require 3 hours
4. The Tracker is fully charged when the LED colour changes to green.
NOTE: The Tracker automatically powers on after few seconds of charging
1 2
43
10
Table des matières


