Complete Control MX-900 Manuel utilisateur

Operating Your System
With The MX-900

This remote control was
Custom Programmed for you by:
For questions about your Custom Programming call:
Custom Programming of a complex home theater and/or a multi-room
system is one of the most challenging tasks within an audio/video
installation. It involves an intimate knowledge of how the components
interact and exact details on the proper sequences of control.
Only a Complete Control dealer has the requisite experience and training
to quickly and effectively customize a remote control for true automated
operation.
Congratulations on your choice!
MX-900 Owner’s Manual © 2006-2014 Universal emote Control, Inc.
Front Cover Photo courtesy of obert idenour of Connected Technologies,
www.connected-technologies.com
The information in this Owner’s Manual is copyright protected. No part of this manual
may be copied or reproduced in any form without prior written consent from Universal
emote Control, Inc.
UNIVE SAL EMOTE CONT OL, INC. SHALL NOT BE LIABLE FO OPE ATIONAL,
TECHNICAL O EDITO IAL E O S/OMISSIONS MADE IN THIS MANUAL.
The information in this Owner’s Manual may be subject to change without prior
notice.
Complete Control is a registered trademark of Universal emote Control, Inc.
Entertainment Made Simple is a trademark of Universal emote Control, Inc.
All other brand or product names are trademarks or registered trademarks of their
respective companies or organizations.
Universal emote Control, Inc.
500 Mamaroneck Avenue, Harrison, NY 10528
Phone: (914) 835-4484 Fax: (914) 835-4532

TABLE OFCONTENTS
Congratulations! 1
Custom Labeled Buttons 1
Programmable only by a URC Certified Professional 1
Optional RF “No Rules” Operation 2
Installing Batteries 3
Selecting a New “Activity” 4
Using the MX-900 to Control an “Activity” 5
Displaying the Setup Screen 6
Selecting from the Setup Screen 6
Setting the LCD 7
Sound Volume 9
Light Settings 9
System Settings 10
Version Information Displays 10
Limited Warranty Statement 11
End User Agreement 14
Specifications 14
Federal Communication Commission Interference Statement 15

Congratulations!
You’ve purchased a unique synthesis of hardware and software engineering,
the Complete Control MX-900. The MX-900 achieves a magnificent
combination of power and flexibility, simplifying and automating operation of
even the most complex system.
One Touch Blue Backlighting
Simply press the L GHT button to backlight the screen.
Integrated Sound Signaling
The MX-900 incorporates a small speaker for beeps. Anytime you press a
button, the MX-900 signals that it has understood your command with a
beep sound.
Custom Labeled Buttons
The MX-900 is equipped with a bright easy to read LCD screen which labels
the six buttons to the right of the screeen. These button labels change based on
what you are watching or listening to. Thus, if you have selected Watching TV,
you will see a list of buttons that are useful to that activity, while if you select
DVD, the buttons will control the DVD.
Programmable only by a U C Certified Professional
To fully automate your audio/video system, the programmer must have
detailed knowledge of each component and how the system is connected
and operated. Only a trained and certified professional audio/video
installer can install a MX-900 remote control in a timely and efficient
manner.
LIGHT Button
Press the Light button on the
side of the MX-900 to backlight
the LCD display and all of the
buttons.
MX-900 OWNE ’SMANUAL
Page 1

Page 2
MX-900 OWNER’SMANUAL
Optional RF “No Rules” Operation
In combination with a Complete Control RF Base Station, the MX-900 can
control your system without being in line-of-sight of the equipment.
3.
The MRF-300’s built-in Front Blaster sends commands to
components in the same cabinet space as the MRF-300.
4.
Self-adhesive “Flashers” affix to the
Infrared sensors on the front panels of
your components. The Flashers relay
commands to components out of sight of
the MRF- 300’s Front Blaster. The flashers
plug in to the MRF-300’s rear flasher line
outputs via their 10 foot cables.
Uniquely, the MRF-300 can also connect
to rear panel IR Inputs via its adjustable
IR Line Outputs.
2.
The RFX-150 RF Sensor can be freely
positioned for optimal reception.
Either the MRF-300 or the MRF-250 RF base station is compatible with the
MX-900. Both incorporate RF addressing. RF Addressing gives you the
ability to control equipment locations throughout your home, even if they
are concealed in other rooms or are behind closed doors.
1.
The MX-900 sends radio waves
in every direction, so you
don’t have to point the
remote any-more!

Installing Batteries
Open the battery cover by pressing
the release and pulling back the
cover on the back of the control.
Remove the cover.
Observe the + and - polarity
indications inside the battery
compartment.
Place the four AAA batteries into
their positions in the battery com-
partment observing the + and -
polarity indicators on the batteries.
Now, replace the battery cover by
inserting the hinged end in first,
then snapping the cover back into
place.
Page 3
MX-900 OWNER’SMANUAL
+
+
-
-
Page 4
MX-900 OWNER’SMANUAL
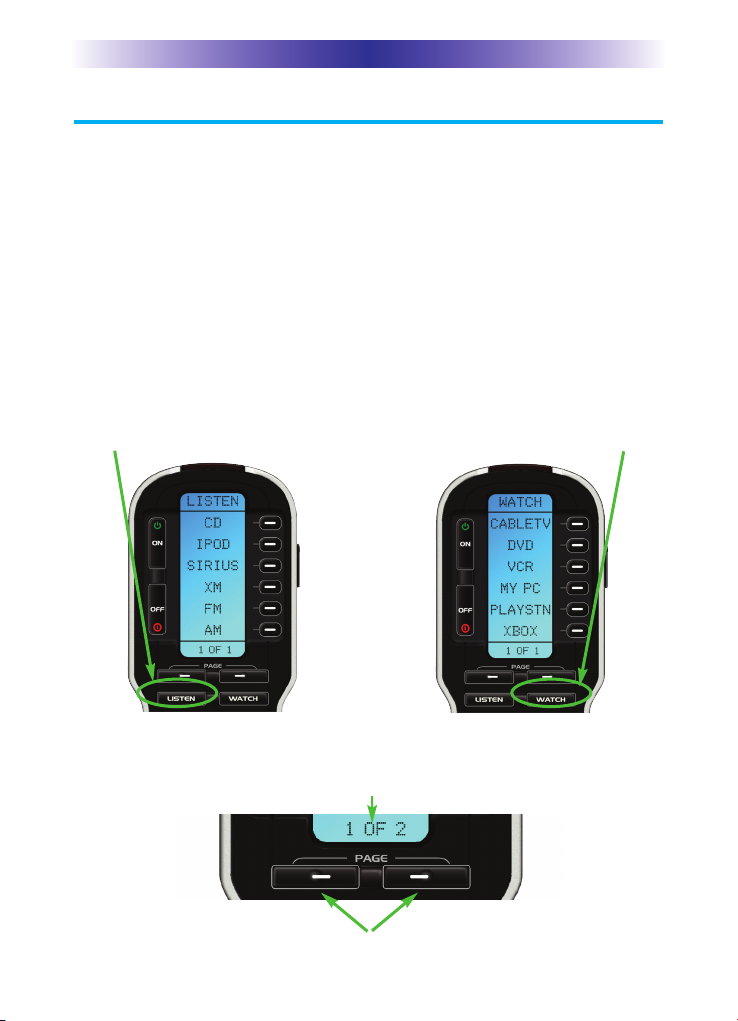
Selecting a New “Activity”
The MX-900’s WATCH and LISTEN buttons display the activities you can
control with your MX-900. When you want to watch something else (a DVD
movie, a videotape or an HDTV broadcast), simply press the WATCH button
and select the new activity. When you want to listen to the radio or to a CD,
touch the LISTEN button and select what you would like to listen to.
Your installer will have programmed the button you pressed to totally config-
ure your system to watch or listen to whatever you selected. Now, the screen
will change, and all of the LCD buttons will be reconfigured to give you full
control of your system while watching or listening to your selection!
Press either of the PAGE buttons to see any other available choices.
PAGE DISPLAY
At the bottom of the LCD screen, the
page display informs you if there are
other pages of buttons available.
When you press the WATCH button,
you can see the most frequently used
activities you have for watching the
sources in your system.
When you press the LISTEN button,
you can see the most frequently used
activities you have for listening in
your system.

Using the MX-900 to Control an “Activity”
Once you’ve selected a new activity, the MX-900 displays the title of the
activity at the top of the screen. Below the title, the LCD displays the cus-
tomized names of any special features you need for the activity. All the
hard buttons of the MX-900 have now changed to functions optimized for
this activity.
The Title displays
what activity you
can control.
The Channel and
Previous Channel
buttons will change
channels when you
have selected an
activity like Watch
CABLETV or
Watch SAT TV.
The Number keypad
will enter numbers for
the activity you’ve
selected. Thus, for
watching Cable TV, you
use the number keypad
to enter channel num-
bers, while when lis-
tening to CD, the num-
ber keypad enters track
numbers.
The LCD button
labels describe
special features
for this activity.
The transport buttons
(Play, Stop, Skip-, Skip+,
FF, REW and Pause)
operate when the select-
ed activity requires them
(for example, if you
watch CABLETV with a
TiVo type of DVR, these
buttons will control the
built-in DVR, while if
you are watching a
DVD, these buttons will
control the DVD player).
The Volume and
Mute buttons always
control the sound
regardless of what
screen is displayed.
Press either of the
PAGE buttons to see
any other available
choices.
The 4 way cursor
buttons enable you
to navigate on
screen guides and
menus with ease.
Page 5
MX-900 OWNER’SMANUAL

Displaying the Setup Screen
You can adjust the settings of the MX-900 whenever you
like by pressing and holding both the WATCH and the
ENTER button at the same time for three seconds. When
you do, the screen will change to the SETUP screen. If
you do not press any button on the SETUP screen within
30 seconds, the MX-900 will time out and automatically
return to normal operation. You can return to normal
operation before that by pressing either the WATCH or
the LISTEN button.
At the same time, press and
hold both the WATCH but-
ton and the ENTER button.
When the SETUP screen
appears, you can release the
two buttons.
MX-900 OWNER’SMANUAL
Page 6
Selecting from the Setup Screen
Simply touch the button for the setting you’d like to adjust:
LCD - The appearance of the
screen.
LIGHT - What the LIGHT button
does.
SOUND - The volume of the
beeps.
SYSTEM - The battery low warn-
ing.
VERSION - No adjustments are
possible. Displays factory info.

Setting the LCD
With these settings, you can set the MX-900 to constantly display the LCD
when not in use, or show a blank screen when not in use. Additionally, you
can control the contrast of the screen.
Page 7
MX-900 OWNER’SMANUAL
To activate the LCD On/Off setting, press
this button. See below.
To activate the CONTRAST setting, press
this button. See the next page.
To activate the BRIGHTNESS setting, press
this button. See the next page.
To exit without saving any changes you
have made, press EXIT.
To exit without saving any changes you
have made, press EXIT.
To change the timer interval, press the
LEFT or RIGHT arrow keys.
If you set the LCD to OFF, the timer set-
tings will appear. The LCD will go blank
after waitting the interval you set here by
adjusting the LEFT and RIGHT arrow
keys.
The timer can be set to turn off the LCD
between 10 seconds and 20 minutes.
To SAVE any changes you have made,
press SAVE.
LCD Timer Setting:
The Timer Interval is displayed here.
Table des matières
Autres manuels Complete Control Télécommande


Manuels Télécommande populaires d'autres marques

Panasonic
Panasonic EUR7622KB0 Manuel utilisateur

Bang & Olufsen
Bang & Olufsen Beo4 Manuel utilisateur

Sunwave Tech.
Sunwave Tech. RemoteComm SRC-7000 Manuel utilisateur

Multiplex
Multiplex PROFI TX 9 Manuel utilisateur

One Remote
One Remote RMB4 Manuel utilisateur

FUTABA
FUTABA 9ZAP - PART2 Manuel utilisateur


